Over 10,000 children in the U.S. visit emergency rooms yearly due to bounce house injuries. The good news? Experts estimate that 95% of these accidents can be prevented with better safety measures. Many incidents happen because of older or poorly designed inflatables with weak materials, low walls, and insufficient anchoring. This guide explains how to make bounce houses safer by upgrading materials, reinforcing structures, improving anchoring, and adding better safety netting.
Key Safety Upgrades:
- Inspect Materials: Check for leaks, tears, and weak seams.
- Use Commercial-Grade Vinyl: Replace thin fabric with durable 18 oz PVC-coated vinyl.
- Reinforce High-Stress Areas: Strengthen seams, corners, and entry points with double stitching and webbing.
- Improve Anchoring: Add heavy-duty D-rings, long stakes, or weighted sandbags.
- Upgrade Safety Netting: Install flame-retardant, UV-resistant mesh with small openings.
- Enhance Entry/Exit Points: Add padded steps, safety mats, and secure closures.
Regular inspections, adherence to ASTM F2374 safety standards, and proper maintenance ensure bounce houses remain safe and fun. These steps help reduce risks like falls, deflation, and tipping, keeping kids safe during play.
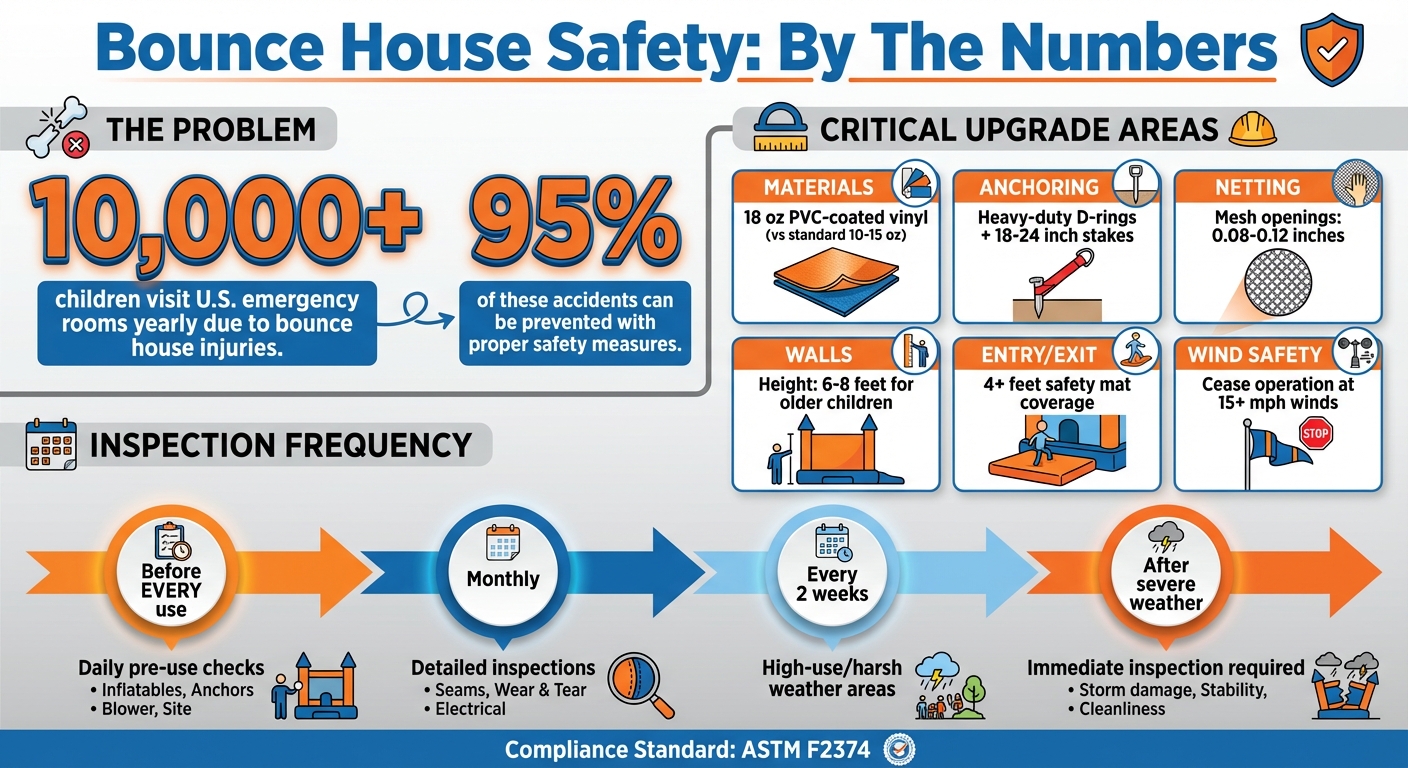
Bounce House Safety Statistics and Critical Upgrade Areas
Checking Your Bounce House’s Current Condition
Before you invest in any upgrades, it’s essential to understand the current state of your bounce house. A detailed inspection will help you figure out which parts are still in good shape, which need immediate attention, and where your upgrade budget will have the most impact on safety. Let’s start by examining the materials and components to pinpoint areas that need improvement.
Inspecting Materials and Parts
Begin by inflating your bounce house on a flat surface and walking around the entire structure. Pay close attention to any sagging, leaning, or uneven inflation, which could indicate internal leaks or blower problems. Once it’s fully inflated, press on different sections of the vinyl to check for soft or worn spots. These areas might have weakened due to prolonged exposure to sunlight or heavy use.
Focus on high-traffic areas such as the bouncing surface, entry and exit points, and the spots where walls meet the floor. Look for cracks, punctures, long tears, or sections where the color has faded, and the fabric feels noticeably thinner. These aren’t just cosmetic issues – any air leak or weak spot in the vinyl is a structural concern that needs to be addressed.
Next, carefully inspect all seams. Look for signs of loose stitching, frayed threads, gaps between panels, or bulging seams, which could indicate internal structural problems. Pay extra attention to corners and stress points, like where walls attach to the floor, as these areas endure the most tension and are more prone to damage. Test each anchor point (like D-rings, loops, or tabs) by giving it a firm tug. If you notice stretching, popping sounds, or fabric distortion, that anchor point may fail under pressure, especially in windy conditions.
Don’t forget to examine the safety netting. Check for holes, broken mesh, or loose edges, particularly near entrances and upper corners where impacts are more likely. Any opening large enough for a child’s head or torso is a serious safety risk. Lastly, run the blower briefly to ensure it operates smoothly, and confirm that you’re using a GFCI-protected outlet along with outdoor-rated extension cords that are free of cuts or exposed wires.
Finding Common Safety Problems
Once you’ve inspected individual components, take note of recurring safety concerns. One frequent issue is weak or incomplete anchoring. Missing stakes, underweighted sandbags, or damaged anchor points can cause the bounce house to shift or tip over, even in moderate winds.
Another common problem is low or sagging walls. If the walls aren’t tall or sturdy enough, there’s a risk of children bouncing over the edge. Older models often have poor entry and exit designs, such as lacking a proper step, missing side flaps for containment, or having an unprotected drop onto hard ground. Additionally, loose seams and worn vinyl in landing zones can signal potential hazards, like falls, entrapment, or sudden deflation.
As you inspect, document every issue you find. Use a checklist to record the condition of the vinyl, seams, netting, anchor points, blower, and entry/exit areas. For each issue, note its exact location (e.g., "left front corner seam" or "rear wall netting"), its severity (minor, moderate, or critical), and specific measurements, such as the length of a tear or the height of a wall. Take clear photos from multiple angles, including close-ups of damage and wider shots for context, like showing how low the walls are compared to a 4–5-foot-tall child. This will help you prioritize critical repairs and allocate your budget effectively.
Understanding Local Safety Standards
Once you’ve identified physical issues, it’s time to review safety standards to guide your upgrades. In the United States, bounce house safety is regulated by a combination of national standards, state laws, and insurance requirements. The ASTM F2374 standard outlines guidelines for the design, manufacturing, operation, and maintenance of inflatable amusement devices. Use this standard to evaluate features like wall height, anchoring points, emergency exits, and material quality.
Many states also require periodic inspections, proof of insurance, and compliance with ASTM standards under local amusement ride regulations. Even if you’re a homeowner or small operator, these rules provide a helpful benchmark. Reach out to your state’s Department of Labor or local amusement ride inspection program to confirm which regulations apply in your area.
Make sure your bounce house meets ASTM F2374 standards and any applicable local rules. These benchmarks not only ensure safety but also help maintain compliance and insurance eligibility. Use this information to prioritize upgrades and repairs that meet these standards.
Upgrading Materials and Structure
After pinpointing weak spots in your bounce house, the next logical step is to improve its materials and structural integrity. These upgrades are essential for creating a safer inflatable, minimizing risks like tears, seam failures, or even tip-overs. Focus your efforts on three critical areas: the vinyl material, high-stress zones, and the anchor points that keep the structure secure.
Switching to Commercial-Grade Vinyl
One of the most impactful changes you can make is replacing thin consumer-grade fabric with 18 oz PVC-coated vinyl – the go-to material for professional rental companies. Unlike the 10–15 oz vinyl found in consumer models, this heavy-duty material offers much better resistance to UV damage, tears, and abrasions. It also maintains air pressure more effectively, even during heavy use at large events.
Look for 18 oz or thicker PVC-coated vinyl with a reinforced scrim layer for added stability. Make sure it meets NFPA 701 fire-resistance standards, and opt for UV-resistant coatings to prevent cracking or fading from prolonged sun exposure. Anti-microbial treatments are also a smart choice, as they help combat wear and tear caused by repeated exposure to moisture. Operators who’ve upgraded to commercial-grade vinyl often report fewer seam issues and less downtime for repairs, thanks to the material’s durability and stronger stitching.
Once you’ve addressed the vinyl, the next priority is reinforcing the areas that bear the most stress.
Reinforcing High-Stress Areas
Certain spots on a bounce house take the brunt of the tension and impact – think floor-to-wall seams, corners, entrance steps, slide lanes, and landings. Strengthening these areas helps prevent premature wear and tear. Use double- or triple-stitched seams, heavy-duty polyester thread, and reinforced seam tape to fortify these high-stress zones.
Adding 2-4 inch wide nylon or polyester webbing along key load paths – such as the base perimeter, entrance steps, and baffle attachment points – distributes tension more evenly, so individual stitches aren’t overloaded. For corners or transition points, like where a slide meets the bounce floor, apply additional vinyl gusset patches or layered strips to reduce strain and protect against tearing caused by repeated landings.
If you’re upgrading an existing inflatable, consider having a commercial repair shop retrofit these reinforcements. Start by fully inflating the unit and inspecting it for seams that show signs of stretching, exposed threads, or light penetration. Mark these areas and have a professional add double-stitching, seam tape, or webbing where needed. Just be sure to maintain proper airflow – any blockage can lead to uneven inflation.
With the fabric and seams fortified, the final step is to upgrade the anchor points for maximum stability.
Improving Anchor Points
A reliable anchor point combines a reinforced attachment on the inflatable (like a sewn-in D-ring or strap) with the right stake or ballast for the ground conditions and expected wind loads. Commercial-grade D-rings, typically made from heavy welded metal or high-strength molded plastic, are sewn into reinforced vinyl pads and webbing. This setup ensures the attachment won’t tear away under stress from kids playing or sudden gusts of wind. Proper anchoring is crucial – poorly secured inflatables can lead to serious accidents. Most guidelines recommend ceasing operation when winds exceed 15 mph.
To upgrade anchor points, consider adding extra D-rings sewn onto reinforced vinyl patches at the base and corners. These should be stitched through both the vinyl and the underlying webbing to ensure the load is distributed across the inflatable’s structural frame. Replace any worn or light-duty plastic rings with welded steel or heavy-duty commercial-grade hardware rated for outdoor use. Regularly inspect all anchor pads for signs of wear or loose stitching.
For natural grass or soil, long steel stakes – typically 18-24 inches – driven at a slight outward angle provide the best holding power when paired with tight straps. On hard surfaces like concrete or asphalt, use sandbags or water barrels at every anchor point. While these setups are less secure than deep stakes, they can still work effectively with closer wind monitoring and reduced wind thresholds. Always keep extra straps, stakes, and ballast on hand to reinforce anchor points in less-than-ideal conditions.
Adding Better Safety Netting and Containment
Once the structure is reinforced, the next step is ensuring user containment. Containment failures – like children falling out or being ejected through openings – are a major factor behind the 10,000+ bounce house–related emergency room visits reported annually in the U.S. Experts estimate that nearly 95% of these injuries could be avoided with features like fully enclosed play areas, secure netting, and controlled entry points. These upgrades build on earlier structural improvements to provide an extra layer of protection.
Upgrading Safety Netting
After inspecting and reinforcing the structure, it’s time to focus on the netting. Replace older netting with commercial-grade, flame-retardant mesh that meets NFPA 701 standards. This type of mesh not only enhances safety but also increases durability. Opt for mesh with openings between 0.08 and 0.12 inches – small enough to prevent fingers or objects from poking through while still allowing clear visibility for supervision.
Use high-tensile, UV-resistant polyester or nylon mesh attached with reinforced webbing. Secure the netting along seam lines with heavy-duty nylon thread and reinforced webbing loops connected to the inflatable’s anchor points. Distributing the load along structural seams is far more reliable than concentrating stress in a few spots. Avoid shortcuts like zip-tying netting to thin fabric or using household thread, as these methods can fail when children lean on or collide with the walls. If you don’t have access to a heavy-duty sewing machine and vinyl-rated needles, consider hiring a professional inflatable repair service to install the upgraded netting while preserving the unit’s original design.
Before every use, inspect the netting for tears, fraying, or loose stitching. Apply firm pressure to each panel to simulate the forces of active play. If any weaknesses are found, repair or replace the netting immediately.
Increasing Wall Height and Adding Roof Enclosures
Raising the side walls helps prevent children from falling or being ejected during play. For older kids or more active use, consider upgrading walls to a height of 6–8 feet to keep heads and torsos safely contained. Adding inward-sloping or fully netted roof enclosures can further discourage climbing by eliminating solid ledges that children might grip.
When retrofitting wall extensions or roof netting to an existing unit, professionals should attach new mesh panels to the original upper seams using reinforced webbing. This ensures that the additional weight and tension are supported by the structural elements rather than just the surface vinyl. For roof containment, a netted canopy that attaches to reinforced tabs at the top of each wall is an effective way to prevent vertical ejections while still allowing airflow and light.
Retrofitted designs must maintain proper ventilation, clear visibility, and at least one emergency exit. Solid vinyl roofs should be avoided as they can trap heat. Instead, use netted roofs or high, open-top designs paired with taller netted walls to balance containment with temperature control and visibility – especially in warmer climates. Always consult the manufacturer’s guidelines before making modifications.
Improving Entry and Exit Containment
Poorly designed entry points can pose a significant ejection risk. To address this, add mesh safety flaps, overlapping curtains, or short tunnel-style entries that require deliberate steps or crawling to exit. These features reduce the chances of accidental ejections during active play. A common approach is using U-shaped or overlapping mesh panels that hang from the doorway and attach with hook-and-loop (Velcro) tabs. These panels keep children from bouncing straight out while still allowing easy emergency access.
Ensure the mesh panels are properly fitted to cover openings completely without dragging. Use soft, flexible mesh with rounded or covered lower edges to minimize impact injuries. Avoid designs with small loops, cords, or gaps that could snag fingers, jewelry, or clothing. Transparent mesh with minimal vinyl trim at eye level is ideal, as it helps supervisors maintain a clear view of the play area. Secure these panels with wide hook-and-loop strips or quick-release buckles, which allow adults to open them quickly in emergencies.
Combine these entry containment features with impact-absorbing safety mats placed at least 4 feet from the entrance. This is especially important on hard surfaces like concrete or asphalt, where falls could result in serious injuries. Even with upgraded netting and walls, proper anchoring and vigilant adult supervision are essential to prevent tip-overs or unsafe behavior.
Making Entry and Exit Points Safer
After addressing materials, netting, and containment improvements, it’s essential to focus on entry and exit points. These areas often pose the highest risk for injuries like falls and collisions in bounce houses. Strengthening these zones with features like stable steps, cushioned landing areas, and secure closures can significantly reduce such risks.
Adding Inflated or Padded Steps
High walls or narrow ledges at bounce house entrances can lead to twisted ankles or head injuries. To minimize these risks, use inflated or padded steps made from durable 15–18 oz vinyl with reinforced stitching. These steps provide a stable surface and reduce the height children must navigate. If you’re retrofitting an existing bounce house, choose steps designed to fit your unit’s entrance style – whether it’s a front step-in, slide platform, or side entry – and secure them to designated D-rings to avoid stressing the seams.
Place the steps directly in front of the entryway so children can walk straight in. Use rated webbing straps or carabiners to secure all connection points. On sloped or hard surfaces, such as driveways, anchor the step unit with stakes or sandbags for added stability. Ensure the top of the step aligns flush with the entry floor to prevent gaps where feet could get caught. Many operators in the U.S. also add grab handles on either side of the entrance, allowing children to climb in safely under adult supervision. Before each use, check that the steps are fully inflated and securely attached.
Installing Safety Mats
Non-slip, impact-absorbing mats at entrances and exits are an effective way to cushion falls and prevent injuries like scrapes or head impacts. This is especially important on hard surfaces like concrete, asphalt, or packed dirt, which are common in many settings. The best mats are made from high-density foam or rubber with a textured surface to reduce slipping. Look for mats rated for outdoor use, with UV resistance and a thickness of 2–3 inches to absorb falls. They should also extend at least 4 feet from the entrance to provide adequate coverage.
On grass or dirt, placing a tarp under the bounce house before laying the mats can help keep them clean and dry. To prevent wind from moving the mats, weigh down the corners with sandbags. For concrete or asphalt, choose mats with grippy undersides or use a non-slip underlayment. Ensure interlocking edges are secured to eliminate gaps where a child’s foot could get caught. Always check that mats lie flat, with no curled edges, and that they don’t obstruct anchor stakes, blower cords, or emergency exits. Test the mats for stability and proper placement before every event.
Improving Zippers and Closures
A secure entrance is critical for safety, but it also needs to allow quick emergency access. Heavy-duty zippers with large teeth and pulls, along with sturdy hook-and-loop (Velcro) strips or buckle straps, strike the right balance. For instance, an overlapping Velcro flap or a "step-in" design with side walls can help control the opening during play. Zipper pulls should be large and easy to grip, positioned on the outside for quick access. Avoid using padlocks or complicated clips that could delay an emergency exit.
If zippers show signs of wear or sticking, replace them with heavy-duty, UV-resistant versions stitched with reinforced seams. When adding new Velcro flaps or safety straps, attach them to reinforced seam lines or existing D-rings instead of cutting into stressed wall panels. After making any modifications, fully inflate the bounce house and repeatedly test the entrance under load to ensure no gaps form and that emergency egress remains unobstructed. Include a thorough inspection of zippers and closures before each use, confirming they move smoothly, stay secure, and leave no openings where a child’s foot might slip through.
Implementing and Maintaining Your Upgrades
Prioritizing and Scheduling Upgrades
Focus first on safety-critical upgrades, such as improving anchoring systems, entry and exit points, and repairing seams to prevent serious injuries. Address high-risk, low-cost fixes right away – like replacing worn-out stakes, adding safety mats at entrances, and mending torn seams or damaged netting. After tackling these, move on to larger structural upgrades, such as using commercial-grade vinyl or increasing wall height for units that experience heavy usage.
Plan major upgrades during slower periods, like weekdays in winter, to avoid disrupting operations. Dedicate one or two weekdays each month for minor fixes, such as patching or replacing mats, and set aside a two- to four-week window annually for more extensive work, like re-paneling vinyl or replacing large sections of netting. If you manage multiple units, stagger their upgrades to keep most of your fleet available for bookings. Once you’ve set the schedule, document every change to ensure a clear record of safety improvements.
Documenting Modifications
Keep detailed records for each upgrade, including the date (MM/DD/YYYY), a description of the work, materials used, the technician involved, and the reason for the modification. Supplement these entries with photos, receipts, and any relevant correspondence with manufacturers. This documentation is invaluable for demonstrating compliance with safety standards, assisting with insurance reviews, and showing due diligence in the event of an incident.
Maintain a streamlined log – whether digital or paper – for all modifications. For significant changes, such as adjustments to anchors, entry/exit designs, or netting, require a supervisor’s sign-off. Conduct monthly reviews with your team to ensure all updates are logged and to identify recurring issues with specific units. With thorough records in place, schedule regular inspections to confirm that the upgrades remain effective.
Conducting Regular Re-Inspections
After completing any upgrade, fully inflate the unit and inspect the modified areas under load conditions. At the first event following the upgrade, assign a trained attendant to monitor the updated area closely for the first 30 to 60 minutes of use, checking for any signs of shifting, loosening, or strain. Incorporate these upgraded components into your daily pre-use checks and perform a more detailed inspection at least once a month – or more frequently for high-use units.
In areas with year-round outdoor events or challenging weather, such as high UV exposure in Arizona, Texas, and Florida, or frequent strong winds, reduce the interval for deep inspections from monthly to every two weeks. Always inspect anchoring and entry protections immediately after events involving winds above 15 mph, heavy rain, or rapid deflation, as these conditions can stress newly upgraded areas. Regular inspections ensure that your safety measures remain effective over time.
Conclusion
Enhancing your bounce house with features like commercial-grade 18 oz vinyl, reinforced anchor points, full-coverage safety netting, and padded entry and exit areas significantly reduces common injury risks. These upgrades help prevent issues like tears, deflation, and accidental ejections – factors that lead to over 10,000 emergency room visits annually in the U.S.. They also ensure the bounce house remains sturdy and fun throughout your event. Stronger materials and better construction mean fewer repairs, smoother operations, and greater peace of mind. To maximize safety, these upgrades should always be paired with regular inspections.
Safety measures work best when combined with consistent checks and professional handling. Inspect the equipment before each use and conduct more thorough reviews periodically. Following proper maintenance routines, adhering to safety standards like ASTM F2374, and strictly enforcing rules on capacity, age separation, and weather conditions can prevent up to 95% of bounce house injuries.
For renters, it’s essential to ask the right questions: Does the rental company use commercial-grade inflatables? How often are the units inspected and cleaned? Will trained professionals handle setup, anchoring, and electrical connections? Reliable operators, such as Bouncy Rentals USA, follow best practices by sanitizing equipment, inspecting it before rentals, using high-quality inflatables, and providing professional on-site setup.
FAQs
What are the most important safety upgrades for a bounce house?
When it comes to making a bounce house safer, a few thoughtful adjustments can make a big difference. Start with durable materials – opt for high-quality fabrics that can withstand wear and tear over time. Adding safety nets around the sides is another smart move to minimize the chance of accidental falls. Finally, consider improved entry and exit points, such as secure steps or ramps, to cut down on trips and slips. These changes can create a safer and more enjoyable environment for everyone.
What should I check to ensure my bounce house is safe to use?
Before setting up your bounce house, take a few minutes to ensure everything is in good shape. Start by checking for tears, holes, or worn seams that might weaken its structure. Verify that all inflation points are securely fastened and working as they should. Don’t forget to inspect the blower and electrical connections for any signs of damage or loose components. Lastly, examine the safety features like netting and entry/exit points to make sure they’re stable and firmly attached. A quick inspection like this can go a long way in preventing mishaps and ensuring everyone has a great time!
What are the best materials to strengthen high-stress areas in a bounce house?
To make high-stress areas in a bounce house sturdier, rely on heavy-duty, puncture-resistant materials like reinforced vinyl or PVC. Pay special attention to critical spots such as corners, seams, and entry or exit points by incorporating double-stitched seams and layering extra durable fabric. These reinforcements enhance durability and provide added safety during energetic play.