Your bounce house might look fine, but hidden damage can lead to safety risks, costly repairs, and downtime. Spotting problems early helps protect users and keeps your equipment in good condition. Here’s what to watch for:
- Small Tears or Holes: Look for punctures causing sagging or deflation. Fixing these early prevents bigger damage.
- Soft Spots or Sagging Walls: Air leaks or internal damage can make the inflatable unsafe. Check for airflow or weak seams.
- Damaged Seams or Loose Stitching: Fraying or loose seams can lead to sudden deflation. Repair immediately to avoid structural failure.
- Worn or Loose Anchor Points: Broken or frayed straps can make the unit unstable, especially in windy conditions. Replace damaged straps without delay.
- Surface Wear or Netting Damage: Fading, tears, or frayed netting compromise safety and usability. Address these issues to maintain performance.
Quick Tip: Regular inspections and minor repairs can extend a bounce house’s life to 5–7 years. Ignoring small issues can lead to major expenses or even liability risks. Keep repair kits on hand and fix problems promptly to ensure safety and reliability.
1. Small Tears, Punctures, and Holes
When a pinhole puncture occurs, air begins to escape, leading to sagging and deflation. Minor tears can quickly become larger, especially with continuous use. Common causes include sharp objects like sticks, rocks, or rough surfaces, as well as items like keys or jewelry left in pockets. These small damages should be addressed quickly to avoid bigger problems.
Safety Risks
A deflating bounce house can become dangerous in no time. As the walls lose their structure, jumpers are at a higher risk of colliding with each other or hitting the ground. In severe cases, parts of the unit might collapse entirely, increasing the chance of injuries.
"A damaged bounce house poses a safety hazard. Timely repairs help prevent accidents and injuries for everyone who uses it." – Hero Kiddo
For rental businesses, operating a damaged unit also brings the risk of legal liability if someone gets hurt.
Repair Urgency
Tears and punctures tend to get worse with use. To find hidden leaks, mix dish soap with water and apply it to the suspected area – bubbles will appear where air is escaping. Fixing these issues early can save the unit from becoming completely unusable. Quick repairs help keep the bounce house both safe and enjoyable.
Impact on Usability
Sagging walls and soft floors not only frustrate users but also harm your reputation. Worse, it may force you to remove the unit from your inventory altogether.
Cost of Repair or Replacement
For small issues, DIY repairs are a budget-friendly option. Basic repair kits with vinyl patches and adhesive typically cost between $10 and $30. For a stronger, long-lasting repair, use vinyl cement like HH-66 on a rounded patch – rounded edges are less likely to peel off than square ones. Applying the patch on the inside of the unit allows air pressure to hold it in place. Be sure to let the adhesive cure for 24 hours before re-inflating.
If you opt for professional repairs, costs can vary, so getting multiple quotes is a smart move. However, for older residential bounce houses that originally cost less than $100, replacing the unit may be more practical than paying for professional repairs.
2. Soft Spots, Sagging Walls, or Slow Deflation
If parts of your bounce house feel softer than usual or the walls start sagging, it’s a sign that air is escaping. This could be caused by small punctures in the vinyl, separated seams, or internal damage from overloading. These issues are similar to other types of structural wear and demand immediate attention to prevent further damage.
Safety Risks
Low air pressure in a bounce house can make it unstable, increasing the chances of collapse and injury. Sagging walls lose their ability to absorb impact, which means children could hit the ground through the vinyl. As i2k emphasizes:
"A damaged bounce house is not safe to use and needs to be repaired as soon as possible."
For rental operators, knowingly using a deflated unit isn’t just unsafe – it could lead to legal consequences if someone gets hurt. Keeping the unit in good condition is essential for safety and extending its lifespan.
Repair Urgency
A small soft spot might not seem like a big deal, but it can strain other parts of the inflatable, leading to more tears or seam failures. To find leaks, inflate the bounce house in a quiet space and listen for escaping air. You can also run your hands along seams and walls to feel for airflow. Bump N Bounce advises:
"Early detection of holes and tears can help prevent the inflatable from being completely ruined."
Before patching, make sure to clean the damaged area with alcohol or mild soap. This ensures the adhesive sticks properly and creates a durable repair.
Impact on Usability
Soft spots don’t just affect safety – they ruin the fun. Underinflated areas lack the tension needed for bouncing, which can leave users disappointed. For rental businesses, this could mean unhappy customers and lost income.
Cost of Repair or Replacement
Fixing small issues is often affordable. DIY vinyl repair kits, which include adhesive, usually cost between $10 and $30. However, if the bounce house is older or was a budget-friendly purchase, replacing it might make more sense than investing in major repairs. Quick fixes can help rental operators minimize downtime and keep their business running smoothly.
3. Damaged Seams and Loose Stitching
Seams are the unsung heroes of any bounce house. They hold the vinyl panels together and keep the air inside, ensuring the structure stays inflated. But when stitching starts to fail – whether through frayed threads or loose seams – the bounce house struggles to maintain pressure. Air escapes faster than the blower can replace it, and what begins as a small gap can quickly turn into a bigger problem under the stress of kids jumping around. Beyond structural concerns, damaged seams also pose serious safety risks.
Safety Risks
If a seam gives way during use, the bounce house can deflate suddenly, creating a potentially dangerous situation for children inside. This kind of failure increases the risk of injuries, making seam integrity a top safety priority.
Repair Urgency
Seam damage isn’t something you can ignore. Unlike minor punctures, loose stitching falls under more advanced maintenance and needs immediate attention. To locate leaks, mix dish soap with water and apply it to suspicious areas – bubbles indicate escaping air. Look out for fraying threads, visible separations, or areas where the stitching starts to unravel after use. Before tackling repairs, clean the area with rubbing alcohol to ensure proper adhesion.
For repairs, a sewing awl paired with heavy-duty thread is your go-to tool. As Pogo Bounce House puts it:
"Knowing how to patch a bounce house damaged at its seams or with large shreds or gashes is more involved… there’s really no better way to fix damaged seams or serious damage [than a sewing awl]."
However, if the seam damage is extensive – like long tears or heavy shredding – it’s best to call in a professional. This ensures the repair is durable enough to handle regular or commercial use.
Impact on Usability
Weak seams don’t just threaten safety – they also affect the bounce house’s performance. Soft spots caused by failing seams reduce the structure’s firmness, making the bouncing experience less enjoyable. For rental businesses, this can lead to unhappy customers and even lost revenue if the unit has to be taken out of service for repairs.
Cost of Repair or Replacement
Fixing damaged seams yourself is typically inexpensive. Tools like sewing awls, heavy-duty needles, and vinyl repair kits usually cost between $10 and $30. On the other hand, professional repairs can get pricey, factoring in labor charges and the cost of shipping a heavy unit to a repair facility. If your bounce house is older, or if it originally cost under $100, replacing it might make more financial sense than investing in extensive seam repairs.
4. Worn, Frayed, or Loose Anchor Points
Anchor points are what keep your bounce house securely in place. If these straps fray, break, or come loose, the stability of the entire unit is compromised. Unlike small vinyl tears that can be patched up, damaged anchor straps must be completely replaced – no exceptions. Boris Boguslavsky, Owner of The Fun Ones, emphasizes this point:
"These straps must be removed and replaced. There is no repairing the strap".
This ties directly to the broader topic of ensuring the structural safety of your inflatable.
Safety Risks
Every year, over 10,000 emergency room visits are linked to bounce house accidents, and proper anchoring could prevent up to 95% of these injuries. When anchor points fail, the inflatable can shift, tip over, or even lift off the ground in high winds – especially when gusts exceed 15 mph. That’s why keeping anchor points in top condition is one of the most critical safety measures you can take.
Repair Urgency
It’s essential to inspect anchor points before every use. Look for signs of wear like fraying, broken stitching where the strap connects to the inflatable, or any visible damage to the material. Straps often get damaged during setup, especially when stakes or tools come into contact with them. Even minor damage, such as a few broken strands, weakens the strap’s ability to hold securely. If you notice any issues, stop using the unit immediately until the damaged straps are replaced. Addressing anchor problems promptly is just as important as checking seams and surfaces for wear.
Impact on Usability
A bounce house with compromised anchors is not safe to use, period. This can lead to lost rental income and downtime while you wait for replacement straps to be installed. Beyond the financial impact, operating with damaged anchors puts you at serious legal risk if someone gets injured.
Cost of Repair or Replacement
Replacing anchor straps and hardware is relatively affordable compared to the potential consequences of neglecting the issue. However, if the anchor point attachment requires professional restitching to meet safety standards, you might need to factor in labor fees and shipping costs for the inflatable. For smaller, residential-grade units purchased for less than $100, it often makes more sense to replace the entire unit rather than invest in costly repairs. Addressing anchor problems quickly not only ensures safety but also protects your business from unnecessary financial and legal risks.
5. Surface Wear, Discoloration, and Netting Damage
Surface wear is often a sign of bigger problems lurking beneath. When the material starts to show damage, it compromises both safety and usability. Discoloration or fading isn’t just cosmetic – it signals material fatigue or weakness, which can affect the inflatable’s overall structure. Prolonged UV exposure or chemical damage can make the vinyl brittle and more likely to tear. Similarly, damaged netting poses serious risks. If children grab onto compromised mesh, it could lead to limb entrapment or other injuries. Addressing these issues quickly is essential to avoid safety hazards and minimize downtime.
Safety Risks
Worn areas on bounce houses bring multiple safety concerns. Improper cleaning can lead to mold and mildew growth, which increases the risk of infections. Small tears in the vinyl can grow quickly under the stress of jumping, potentially causing sudden deflation or collapse. Damaged netting fails to provide adequate containment, increasing the chance of falls or limbs getting stuck in frayed sections.
Repair Urgency
Surface and netting damage can worsen rapidly if left unchecked. Even minor stitching issues can escalate with continued use. To prevent this, inspect your unit after every use to spot punctures or snags early. Use the soap test periodically to detect leaks. For netting, avoid patching small sections; instead, replace the entire mesh panel to ensure the barrier remains safe for children. Prompt repairs not only protect users but also maintain the bounce house’s functionality.
Impact on Usability
Worn surfaces can create soft spots, reducing air retention and making the inflatable less safe. Discoloration or persistent odors from mold can harm your business’s reputation, leading to unhappy customers. A well-maintained bounce house can last between 5 and 10 years, but neglecting repairs could shorten its lifespan to just 3 years. Always ensure the unit is completely dry before storing it, as moisture trapped in weakened fibers can accelerate mold growth.
Cost of Repair or Replacement
For smaller issues, DIY repair kits offer a budget-friendly solution. When patching, cut the material into rounded shapes to prevent edges from snagging. Make sure the damaged area is clean and dry before applying the patch; otherwise, the adhesive won’t stick properly. Avoid bleach-based cleaners, which can permanently damage vinyl, and instead use a mixture of three parts water, one part vinegar, and a bit of dish soap. However, if your bounce house cost less than $100 and has been in use for several years, replacement might be a smarter option than extensive repairs. As Hero Kiddo points out:
"Fixing them promptly saves you money in the long run".
How Early Repairs Protect Your Rental Business
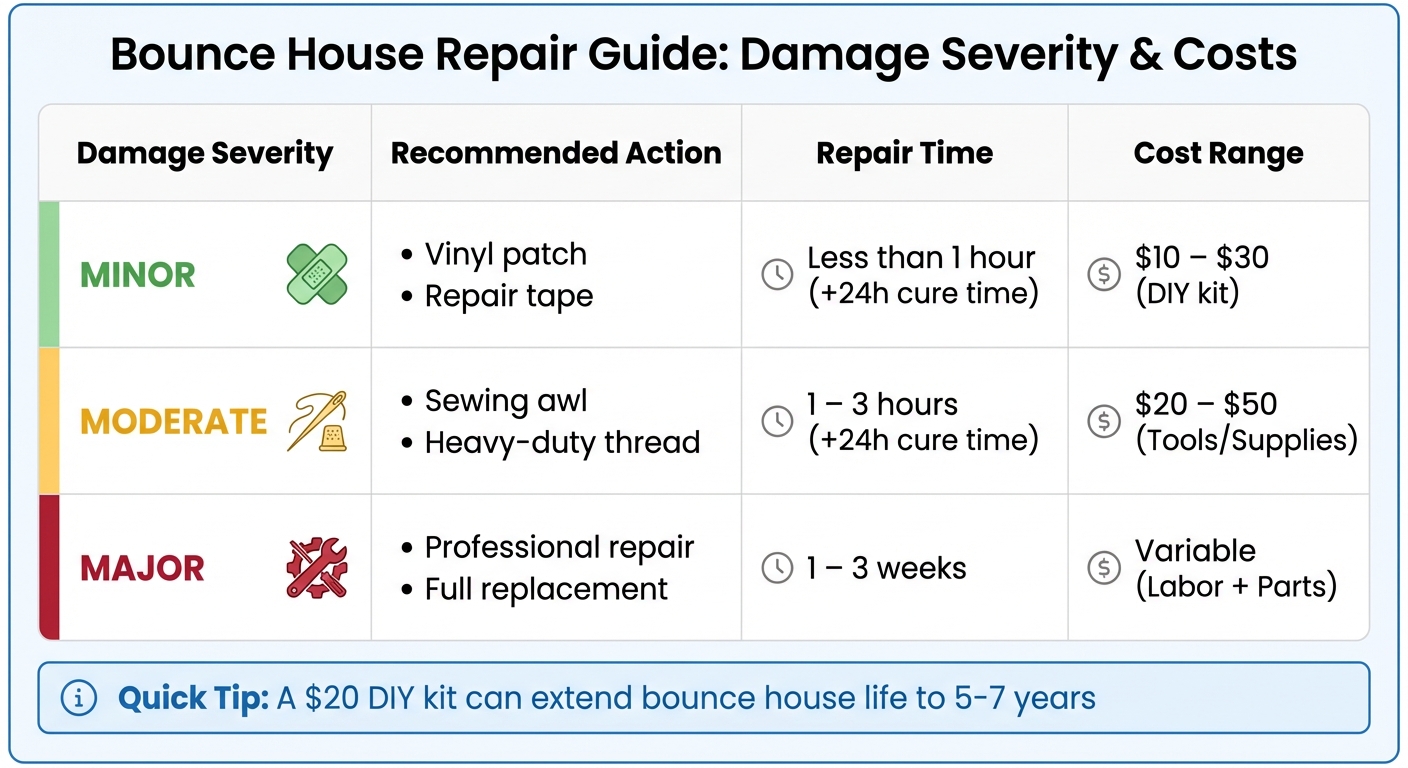
Bounce House Damage Severity Guide: Repair Actions, Time and Costs
Taking care of repairs early keeps your bounce houses in top shape and your revenue flowing. A quick patch job on a small tear can prevent it from turning into a major rip that requires professional attention. And let’s face it – when a unit is out of commission during peak season, you’re not just losing time; you’re losing money from missed bookings and canceled rentals.
Regular inspections are your first line of defense. They help maintain the quality of your equipment and reduce liability risks. By addressing issues before they escalate, you ensure your insurance coverage stays valid and avoid potential lawsuits caused by unexpected deflations or structural failures. This proactive approach doesn’t just protect your business; it also keeps your operations running smoothly and minimizes costly downtime.
At Bouncy Rentals USA, routine checks are a non-negotiable part of the process. After every rental, units are inspected for any signs of wear and tear, with more thorough inspections done weekly. From seams to blowers, catching small problems early prevents them from becoming expensive headaches. This not only extends the lifespan of your equipment but also helps maintain the professional reputation that keeps customers coming back.
Here’s a quick breakdown of common damage situations, what to do, repair times, and costs:
| Damage Severity | Recommended Action | Repair Time | Cost Range |
|---|---|---|---|
| Minor | Vinyl patch or repair tape | Less than 1 hour (+24h cure) | $10 – $30 (DIY kit) |
| Moderate | Sewing awl and heavy-duty thread | 1 – 3 hours (+24h cure) | $20 – $50 (Tools/Supplies) |
| Major | Professional repair or replacement | 1 – 3 weeks | Variable (Labor + Parts) |
The takeaway? Spending $20 on a DIY kit to fix moderate seam damage in a couple of hours is a no-brainer compared to the steep costs of replacing an entire unit. Keep essential repair supplies – like vinyl patches, industrial adhesive, and a sewing awl – on hand in your rental trailer. These simple tools can save the day, ensuring you’re ready to handle quick fixes and keep your events on schedule. Early repairs not only protect your investment but also keep your business running without a hitch.
Conclusion
Spotting damage early is crucial for both safety and profitability. What might start as a small tear or a frayed seam can quickly escalate into a costly replacement if ignored. Regular maintenance can prevent up to 90% of inflatable-related issues, directly protecting your customers and your business. By addressing minor problems right away, you not only ensure the safety of your guests but also extend the life and reliability of your rental equipment.
A simple $20 DIY repair kit can handle moderate damage and help a bounce house last 5–7 years. Make it a routine to inspect your equipment before and after every rental, focusing on high-stress areas like seams, anchor points, and netting. As mentioned earlier, staying ahead with proactive maintenance is key to running a successful rental business.
At Bouncy Rentals USA, we take safety seriously by conducting thorough inspections after every rental and on a weekly basis. This approach helps us catch potential issues early, keeping our equipment safe, insured, and ready for use. Whether it’s a backyard birthday or a large community event, we’re committed to delivering safe, reliable fun every time.
Keep your repair supplies stocked, fix damage promptly, and never compromise on safety. A well-maintained rental fleet not only safeguards your customers but also strengthens your reputation – because a successful business depends on equipment that’s safe, dependable, and always ready to bring the fun.
FAQs
What’s the best way to find hidden leaks in a bounce house?
To pinpoint hidden leaks in your bounce house, start by inflating it completely in a quiet space. Pay close attention to seams, corners, and joints as you listen for any faint hissing sounds. Another effective method is spraying a mix of soapy water on areas you suspect might be leaking – bubbles will appear where air is escaping. You can also use your hand to feel for escaping air along the surface. Once you’ve found the leak, mark the spot with chalk or a washable marker to make it easy to locate when it’s time to repair. Fixing leaks quickly not only keeps the bounce house safe but also helps it last longer.
How do I know if it’s time to replace my bounce house instead of repairing it?
If your bounce house has damage that’s beyond safe or practical repair, it’s time to think about replacing it. This could mean dealing with large or multiple tears, broken seams, mold issues, or when repair costs approach the price of buying a new one.
A worn-out bounce house can become a safety hazard, so upgrading to a new unit ensures a safer and more dependable experience. If you’re on the fence, consider reaching out to a professional for an assessment to determine whether repairs are still feasible or if replacement is the smarter move.
What tools do I need for basic bounce house repairs?
For quick and efficient bounce house repairs, it’s crucial to have a vinyl repair kit on hand. The essentials? Vinyl-compatible adhesive, pre-cut vinyl patches, sharp scissors, a mild cleaning solution like soapy water or rubbing alcohol, and a soft cloth to clean the damaged area before applying the patch.
If you need a temporary fix, consider heavy-duty vinyl or duct tape to seal tears and a sturdy needle with heavy thread for stitching seams. A small brush can help scrub away dirt, and a measuring tool is useful for sizing patches accurately. Keeping these tools nearby means you’re always ready to tackle minor issues, reducing the risk of further damage or unnecessary downtime.