- Event Needs: Determine guest count, age range, and event duration. Check weight limits and capacity for the inflatable.
- Setup Area: Use a flat, clear space with proper dimensions. Ensure 20 feet of overhead clearance and a nearby power source.
- Budget: Plan for rental fees, delivery costs, deposits, and extras like generators or attendants.
- Vendor Selection: Choose a reliable company with safety certifications, insurance, and clear rental policies.
- Safety Rules: Enforce no sharp objects, food, or drinks inside. Monitor weather conditions and supervise play zones.
- Post-Event: Inspect equipment for damages, confirm charges on the final invoice, and provide feedback to the vendor.
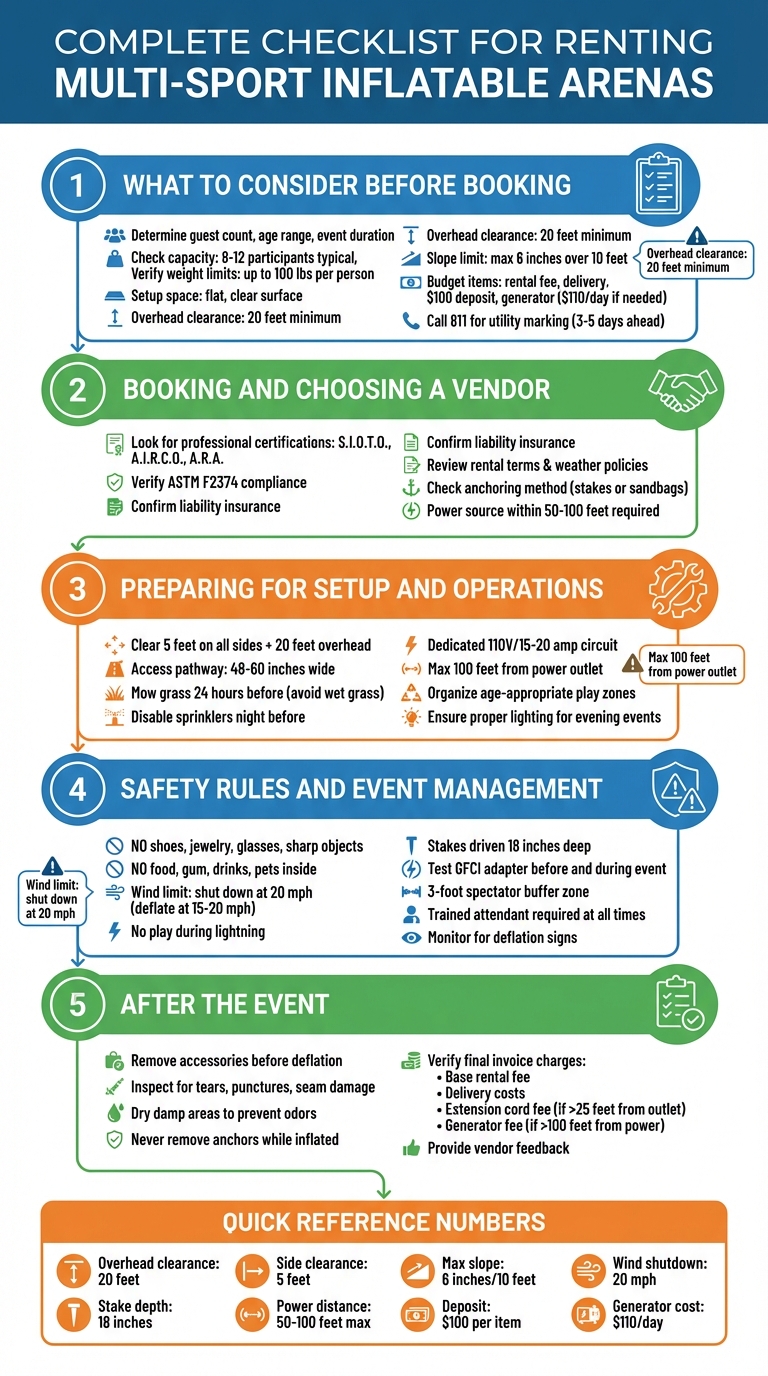
5-Step Checklist for Renting Multi-Sport Inflatable Arenas
Step 1: What to Consider Before Booking
Determine Your Event Needs
Start by figuring out the basics: how many guests you’re expecting, their age range, and how long your event will last. Multi-sport arenas work well for mixed-age groups, but you’ll need to make sure the inflatable can handle your crowd. For example, some units are designed for up to 12 kids, while others are better suited for 8–10 participants. If you’re planning for older kids or adults, double-check the weight limits – some inflatables max out at 100 lbs per person. Look for the manufacturer’s guidelines printed on the inflatable to confirm it fits your needs. Lastly, make sure your event location meets the setup and access requirements.
Check Your Setup Space and Access
Your setup area matters more than you might think. It should be flat, clear, and free of gravel, mulch, rocks, or steep slopes. Most rental companies won’t install on surfaces with more than a 6-inch slope over 10 feet. You’ll also need at least 20 feet of overhead clearance to avoid power lines, tree branches, or building overhangs. If you’re setting up on grass, call 811 at least 3–5 business days ahead to have underground utility lines marked. For delivery, ensure there’s a pathway at least 3–4 feet wide (up to 6 feet for larger units). Keep in mind that inflatables can weigh between 200 and 1,000 lbs, so clear access is essential for the large hand trucks used to move them.
Plan Your Budget
Budgeting isn’t just about the rental fee. Account for additional costs like delivery fees, which vary by distance, and expect to put down a $100 deposit per item to secure your booking. If your power source is more than 150 feet away, you’ll need a portable generator, which typically costs around $110 per day. Don’t forget to plan for extras like attendants or additional equipment. Be aware of potential damage fees too – if a unit not meant for wet play ends up wet and needs cleaning or drying, you could face charges of about $20 per hour.
Review Weather and Permit Needs
Weather can make or break your plans, so monitor conditions as your event date approaches. Rain, high winds, or extreme heat can impact both the setup and safety of the inflatable. If you’re hosting at a public park or community space, check if permits are required – rules can differ by city or county. Also, confirm that your vendor has liability insurance, which is legally required in some states, like Louisiana, for inflatable operators.
Step 2: Booking and Choosing a Vendor
Select a Reliable Vendor
Once you’ve figured out your needs, the next step is finding a vendor you can trust. Consider reaching out to companies like Bouncy Rentals USA to check availability. It’s also a good idea to prioritize vendors who are part of professional organizations like the Safe Inflatable Operators Training Organization (S.I.O.T.O.), Inflatable Rental Company Operators (A.I.R.C.O.), or the American Rental Association (A.R.A.). Membership in these groups often signals a commitment to safety standards and regular training. After narrowing down your options, make sure to verify the vendor’s safety credentials.
Confirm Safety and Certification
Safety should be a top priority. Ask the vendor to provide proof that their equipment complies with ASTM F2374 standards, which are the national safety guidelines for inflatable amusement devices. Additionally, request copies of their liability insurance and safety certifications. A reliable vendor will also inspect their equipment thoroughly before every use, so don’t hesitate to ask about their inspection process.
Review Rental Terms and Policies
Before finalizing your booking, take time to go through the rental agreement carefully. Pay attention to important details like delivery times, setup and takedown procedures, and supervision requirements. Also, make sure the vendor has a clear written policy for shutting down equipment during bad weather and provides options for rescheduling if necessary.
Get Equipment Specifications
Double-check the technical details with the vendor before you book. Find out how the equipment will be anchored – whether they use stakes for grassy areas or sandbags for hard surfaces. Also, confirm that there’s a power source within 50–100 feet of the setup location. These small details can make a big difference in ensuring everything runs smoothly.
Step 3: Preparing for Setup and Operations
Prepare the Setup Area
Once you’ve completed your initial checklist, it’s time to focus on the details to ensure everything runs smoothly on event day. Start by choosing a level grass surface for secure staking. If you’re working on hard surfaces like concrete, use tarps and sandbags for stability. The ground should have no more than a 6-inch slope over 10 feet – roll a ball across the area to check for any hidden inclines that could lead to instability. Clear the space of debris, including rocks, sticks, or sharp objects, and make sure to remove any animal waste. If you do spot-clean for waste, cover the area to protect the equipment from residue.
Make sure there’s at least 5 feet of clearance on all sides of the inflatable’s footprint and 20 feet of vertical clearance to avoid obstacles like low-hanging branches or ceilings. Check that the access pathway is wide enough for delivery – most standard units require at least 48 inches, while larger obstacle courses may need 60 inches. If the setup is on grass, mow it at least 24 hours before delivery, but avoid freshly cut, wet grass. Also, disable automatic sprinklers the night before to keep the ground dry.
Set Up Electrical Requirements
A reliable power source is critical. Ensure you have a dedicated 110V/15-20 amp circuit located within 50–100 feet of the setup area. Inflatables shouldn’t be placed more than 100 feet from the nearest electrical outlet. Avoid sharing the circuit with other high-demand appliances like concession machines or household devices. If you’re hosting your event in a park or remote area without easy access to power, renting a generator is a smart option. Before the event, check for any buried electrical lines or nearby overhead power lines to avoid potential safety risks.
Organize Play Zones and Supervision
Once the physical setup is ready, focus on creating organized play zones to keep the event safe and enjoyable. Designate specific areas for different age groups or activities. For instance, you could have one zone with a bounce house for younger kids and another with an obstacle course for older participants. If your event runs into the evening, ensure all areas, including walkways, are well-lit. Use LED or string lights and secure any cords to prevent tripping hazards. Thoughtful planning here ensures a seamless and enjoyable experience for everyone.
Step 4: Safety Rules and Event Management
Once everything is set up and ready to go, the next step is making sure the event runs smoothly and safely. Safety should always be the top priority to keep the fun going without any interruptions.
Enforce Safety Rules
After setting up the inflatable, it’s crucial to enforce some basic safety rules. Items like shoes, jewelry, glasses, and anything sharp should stay outside the inflatable. These can damage the material or lead to injuries during play. Similarly, food, gum, drinks, and pets are a no-go inside the inflatable – they can create choking hazards or make the surface slippery.
Weather conditions also play a big role in safety. If winds exceed 20 mph or lightning is present, it’s time to stop play immediately. Many guidelines suggest deflating the inflatable when winds reach 15-20 mph to prevent tipping or structural damage. Keep participants away from blower areas and entrances, and maintain a 3-foot buffer zone for spectators. Additionally, pregnant individuals or anyone with physical health concerns should avoid entering the inflatable.
Inspect Equipment Before Use
Before guests start arriving, take a moment to thoroughly inspect the equipment. Look for any rips, holes, or loose seams. Check that zippers, straps, anchors, and ground stakes (which should be driven 18 inches deep) are secure. Test the GFCI adapter both before and during the event to ensure it’s functioning properly. Once inflated, the inflatable should feel firm and stable – no sagging or wrinkled areas.
Arrange Staffing or Attendants
Having a trained attendant on hand to supervise the inflatable at all times is essential. This person should enforce safety rules, monitor capacity limits, and quickly address any risky behavior like flips or roughhousing. For larger gatherings, professional attendants can be a good option. They can help manage crowd control, enforce age-appropriate groupings, and handle rotation schedules. Supervisors should also keep an eye out for signs of deflation, such as sagging or distortion, and evacuate the inflatable immediately if there’s an issue. It’s also a smart idea to have someone on-site with basic first aid training, just in case.
Step 5: After the Event
Wrapping up your event involves a few important steps to ensure everything is properly handled. Just like pre-event checks help set the stage for success, post-event procedures protect equipment and maintain service standards for future use.
Coordinate Takedown and Inspection
The vendor usually takes care of deflating and removing the inflatable, but there are a few things you should keep in mind. Before turning off the blowers, make sure to remove any detachable accessories like mats, balls, or other loose items to avoid accidental damage. Once the blowers are off, the vendor will deflate the inflatable and fold it up by rolling the material tightly from the base.
While this is happening, take a moment to inspect the equipment. Look for any damage along the seams and stitches, and after deflation, check for punctures, tears, or wear that might have occurred during use. If the inflatable is damp, dry it off with towels or use blowers to remove moisture. This helps prevent odors from forming. One crucial safety tip: never allow anyone to remove anchors, such as stakes or sandbags, while the inflatable is still inflated. On windy days, a partially deflated inflatable can act like a sail, creating a serious safety hazard.
Check the Final Invoice
Take a close look at the final invoice to ensure all charges align with your original booking. Confirm that the base rental fee, any add-ons, and delivery charges match what was agreed upon. If the setup location was more than 25 feet from an outlet, check if an extension cord fee was added. Similarly, if a generator was required because there wasn’t a power source within 100 feet, verify that the quoted rate matches the invoice. Addressing any discrepancies promptly can help maintain a good relationship with the vendor.
Give Feedback to the Vendor
Share your experience with Bouncy Rentals USA to help them improve their services. Whether everything went smoothly or there were a few hiccups, honest feedback is always valuable. If you were happy with the service, consider leaving a review or testimonial to assist other families and event planners in making informed choices. If there were any issues, reaching out directly gives the vendor a chance to address your concerns and make improvements for the future.
Conclusion
Planning an event with a multi-sport inflatable arena can be straightforward when you stick to a well-thought-out checklist. The secret lies in preparation – making sure your setup area is clean, level, and meets all necessary safety requirements.
Taking the right safety precautions is non-negotiable. For example, checking for underground utilities ensures proper staking, and mowing your lawn at least a day before delivery helps avoid wet grass clippings getting inside the inflatable. These small but essential steps go a long way in keeping everyone safe and comfortable.
When you work with Bouncy Rentals USA, you’re not just renting equipment – you’re gaining peace of mind. Their commitment to sanitized units, insurance coverage, and timely service means you can focus on enjoying the event while they handle the logistics.
From the initial booking to the final takedown, every step you take contributes to creating a seamless and enjoyable experience for your guests. Whether it’s a birthday bash, school carnival, or neighborhood gathering, careful planning ensures everything runs smoothly and leaves everyone with smiles and great memories. Stick to the checklist, and you’ll have all the ingredients for a safe, fun, and unforgettable event.
FAQs
What safety certifications should I check when renting a multi-sport inflatable arena?
When considering a rental for a multi-sport inflatable arena, it’s crucial to ensure the vendor meets established safety standards. Look for certifications such as CPSC compliance, ASTM F2374, or UL safety listings. These credentials demonstrate that the equipment meets rigorous safety requirements.
It’s also a good idea to check if the vendor is affiliated with respected industry groups like SIOTO (Safe Inflatable Operators Training Organization) or the American Rental Association (ARA). Membership in these organizations suggests a commitment to safety, quality equipment, and proper operational practices. Don’t hesitate to request proof of these certifications and memberships to guarantee a secure and enjoyable experience.
What should I check to ensure the setup area for a multi-sport inflatable arena is safe?
To set up your inflatable arena safely, start by selecting a flat, level surface like grass, concrete, or asphalt. Clear the area of any hazards – rocks, sticks, animal waste, or other debris – and ensure the space is completely dry. You’ll need enough room to accommodate the inflatable, so leave at least 5 feet of clearance on all sides and check for overhead obstacles like power lines or tree branches.
The ground should be level, with no more than a 5° slope for stability. If anchoring is necessary, use stakes driven at least 12 inches deep, or opt for sandbags on hard surfaces. Make sure there’s a 110-115V outlet within 100 feet of the setup area, or arrange for a generator if power access is limited. Before use, inspect the inflatable for any signs of damage, confirm the blower is running continuously, and assign an adult to supervise for added safety.
By following these guidelines, you’ll create a secure and fun environment for everyone. At Bouncy Rentals USA, we take care of all these safety checks for you, so you can enjoy a stress-free event!
What extra costs should I plan for when renting a multi-sport inflatable arena?
When renting a multi-sport inflatable arena, it’s essential to account for extra expenses beyond the base rental price. These can include delivery and setup charges, electricity or generator rental if there’s no access to nearby power outlets, and liability insurance to cover any potential risks during the event.
It’s also wise to verify whether your venue requires any permits or licenses and determine if you’ll need to bring in additional staff or attendants to oversee the equipment and ensure safety. Preparing for these costs in advance can help your event go off without a hitch!