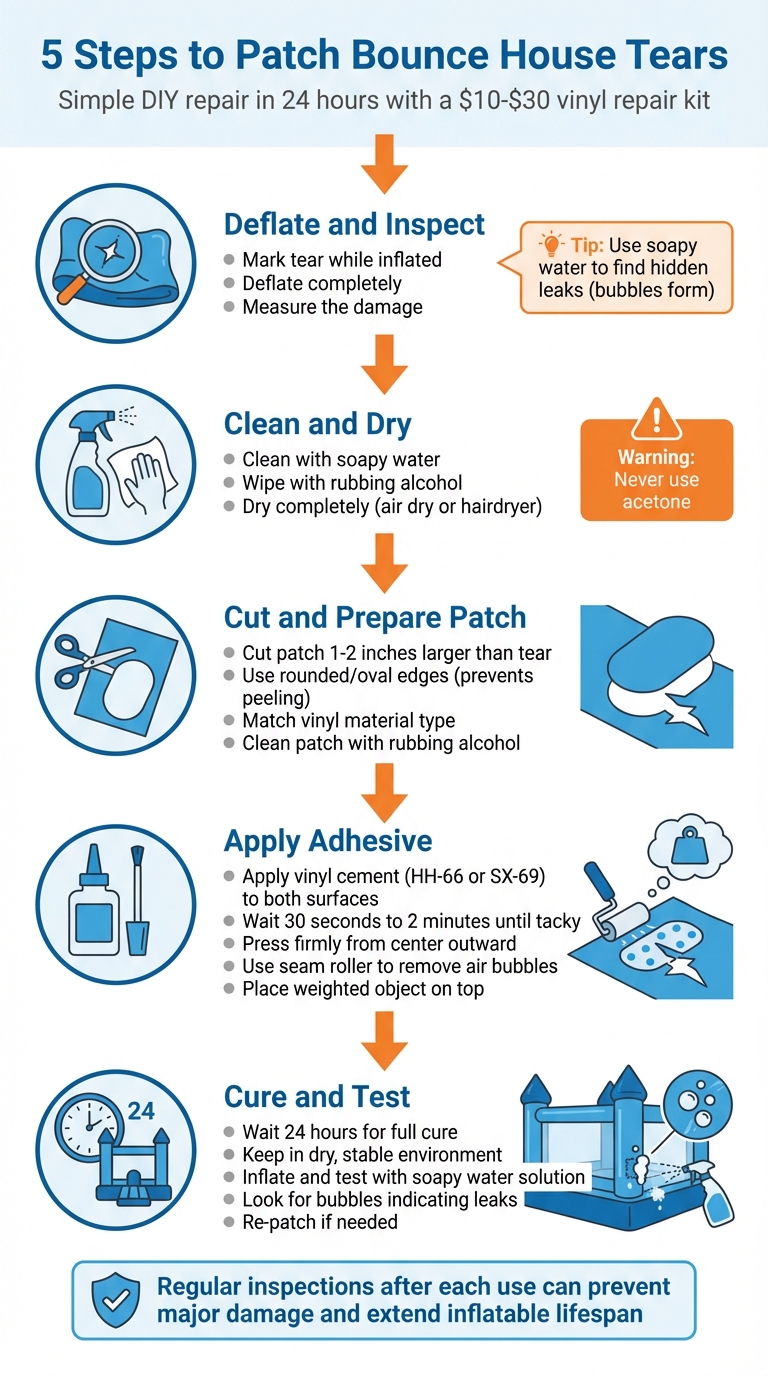
A damaged bounce house can be unsafe if not repaired promptly. Fixing it yourself is simple and cost-effective, requiring just five steps and a basic vinyl repair kit ($10–$30). Here’s how:
- Deflate and Inspect: Mark the tear while inflated, deflate, and measure the damage.
- Clean and Dry: Use soapy water and rubbing alcohol to clean, then dry completely.
- Cut and Prepare the Patch: Cut a vinyl patch 1–2 inches larger than the tear with rounded edges.
- Apply Adhesive: Use vinyl cement (e.g., HH-66), apply to both surfaces, and press firmly.
- Cure and Test: Let it cure for 24 hours, then check for leaks by inflating and testing with soapy water.
Regular inspections and proper care can prevent future damage. Always keep a repair kit handy for quick fixes.
5-Step Bounce House Repair Process: From Tear Detection to Testing
Tools and Materials Needed
Before starting the repair, make sure you have all the necessary tools and materials ready. Having everything on hand will make the process smoother and ensure a strong, long-lasting fix.
Required Repair Tools
For the adhesive, go with industrial-grade vinyl cement like HH-66 or SX-69, as these are known for creating bonds that are stronger than the vinyl itself. According to RH Adhesives:
"HH-66 is the world’s most effective waterproof PVC vinyl adhesive. It bonds with a single application, and it doesn’t let go."
You’ll also need vinyl patch material that matches your bounce house. For commercial-grade inflatables, this usually means reinforced vinyl (e.g., 22 oz), while lighter, non-commercial units often use unreinforced PVC. Make sure the patch is large enough to extend at least 2 inches beyond the tear on all sides. This extra margin is key for a secure and reliable repair.
For prepping the surface, keep rubbing alcohol or HH-66 Thinner handy to clean the area. Additional tools include scissors, a marker or grease pencil, a small paintbrush, and a seam roller.
When cutting patches, always go for circular or oval shapes. Rounded edges are less likely to peel over time.
Optional Safety Gear
To protect your hands from strong solvents, consider wearing nitrile or latex gloves. Always work in a well-ventilated space and apply the adhesive within a temperature range of 35°F to 95°F for the best results.
Step 1: Deflate and Inspect the Tear
Deflate the Bounce House
Before letting the air out of the bounce house, make sure to mark the damaged area while it’s still inflated. This will save you the hassle of searching for the tear once the structure loses its shape.
To pinpoint hidden leaks, apply soapy water to areas you suspect might be damaged – bubbles will form where air escapes. Alternatively, you can run your hand along the surface to feel for airflow or listen closely for hissing sounds in a quiet space, like a garage.
Once the damage is marked, switch off the blower and let the bounce house deflate completely. With the unit flat and the tear clearly identified, clean and dry the area you’ll be repairing.
Examine the Damage
Measure the tear using a ruler or tape measure. This step ensures your patch will be large enough to cover the damaged area, extending at least 1–2 inches beyond the tear on all sides. While small punctures are relatively easy to fix, larger tears or issues with seams may require professional assistance.
| Damage Type | Recommended Repair Method | Difficulty Level |
|---|---|---|
| Small Puncture/Cut | Vinyl Patch or Repair Tape | Easy |
| Minor Seam Fraying | Sewing Awl (Stitching) | Moderate |
| Large Tear or Gash | Professional Repair Service | High |
| Heavy Shredding | Professional Repair or Replacement | High |
For severe damage, like extensive shredding, large tears, or significant seam failures, it’s better to reach out to a professional repair service or the manufacturer. As Happy Jump advises:
"For larger damages, it’s best to consult a professional repair service or contact the manufacturer for guidance on proper repair procedures." – Happy Jump
Once you’ve assessed the tear and measured its size, you’ll be ready to cut a patch that fits the repair.
Step 2: Clean and Dry the Repair Area
Clean the Surface
For a strong and lasting bond, start with a clean surface. Mix 1/2 teaspoon of dish soap with a cup of water and use this solution to wipe away dirt, sand, grease, or oils from the tear. Afterward, use an isopropyl alcohol wipe to remove any lingering residue. Skip the acetone – it can harm the vinyl.
Once the area is spotless, it’s time to dry it.
Dry the Area Completely
Make sure the surface is completely dry before moving forward. Let it air dry naturally or place it in direct sunlight for quicker results. If you’re in a hurry, a hairdryer on a cool setting can help speed things up. A fully dry surface ensures the adhesive sticks properly.
Step 3: Cut and Prepare the Patch
Measure and Cut the Patch
Start by measuring the damaged area carefully with a ruler. Cut a patch that’s 1 to 2 inches larger than the tear on all sides. Then, shape the edges into a smooth circle or oval to prevent snagging and ensure a better seal. This extra overlap is crucial for creating a solid, durable bond.
Always aim for rounded edges. If you’re using a rectangular piece of vinyl, trim the corners into smooth curves with about a 1-inch radius. Sharp corners are more prone to catching on clothing or other objects, which can cause the patch to peel off prematurely. Rounded edges, on the other hand, help distribute stress evenly along the patch, which is especially important for inflatables under constant air pressure.
Match the Patch Material
For the best results, choose a patch made from heavy-duty vinyl that matches the material of your inflatable. Using the right patch kit ensures compatibility with your equipment and makes the repair more effective.
"Make sure you get the ‘Type A’ [Tear-Aid] that is specifically designed for repairing vinyl inflatables." – Bounce Insider
Before applying the patch, clean it thoroughly with rubbing alcohol to remove any oils left from handling. Once your patch is cut, cleaned, and matched to the material, you’re ready to prepare the adhesive for the next step.
Step 4: Apply Adhesive and Attach the Patch
Apply the Adhesive
Start by spreading a thin, even layer of vinyl cement – such as HH-66 or SX-69 – on both the patch and the area around the tear. Let the adhesive sit for about 30 seconds to 2 minutes until it feels tacky. A lighter coat works better than a thick one, as it creates a stronger bond.
Once the adhesive reaches the right consistency, you’ll need to act quickly since vinyl cement dries fast. If you’re using heat-sensitive adhesives or TPU tape, you can gently warm the area with a hairdryer to help improve the bond.
Attach and Press the Patch
When the adhesive is ready, attach the patch without delay. Start pressing it down firmly from the center, working outward to push out any air bubbles or creases. For an even application, use a seam roller to apply pressure across the entire patch. If you don’t have a seam roller, a credit card or even a rolling pin from your kitchen can do the trick.
Once the patch is secured, carefully check the edges. If you notice any lifting, apply a small amount of adhesive to that area and press it down again. To ensure the patch adheres properly, place a heavy object – like a large pot filled with water – on top of the repair. Just remember to put a piece of wax paper between the patch and the weight to keep them from sticking together.
Step 5: Cure and Test the Repair
Allow Curing Time
Once the patch is securely in place, the next step is to let the adhesive fully cure before testing the repair. Do not inflate the bounce house during this time. Allow at least 24 hours for the adhesive to set completely, ensuring the patch holds firmly and the repair is durable. To help the patch stay in place, put a weighted object on it, separated by a layer of wax paper, for the full curing period.
"Once applied, press firmly on both sides of fabric until secure and leave aside for at least 24 hours before using again." – XJUMP
Keep the bounce house in a dry, stable environment during this time. Avoid exposing it to direct sunlight or extreme temperatures, as these conditions can interfere with the curing process. If you’re using TPU tape instead of vinyl cement, follow the specific curing instructions provided by the manufacturer, as the required time may differ.
Test for Leaks
After the adhesive has cured, it’s time to check the repair. Inflate the bounce house and carefully inspect the patched area for any signs of air leakage. A simple way to do this is to spray a soapy solution on the patch and watch for bubbles, which indicate escaping air . You can also run your hand over the patch to feel for air escaping or listen closely for any hissing sounds.
Pay close attention to the edges of the patch. If you notice any part lifting or peeling, apply more adhesive and press the patch down firmly again before using the bounce house .
If the bubble test reveals a leak, deflate the bounce house and clean the area thoroughly with rubbing alcohol to remove any leftover adhesive. Then, repeat the patching process . A properly repaired patch will show no bubbles, no hissing, and should feel firm and fully sealed once inflated.
Maintenance Tips to Prevent Future Tears
Once you’ve repaired your bounce house, regular upkeep is key to keeping it in great shape for years to come.
Regular Inspections
Check your bounce house after every use to spot small issues before they turn into costly problems. A quick post-event inspection can save you a lot of trouble down the line. For bounce houses used frequently, plan a more detailed inspection every few months.
Fully inflate the bounce house and examine seams and surfaces for leaks. Run your hand along the seams and high-wear areas to feel for escaping air. In a quiet space, like a garage, briefly turn off the blower and listen for hissing sounds – this can help you pinpoint tiny leaks. To confirm a suspected leak, use a soapy water solution; escaping air will form visible bubbles.
During inspections, focus on loose seams, faded colors, and damaged netting. Look for areas that seem underinflated or saggy compared to the rest of the structure. Cleaning the unit beforehand can help uncover hidden wear or small punctures by removing dirt and sand that might obscure damage.
Once inspections are complete, proper usage can further reduce the chances of damage.
Proper Usage and Anchoring
Choose the right setup location to protect your bounce house. A soft, grassy area is ideal, but always clear the space of sticks, rocks, or other debris before inflating the unit. Using a tarp under the bounce house can help prevent friction damage.
Avoid placing the unit under low-hanging branches that could snag or tear the material. Enforce a no-shoes policy and keep sharp objects away – these are common causes of punctures. Stick to the weight limits and ensure that older kids or teens don’t use inflatables designed for toddlers. Too much weight can strain seams and cause structural issues.
Keep Repair Kits on Hand
Having a repair kit ready can make all the difference when minor damage occurs. Stock your kit with essentials like vinyl cement (e.g., HH-66 or SX-69), vinyl patches in various colors, rubbing alcohol for cleaning surfaces, sharp scissors, and a silicone seam roller. With these tools, you’ll be prepared to handle small repairs quickly.
For temporary fixes, keep TPU tape or Tear Aid (Type B) handy. These allow you to patch minor tears on the spot, so the fun doesn’t have to stop. You can always make a permanent repair later. A small bottle of dish soap is also useful for spotting leaks – just mix it with water and look for bubbles.
When storing your bounce house, make sure it’s completely dry and packed in a heavy-duty bag. Store it in a cool, dry place to avoid mold and protect it from pests. Proper storage can significantly extend the life of your inflatable.
Conclusion
Fixing a bounce house doesn’t have to be complicated. Follow these five steps: deflate the inflatable and locate the tear, clean and dry the area, cut a rounded patch, apply adhesive to both surfaces, and let it cure fully before testing. These steps not only restore functionality but also ensure the safety and durability of your inflatable.
Addressing repairs promptly is crucial. As XJUMP explains, "If not fixed quickly, it can lead to further damage and even injury". A small puncture can quickly grow into a major issue if ignored. Regular checks and quick fixes can save you from costly replacements down the line.
DIY repair kits are affordable, typically costing between $10 and $30. Early detection of tears can prevent your bounce house from becoming unusable. Make it a habit to inspect your inflatable after each use – it’s a simple step that can save you money and hassle.
For high-quality inflatables and repair kits, check out Bouncy Rentals. Their fully insured and thoroughly sanitized equipment ensures safety and reliability. By practicing proper maintenance and repairs, you can extend the life of your inflatable and protect your investment.
FAQs
What’s the best vinyl adhesive for repairing bounce house tears?
If you’re looking to repair tears in a bounce house, HH-66 Vinyl Cement is your go-to solution. This industrial-grade adhesive forms a tough, long-lasting bond while staying flexible, making it perfect for inflatables. Plus, it holds up well against weather, heat, and everyday wear, ensuring your repair lasts.
To get the best outcome, make sure the surface is clean and completely dry before applying the adhesive. Follow the product instructions step by step for a solid and secure fix.
How do I check for leaks after fixing a tear in a bounce house?
To ensure your bounce house repair is successful, start by fully inflating it and listening closely for any hissing sounds that might signal escaping air. Another effective method is to apply a soapy water mixture to the patched area – if bubbles form, you’ve found a leak.
If you spot air escaping or see bubbles, reinforce the patch or reapply it for a tighter seal. Take the time to inspect the entire surface to confirm there are no other leaks lurking elsewhere.
How can I tell if my bounce house needs professional repair?
If your bounce house has large tears, separated seams, or extensive punctures that basic patch kits can’t handle, it’s probably time to call in a professional. Another red flag is rapid air loss, even after you’ve tried to locate and fix small leaks, or damage in spots that are tricky – or unsafe – to repair on your own.
Other issues to watch for include persistent leaks, damage caused by sharp objects, or noticeable wear and tear that could affect the inflatable’s overall structure. Tackling these problems early ensures the bounce house stays safe, durable, and ready for endless fun!