Setting up a bounce house indoors is a smart way to ensure fun regardless of weather or outdoor conditions. Here’s what you need to know:
- Space Requirements: Measure your room carefully. You’ll need to meet specific space requirements for indoor and outdoor bounce houses, including at least 12–15 feet of ceiling clearance and a 3–6 foot safety buffer.
- Flooring: Carpeted floors are ideal. For hard surfaces like tile or concrete, use rubber mats or foam padding to prevent sliding and protect the floor.
- Power Source: Ensure a grounded outlet is within 100 feet. Use a heavy-duty extension cord if needed, and keep cords out of walkways.
- Anchoring: Use sandbags or water weights to secure the bounce house since indoor setups can’t use ground stakes.
- Safety Checks: Inspect the inflatable for damage, ensure seams and zippers are secure, and keep the blower’s air intake clear.
Checking Your Indoor Space
Indoor Bounce House Size Requirements and Space Planning Guide
Before you even think about unpacking a bounce house, take a moment to measure your indoor space. Ensuring it fits through the doorway and leaves enough headroom can save you from a lot of headaches.
Measuring Ceiling Height and Floor Space
Start by checking your ceiling height. Most indoor bounce houses require at least 12 to 15 feet of clearance, but bounce house vs. combo units or inflatable slides might need 18 feet or more. This is crucial because the bouncing surface is typically raised 18 inches to 2 feet off the ground, and kids can jump an additional foot or two.
"A typical unit’s bouncing surface is about eighteen inches to two feet off the ground, and kids will usually jump another foot or two off of the surface. Even if the unit itself fits, make sure nobody will be hitting their heads on the ceiling when they jump." – Zeke Netzel, Parent Advice Expert
Watch out for ceiling fans, light fixtures, or exposed beams that could limit your usable height. For larger spaces like gyms, a laser measuring tool can provide precise dimensions.
Next, measure your floor space. Small bounce houses usually range from 8 feet by 8 feet to 10 feet by 10 feet, while medium ones measure around 15 feet by 15 feet. But don’t forget the safety buffer – leave at least 3 feet of clearance on all sides, or 6 feet for commercial-grade setups.
"Leave at least six feet of clear space around all sides of your rent grade commercial water slides or other attractions. This gives users room to get on and off safely and prevents collisions with nearby objects." – JumpOrange Marketing Team
Also, plan for entry and exit zones where kids will climb in and out.
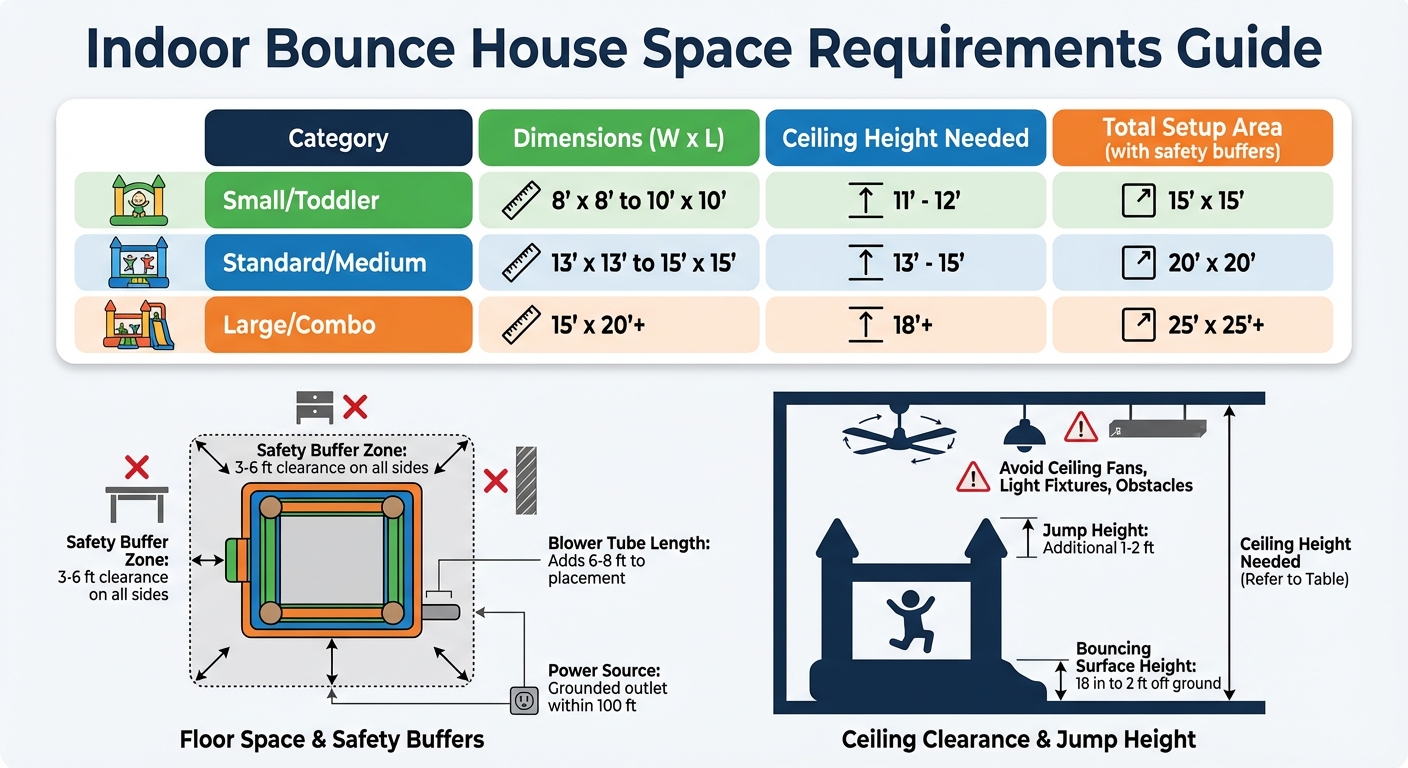
| Bounce House Category | Typical Dimensions (W x L) | Recommended Ceiling Height | Minimum Setup Area (with Buffers) |
|---|---|---|---|
| Small / Toddler | 8′ x 8′ to 10′ x 10′ | 11′ – 12′ | 15′ x 15′ |
| Standard / Medium | 13′ x 13′ to 15′ x 15′ | 13′ – 15′ | 20′ x 20′ |
| Large / Combo | 15′ x 20’+ | 18’+ | 25′ x 25’+ |
Once you’ve confirmed the dimensions, take a closer look at the floor to ensure it’s suitable for safe play.
Checking Your Floor Type
The type of flooring you have can make a big difference in both safety and stability. The surface must be completely flat and level – any slopes or uneven areas could cause the bounce house to shift or tip during use.
For indoor setups, carpeted floors work best. They naturally provide friction to keep the bounce house stable and help absorb noise from the blower. On hardwood, tile, or concrete, you’ll need to add protective rubber mats or foam tiles underneath. These not only prevent the bounce house from sliding but also protect your floors from scratches.
"A non-slip floor surface, such as carpet or rubber matting, can help with stability." – Hero Kiddo Inflatables
Before setting up, sweep or vacuum the floor thoroughly. Small debris like pebbles or toys can puncture the vinyl under the weight of the inflated structure. Concrete floors, in particular, are abrasive and require heavy-duty tarps or thick padding to prevent wear and tear.
Once you’ve ensured the space and surface are ready, the next step is to check for a reliable power source.
Locating Power Outlets
Your bounce house blower will need a grounded power outlet within 100 feet of the setup area. Test the outlet beforehand to avoid mid-setup surprises.
Keep in mind that the blower’s air supply tube adds another 6 to 8 feet, so plan its placement carefully. Make sure the tube isn’t stretched too tightly, as this could restrict airflow or damage the connection. Position the blower away from foot traffic to reduce tripping hazards.
If the outlet is too far, use an extension cord – but make sure it’s neatly coiled and secured to prevent accidents. Ideally, connect the blower to a dedicated circuit to avoid overloading and tripping breakers. Finally, keep the area around the blower’s air intake clear of objects like curtains or toys that could block airflow.
Getting Ready for Setup
Taking the time to prepare properly ensures a safe and smooth setup process, aligning with the space and power considerations mentioned earlier. Once you’ve confirmed your area meets the necessary requirements, focus on clearing the space and gathering all the materials needed.
Clearing the Space
Start by removing any furniture, toys, or sharp objects from the setup area. Even small items can damage the inflatable vinyl when the unit is inflated.
Don’t forget to look up – secure or remove any hanging decorations, and check for low-hanging light fixtures or ceiling fans that could pose a risk. These overhead hazards are especially concerning when kids are jumping around.
Clean the floor thoroughly by sweeping or vacuuming to eliminate debris. If you’re setting up on hard surfaces like tile or wood, place rubber mats or foam padding underneath. This prevents the inflatable from sliding and provides extra cushioning at entry and exit points.
Create a designated no-go zone around the setup area to avoid interference. This step helps keep people from tripping over cords or getting in the way during inflation.
Once the area is prepped, you’re ready to gather your setup materials.
Collecting Setup Materials
Make sure you have everything needed before starting. For indoor setups where ground stakes aren’t an option, use weighted sandbags or water weights to anchor the bounce house securely. Most units require four anchor points, so plan accordingly.
Lay down tarps or protective mats under the inflatable – even on carpet – to shield both the floor and the bounce house material from unnecessary wear. If your outlet is more than 50 feet away, have a heavy-duty extension cord rated for the blower’s power needs. Place cords carefully to minimize tripping hazards.
Safety signage is a must to communicate age limits, capacity rules, and general bounce house guidelines. Additionally, consider using cones or ropes to establish a 6-foot safety perimeter around the inflatable. For post-event cleanup, keep mild soap, water, and brushes on hand.
Here’s a quick breakdown of the materials you’ll need:
| Material Category | Specific Items | Purpose |
|---|---|---|
| Anchoring | Sandbags, water weights, furniture anchors | Keeps the unit stable on indoor surfaces |
| Floor Protection | Tarps, rubber mats, foam padding | Shields floors and prevents sliding |
| Power Supply | Air blower, heavy-duty extension cords | Ensures consistent air pressure |
| Safety Equipment | Cones, ropes, safety signage, netting | Sets boundaries and enforces safety rules |
These items will help you secure and protect the bounce house while making the setup process more efficient.
If this feels like a lot to manage, you might want to check out Bouncy Rentals USA. Their rentals come pre-sanitized, fully insured, and include all the necessary setup materials. Plus, their team of professionals handles delivery and setup, so you can focus on enjoying the event rather than worrying about logistics.
With your space cleared and materials ready, you’re all set to inspect and inflate the bounce house.
Setting Up Your Bounce House
Getting a bounce house ready for use isn’t just about plugging in the blower and letting it inflate. It’s a step-by-step process that ensures the unit is safe, secure, and ready for hours of fun.
Inspecting the Bounce House
Before you even think about inflating the bounce house, spread it out on a tarp and give it a thorough inspection. Look closely at every seam – loose stitching or separated seams are red flags that the unit might not be safe. Check for tears, holes, or any thinning areas in the material that could weaken the structure.
Make sure all zippers and air outlets are tightly closed. Check the safety netting for any holes or damage, and inspect the entrance and exit flaps to ensure they’re functioning properly. The blower tube should also be intact and able to form a snug, airtight seal with Velcro or zippers.
If the bounce house has been in storage, look for any signs of moisture, mold, or mildew. The material needs to be completely dry to avoid health risks. Finally, locate the manufacturer’s capacity label, usually stitched on the outside, to confirm the weight limits, age restrictions, and maximum occupancy.
| Inspection Component | What to Look For | Action if Found |
|---|---|---|
| Vinyl Surface | Tears, punctures, thinning material | Repair or do not inflate |
| Seams | Loose threads or gaps | Seek professional repair |
| Zippers/Outlets | Unzipped or open ports | Close and secure |
| Safety Netting | Holes or detachment | Repair before use |
| Blower Tube | Tears or weak connection | Secure or replace |
Once everything checks out, you’re ready to inflate the bounce house.
Inflating and Anchoring the Bounce House
Start by attaching the blower tube to the air inlet, ensuring it’s tightly sealed with the provided Velcro straps or zippers. Position the blower in a low-traffic area to prevent anyone from tripping over it, and keep the air intake free from obstructions like loose fabric or debris that could cause overheating.
Double-check the space above the bounce house to make sure there’s enough clearance for the fully inflated unit. Depending on the size of the inflatable and the blower’s power, inflation can take anywhere from 10 to 35 minutes.
If you’re setting up indoors, use weighted sandbags to secure the anchor points since ground stakes aren’t an option. Place these sandbags on the designated loops at each corner to keep the structure stable and prevent shifting during use.
"Always ensure the bounce house is adequately inflated before use. Under-inflated bounce houses can collapse, leading to injuries." – Hero Kiddo Inflatables
Once inflated, check for any “soft spots” by pressing on different areas. If you notice any sections that feel under-pressurized, it could indicate a leak or an issue with the blower that needs immediate attention.
Installing Safety Features
With the bounce house inflated and anchored, it’s time to add some final safety touches. Place thick rubber or foam mats at the entry and exit points to cushion hard floors and reduce the risk of slips or falls.
Set up safety signage near the entrance to clearly display rules like “no flips,” “no rough play,” and “no wall climbing.” Include weight and occupancy limits so parents can easily see them. To prevent collisions, create a buffer zone of 3 to 6 feet around the inflatable using cones or ropes.
Before letting kids in, test the stability by gently pushing on the walls to ensure the anchor points are holding firm. Double-check that the safety netting is secure and entrance flaps are working properly.
To avoid damage to the bounce house and reduce injury risks, create a designated area for shoes and have kids empty their pockets of sharp objects, crayons, or toys before entering.
"Inflatables aren’t baby sitters. Sometimes, people look at it that way… You should never leave an inflatable unsupervised." – Ted Amberg, CEO, Amberg Entertainment
With these steps complete, your bounce house is ready for action, ensuring a safe and fun environment for everyone involved.
Making the Most of Your Indoor Space
Arranging Furniture and Organizing Cords
To make the most of your indoor setup, start by moving furniture to the edges of the room. This clears central space and keeps hard surfaces out of reach for jumping kids. Aim to maintain a 6-foot safety buffer around all sides of the inflatable to avoid punctures from sharp furniture corners or decorative items.
Position the bounce house near a power outlet, ensuring the same 6-foot clearance from walls. This setup minimizes the length of exposed cords and reduces tripping hazards. Run extension cords along the baseboards for added safety. The team at JumpOrange recommends:
"Face the blower away from where people will be walking to prevent accidents".
Place the blower in a low-traffic corner so it won’t get kicked or tripped over. Keep the air intake free of toys, fabric, or debris to prevent overheating. To reinforce safety, you can use cones or ropes to mark the buffer zone.
Once your furniture is repositioned and cords are safely managed, you can compare bounce houses vs. indoor sports games to find the best fit for your available space.
Selecting the Right Size Bounce House
After optimizing your indoor area, choose a bounce house that matches the dimensions of your room. For example, a typical 13×13-foot bounce house requires a space of 17×17 to 20×20 feet to include the blower and safety buffer. This extra clearance is crucial, as the listed dimensions only account for the unit itself.
If you’re working with smaller spaces like playrooms or basements, compact models are a great option. Toddler-sized units, for instance, often measure around 8x8x5 feet or 11x9x7 feet and need about 14×14 feet of total space. These smaller designs are ideal for rooms with standard 8 to 10-foot ceilings. Bouncy Rentals USA offers indoor-friendly bounce houses that are specifically designed for residential spaces, with sanitized equipment delivered by their experienced team.
Before purchasing or renting, measure your room carefully. Don’t just consider the bounce house’s height – factor in the jumping surface height (typically 18 inches to 2 feet off the ground) and the added height of a child mid-jump (1 to 2 feet). Also, check for potential obstacles like ceiling fans, low-hanging light fixtures, or recessed lighting that could interfere with the inflatable.
Conclusion
Indoor bounce houses provide a reliable way to keep the fun going, no matter the weather. Before setting one up, make sure your space has at least 12 to 15 feet of vertical clearance and enough room for a 3 to 6-foot buffer zone on all sides for safe play. Use non-slip surfaces and secure the inflatable with weighted anchors, like sandbags, to keep it stable. A quick safety review before use is always a good idea.
Double-check the seams and netting for any signs of wear, and ensure the cords are positioned safely to avoid tripping hazards. Establish clear rules: no shoes, food, or sharp objects inside, and group children of similar age and size to minimize risks. These precautions are crucial, especially considering that bounce house–related injuries saw a dramatic rise of 1,500% between 1995 and 2010, with an average of 31 children treated daily in emergency departments in 2010 alone.
If you’d rather skip the hassle, renting from a trusted provider can make the process much easier. Companies like Bouncy Rentals USA offer indoor-friendly bounce houses made of durable, commercial-grade materials designed to resist punctures and deflation. Their rentals come sanitized, fully insured, and delivered by professionals who handle setup and safety checks – leaving you free to enjoy the event stress-free.
FAQs
Can I set up a bounce house in a room with 8-foot ceilings?
A room with 8-foot ceilings is generally not suitable for setting up a bounce house. Most bounce houses range from 5 to 8 feet in height, and they require additional clearance to accommodate jumping and the air supply tubes. Without enough overhead space, the setup could pose safety risks.
What extension cord should I use for the blower indoors?
For indoor use, it’s best to use a 12-gauge extension cord that’s no longer than 25 feet. A thicker gauge ensures steady power flow, preventing voltage drops that could harm the blower. Keeping the cord length under 25 feet also minimizes safety hazards and reduces the risk of equipment problems.
How do I keep an indoor bounce house from sliding?
To keep an indoor bounce house steady, use weighted sandbags or indoor anchors made specifically for smooth surfaces. Make sure the bounce house is placed on a flat surface and fully inflated, as this adds stability. Proper anchoring is especially important in larger areas like gyms or auditoriums to prevent any shifting. Following these steps ensures the bounce house remains secure and safe for use indoors.