Proper care for inflatables can save you money and extend their life. The biggest risks? Moisture, UV exposure, and damage during handling or transit. A detailed checklist ensures your equipment stays in top condition, avoiding issues like mold, mildew, and structural damage. Here’s what you need to know:
- Cleaning & Inspection: Remove debris, wash with mild soap, inspect for tears, and avoid harsh chemicals.
- Drying: Ensure inflatables are completely dry to prevent mold. Use towels, fans, or blowers.
- Folding & Packing: Use tarps, fold carefully to avoid creases, and store in breathable vinyl bags with labels.
- Storage Conditions: Maintain a climate-controlled space (50°F–77°F), avoid direct sunlight, and elevate items off the ground.
- Transportation: Secure inflatables with tie-down straps, use a dolly for movement, and monitor the load during transit.
- Post-Transport: Inspect for damage, dry any moisture, and prepare for use or storage.
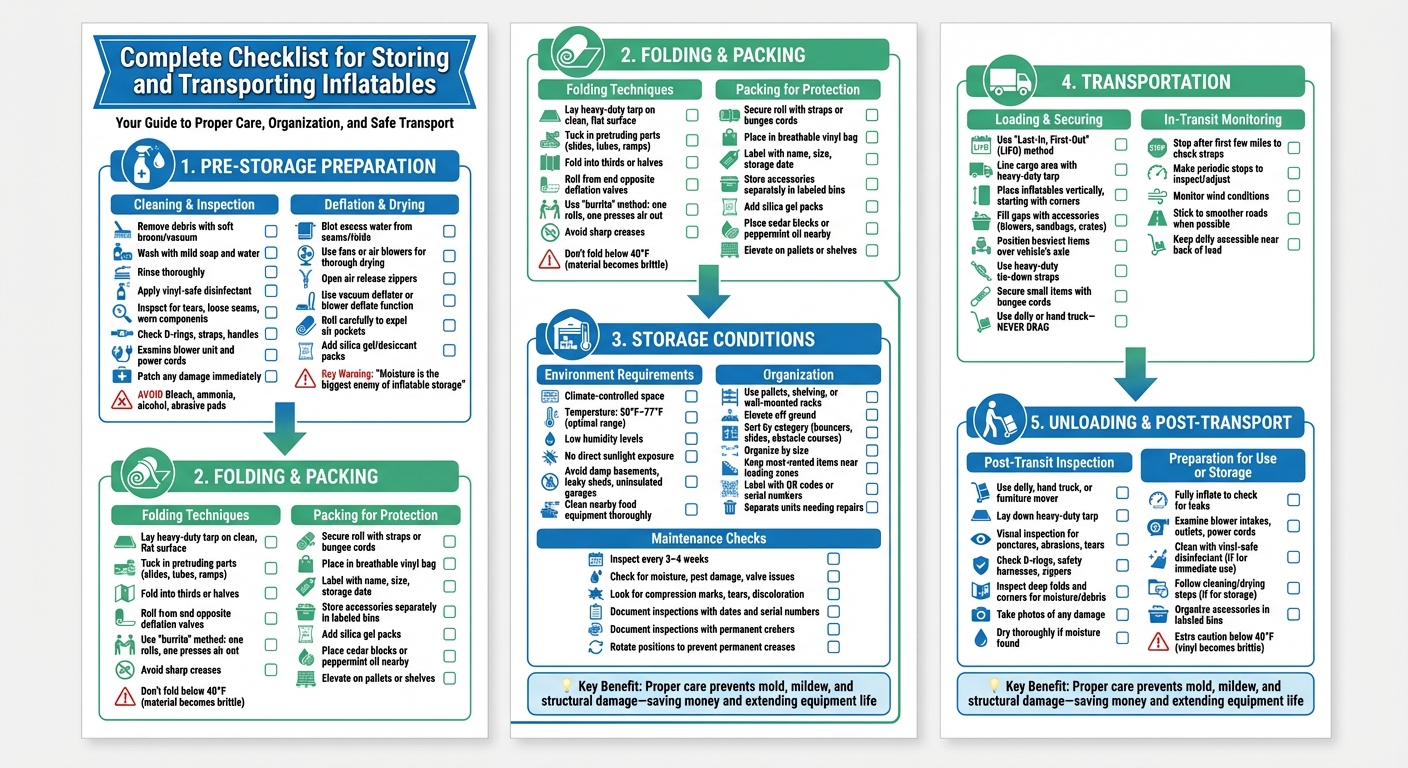
Complete Checklist for Storing and Transporting Inflatables
Pre-Storage Preparation Checklist
Cleaning and Inspection
Start by clearing away any visible debris like grass, leaves, dirt, or food residues using a soft broom or vacuum. Inflatables tend to collect grime in their folds and seams, so a thorough cleaning is key. Wash the entire unit with mild soap and water, using a soft cloth, sponge, or soft-bristle brush. Pay extra attention to high-contact areas such as entrances, steps, and slide surfaces. After washing, rinse everything thoroughly with clean water to prevent soap residue, which can lead to staining or attract more dirt. Once clean, apply a vinyl-safe disinfectant spray to kill bacteria and keep odors at bay.
Next, carefully inspect the inflated unit for any signs of wear and tear. Look for holes, loose seams, or worn-out components. Check D-rings, straps, and handles for any fraying or material fatigue. Don’t forget to examine the blower unit – clean the intakes and outlets, and inspect power cords for any damage. If you find any issues, decide whether to patch or replace the unit using a vinyl repair kit to avoid more extensive (and expensive) repairs down the line.
Avoid using harsh chemicals like bleach, ammonia, alcohol, or abrasive pads – these can degrade the vinyl’s protective coating and reduce the lifespan of your equipment.
Once cleaning and inspection are complete, move on to deflating and drying the unit to ensure it’s completely moisture-free before storing.
Deflation and Drying
Proper drying is critical because even a small amount of moisture can lead to mold and mildew. If you spot existing growth, you must clean the mold safely before proceeding. JumpOrange emphasizes this point:
"Moisture is the biggest enemy of inflatable storage."
Begin by blotting away any excess water from seams and folds with a towel or chamois. Use fans or air blowers to dry the unit thoroughly. Make sure no damp spots remain, especially in hidden folds or seams.
When deflating, open the zippers designed for air release and use a vacuum deflator or the blower’s deflate function to remove all trapped air. Roll the unit carefully to expel any remaining air pockets. Place it on a clean tarp during this process to avoid getting it dirty again. For added protection during long-term storage, consider adding silica gel or desiccant packs to the storage bag to absorb any lingering humidity.
Folding and Packing Checklist
Folding Techniques
Start with your inflatable completely dry and deflated – this is key to keeping it in good shape for storage and transport. Lay down a heavy-duty tarp on a clean, flat surface to stop dirt or moisture from sneaking in during the process. Tuck in any protruding parts, like slides, tubes, or ramps, to create a uniform shape. This step helps avoid awkward bulges when you roll it up.
Once you’ve got a neat rectangle, fold it into thirds or halves so it’s the right width for your storage bag. Then, roll it up starting from the end opposite the deflation valves. This method pushes out any leftover air and compacts the inflatable for easier storage. Rolling works better than traditional folding because, as Reservety explains:
Rolling an inflatable is recommended for smoother storage and fewer wrinkles.
For best results, try the "burrito" method: one person rolls slowly while another gently presses out any remaining air.
Be careful not to create tight or sharp creases. As Reservety points out:
Depending on the material, sharp creases can shorten the lifespan of your inflatables.
Folding the same way each time helps prevent new wrinkles from forming. If you’re working with a brand-new unit, consider filming the initial unfolding so you can use it as a guide for folding later. Also, avoid folding in temperatures below 40°F – cold conditions can make the material brittle.
Once you’ve folded and rolled the inflatable correctly, secure it for storage.
Packing for Protection
Packing your inflatable properly is just as important as folding it. Use sturdy straps or bungee cords to keep the roll secure before placing it in a heavy-duty, breathable vinyl bag. These bags shield your inflatable from dust, UV rays, and pests. Don’t forget to label the bag with the inflatable’s name, size, and storage date for easy identification.
Store accessories like stakes, blowers, and repair kits in separate, clearly labeled bins. This keeps sharp items away from the inflatable, reducing the risk of punctures. To deter pests, toss in silica gel packs and place cedar blocks or peppermint oil near the storage area. Always elevate packed inflatables on wooden pallets or shelves. This keeps them off cold concrete floors and away from moisture or spills.
Storage Conditions Checklist
Storage Environment
Inflatables need a climate-controlled space with temperatures between 50°F and 77°F. Vinyl becomes brittle when exposed to temperatures below 40°F, while high humidity encourages mold growth, which can permanently stain the material. Keeping humidity levels low is essential for avoiding moisture-related damage like mold and mildew.
Direct sunlight is another enemy of inflatables. It not only fades colors but also speeds up material degradation. As Matthew Lluis from Event Rental Systems explains:
Exposure to direct sunlight will fade the appearance of your inflatables and can also speed up the material’s degradation.
Avoid storing inflatables in damp basements, leaky sheds, or uninsulated garages. If you’re storing food concession equipment – like popcorn or cotton candy machines – nearby, make sure they’re thoroughly cleaned first. Leftover food can attract pests that might chew through your inflatables.
Once the storage environment is set, the next step is organizing your equipment to maximize protection and efficiency.
Storage Organization
A well-organized storage system not only saves time but also helps prevent damage. Use pallets, industrial shelving, or wall-mounted racks to elevate inflatables off the ground. Ground-level storage increases the risk of condensation damage and rodent infestations. Reservety highlights this risk:
Mice and rats love to grind on vinyl products.
Start by sorting inflatables into categories like bouncers, slides, or obstacle courses, then organize them by size. Keep your most-rented items close to loading zones for easy access. Label storage bags with QR codes or serial numbers so you can identify contents without unrolling them. Separate any units requiring repairs from those ready for rental to avoid confusion. If space permits, hanging storage bags can provide added protection against pests and moisture.
Maintenance Checks
Regular maintenance is key to protecting your investment. Inspect inflatables every 3–4 weeks for signs of moisture, pest damage, valve issues, compression marks, tears, or discoloration. Document each inspection with dates and serial numbers to track recurring issues and maintain warranty coverage. Rotating the positions of stored units can help prevent permanent creases and ensure even air circulation throughout your storage space.
Transportation Loading and Monitoring Checklist
Loading and Securing
When planning your loading sequence, follow the "Last-In, First-Out" (LIFO) method. This means loading inflatables for the last drop-off first, so the equipment for your first stop is easily accessible near the rear door. To protect your vehicle’s cargo area, line it with a heavy-duty tarp before loading. Place dry inflatables vertically, starting with the corners to create a stable base.
To prevent movement during transit, fill any gaps between inflatables with accessories like blowers, sandbags, or crates. Magic Jump Inc. highlights the importance of this step:
Ensuring nothing is loose will keep your load safe and prevent accidents during transportation.
Position the heaviest inflatables over the vehicle’s axle to maintain balance and avoid trailer sway. Use heavy-duty tie-down straps to secure the load, and for convenience, lay the straps on the ground before rolling up the inflatable – this way, you won’t need to lift the heavy roll again once it’s in the truck. Smaller items like blowers and toolboxes should be secured with bungee cords to prevent them from shifting or damaging the vinyl during sudden stops. Always use a dolly or hand truck to move the inflatables to the vehicle – never drag them, as dragging can cause immediate tears in the material.
Once everything is secured, the next step is to monitor the load during transit to ensure ongoing safety.
In-Transit Monitoring
After securing your load, it’s crucial to keep an eye on it throughout the trip. Stop after the first few miles to check that straps are still tight, as the vinyl may settle. Continue to make periodic stops to inspect and adjust straps or protective covers as needed. Pay close attention to wind conditions – while inflatables shouldn’t be operated in winds over 15–20 mph, similar caution applies during transit. High winds can lift protective tarps, destabilizing your load.
Stick to smoother roads when possible, and always keep a dolly or hand truck easily accessible near the back of the load. This will make it easier to reorganize cargo if anything shifts mid-transit. These steps will help ensure your equipment arrives safely and in good condition.
Unloading and Post-Transport Checklist
Post-Transit Inspection
When you arrive at your destination, use tools like a dolly, hand truck, or furniture mover to minimize the risk of tears and scratches caused by friction. Before unloading, lay down a heavy-duty tarp on a clean surface to protect the inflatable. Then, conduct a thorough visual inspection for any signs of damage, such as punctures, abrasions, tears, or weakened seams.
Pay close attention to D-rings, safety harnesses, and zippers to ensure they are in good working condition. Reservety offers a key reminder about the importance of early damage detection:
"It’s better to fix damage when it’s small. Bigger damages may require costly repairs or make your inflatables unusable."
If you find any damage, take photos immediately for insurance purposes or maintenance records. Don’t forget to inspect deep folds and corners, as they can trap moisture, grass, and debris – potentially leading to mold. If you discover moisture, dry the inflatable thoroughly using towels or an air blower before moving on.
Once you’ve confirmed the inflatable’s condition, you can move on to preparing it for use or storage.
Preparation for Use or Storage
After completing the inspection, fully inflate the unit to check for leaks. While inflated, examine blower intakes, outlets, and power cords for any signs of damage or debris.
If the inflatable is going straight into use, clean the surface with a vinyl-safe disinfectant to ensure it’s ready for participants. For storage, follow the cleaning and drying steps outlined in the Pre-Storage Preparation Checklist. Organize accessories like blowers, extension cords, and stakes in labeled bins. This not only prevents loss but also reduces the risk of punctures during storage.
Be extra cautious when handling the inflatable in cold weather – vinyl can become brittle and crack when temperatures drop below 40°F. Proper care during these steps will help extend the life of your inflatable while keeping it safe and functional.
Conclusion
Having a thorough checklist is key to safeguarding your investment and ensuring your events go off without a hitch. It helps prevent issues like mold, mildew, and structural damage, which can lead to expensive repairs. Every step – whether it’s cleaning or proper transport – plays a part in maintaining your equipment. As Matthew Lluis, Content Marketer at Event Rental Systems, puts it:
The equipment you store away today is the same equipment you will be relying on when the rental calendar starts to fill up again next season.
Regular maintenance not only cuts down on repair costs by addressing small issues early but also keeps your inflatables clean and safe for customers. This attention to detail protects customer health and strengthens your reputation as a reliable professional. For more on maintaining high standards, follow our setup and takedown checklist.
FAQs
How can I tell if an inflatable is completely dry inside the folds?
To ensure an inflatable is completely dry, pay close attention to the folds, seams, and corners – these spots tend to trap moisture. Run your fingers over these areas to confirm they feel dry. After air drying, check for any signs of dampness or a cool sensation on the material. If you detect even a hint of moisture, it’s not fully dry yet, and leaving it that way could lead to mold growth or damage over time.
What’s the safest way to transport inflatables in a pickup or trailer?
When transporting inflatables in a pickup truck or trailer, careful planning is key. Arrange your loading order so the last inflatable you need to deliver is loaded first – this makes unloading much easier. Use a dolly or hand truck to lift and move the inflatables safely, and position them vertically to keep them stable during transit. Secure everything tightly with straps or bungee cords to prevent shifting. If you’re using a trailer, aim to distribute about 60% of the weight toward the front for better balance. Drive carefully to avoid sudden movements that could cause damage or displacement.
How should I store inflatables if my storage space isn’t climate-controlled?
To keep inflatables safe in non-climate-controlled storage, start by making sure they’re thoroughly cleaned and completely dry. This helps avoid mold and mildew. Place them in a sturdy bag or container to protect against dirt, dust, and pests. Store them in a cool, dry spot like a garage or basement, away from any sources of moisture. Be sure to deflate them fully, fold them neatly, and pack them carefully to minimize bulk and protect the material.