Inflatable rentals like bounce houses and water slides are fun, but keeping them clean is critical for safety and durability. Germs, dirt, and moisture can turn these surfaces into health hazards and damage the equipment over time. Proper cleaning protects users, extends the life of your inflatables, and maintains your reputation. Here’s a quick breakdown:
- Why Clean? Prevents the spread of bacteria and viruses, protects vinyl from damage, and ensures customer safety.
- Key Steps: Remove debris, wash with soap and water, disinfect with EPA-approved products using a sanitization checklist, and thoroughly dry to avoid mold.
- Tools Needed: Soft brushes, microfiber rags, shop vacuums, air blowers, and disinfectants like Simple Green d Pro 5.
- Storage Tips: Always dry completely, store in a cool, dry space, and use breathable bags to prevent mold and pests.
- Maintenance: Inspect regularly for damage, clean blowers, and keep a log to track cleaning and repairs.
Cleaning inflatables is more than just wiping them down – it’s about ensuring they’re safe, hygienic, and ready for the next event.
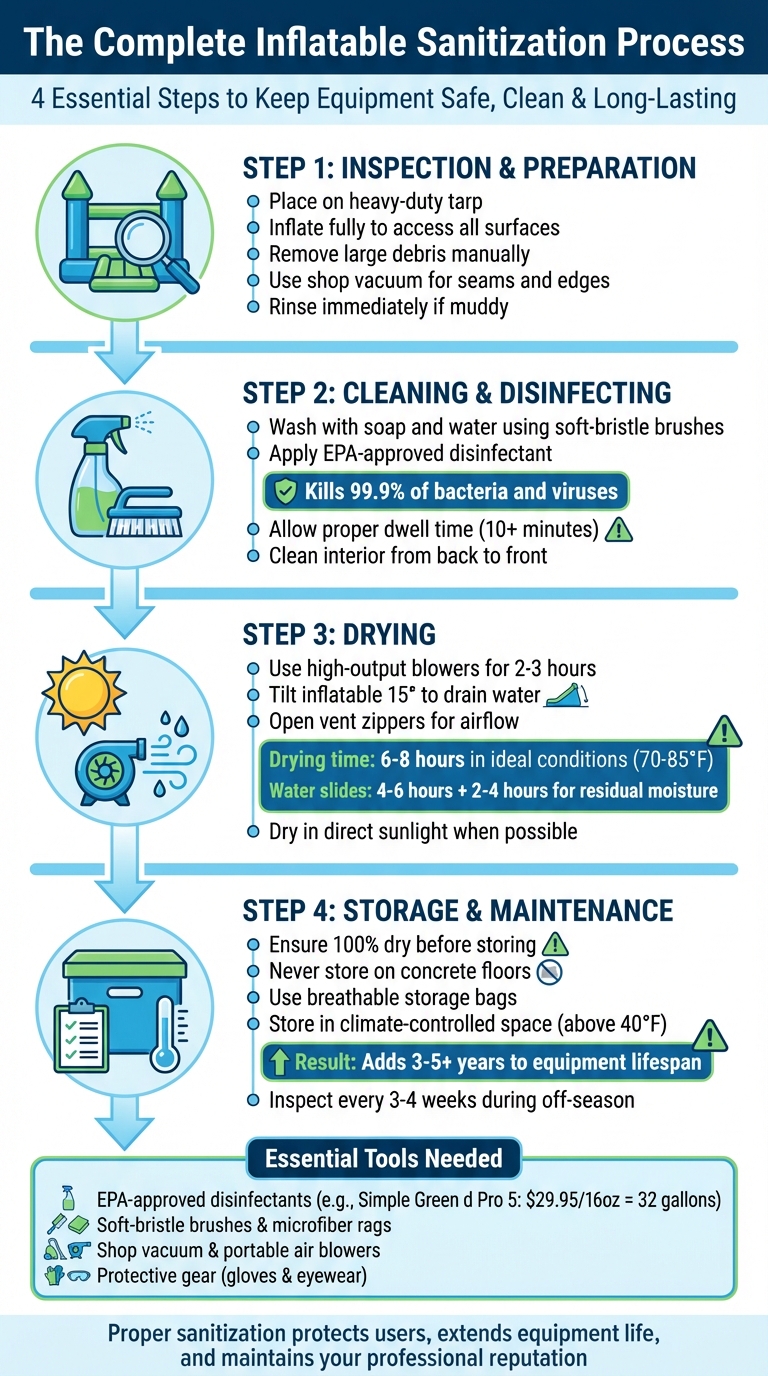
Complete Inflatable Sanitization Process: 4 Essential Steps
Tools and Supplies Needed for Cleaning
Having the right supplies makes cleaning more efficient and ensures your inflatables stay in great condition. You don’t need a massive collection – just a few essential products that are both safe for vinyl and effective against germs. Here’s what you’ll need.
Required Cleaning Supplies
Start with EPA-approved, bleach-free disinfectants specifically made for inflatables. A great option is Simple Green d Pro 5, which kills 99.9% of germs. According to Magic Jump Inc.:
Simple Green d Pro 5 has demonstrated effectiveness against viruses similar to SARS-CoV-2 on hard, non-porous surfaces.
A 16-oz bottle of this concentrated disinfectant costs about $29.95 and can be diluted to make 32 gallons of cleaning solution. Alternatively, an organic concentrated cleaner is priced around $18.95 for a 16-oz bottle. If you prefer using bleach for tougher jobs, mix it in a 1:10 ratio (1 part bleach to 10 parts water) and keep the pH between 7 and 9. Exceeding a pH of 10 can damage vinyl surfaces [11, 12].
You’ll also need a few basic tools: soft-bristle brushes for gentle scrubbing, microfiber rags for wiping, and rubber gloves with protective eyewear for handling chemicals safely [1, 12]. To ensure disinfectants work properly, let the solution sit on surfaces for at least 10 minutes before wiping. For water slides, applying a fast-drying, non-sticky lubricant after cleaning can help maintain their slippery surface [5, 6].
Additional Tools for Faster Cleaning
To speed up the cleaning process, consider adding a few specialized tools. Shop vacuums are excellent for removing dry debris from seams and corners before wet cleaning. For more stubborn dirt, like mud or outdoor grime, a pressure washer can help – just keep the nozzle at a safe distance to avoid forcing water into seams or damaging the vinyl.
Drying inflatables can be time-consuming, but portable air blowers can cut down drying time significantly. For larger water slides, combine manual wiping with air circulation. Keep the blower running with zipper flaps partially open to increase airflow through the internal baffles. Typically, commercial water slides need 4 to 6 hours to dry, with an additional 2 to 4 hours for any remaining moisture to evaporate.
For quick touch-ups, use Arrow 150, a CDC-approved no-rinse sanitizer that’s safe to apply right before guests arrive. Before storing your inflatables long-term, dust them with talc-free anti-sticking powder. This prevents vinyl surfaces from sticking together, which can trap moisture and lead to mold growth. To avoid residue and ensure the best results, complete all cleaning steps before moving on to storage. Following a consistent process for cleaning bounce houses ensures no spots are missed.
Step-by-Step Cleaning Process
Once your cleaning supplies are gathered, follow this process to make sure every part of your inflatable is clean and sanitized.
Inspection and Preparation
Start by placing the inflatable on a heavy-duty tarp to protect its underside. Inflate it fully to access all surfaces, seams, and crevices. Walk around the unit and manually remove large debris like trash, candy wrappers, or leaves. For finer debris caught in seams or edges, use a shop vacuum – it’s more efficient than a leaf blower, which might just scatter the debris or release exhaust fumes.
If the inflatable is muddy, rinse it with a water hose immediately to prevent the mud from hardening. If it’s returned wet, let it air dry completely before cleaning to avoid trapping moisture. As 3 Monkeys Inflatables notes:
Ensuring the surface is clear before sanitizing allows us to disinfect more effectively.
Avoid dragging the inflatable to prevent tears in the vinyl. Once it’s cleared and prepped, you’re ready to clean and sanitize.
Cleaning and Disinfecting
After removing debris, wash the inflatable with soap and water to remove dirt that could block disinfectants from working properly. Use soft-bristle brushes or sponges with a non-toxic, biodegradable soap to scrub the surfaces. Avoid power washers, as their high pressure can damage the vinyl and seams. For water-based stains like juice, warm water with mild dish soap works well. For grease or oil-based stains, use a degreasing cleaner.
Once the unit is clean, apply an EPA-approved disinfectant. Make sure the disinfectant stays on the surface for the recommended dwell time to kill 99.9% of bacteria and viruses. As David Hansen from Channal Inflatables emphasizes:
A vital process for effectively killing germs is to make the thing… wet, and leave the disinfectant on the treated surface for some amount of time.
When disinfecting the interior, clean from the back to the front to avoid re-contaminating already cleaned areas.
Drying and Final Steps
Drying is just as important as cleaning. Thoroughly dry the inflatable to prevent mold growth. Use high-output blowers for 2 to 3 hours to remove most surface moisture. To speed up the process, tilt the inflatable slightly (about 15°) so water drains toward the zippers and outlet tubes. Open vent zippers and inspect inside the air chambers, as moisture can linger there even if the surface feels dry. Use towels to dry tricky spots like triple-stitched seams, Velcro, and under slide liners.
Whenever possible, dry the inflatable in direct sunlight, which speeds up drying and offers natural antimicrobial benefits. In ideal conditions (70–85°F), professional drying takes about 6 to 8 hours. Once it’s completely dry, you can apply a fast-drying, non-sticky lubricant to slide surfaces to keep them functional. As MyADAcademy warns:
Mold is the silent, slimy destroyer of bounce houses… When inflatables sit wet for too long, mold doesn’t just grow – it thrives.
Before storing, do one last moisture check, especially around vent areas, to ensure the inflatable is completely dry before folding and storing the unit.
Storage and Maintenance After Cleaning
How to Store Inflatables Correctly
After cleaning and drying your inflatables thoroughly, proper storage is key to keeping them in great shape for future use. Once the inflatable is completely dry, never store it directly on concrete floors. Concrete tends to absorb and release moisture, which can seep into the vinyl and lead to mold. Instead, opt for pallets, wooden stands, or metal shelving to elevate the equipment and allow airflow underneath.
For long-term storage, roll the inflatables carefully to avoid stress points and creases. Before rolling, use a vacuum deflator to remove all the air, making the unit flatter and easier to pack tightly. Double-check all seams, straps, and crevices to ensure they’re completely dry before storing.
Choose a cool, dry, climate-controlled space for storage, where temperatures stay above 40°F. Extreme heat can weaken the material, while freezing temperatures can cause cracks in the vinyl. Avoid areas with high humidity, like damp basements or uninsulated sheds, as these conditions encourage mildew. As Pogo Bounce House emphasizes:
Moisture is your biggest enemy when storing a bounce house or other inflatable.
Use breathable mesh or the original storage bags to allow airflow, and avoid airtight containers. To protect against rodents, consider placing cedar blocks, peppermint oil sachets, or dryer sheets in the storage area. Keep accessories like blowers, stakes, and extension cords in separate, labeled bins to prevent metal parts from damaging the vinyl. Lubricate zippers and closures with recommended products before storage to prevent sticking or corrosion during downtime.
By storing your inflatables correctly, you set the stage for easier maintenance and reliable performance when they’re needed again.
Regular Maintenance and Inspections
Once your inflatables are stored properly, regular maintenance becomes essential to catch small issues early and maximize their lifespan. Routine inspections can prevent costly repairs by addressing minor problems before they escalate. During the off-season, check stored equipment every 3 to 4 weeks for signs of pest damage, roof leaks, or moisture buildup. Rotate the position of stored units occasionally to prevent compression marks and ensure even ventilation.
Before the busy season kicks off, inflate and test each unit. Look for leaks, blower issues, or any damage to high-stress areas like D-rings, anchor points, and straps. Address small holes or loose seams immediately, as they’re easier to fix when caught early. Also, clean blower filters regularly and inspect power cords for wear or exposed wiring.
Keeping a digital log or inventory system can streamline maintenance. Record details like cleaning dates, repairs, and inspections to ensure no unit is overlooked. This system also helps you identify which inflatables might need attention before they’re rented out. As Matthew Lluis from Event Rental Systems explains:
Investing time in smart storage now will pay off in fewer repairs, longer equipment life, smoother operations, and a more professional presentation when your busy season returns.
Conclusion
Inflatable sanitization plays a key role in keeping users safe and healthy. By using EPA-approved disinfectants, ensuring thorough drying, and storing equipment properly, you can prevent illnesses while also extending the lifespan of your inflatables. As 3 Monkeys Inflatables explains:
Cleaning and sanitizing bounce houses aren’t just about appearance – it’s about safety and health.
But sanitization is just the start. Regular maintenance is equally important. Taking care of your inflatables helps protect your investment by preventing dirt and debris from wearing down the vinyl. Simple steps like vacuuming before cleaning, checking for damage, and storing units in climate-controlled spaces can add an extra 3 to 5 years – or more – to their lifespan. This means fewer repairs, lower replacement costs, and dependable equipment when your peak season hits.
FAQs
How often should inflatables be sanitized?
Inflatables need to be cleaned and sanitized after every use to keep them safe, stop germs from spreading, and preserve their condition. Consistent cleaning not only safeguards users but also helps the equipment last longer.
What disinfectants are safe for vinyl inflatables?
When it comes to cleaning vinyl inflatables, hospital-grade disinfectants like Simple Green Pro D 5 and Simple Green Pro D 3 are reliable options. They’re effective at disinfecting while being safe for the material – as long as you follow the manufacturer’s instructions carefully. Proper use ensures thorough cleaning without risking damage to the vinyl.
How can I tell an inflatable is fully dry before storage?
To prepare an inflatable for storage, make sure it’s completely dry. Check every surface, seam, and crevice for any lingering moisture. You can use fans or air blowers to speed up the drying process. The inflatable should feel entirely dry to the touch – no damp areas at all. This step is crucial to avoid mold, mildew, or damage to the material, particularly if it won’t be used again within the next day.