Setting up sports inflatables can be safe and hassle-free if you follow the right steps. Whether you are looking for the ultimate guide to inflatable obstacle course rentals or simple backyard games, preparation is key. A proper setup prevents injuries, ensures durability, and creates a fun experience for everyone, making them some of the best inflatable games for team building events. Here are the 5 essential tips:
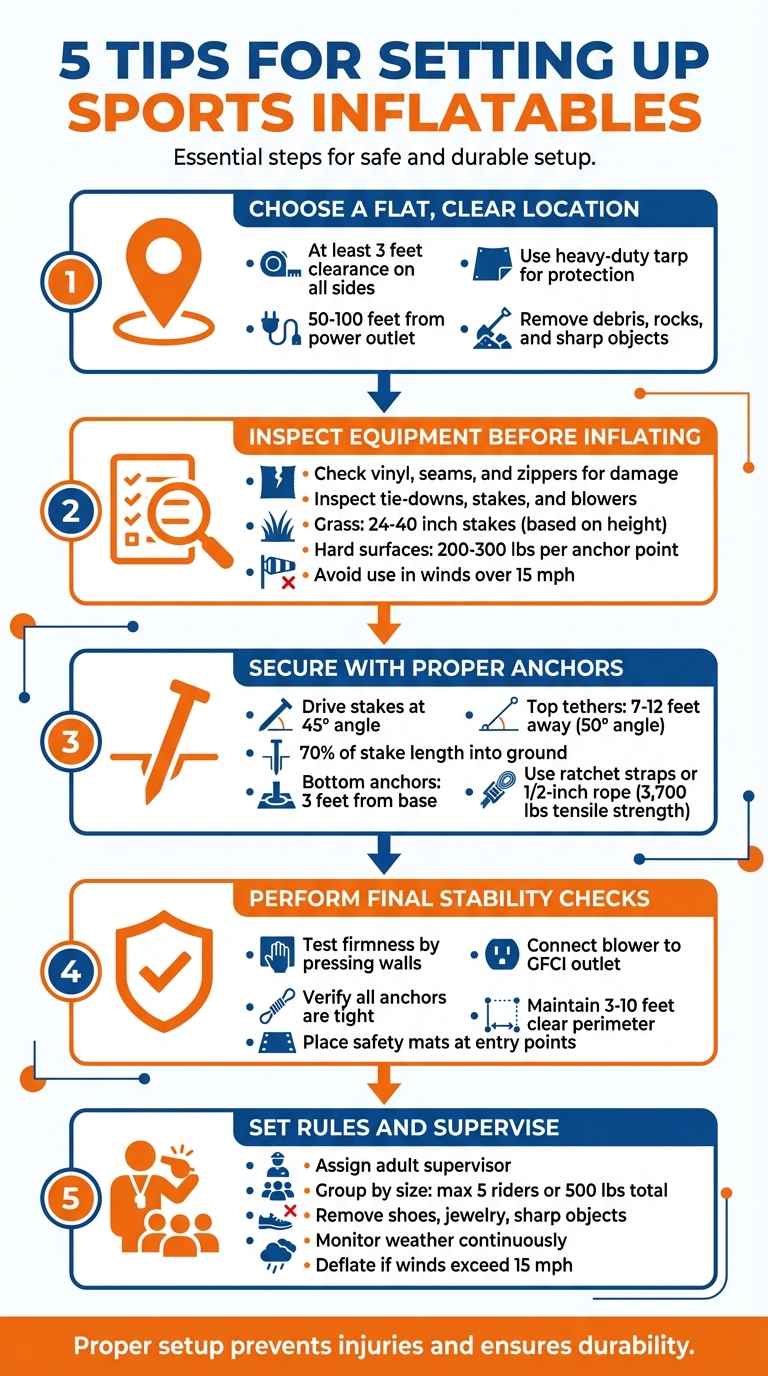
- Choose a Flat, Clear Location: Pick a stable, debris-free area with at least 3 feet of clearance. Use a heavy-duty tarp to protect the inflatable and ensure proximity to a power outlet (50-100 feet).
- Inspect Equipment Before Inflating: Check for damage in the vinyl, seams, and zippers. Ensure tie-downs, stakes, and blowers are in good condition. Avoid use in winds over 15 mph or bad weather.
- Secure with Proper Anchors: Use sturdy stakes for grass or sandbags for hard surfaces. Drive stakes at a 45° angle and ensure all anchors are tight to prevent shifting.
- Perform Final Stability Checks: Test the inflatable for firmness, secure all anchors, and place safety mats at entry points. Ensure the blower is connected to a GFCI outlet.
- Set Rules and Supervise: Assign an adult supervisor to enforce safety rules, monitor weather, and ensure proper usage. Group participants by size and remove sharp objects before entry.
5 Essential Steps for Safe Sports Inflatable Setup
1. Choose a Flat, Clear Setup Location
Setting up an inflatable safely starts with selecting a flat, stable area. Grass, pavement, or indoor flooring are all good options, but steer clear of uneven surfaces like sand or mulch, as these can cause the inflatable to shift or tip over. Before you begin, thoroughly check the area and remove any rocks, sticks, toys, lawn furniture, or sharp objects that could damage the vinyl.
Leave at least 3 feet of clearance on all sides and above the inflatable. Watch out for potential hazards like power lines or tree branches. To ensure you have enough space, use a tape measure to confirm how much space the inflatable needs including the required buffer.
Make sure the setup spot is between 50 and 100 feet from a dedicated 110- or 120-volt power outlet. If you need to use an extension cord, keep it under 50 feet and opt for a 12-gauge cord to handle the power safely. For water-based inflatables, ensure there’s easy access to a standard garden hose connection. Place the blower in a way that its cord doesn’t cross any walkways to prevent tripping hazards.
Always lay down a heavy-duty tarp before setting up the inflatable. This helps protect the vinyl from wear and tear, especially on abrasive surfaces like concrete or asphalt. On grass, a tarp is still essential, but also check with your local utility locator to avoid hitting underground lines when staking the inflatable.
Once you’ve prepared a level, clear area and placed the tarp, inspect your equipment thoroughly before inflating it.
2. Inspect Equipment Before Inflating
Before inflating, it’s crucial to carefully inspect all equipment to avoid potential issues. Start by laying the inflatable flat on the tarp and checking for punctures, tears, or any damage to the vinyl. Pay close attention to seams, stitching, and bonded areas, as these are more likely to experience wear and tear. Examine the mesh panels, netting, and zippers to ensure they are in good condition and functioning properly. Make sure all deflation zippers are fully closed and secured before proceeding.
"Check vinyl, seams, mesh, netting, and zippers for punctures, tears, or damage." – Blaine Ladd, BounceWave Slide Sales
Next, inspect and arrange all tie-down rings, ropes, straps, stakes, or sandbags. Frayed ropes or damaged straps can fail under tension, so replacing any weakened components is essential. This step ensures the inflatable can be securely anchored once it’s upright.
For setups on grass, use stakes that are at least 24 inches long for inflatables under 15 feet tall, and 40-inch stakes for taller units. On hard surfaces like concrete or asphalt, secure the inflatable with sandbags or weights that provide 200–300 lbs of pressure per anchor point.
Before inflating, double-check your blower and electrical setup. Ensure the blower’s horsepower and airflow (CFM) match the inflatable’s requirements. Most commercial units need a blower rated between 1 and 3 HP, with airflow ranging from 700 to 1,800 CFM. Inspect the blower for debris in the fan blades, and examine all cords and plugs for signs of fraying or damage. Confirm all electrical connections are secure, and make sure the inflation tube is straight and unobstructed to maintain proper airflow and avoid straining the blower.
Lastly, review the weather risks for bounce houses. If winds exceed 15 mph, or if there’s lightning, hail, or heavy rain, it’s unsafe to operate inflatables. In such conditions, it’s better to delay the setup until the weather improves.
3. Secure with Proper Stakes and Tie-Downs
Once you’ve confirmed your equipment is in good shape, the next step is anchoring it securely. Proper anchoring is key to keeping the inflatable stable and safe. The method you choose depends on the surface you’re working with. For grass or soil, use heavy-duty steel stakes sized as recommended earlier. On concrete, asphalt, or indoor surfaces, sandbags or water bags are your go-to options.
Before driving stakes into the ground, call 811 to check for underground utilities like gas, water, or power lines. This step is essential to avoid accidents or damage. When hammering stakes, position them at a 45° angle away from the inflatable – this angle provides the best resistance against tension. Ensure the stakes are driven at least 70% of their length into the ground, ideally flush with the surface to prevent tripping hazards. If the stake heads stick out, cover them with sandbags or mark them with safety cones. These steps help ensure your anchors hold firm during play and in varying weather.
"The best way to secure your bounce house is with long metal stakes hammered correctly and completely into grass or dirt." – Bounce Insider
Place bottom anchor stakes about 3 feet from the base of the inflatable. For larger units with top anchor points, position those tethers 7 to 12 feet away to create a 50-degree vertical angle when the inflatable is fully inflated. Use ratchet straps or cam buckle tethers for easy adjustments, or choose 1/2-inch solid-braided polypropylene rope with a tensile strength of 3,700 lbs. Keep all tethers tight to prevent shifting or tipping, even during active play.
Avoid using vehicles, concrete blocks, or rocks as anchors. These can damage the inflatable’s vinyl and pose serious safety risks. Check the anchors periodically, especially if the inflatable is experiencing heavy use or if the wind picks up, to ensure everything stays secure.
4. Complete Final Stability and Readiness Checks
After inspecting and anchoring the equipment, it’s time to perform your final stability and readiness checks. Start with a thorough safety inspection. Gently press against the walls to confirm the unit is stable and that the anchors remain secure. If you notice any movement in the walls or anchors, add extra weight to stabilize the setup.
Double-check all tie-downs and anchors to ensure they’re firmly secured. Walk around the bounce house to confirm that every section – walls, slides, and pillars – is fully inflated and feels firm to the touch. As a rental expert advises:
"A good rule of thumb is if you can push on the side of the bounce house and the sandbag move, add more weight/sandbags." – Bounce Insider
Place safety mats at all entry and exit points to help cushion falls. Verify that the blower is connected to a 20-amp GFCI outlet, and press the test button to confirm the safety shut-off is functioning properly. If the inflatable is in direct sunlight, check the vinyl to ensure it’s not too hot for use.
Throughout the event, keep an eye on the weather using an app or anemometer to monitor wind conditions. Maintain a clear safety perimeter of 3 to 10 feet around the inflatable, free of any obstructions. Finally, walk through the interior of the bounce house to remove any tools, sharp objects, or debris that may have been left behind during setup.
Once all these steps are completed, your inflatable is ready for safe use.
5. Set Usage Rules and Maintain Active Supervision
Creating a safe environment for inflatables starts with setting clear rules and having active supervision in place. It’s essential for an adult supervisor to oversee the activity at all times. This person should keep track of the number of participants, enforce safety guidelines, and be prepared to handle emergencies on the spot.
Once you’ve assigned a supervisor, establish safety rules for participants. To minimize the risk of collisions and injuries, group individuals by similar age, height, and weight. Most bounce houses can accommodate up to 5 riders or a combined weight of 500 lbs, with each participant typically weighing no more than 185 lbs and standing between 36 and 55 inches tall. Before entering, participants should remove shoes, jewelry, eyeglasses, and any sharp objects. Additionally, food, drinks, and gum should stay outside the inflatable.
Supervision also involves keeping a close eye on environmental factors and equipment stability. Watch the weather carefully; if winds exceed 15 mph or if lightning or heavy rain starts, deflate the inflatable and evacuate immediately. Periodically check that stakes or sandbags anchoring the inflatable are secure by giving them a firm tug. For water inflatables, enforce a strict "one-at-a-time" sliding rule and create a dry-off area with towels to reduce slip risks.
"Supervision is what turns a fun inflatable into a smooth experience. Even at smaller events, an attendant (or assigned adult) helps enforce spacing, guide rules, and keep a steady pace." – Party Pros East Coast
To manage crowd flow and avoid congestion at entry points, consider using wristbands or timed rotations. Position the supervisor where they have a clear view of the entire inflatable and can quickly access the blower if needed.
Conclusion
Setting up sports inflatables safely boils down to three key steps: selecting the right location, securing the equipment, and ensuring active supervision. Start with a flat, debris-free surface that has at least 3 feet of clearance on all sides – this provides a safe foundation for play. Next, proper anchoring is essential to keep the inflatable stable. Finally, active supervision helps enforce rules and monitor weather conditions, creating a safe environment for everyone. Together, these steps make for a smooth, worry-free experience.
For standard inflatables, the setup process usually takes about 20 to 30 minutes, while larger obstacle courses might require up to an hour for complete setup and inspection. At Bouncy Rentals USA, we take care of everything – from delivery and setup to safety checks and takedown.
Our team ensures every inflatable is thoroughly sanitized, fully insured, and meets strict safety standards. We handle proper positioning, secure anchoring, and provide clear usage instructions before your event begins. Plus, if weather conditions change or you need assistance during your event, our friendly party pros are just one call away.
"Proper setup prevents accidents, increases bounce house durability, and ensures a safe experience for every child and event participant." – Blaine Ladd
FAQs
How do I know if my extension cord is safe?
To keep your extension cord safe to use, make sure it’s specifically rated for outdoor use and has the proper amperage capacity for your needs. Inspect it closely for any signs of wear, like frays, cuts, or exposed wires. Choose a cord that’s long enough to prevent unnecessary tension or potential tripping hazards. Avoid daisy-chaining multiple cords together, as this can increase safety risks. Always stick to the manufacturer’s guidelines and replace any damaged cords immediately to ensure safe operation.
What anchors should I use on concrete or indoors?
For inflatables set up on concrete or indoors, secure the anchor points using heavy sandbags or weights. Position these directly on the tethers to keep the inflatable steady and prevent it from shifting or tipping over. Avoid using metal stakes, as they only work on grass or dirt. Ensuring proper anchoring is crucial for maintaining safety and stability during use.
What should I do if the wind picks up during use?
If the wind starts to pick up, act quickly: evacuate everyone from the inflatable, deflate it, and secure it to keep it from moving. Use an anemometer to keep a close eye on wind speeds, and stick to the manufacturer’s guidelines – most recommend stopping use if winds go above 15 mph. While proper anchoring with stakes or weights is essential, the safest choice in deteriorating conditions is to deflate and secure the inflatable to prevent any accidents.