Holiday-themed live shows can create unforgettable memories, but planning them requires careful preparation. Starting 3–6 months in advance is crucial to secure venues, performers, and vendors. Here’s a quick breakdown of what you need to know:
- Set Goals and Budget: Define your event’s purpose, pick a theme, and allocate funds for venue, entertainment, catering, and more.
- Book Early: Reserve venues and hire performers well in advance to avoid last-minute stress.
- Plan Logistics: Handle technical setups, parking, and guest access to ensure smooth operations.
- Engage Guests: Include interactive elements like photo booths, DIY stations, and contests to keep attendees entertained.
- Finalize Details: Run rehearsals, confirm vendor schedules, and create a day-of coordination plan.
Starting early and staying organized helps you deliver a polished, enjoyable event that stands out during the busy holiday season.
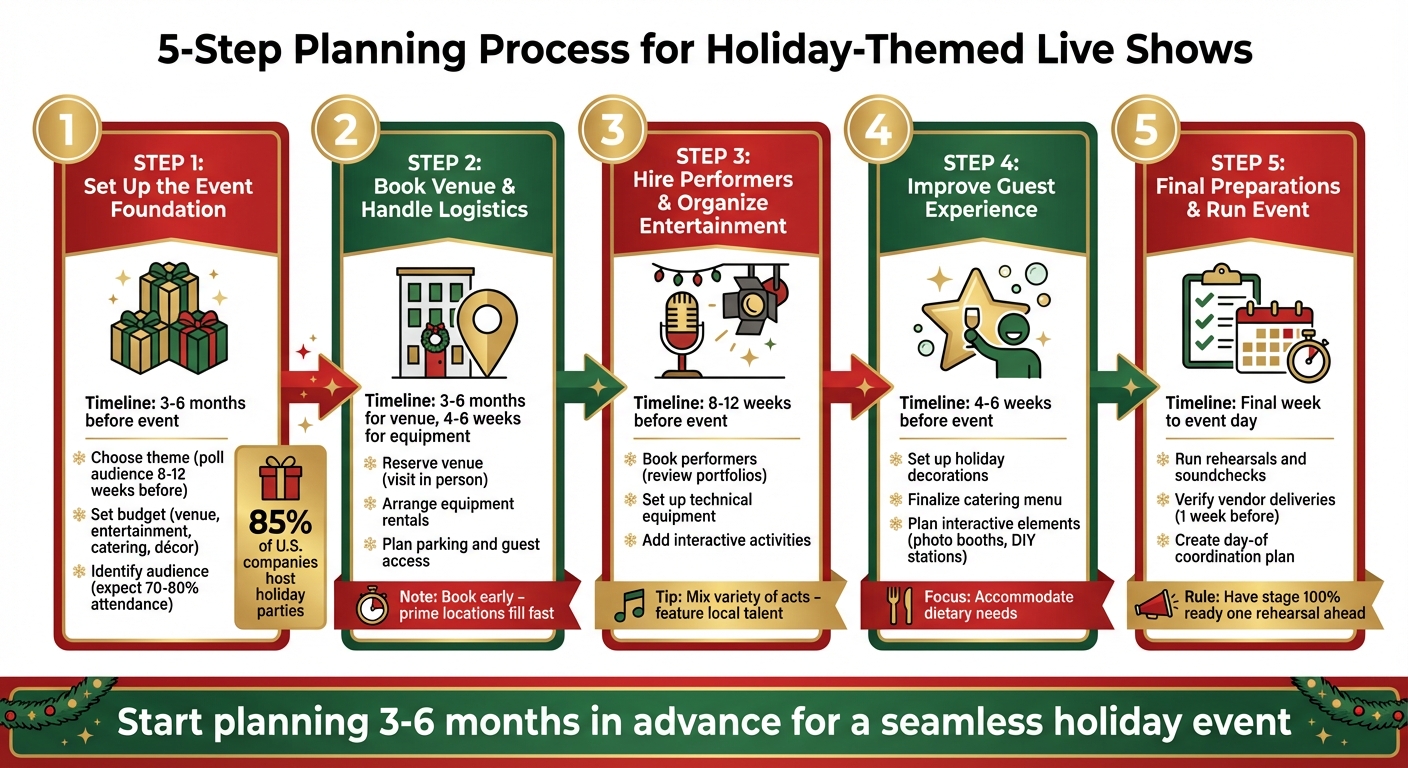
5-Step Holiday Live Show Planning Timeline: 3-6 Months to Event Day
Step 1: Set Up the Event Foundation
Start by laying out the groundwork for your event. These initial decisions will guide the entire planning process and ensure your event is both feasible and well-executed.
Choose Your Theme and Set Goals
Pick a theme that connects with your event’s purpose and resonates with your audience. For instance, corporate events often aim to boost team morale, show appreciation to clients, or celebrate milestones. Did you know that 85% of U.S. companies host holiday parties for these very reasons? A luxury brand might lean toward an elegant black-tie Christmas gala, while a family-focused organization could opt for a winter wonderland theme complete with activities for all ages.
It’s helpful to involve your audience early by polling them for ideas on themes they’d enjoy. Once you’ve gathered feedback, finalize your theme about 8 to 12 weeks before the event. This gives you enough time to coordinate custom decorations and book themed entertainment. To keep your vision cohesive, consider creating a visual guide using tools like Pinterest or digital mood boards. These can help ensure your décor, lighting, and other elements align seamlessly.
Determine Your Budget
Break down your budget into key categories such as venue, entertainment, equipment, catering, décor, and activities. This method makes it easier to see where adjustments might be needed. Reach out to multiple vendors for quotes, and check their reviews to ensure you’re getting good value. Some venues offer holiday packages that include catering, tables, and décor, which can save both time and money.
Don’t forget to account for hidden costs like cleanup supplies, insurance, permits, and labor. If you’re planning something specialized – like a choreographed light show – budget accordingly (for example, expect to pay around $1 per pixel). It’s also smart to set aside contingency funds for surprises, such as extra heaters for outdoor areas, last-minute rentals, or emergency supplies.
Once your budget is set, shift your focus to understanding your audience so you can tailor the event experience to their preferences.
Identify Your Audience
Your guest list will shape many aspects of your event, from the number of invitations to the amount of food and drink you’ll need. Set a clear headcount limit and decide whether to allow plus-ones or children.
Understanding your audience also helps you make better entertainment choices. For example, a high-energy DJ might be perfect for a corporate party, while interactive games or craft stations are ideal for family-friendly events. If you’re hosting a large cocktail-style gathering, keep in mind that 70% to 80% of invitees typically attend. To account for this, you can invite up to 20% more people than your venue’s capacity allows. Don’t forget to plan catering options that accommodate dietary needs, including vegetarian, vegan, and gluten-free preferences.
Step 2: Book Your Venue and Handle Logistics
Now that you’ve laid the groundwork for your event, it’s time to focus on securing the venue and ironing out logistics. These steps are essential to creating the holiday atmosphere you’ve envisioned.
Choose and Reserve the Venue
Start looking for venues 3–6 months in advance, especially since the holiday season is a busy time and prime locations book up quickly. The venue you choose should comfortably fit your expected crowd, have enough space for staging and AV equipment, and match the tone of your event. Unique options like museums, theaters, historic buildings, or university spaces can add an extra touch of charm to your holiday gathering.
Make sure to visit potential venues in person. Check out the guest areas, facilities, and parking options. If you’re planning an outdoor event, be prepared with the necessary permits, weatherproof speakers, and heaters to keep everyone comfortable. Also, confirm the venue’s electrical capacity – holiday light displays can consume a lot of power. For outdoor lighting setups, opt for GFCI (Ground Fault Circuit Interrupter) outlets to reduce the risk of electrical hazards.
Arrange Equipment Rentals
Create a detailed list of all the equipment you’ll need, such as sound systems, microphones, lighting rigs, and stage platforms. Don’t forget festive extras that can enhance the holiday mood. Book your sound, lighting, and stage equipment about 4–6 weeks ahead of time, and make sure your delivery plans align with the venue’s load-in policies.
If your event is family-focused, think about adding fun, interactive features like inflatable obstacle courses, bounce houses, or concession machines for treats like popcorn and cotton candy. Vendors like Bouncy Rentals offer a variety of options, including snow cone makers and dunk tanks, to take your event to the next level.
Coordinate vendor delivery times with the venue’s schedule and arrange a walk-through with your vendors. Use this time to go over staging areas, delivery access points, and breakdown procedures. With these details sorted, you’ll ensure a smooth setup process.
Prepare for Guest Access and Parking
Your guests’ experience starts the moment they arrive, so proper planning for parking and access is crucial. Assess parking availability and how close the venue is to public transportation – both factors can influence turnout. Use clear signage to guide guests from parking lots to check-in areas, seating, and exits. For outdoor events with specialized setups like synchronized light displays, physical barriers can help keep attendees at a safe distance from high-voltage equipment.
Provide detailed directions and transportation options to your guests at least a week before the event. For larger gatherings, hiring security personnel can help manage crowds and ensure everyone has a safe and enjoyable experience.
Step 3: Hire Performers and Organize Entertainment
With your venue and logistics in place, it’s time to bring your event to life by booking performers and incorporating engaging activities.
Book and Confirm Your Performers
Start securing your talent 8 to 12 weeks before the event – holiday performers are in high demand, and waiting too long could leave you with limited options. Look for entertainers with experience in holiday-themed events, as they’ll already have a repertoire suited to the season and know how to connect with festive audiences. To ensure quality, review performance videos, portfolios, and client reviews.
A mix of entertainment keeps things exciting. As Elizabeth Mannhardt advises, "You need a ‘variety’ so set a limit of certain types of acts… They audition for those slots. The best 5 soloists get in, etc." Consider blending different genres, from classical to modern, and include a variety of acts like musicians, comedians, dancers, or even holiday-themed skits. Don’t forget to explore local talent – Savannah McIntosh from Purplepass highlights that "Featuring local artists can foster a sense of community and support for regional talent. They often have a dedicated fan base, which can help boost attendance."
Check each performer’s technical rider to confirm their requirements for sound, lighting, and staging. Once you’ve finalized contracts, performance schedules, and payment terms, secure backup performers to handle any last-minute cancellations. With everything booked, it’s time to turn your attention to the event’s technical needs.
Set Up Technical Equipment
A solid technical setup ensures smooth performances. For large-scale events with over 1,000 attendees, hiring professional production vendors is a smart move. These experts can handle staging, audio, and lighting requirements. Arrange an on-site meeting with your vendors to assess rigging points, power needs, and any potential challenges.
Schedule sound checks to test microphones, adjust audio levels, and confirm speaker placement. Use a combination of spotlights, wash lights, and colored gels to create a festive atmosphere. Dennis Meyers, an experienced event planner, points out that "The stage should be appropriately sized for the number of performers and the type of performance. Consider the audience’s perspective and ensure good visibility from all angles."
Create a detailed technical timeline that includes extra time for transitions and troubleshooting. Jacklyn Walters from Dekra-Lite suggests: "Plan your installation near the event date, but give yourself enough time for testing. Do a mock run-through of the lighting event. Address issues before the show begins." Once technical details are sorted, shift your focus to keeping guests entertained between performances.
Add Interactive Activities
Make the event memorable by offering interactive activities that complement the live entertainment. Set up stations like cookie decorating tables, hot chocolate bars with customizable toppings, or festive photo booths with holiday-themed props. These are perfect for intermissions or while guests mingle.
For family-friendly events, add activities like inflatable obstacle courses, human hamster balls, or interactive games. Companies like Bouncy Rentals provide these options, along with concession machines for popcorn and cotton candy to amplify the festive vibe. Strolling entertainers, such as magicians or holiday characters like Santa and Mrs. Claus, can keep guests engaged during breaks between performances. You could also organize fun competitions, like ugly sweater contests or holiday trivia covering traditions from Christmas, Hanukkah, and Kwanzaa, to maintain high energy throughout the event.
Step 4: Improve the Guest Experience
Once you’ve nailed the performances and technical details, it’s time to shift focus to the overall guest experience. A memorable holiday show isn’t just about what happens on stage – it’s about creating an inviting and engaging atmosphere that leaves attendees feeling delighted from start to finish.
Set Up Holiday Decorations
Start with a cohesive theme. Whether you’re aiming for a Winter Wonderland with shimmering blues and snowy accents, a Vintage Christmas with cozy reds and rustic wood, or a sleek Modern Chic vibe with metallic finishes, consistency is key. As Christmas Decor Augusta puts it, "The power of holiday stage decor is undeniable: it transforms seasonal performances into enduring memories."
Lighting plays a big role in setting the mood. Twinkling string lights, LED candles, and lanterns can create a warm and magical vibe. For a Winter Wonderland, think icy blue lights paired with artificial snow. For a Vintage Christmas, warm gold and red tones work beautifully. Make sure your decorations, like oversized snowflakes or garlands, enhance the space without blocking views or interfering with performers.
Functional decorations can also elevate the experience. Welcome signs, directional arrows, and table numbers designed to match your theme add a polished touch. Interactive elements like photo backdrops with fun props (Santa hats, reindeer antlers) or a memory tree where guests can hang ornaments can make the event more personal. If it’s a winter-themed event, cozy extras like throw blankets and pillows can boost comfort. And don’t forget practical details – discreet clean-up stations stocked with essentials like salt and club soda can help manage spills without disrupting the festive mood.
Provide Holiday Treats
Catering to dietary preferences is a must. Collect this info during registration so you can include vegetarian, vegan, and gluten-free options in your menu, covering everything from starters to desserts.
DIY food and drink stations are always a hit. A hot chocolate bar, for example, allows guests to customize their drinks with options like milk, dark, or white chocolate bases and toppings like marshmallows, peppermint, and flavored syrups. Cookie-decorating tables are another fun way to let guests create treats that suit their tastes. For nostalgic snacks, renting equipment like popcorn machines, cotton candy makers, or snow cone machines from Bouncy Rentals can add a playful touch.
Don’t forget festive non-alcoholic drink options so everyone feels included. Swap champagne for ginger ale in a "Fresh Cranberry Mimosa" or serve sparkling ciders that fit your theme. Presentation matters too – arranging appetizers in creative displays like an "Antipasto Wreath" or an "Artichoke Spinach Pinwheel Christmas Tree" can make a big impact. Finalize your menu and rental needs 4 to 6 weeks in advance to ensure everything is ready.
Encourage Audience Participation
Interactive activities can keep guests entertained between performances. A venue-wide scavenger hunt encourages exploration and interaction, while competitions like gingerbread house building or ugly sweater contests bring out creativity and fun for all ages.
During performances, live polls or Q&A sessions can engage the audience and provide valuable feedback. Adding character actors – like Santa, elves, or even the Grinch – can inject whimsy and charm as they mingle with guests.
DIY craft stations, where attendees can make ornaments or keepsakes, add a personal touch. Raffles or holiday-themed giveaways can keep energy levels high, and QR codes on printed materials can direct guests to digital schedules, event websites, or social media pages for added convenience. These thoughtful additions ensure your event feels lively and well-organized from beginning to end.
Step 5: Complete Final Preparations and Run the Event
The last few days before your holiday show are all about double-checking details, running tests, and ensuring everyone understands their responsibilities. This is the time to address potential issues and set the stage for a seamless event day.
Run Rehearsals and Soundchecks
Start with a "paper tech" rehearsal – a detailed walk-through without performers – to confirm cues, transitions, and responsibilities. This helps identify any gaps in your plan while there’s still time to fix them.
Next, thoroughly test all audio equipment. Check every microphone line, instrument cable, wireless pack, and monitor feed. Run a full line check to ensure everything works as expected. For lighting, conduct a "flash through" by testing each fixture individually to spot any burnt-out bulbs or malfunctioning equipment. Coordinate closely with your sound, lighting, and video teams on cues involving multiple systems, such as a blackout timed to a specific audio moment.
"A good rule of thumb is to have the full stage and all tech 100% show-ready one full rehearsal or soundcheck ahead of time." – Ticket Fairy
Keep spare gear on hand, like extra microphones, cables, and batteries. For larger events, you might even want a backup mixing console or a laptop with digital mixer settings ready to go. Build some extra time into your schedule to handle unexpected delays or technical hiccups without derailing the event.
Once your technical rehearsals are complete, move on to confirming vendor and rental deliveries.
Verify Vendor and Rental Deliveries
After locking down your tech setup, shift focus to your vendors. About a week before the event, reach out to confirm headcounts, delivery schedules, and setup requirements for caterers, rental companies, and entertainment providers. Conduct a venue walk-through with vendors to clarify details like load-in access, staging areas, and power needs.
For specialty rentals – like inflatables or concession machines from Bouncy Rentals – most professional companies will deliver and set up their equipment a few hours before the event begins. Use this time to inspect everything for cleanliness, safety, and functionality. For example, ensure bounce houses are sanitized and ready for guests.
Assign staff to manage vendor arrivals and guest check-ins. Keep vendor contact numbers easily accessible, and have a printed schedule and contact list on hand. This ensures smooth communication and keeps your event timeline on track.
Create a Day-of Coordination Plan
A clear coordination plan is essential to keep everything running smoothly on event day. Assign specific responsibilities to each team: one group for guest check-ins, another for activity stations, and a separate team to handle any issues that arise.
Prepare an emergency kit stocked with essentials like extra napkins, utensils, first-aid supplies, and cleaning materials for quick fixes. Equip your stage manager and technical leads with two-way radios or intercom headsets for real-time communication. Cross-train your crew on basic tasks, such as coiling cables or using fire extinguishers, to ensure flexibility in case of unexpected challenges.
Start planning for post-event cleanup early. Review breakdown expectations with the venue manager and vendors to avoid surprise fees. Use a checklist to ensure all rented items are returned, trash is removed, and personal belongings are accounted for. This keeps the exit process smooth and leaves the venue in great shape for the next event.
Conclusion
Main Points for a Successful Event
Start by defining the purpose of your event and setting a clear budget to guide your decisions. Book your venue early – ideally 3 to 6 months in advance – since popular locations fill up fast, especially during the holiday season. Choosing a cohesive theme can simplify decisions around décor and entertainment, while careful technical planning ensures the lighting and sound systems are ready to go when guests arrive.
The guest experience hinges on thoughtful planning and seamless execution. Offer a variety of menu options to cater to different dietary needs, include interactive entertainment to keep your guests engaged, and establish a detailed day-of schedule so everyone on your team knows their responsibilities.
"A detailed holiday party checklist keeps everything on track, ensuring no detail slips through the cracks." – Sean O’Donnell, Unique Venues
These points highlight the importance of early preparation and having a flexible approach to ensure success.
Start Early and Stay Flexible
Planning 3 to 6 months ahead gives you the advantage of locking in preferred vendors and venues before they’re fully booked. This timeline also allows room to manage unexpected costs, conduct technical rehearsals, and make adjustments without unnecessary pressure.
"Choose a few options for party dates, so you have some flexibility when you’re booking venues. That can give you more wiggle room if the venue you want is booked." – Clayton de la Chapelle, The Music Trust
Working with reliable rental vendors can also reduce stress on the event day. Companies like Bouncy Rentals handle everything from delivery and setup to safety checks and cleanup, so you can focus on your guests instead of logistics. Many vendors even offer delivery the day before and pickup the day after, giving you extra time to inspect and test the equipment. With a solid plan and dependable partners, you’ll create an event that runs smoothly, delights your guests, and captures the spirit of the season.
FAQs
What’s the minimum timeline to plan a holiday live show?
The best timeline for planning a holiday live show is 6 to 8 weeks. This gives you enough time to book a venue, organize performers, and handle essential logistics. If the event is larger or has more moving parts, starting earlier – at least 8 weeks or more – can make the process much easier and more organized.
How do I choose the right venue size and layout for a live show?
When planning an event, start by estimating the size of your audience and the type of performance you’re hosting. Smaller venues are ideal for solo artists or DJ sets, while larger spaces can handle full bands or even festivals. Pay close attention to the venue’s layout – make sure it offers clear sightlines, distributes sound evenly, and has enough room for performers and their equipment. Accessibility should be a priority, so work closely with the venue coordinator to customize the setup to fit your event’s specific requirements.
What should be included in a day-of run sheet for a holiday show?
A day-of run sheet for a holiday show is essential for keeping everything on track. It should cover the following key details:
- Performance schedules: Include call times, start times, and scheduled breaks to keep everyone on the same page.
- Venue details: Clearly outline meeting points, entrances, and any specific instructions for navigating the space.
- Performer needs: List essential items like music, attire requirements, and hydration to ensure performers are fully prepared.
- Technical setup: Specify equipment, sound, and lighting requirements to avoid last-minute technical hiccups.
- Guest engagement tips: Provide guidance on welcoming guests, seating arrangements, and ensuring their comfort throughout the event.
By addressing these elements, the event can run smoothly for performers, staff, and guests alike.