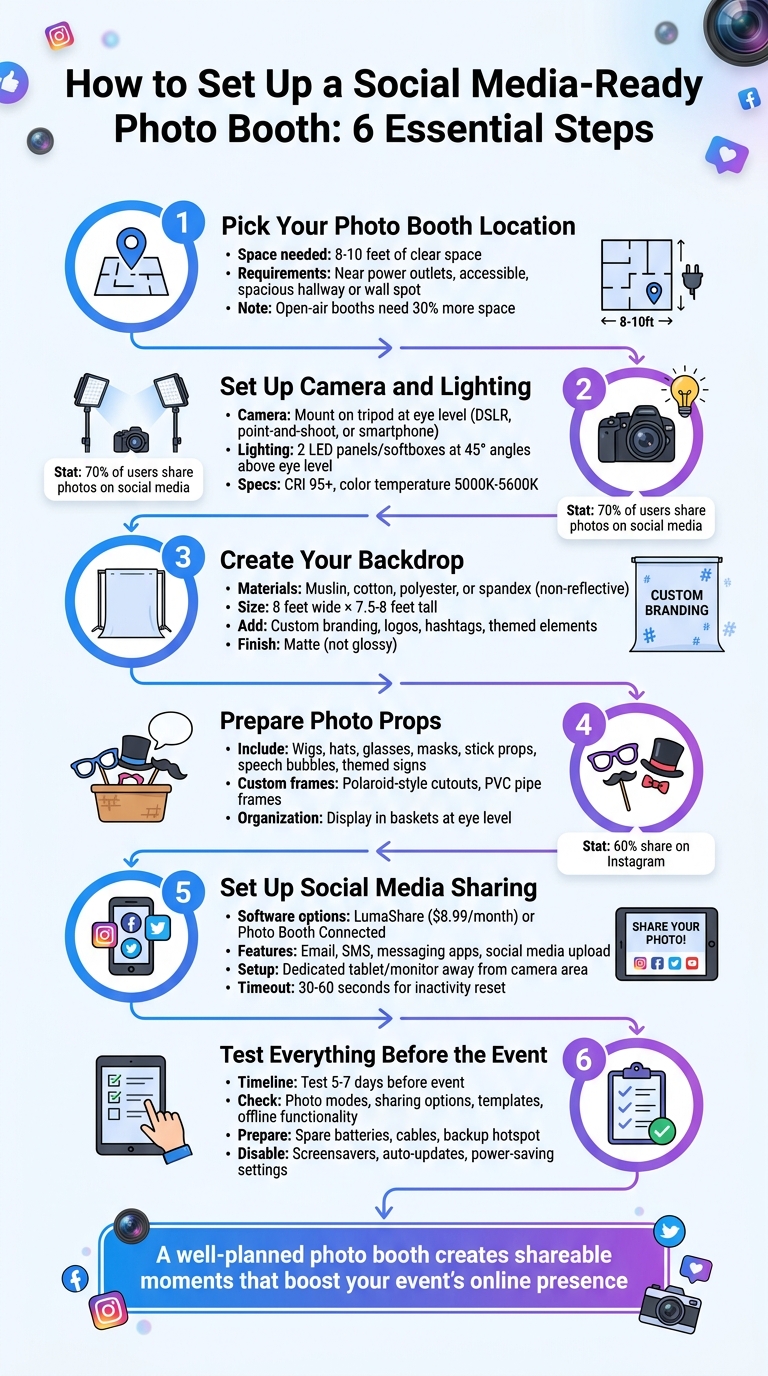
A social media-ready photo booth can make any event more engaging and fun. Here’s how to set one up step-by-step:
- Choose the Right Location: Pick a spot that’s easy to access, spacious (8-10 feet), and near power outlets. Test the area to ensure everything fits.
- Set Up Camera and Lighting: Use a camera or high-resolution smartphone on a tripod at eye level. Ensure lighting is even with softboxes or LED panels at 45° angles to reduce shadows and glare.
- Design a Backdrop: Use non-reflective materials like muslin or polyester. Add themed elements, logos, or hashtags for a polished look.
- Prepare Props: Offer a variety of props like hats, signs, and masks. Organize them neatly for easy access.
- Enable Social Media Sharing: Install apps like LumaShare or Photo Booth Connected for instant sharing via email, text, or social media. For offline venues, use software with queuing options.
- Test Everything: Check all equipment and settings days before the event. Run test shots to ensure lighting, focus, and sharing features work seamlessly.
A well-planned photo booth not only entertains guests but also boosts your event’s online presence through shareable moments.
6-Step Guide to Setting Up a Social Media-Ready Photo Booth
Step 1: Pick Your Photo Booth Location
Choose a spot that’s easy to find and doesn’t interfere with the flow of your event. A spacious hallway or a spot along a wall is usually ideal. This keeps the booth accessible while ensuring your equipment stays safe from accidental bumps during busy moments.
Measure Your Space Needs
You’ll need about 8-10 feet of clear space to set up your backdrop, camera, lighting, and a table for DIY photo booth props. This ensures there’s enough room for guests to move comfortably. Think about all the pieces involved: a backdrop (mounted on a wall or a stand), a camera at eye level, and one to three light stands, depending on your setup.
If you’re planning an open-air booth – a setup that’s grown in popularity by 30% – you’ll need even more space to fit larger groups. To avoid surprises, test the area beforehand by setting up your equipment to make sure everything fits well without feeling cramped.
Check Power Availability
Your booth will need a steady power source for the lights, camera, and any devices you’re using for digital sharing. Pick a location close to outlets to avoid running long cords across the floor, which can create tripping hazards. If outlets aren’t nearby, use heavy-duty extension cords rated to handle your equipment’s wattage, or consider a portable power station.
To prevent downtime, keep spare batteries or chargers on hand. Once you’ve secured your location and power setup, you’ll be ready to dive into arranging your camera and lighting in the next step.
Step 2: Set Up Your Camera and Lighting
Your camera and lighting setup can make or break the success of your photo booth. Since over 70% of photo booth users share their images on social media, it’s essential to ensure your equipment consistently produces sharp and flattering photos.
Position Your Camera or Phone
Start by mounting your camera or phone on a sturdy tripod. This step eliminates any risk of blurry shots and keeps your setup stable for the duration of the event. Position the lens at eye level – this angle creates natural, flattering photos for your guests. Make sure the camera is centered on your backdrop to maintain a balanced and professional composition.
When it comes to equipment, you have options. A DSLR camera, a point-and-shoot, or even a high-resolution smartphone can all work well. If you’re using a smartphone, consider pairing it with a photo booth app like Tap Booth, which allows guests to instantly share their pictures via text, email, or social media – no need to wait for prints. Before the event begins, test the focus settings to ensure the images are crisp. Clear, sharp photos are far more likely to be shared online.
Once your camera is ready, it’s time to perfect your lighting.
Arrange Your Lights
Lighting is the key to creating photos that people love. For the best results, use two LED panels or softboxes positioned at 45° angles above eye level. This setup provides even lighting across faces and minimizes shadows, even in group shots. If you’re working with only one light, a large softbox placed above and in front of your guests – angled slightly downward – can still achieve great results.
For natural and flattering skin tones, choose lights with a CRI of 95 or higher and a color temperature between 5000K and 5600K. Adding diffusers is a smart move – they soften harsh shadows and prevent unflattering glare. If some of your guests wear glasses, adjust the lights by raising them higher and tilting them downward at a 45-degree angle. This reduces reflections and ensures clear, glare-free photos.
"The secret to photos people actually want to share is not the camera or the backdrop. It is the lighting." – Avery Spark, Author
Good lighting doesn’t just illuminate your subject – it elevates the entire photo booth experience.
Step 3: Create Your Backdrop
Once your camera and lighting are set up, it’s time to focus on crafting a backdrop that not only looks amazing but also encourages social media sharing. A well-thought-out backdrop can make your photos pop and inspire guests to share their snapshots online. It should fill the camera frame, complement your event theme, and contrast with what guests are wearing.
Select Backdrop Materials
The material you choose plays a huge role in how your photos turn out. Fabrics like muslin or cotton are excellent because they absorb light and don’t create glare. If you’re worried about wrinkles during transport, polyester or spandex are great alternatives since they resist creasing and stay smooth throughout your event.
"The best materials for photo booth backdrops are non-reflective fabrics like muslin or cotton." – Amber Guttilla
For a more eye-catching look, consider using materials like sequin panels, inflatable decorations from Bouncy Rentals USA, faux greenery, or even reclaimed wood to match your event’s vibe. Most backdrops are around 8 feet wide by 7.5 to 8 feet tall, which is a comfortable size for most adults to fit in frame.
Always go for matte finishes instead of glossy ones. Matte surfaces reduce glare and keep the focus on your guests rather than unwanted reflections.
Once you’ve chosen the right materials, it’s time to add a personal touch that ties the backdrop to your event’s theme.
Add Custom Branding or Themes
A simple backdrop can turn into a powerful branding tool with the right additions. Think about incorporating your event logo, a hashtag, or even your company name. Custom vinyl prints or step-and-repeat banners are excellent options for this. As guests post their photos online, your branding naturally gets more visibility.
For a corporate event, a white backdrop with repeated logos and red accents can create a sleek red-carpet vibe. For something more casual, playful touches like neon signs or chalkboard walls can make the backdrop fun and interactive.
To ensure your branding isn’t hidden in photos, place logos or text in the top corners of the backdrop. Another option is to use a digital overlay that adds your logo when photos are shared online. And don’t forget to test your setup ahead of time – guests standing closer to the camera can make the backdrop appear smaller in the frame, so adjusting the spacing is key.
Step 4: Prepare Photo Props
Props are what take simple snapshots and turn them into moments worth sharing. They encourage guests to get playful, connect with others, and, most importantly, post their pictures online. In fact, industry stats show that 70% of guests share their photo booth pictures on social media, with Instagram being the platform of choice for 60% of those shares. The takeaway? Your prop selection plays a big role in how much buzz your event generates online.
Stock Up on Props
When it comes to props, variety is key. Start with wearable accessories and classic stick props that guests can grab and use instantly. Think fun wigs, quirky hats, oversized glasses, and colorful masks for quick transformations. Stick props like mustaches, lips, and bowties are always a hit – they’re simple, timeless, and easy to use.
To encourage interaction, add themed signs or speech bubbles to your collection. Phrases like "Team Bride," "Poppin’ Bottles," or "Came for the Gossip" are perfect for weddings or parties. For corporate events, include signs with your company hashtag to boost visibility. School reunions or family gatherings can benefit from personalized options, like "Most Likely to Succeed" or "Class Clown," which add a fun, nostalgic touch.
Keep the prop area organized by displaying everything in baskets or trays. This not only keeps the space tidy but also makes it easier for guests to browse. Place props at eye level and within easy reach to encourage participation. For something extra, consider lightweight inflatable items, like guitars or animals, which add a fun 3D element without taking up too much space.
Create Custom Photo Frames
Take your prop game up a notch with custom photo frames that make every picture pop. Frames create a "photo within a photo" effect, which looks fantastic on social media. Polaroid-style cutouts made from foam board are a popular choice because they’re lightweight and durable. If you’re planning a larger event, frames made from PVC pipes offer a sturdy, portable option.
To tie everything together, match your frames to the event theme. Add custom text, like the event date, the couple’s names, or a company logo, for a polished touch. For weddings, metallic accents like gold or rose gold work beautifully, while graduation parties can feature school colors. Want to add an interactive twist? Use chalkboard paint on cardboard frames or speech bubbles so guests can write their own messages or hashtags. This not only personalizes the photos but also encourages guests to share them online, giving your event even more exposure.
Step 5: Set Up Social Media Sharing
Once your props and booth are ready, make sure your photos can spread online effortlessly. Easy sharing not only boosts your event’s online visibility but also ensures a steady flow of guests at the booth.
Create a Digital Sharing Station
Set up a dedicated tablet or monitor for photo sharing to keep things running smoothly. Position this device away from the main camera area, so while one group shares their photos, the next group can step in for their turn.
"Enjoying using the fotoshare app for my photo booth sharing station!!… Frees up my booth to take more photos. Guests love it!" – Abby P.
For software, check out options like LumaShare (compatible with iOS, Android, and Mac) or Photo Booth Connected (designed for Windows). These tools allow guests to upload their photos via email, SMS, popular messaging apps, and social media. LumaShare offers unlimited sharing for $8.99 per month, while Photo Booth Connected uses "Watch Folders" to automatically pull new images into a gallery as they’re taken.
If you’re dealing with unreliable internet at the venue, choose software with offline queuing. This feature ensures photos upload automatically once the connection is restored. To keep things efficient, set a 30–60 second inactivity timeout to reset the screen if someone walks away mid-session. You can also add custom branding or themed backgrounds to make the station look polished and professional. This setup ensures every photo captured contributes to the event’s digital footprint.
Now, take it a step further by showcasing the fun in real time.
Display Photos in Real Time
A live slideshow on a big screen or TV can create instant excitement. Use simple casting or HDMI connections to stream photos as they’re taken. Seeing others enjoying themselves often inspires more guests to join in the fun. Display your event hashtag prominently near the booth and on the slideshow screen to make tagging posts easier. This also helps you track social media engagement later. Combining real-time displays with easy sharing transforms your photo booth into a lively content hub that keeps the energy high throughout the event.
Step 6: Test Everything Before the Event
Nothing derails an event like technical hiccups in the middle of the action. To avoid this, test your entire setup five to seven days before the big day. This gives you time to troubleshoot and fix any issues.
"Troubleshooting on-site can lead to unhappy clients and a tarnished reputation. By thoroughly testing your setup beforehand, you can guarantee a seamless experience for your clients." – GO360BOOTH
Check All Equipment
Go through every feature your guests will interact with, including photo modes like standard shots, GIFs, and videos, as well as sharing options via email, text, or social media. Double-check that your photo templates are accurate – no misspellings or wrong dates. Amber Guttilla from Photobooth Supply Co. puts it best:
"You don’t want to be that person who has the wrong date on their template and has to go back and change it on all the pictures you took at the event."
Load the event settings and test everything offline. Since venue Wi-Fi can be unreliable, ensure your software can queue photos and upload them automatically when the connection is restored. If you’re using a printer, run a test offline to confirm your software license remains valid and the system clock is set correctly. Also, disable any screensavers, power-saving settings, messaging apps, and automatic updates that could interrupt your workflow.
Once you’ve confirmed that every component is working smoothly, move on to fine-tuning your setup.
Make Final Adjustments
Take a few test shots to check the camera’s focus, lighting, and backdrop alignment. Watch out for harsh shadows or reflections that could ruin the photos. Set your camera at eye level and ensure your tripod is stable – shaky equipment can lead to blurry images. Adjust your lighting to minimize glare, especially on glasses or reflective surfaces.
Secure all extension cords with duct tape to avoid tripping hazards, lock your software settings to prevent accidental changes, and have backups ready. This includes extra batteries, cables, and even a spare hotspot, so you’re prepared for any last-minute surprises.
Conclusion
Setting up a photo booth that’s perfect for social media doesn’t have to be complicated. Start by selecting a spacious location with easy access to power. Then, arrange your camera and lighting for the best photo quality. Add a themed backdrop with custom branding, provide fun props, and make sure digital sharing is quick and easy. Most importantly, test everything beforehand to ensure it all works smoothly.
Testing is key to avoiding hiccups. A final equipment check can help you spot and fix any issues before the event begins. Keep spare batteries and cables handy to handle any last-minute problems without stress.
Want to take your event to the next level? Bouncy Rentals USA has you covered with a variety of party equipment and extras. They offer everything from bounce houses and water slides to cotton candy machines, popcorn makers, and even dunk tanks. Their team ensures all equipment is sanitized, insured, and delivered on time, making them a great choice for birthday parties, school events, or backyard celebrations.
With a well-planned setup, your photo booth won’t just capture quality pictures – it will also create buzzworthy, shareable moments that keep the fun alive long after the event wraps up.
FAQs
What’s the cheapest lighting setup that still looks good on Instagram?
If you’re looking to create a budget-friendly and Instagram-ready DIY photo booth, consider using string lights, LED fairy lights, or colored bulbs. These affordable lighting options add a soft, flattering glow that enhances photo quality, making your snapshots perfect for social media. Arrange the lights to evenly brighten both the backdrop and your subjects, avoiding any harsh shadows. This easy setup ensures vibrant, shareable photos – all without spending a fortune.
How do I make sharing work if the venue has no Wi‑Fi?
If the venue doesn’t have Wi‑Fi, you can still capture great moments using a camera or smartphone with offline functionality. Once the event is over, transfer the photos to a device with internet access – like a laptop or tablet – using a USB cable, SD card, or Bluetooth. This way, guests can enjoy taking photos during the event and share them online later when you’re able to upload them to social media.
How can I keep lines moving at the photo booth?
To keep things running smoothly, pick a location that’s spacious and easy to navigate, with plenty of outlets for setting up equipment. Arrange props and backdrops in an organized way so guests can make quick choices, and have someone on hand to assist with props or operate the camera. Bright lighting and a clutter-free setup also help maintain a steady flow. These simple steps make sure your guests can enjoy the booth without unnecessary delays.