Proper bounce house placement can make your event safer and more enjoyable. Here’s what you need to know:
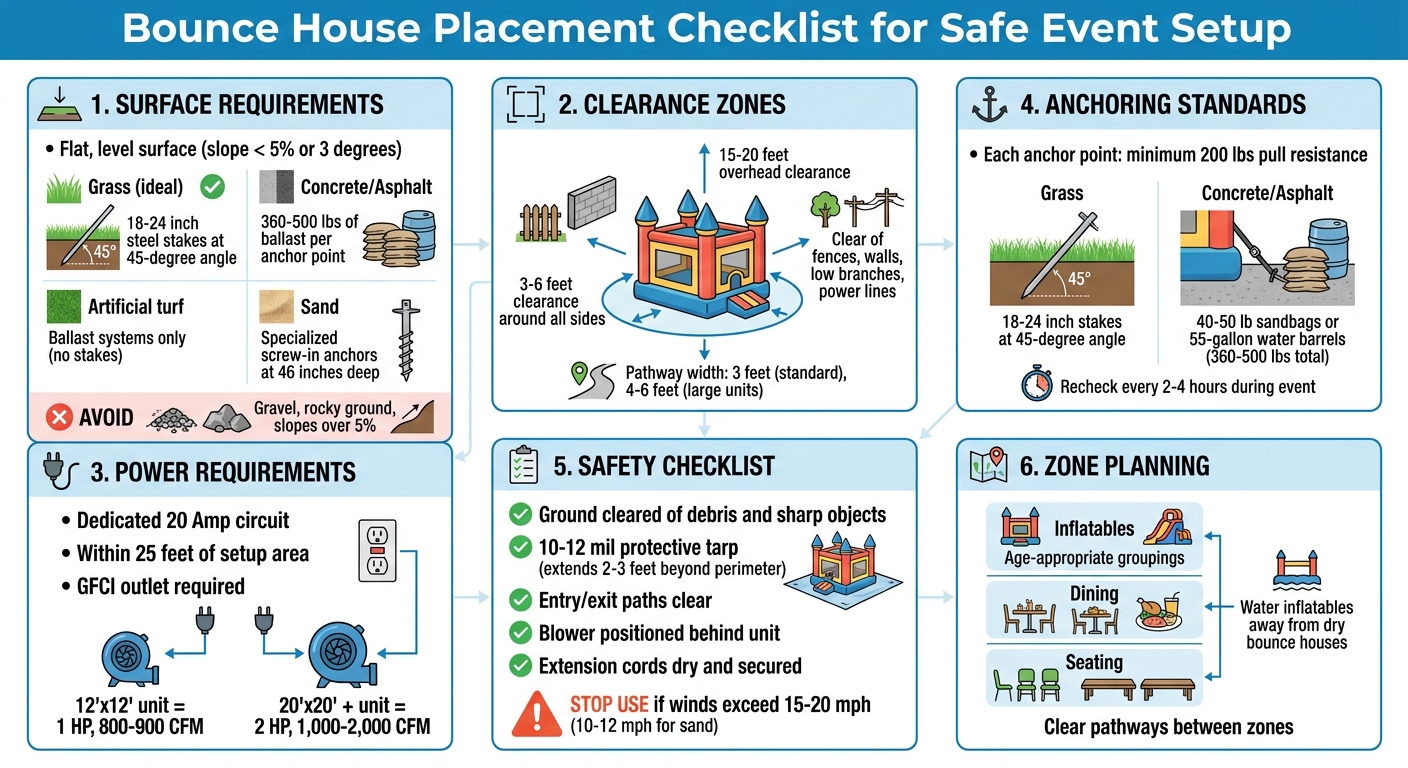
- Flat, Level Surface: Always set up on even ground to keep the inflatable stable. Grass is ideal, but concrete or asphalt works with proper anchoring.
- Clear Hazards: Avoid fences, walls, low branches, or power lines. Leave 3–6 feet of clearance around the bounce house.
- Access to Power: A dedicated 20 Amp outlet within 25 feet is necessary to keep the blower running. (Check how much electricity your setup will require.)
- Anchoring Matters: Use stakes for grass or weighted systems for hard surfaces like concrete. Ensure anchor points can handle at least 200 lbs of pull resistance.
- Activity Zones: Separate inflatables from dining and seating areas for better traffic flow and safety.
- Weather Precautions: Stop use if winds exceed 15–20 mph. Keep cords dry and away from water.
Proper planning ensures a smooth setup and a safe, enjoyable experience for everyone.
Bounce House Placement Checklist for Safe Event Setup
Pre-Placement Site Assessment
Ground and Space Evaluation
Start by walking through the area where you plan to set up the inflatable. Make sure the ground is level and flat – uneven surfaces can cause the inflatable to wobble, tip over, or bounce unevenly, which isn’t safe or fun. Clear the space of any debris, sharp objects, or anything that could damage the inflatable, like rocks or sticks. Don’t forget to clean up pet waste before you begin – it’s not something you want near the setup.
Measure the space to ensure it accommodates the inflatable’s size, plus an extra 3 to 6 feet of clearance around it. For delivery, standard inflatables require a pathway at least 3 feet wide, while larger ones may need 4 to 6 feet. Check overhead for obstacles like tree branches, power lines, or building eaves that could interfere with the setup.
You’ll also need room around the inflatable for secure anchoring. On grass, heavy-duty stakes are used, while concrete or asphalt setups require weighted anchor systems designed for these surfaces. Be sure to leave a buffer zone between the inflatable and any nearby structures like walls, fences, or buildings. This not only keeps the area safe but also makes it easier to access.
Once you’ve confirmed the ground is suitable and there’s enough space, move on to checking power and drainage requirements.
Power and Drainage Check
A steady power supply is critical. You’ll need a dedicated 20 Amp circuit within 25 feet of the setup area. Most commercial inflatables require this level of power, and larger units may need 2 or 3 separate outlets to run smoothly. Avoid plugging other high-powered devices into the same circuit – this could overload it and shut down the inflatable during your event.
If you’re setting up a water slide or a combo unit, look for any spots where water might pool. Make sure a water hose can easily reach the inflatable, and confirm that drainage will flow away from the inflatable and any electrical equipment. Always keep extension cords dry, and never let water come into contact with the blower or power connections. Safety first!
Space Planning for Large Gatherings
Creating Activity Zones
When planning a large event, organizing the space into specific activity zones can make a big difference. Separate areas for play, dining, and seating help everything flow smoothly. For instance, group inflatables in one section, food and drink stations in another, and seating in its own space. This setup reduces the chances of kids running through dining areas or adults accidentally wandering into active play areas.
Make sure there are clear pathways connecting these zones. If you’re using water-themed inflatables, keep them away from dry bounce houses to avoid slippery surfaces that could cause accidents. For events with mixed age groups, consider creating separate zones based on age to ensure younger kids don’t feel overwhelmed by older children.
Pay attention to where entry and exit points are located for each inflatable. Avoid situations where the exit of one activity leads directly into the entrance of another to prevent congestion and potential collisions. Leave enough buffer space around exits so kids have room to slow down before moving on to the next activity.
Once these zones are set, focus on the finer details like how much space a bounce house needs and the placement of each inflatable to ensure safety and easy monitoring.
Arranging Multiple Inflatables
After defining your zones, proper spacing between inflatables becomes essential. Leave enough room between units to secure them safely, allow for easy supervision, and ensure emergency access if needed.
Consider the size and weight of each inflatable. For example, a smaller 12′ x 8′ bounce house might weigh around 129 lbs and support 100–300 lbs, while a larger 22′ x 22′ unit could weigh up to 435 lbs and hold over 1,000 lbs. Place larger units in spots that are easy to access and provide good visibility for supervision. Smaller units can be set up in areas with less foot traffic.
To keep inflatables safe and comfortable, position them in shaded areas or use overhead covers. This helps prevent the vinyl from overheating under direct sunlight, ensuring a better experience for everyone.
Surface Preparation and Anchoring
Choosing the Right Surface
The surface you choose plays a big role in ensuring the safety and stability of inflatables. Natural grass is the safest option, thanks to its ability to absorb impact and support deep anchoring. For grass setups, use heavy-duty steel stakes that are at least 18 inches long and 1 inch in diameter. These should be driven into the ground at a 45-degree angle, pointing away from the inflatable, to provide maximum stability.
Concrete and asphalt are also viable options, though they require extra effort. Since stakes can’t be used, you’ll need to secure each anchor point with 360–500 lbs of ballast. Options include heavy-duty sandbags (40–50 lbs each), 55-gallon water barrels, or rubber-coated concrete blocks. Attach the weights with ratchet straps to keep them firmly in place. Keep in mind that black asphalt can heat up to 40–60°F above the ambient temperature, which can stress the vinyl material and impact air pressure.
For artificial turf, stakes are not an option as they can damage the surface. Instead, you’ll need to rely entirely on ballast systems. Sandy surfaces require specialized screw-in or arrowhead anchors that must reach a depth of 46 inches to achieve over 2,000 lbs of pullout resistance. Avoid gravel, rocky ground, or sloped areas with more than a 5% incline (about 3 degrees), as these are deemed unsafe for inflatables.
"A slope of more than 5% (approximately 3 degrees) is considered unsafe for any commercial inflatable." – Hero Kiddo
Once the surface is selected and the inflatable is properly secured, additional steps should be taken to protect both the weather-resistant bounce house and the ground.
Protective Ground Measures
After selecting a suitable surface, take steps to shield the inflatable and maintain ground conditions. Start by clearing the area of debris to avoid damaging the inflatable. Lay down a 10–12 mil heavy-duty protective tarp, ensuring it extends at least 2–3 feet beyond the perimeter of the inflatable. This helps prevent abrasion and protects against moisture damage.
For multi-day events on natural grass, it’s a good idea to rotate the inflatable every 24–48 hours to avoid killing or yellowing the grass beneath it. If you’re using a water-based inflatable, position it so that water drains away from gardens or building foundations to prevent runoff issues. Following safety tips for water slides ensures these setups remain secure and fun for all guests.
Safety and Accessibility Considerations
After preparing and securing the surface, it’s crucial to review safety measures to ensure everything runs smoothly and guests can enjoy the event without issues.
Avoiding Hazards
When setting up a bounce house for a large event, it’s important to inspect the area for potential overhead obstacles. Make sure there’s enough space around the inflatable, keeping it clear of fences, walls, or any permanent structures.
Pay close attention to electrical safety. Place the bounce house near a dedicated power outlet to avoid overloading circuits. Keep extension cords dry and away from water features, and ensure the blower remains unobstructed for continuous operation. It’s also a good idea to keep pets away from both the inflatable and its electrical components to prevent accidents or damage.
Keep entry and exit paths clear. These areas should be free of cords, debris, or anything that could cause tripping or collisions. For larger events, consider separating children by age groups and limiting the number of participants inside the inflatable at one time to maintain balance and avoid injuries. Before entering, all users should remove shoes and sharp objects to protect both the equipment and other participants.
Stay on top of weather conditions. Continuously monitor wind forecasts and be prepared to halt use if winds pick up significantly. Have a backup plan in place in case weather forces you to temporarily shut down the inflatable.
Local Regulations and Permits
Once you’ve addressed on-site safety, make sure you’re in compliance with local regulations.
Permits may be required for public venues like parks or schools. Check with your local parks and recreation department or school administration well in advance. Some municipalities require special event permits for gatherings of a certain size, while others have rules specifically for amusement devices. Since processing times can vary, it’s a good idea to start this process at least 30–45 days before your event.
Understand insurance and supervision requirements. Many public venues will ask for proof of liability insurance before approving inflatable setups. Most professional rental companies carry this coverage and can provide a certificate of insurance upon request. During the event, active adult supervision is mandatory. Supervisors are responsible for enforcing safety rules, managing guest flow, and helping anyone who might need assistance entering or exiting.
Rely on professional installation. Rental companies handle delivery, secure setup, proper anchoring, and a final safety inspection before the event begins. This ensures compliance with safety standards and aligns with the setup strategy mentioned earlier. Never attempt to adjust stakes or weights on your own after installation – if you have concerns about stability, contact the rental provider immediately. Anchoring methods must be tailored to the surface type, and only trained technicians should make these adjustments.
Final Placement Walkthrough
After preparing the site and anchoring the inflatable, conduct a final walkthrough to confirm safety and ensure smooth guest movement. Once installed, double-check that the inflatable is secure, fully inflated, and fits well within the event’s overall layout.
Testing and Adjustments
Check that all anchor points are secure. For grass installations, confirm that 18–24 inch heavy-duty steel stakes are driven at a 45-degree angle away from the inflatable. Each anchor point should handle at least 200 lbs of pull resistance. On concrete or asphalt, make sure anchor points have at least 40 lbs of sandbags or 50–80 lb water bags. For sand setups, use 18–24 inch auger-style anchors along with extra sandbags. Keep in mind, wind limits for sand setups are lower, dropping to 10–12 mph compared to 15–20 mph for grass or concrete.
Test inflation firmness. Perform a physical check to ensure the inflatable is properly inflated – there should be no sagging, pooling material, or soft spots. Walk around the perimeter, inspecting for sagging or tension issues at the seams. Make sure all inflation tubes are secured and vents are closed. Seal unused inflation tubes and deflation zippers. Ensure the blower is connected to a dedicated 15–20 amp GFCI outlet, with the air fill hose straight and free of kinks. For reference, a 12′ x 12′ bounce house typically requires a blower with 1 HP and 800–900 CFM, while larger units (20′ x 20′ or more) need 2 HP and 1,000–2,000 CFM.
Maintain proper clearances. Ensure there’s at least 5 feet of clearance on all sides and 15–20 feet overhead, keeping the inflatable away from branches or power lines. Inside the unit, check for loose or wrinkled removable linings that could trip guests. Securely wrap the blower cord and extension cord together at the connection point to prevent accidental disconnection during the event. Recheck anchor points every 2–4 hours to compensate for any shifting caused by movement or vibrations.
Event Layout Integration
Once the inflatable is secure and functioning properly, focus on its placement within the event space. Position the entrance so it faces the main gathering area or audience. This arrangement simplifies supervision and makes it easier for guests to locate the inflatable. Place the blower behind the inflatable, directing the sound away from the main event area so it blends into the background. For events with mixed age groups, consider placing toddler-friendly inflatables near larger ones. This setup allows parents to keep an eye on kids of different ages while maintaining safety.
Plan for smooth traffic flow. Set up shoe and towel stations near the inflatable’s entry and exit to minimize tracking of sand, grass, or water into other areas. For water slides, ensure runoff is directed away from high-traffic zones, patios, or entrances to buildings. If you’re using inflatable obstacle courses at large events like school functions or neighborhood gatherings, position them strategically to handle guests in bursts, reducing overcrowding that can occur with square bounce houses. Lastly, make sure each blower has its own dedicated circuit to avoid tripping breakers when operating other equipment like food warmers or sound systems.
Conclusion
Key Takeaways
Before reserving an inflatable, make sure to measure your setup area. The surface should be flat, free of debris, and have an accessible power outlet within 25 feet for the 20 Amp circuit most commercial inflatables require. Double-check that anchoring and clearance requirements are met, and always pause use if wind speeds exceed 15–20 mph.
Finally, do a walkthrough to confirm anchor points are secure and the inflatable is fully inflated. Following this checklist ensures every detail of the setup is properly addressed, so you can confidently incorporate the inflatable into your event layout.
How Bouncy Rentals Can Help
Bouncy Rentals USA simplifies the setup process, taking care of everything from site assessment to secure anchoring. Whether you’re working with grass, concrete, or asphalt, our team ensures your inflatables – whether bounce houses, water slides, or obstacle courses – are positioned safely and efficiently. We also handle all electrical needs to prevent any disruptions during your event.
Check out Bouncy Rentals USA for a wide range of inflatables and party extras. Our equipment is fully insured, sanitized, and delivered on time by our dedicated team, so you can focus on making your event a success.
FAQs
How do I choose the safest spot for a bounce house at a big event?
Pick a flat, open area free from obstacles to ensure stability and safety. Stay away from hazards like overhead power lines, trees, or sharp objects. The space should be spacious enough to accommodate the bounce house and allow guests to move around comfortably. Always anchor the inflatable securely and inspect the area thoroughly before setting up to reduce potential risks.
What anchoring do I need for grass vs. concrete?
Anchoring your inflatables properly depends on the type of surface you’re working with. For grass, it’s best to use 1-inch diameter, 18-inch steel stakes to secure the inflatable firmly, especially in compact soil. On concrete or asphalt, you’ll need ballast systems with at least 360-500 lbs of weight per anchor point. Don’t forget to place a protective tarp underneath to minimize wear and tear from abrasion. Proper anchoring is key to keeping everything secure and safe during your event.
How do I plan traffic flow around multiple inflatables?
To keep traffic moving smoothly around multiple inflatables, it’s important to plan your layout carefully. Leave enough space between attractions to avoid overcrowding, and arrange the inflatables in a way that forms a logical flow or circuit. This setup helps guide guests naturally from one attraction to the next.
Make sure to include clear pathways and visible signage to direct foot traffic and minimize bottlenecks. For larger crowds, placing the most popular inflatables near entrances or central spots can help spread out visitors more evenly. This not only improves safety but also makes the experience more enjoyable for everyone.