
Combining water activities with inflatables can turn any event into a fun-filled experience for kids. To ensure everything runs smoothly, you’ll need to plan carefully, prioritize safety, and manage the setup and cleanup efficiently. Here’s a quick rundown:
- Measure Your Space: Ensure enough room for inflatables and safety zones. For example, a 15 x 15 ft bounce house needs at least 20 x 20 ft of space.
- Check Utilities: Confirm access to water and a dedicated 20-amp power circuit within 100 feet.
- Book Early: Reserve rentals in advance, especially during peak seasons.
- Safety First: Clear the area of hazards, assign adult supervision, and inspect equipment thoroughly.
- Organize Zones: Separate wet and dry activities, keep food areas dry, and maintain clear pathways.
- Cleanup: Deflate, rinse, dry, and inspect rentals before pickup.
With proper planning and attention to detail, you can create a safe and enjoyable event for everyone.
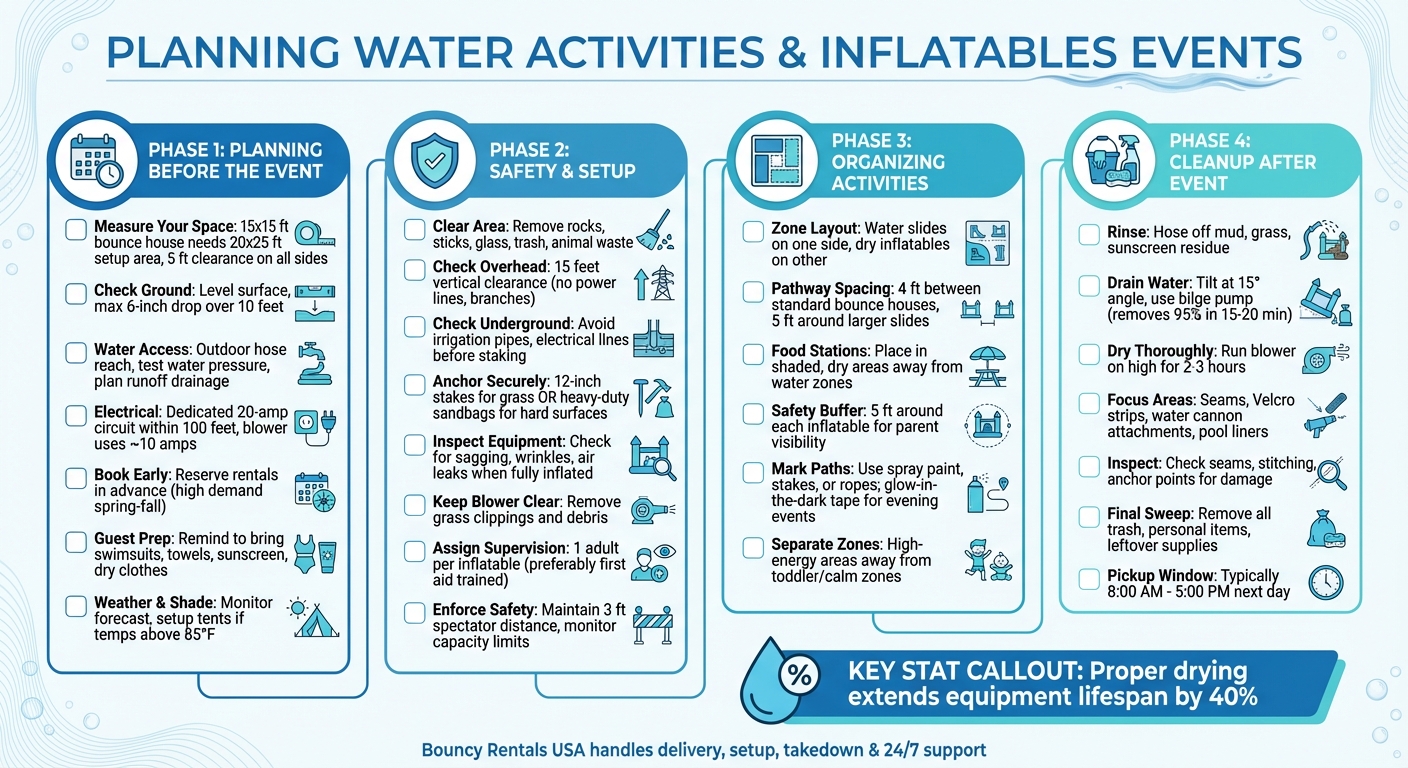
Complete Checklist for Water Inflatables Event Planning Setup and Safety
Planning Before the Event
Measure Your Space and Layout
Start by measuring your yard in feet to ensure you have enough room for the inflatable. For example, a 15 x 15 ft bounce house needs a setup area of 20 x 20 to 25 x 25 ft, with at least 5 feet of clearance on all sides. Obstacle courses, on the other hand, can be much larger – some are 30 to 60 feet long and require setup areas as big as 70 x 25 feet.
Make sure the ground is level, with no more than a 6-inch drop over 10 feet. You’ll also want to check for underground hazards like irrigation pipes or cables that could interfere with the 12-inch stakes used to secure the inflatable.
Check Water and Electrical Access
If you’re setting up a water slide or splash zone, confirm that your outdoor hose can reach the area. Test the water pressure ahead of time and figure out where the runoff will go. You’ll need a nearby drain or a grassy spot where water can flow without creating muddy areas around the inflatable.
For power, inflatables typically require a dedicated 20-amp circuit within 100 feet of the setup area. A standard blower uses around 10 amps while running, so it’s important to avoid overloading circuits by keeping the power source exclusive to the inflatable. Also, ensure the grass is well-mowed (ideally 2–3 days before the event) to provide a secure surface for staking and to add some cushioning.
Reserve Equipment Early with Bouncy Rentals USA
Once you’ve confirmed your space and utilities, it’s time to book your rentals. Water slides and bounce houses are in high demand from late spring through early fall, so securing your equipment early is key. Bouncy Rentals USA takes care of delivery, setup, and takedown, and they inspect all equipment before it leaves their warehouse. Booking ahead also gives you flexibility to make changes if your guest list grows or shrinks.
Tell Guests What to Bring
In your invitations, remind guests to pack essentials like swimsuits, towels, sunscreen, and extra dry clothes. Kids often switch between water slides and dry bounce houses, so having a change of clothes on hand helps keep everyone comfortable and avoids last-minute wardrobe problems.
Monitor Weather and Arrange Shade
Check the weather forecast as your event approaches. If temperatures are expected to climb above 85°F, set up tents or canopies near activity areas to provide shade. These can also double as a backup plan in case of unexpected rain.
Safety and Setup Steps
Prepare the Area and Choose the Right Spot
Before setting up, clear the area of anything that could cause injuries or damage, like rocks, sticks, broken glass, or trash. Don’t forget to check for animal waste too – nobody wants surprises like that during a fun day. The ground should be flat, with no more than a 6-inch slope over a 10-foot distance. If the terrain isn’t level, you’ll need to either adjust the area or find a better location.
Look up and make sure there’s at least 15 feet of vertical clearance above the inflatable. Watch out for power lines, tree branches, or utility cables. Also, check below the surface for irrigation pipes or electrical lines before staking anything into the ground. If you’re setting up a water slide, choose a spot that drains well or is near a drain to avoid water pooling and creating slippery, muddy areas.
Inspect the Equipment for Safety
Once the inflatable is fully set up, let it inflate completely so you can check for any issues like sagging, wrinkles, or air leaks. Anchor it securely using 12-inch stakes if it’s on grass, or heavy-duty sandbags for harder surfaces. Make sure there’s enough clearance around all sides of the inflatable. Keep the blower area free from blockages like grass clippings or debris to ensure it functions properly.
Assign Supervision to Responsible Adults
Even with everything set up perfectly, supervision is key. Assign at least one adult – preferably someone with first aid training – to monitor each inflatable. They’ll need to enforce capacity limits, stop any roughhousing, and ensure spectators stay at least 3 feet away from the inflatable. On hot days, it’s also important to periodically check the surface temperature of the inflatable, as it can get hot enough to cause burns.
Organizing Activities During the Party
Once your setup is ready, it’s time to plan activities that keep the fun going while ensuring everything runs smoothly and safely.
Combine Water and Dry Inflatables
Position water slides near dry bounce houses and obstacle courses to let guests easily move between wet and dry activities. This setup helps spread out the crowd and avoids long lines at any single attraction. Keep water attractions on one side and dry activities on the other, with a 4-foot pathway between standard bounce houses and 5-foot pathways around larger slides. This spacing reduces the chance of water spilling into dry zones.
Keep Food Stations Dry
Place food machines in shaded, dry areas, far from water attractions. This way, guests can grab snacks without needing to cross wet zones. Use cones or ropes to clearly define these areas and keep things organized.
Define Clear Paths Between Zones
Use spray paint, stakes, or ropes to map out activity zones. Leave a 5-foot safety buffer around each inflatable so parents can easily keep an eye on their kids across multiple areas. Separate high-energy spots like obstacle courses from calmer zones such as toddler play areas or seating. This reduces crowding and minimizes the risk of accidental bumps or collisions. Make sure emergency routes stay open and unobstructed. For evening events, use glow-in-the-dark tape to mark paths and edges, helping prevent trips and falls in low light.
Cleanup After the Event
Once the party wraps up, it’s time to clean up and prepare the equipment for pickup by Bouncy Rentals USA. Taking care of the rentals after use not only ensures their safety but also helps maintain their quality for future events.
Deflate and Inspect All Inflatables
Start by rinsing each inflatable unit with a hose to wash off mud, grass, or sunscreen residue. Use an air blower to clear away any excess water and debris. Once deflated, check the seams, stitching, and anchor points for any signs of damage. Be sure to vacuum or sweep out any leftover debris to leave the inflatables in good shape.
Dry and Clean Thoroughly
For water inflatables, tilt them at a 15-degree angle to help drain water effectively. If you’re dealing with pool liners or deeper basins, a bilge pump can remove up to 95% of the water in just 15–20 minutes. After that, run the blower on high for 2–3 hours to dry out any remaining moisture. Pay special attention to areas like seams, Velcro strips, water cannon attachments, and pool liners, as these tend to hold more water. Use dry towels and soft brushes to tackle any lingering dampness. Proper drying can extend the lifespan of the equipment by as much as 40%.
Clear Trash and Gather Feedback
Before the rental pickup, which typically happens between 8:00 AM and 5:00 PM the next day, dispose of all trash, personal belongings, and leftover supplies. Double-check the area to ensure nothing is left behind. Lastly, take a moment to ask your guests for feedback about the event – what they enjoyed and what could be improved. Their input can be invaluable for planning future gatherings.
Conclusion
Bringing together water activities and inflatables can be a breeze when you follow a well-thought-out plan. Start by measuring your space, ensuring access to water and electricity, and reserving your rentals early with Bouncy Rentals USA. They handle the heavy lifting, offering services like delivery, professional setup, 24/7 text support, and even an emergency road crew to tackle any unexpected hiccups. Their support aligns perfectly with a step-by-step checklist, guiding you from the initial setup to the final cleanup.
Safety remains a top priority, with professional equipment handling, strict adherence to industry guidelines, and thorough inspections. Keeping clear pathways and maintaining proper supervision ensures a secure and enjoyable environment for everyone.
A solid plan keeps everything running smoothly, allowing you to focus on what truly matters – making sure your guests have a fantastic time.
When the party winds down, proper cleanup is key. Deflating, drying, and inspecting the equipment not only wraps up the event but also keeps everything in great shape for future use. With Bouncy Rentals USA taking care of logistics, you’re free to relax, enjoy the festivities, and create unforgettable memories with your guests.
FAQs
What safety precautions should I take when using water inflatables?
When using water inflatables, safety should always come first. Make sure a responsible adult is supervising at all times to keep an eye on everyone. Double-check that the inflatable is properly anchored to avoid any tipping or shifting while in use. Follow the manufacturer’s guidelines for setup and safety, and inspect the area around the inflatable for any sharp objects, debris, or uneven ground that could pose risks. Also, stick to the recommended capacity to prevent overcrowding and ensure everyone has a safe and enjoyable time.
What do I need to prepare for electrical and water access when using inflatables?
To set up your inflatable properly, you’ll need a dedicated 15-amp outlet within 100 feet of the setup area. For larger inflatables, you might need more than one outlet. If the nearest outlet is over 25 feet away, let your rental provider know ahead of time so they can arrange extension cords or other power options. Also, ensure the setup area is free of obstacles, with at least 3 feet of clearance around the inflatable to allow for safe installation and use.
For water inflatables, such as slides or splash zones, you’ll need a garden hose that can connect to the inflatable’s water inlet. Make sure the hose is long enough to comfortably reach your water source. Check all connections to prevent leaks, tightening them securely and using washers or adapters if necessary. While the inflatable is in use, keep an eye on the water flow to ensure it remains steady and safe for operation.
How do I clean and maintain inflatables after use?
To keep your inflatable in good shape and safe for future use, here’s what you need to do:
- Clear off debris: After using the inflatable, remove any grass, dirt, or small objects stuck to it. A soft brush or a vacuum works well for this.
- Wash the surface: Use warm water and a mild soap with a soft cloth or sponge to clean the inflatable. Make sure to rinse it thoroughly so no soap residue is left behind, as that can cause damage over time.
- Sanitize: Apply a safe disinfectant to kill any germs or bacteria, especially if multiple people used the inflatable.
- Dry it completely: Ensure the inflatable is fully dry before storing it. This prevents mold and bad odors. Towels or fans can help speed up the drying process.
- Store it right: Deflate the inflatable completely and store it in a cool, dry spot away from direct sunlight. This protects it from moisture and UV damage.
Taking these steps will keep your inflatable clean, safe, and ready to use for your next event!