
Setting up an inflatable safely requires careful planning and attention to detail. Whether indoors or outdoors, the process involves selecting the right location, preparing the surface, using proper equipment, and following strict safety measures. Here’s a quick summary:
- Indoor Setup: Ensure at least 20 feet of ceiling clearance, use a tarp to protect the floor, maintain ventilation, and have a power source within 50 feet.
- Outdoor Setup: Choose a flat, debris-free surface, check for overhead hazards, and use stakes or sandbags for anchoring. It is also vital to set up a safety perimeter to keep bystanders at a safe distance.
- Equipment Needs: A commercial blower, heavy-duty tarp, extension cords (12-gauge, max 50 feet), and appropriate anchoring tools.
- Safety Checks: Inspect for damage, secure anchors, and verify all equipment is functioning properly.
- Usage Rules: Follow weight and occupancy limits, supervise participants, and deflate the inflatable during high winds.
Proper preparation ensures safety, protects your equipment, and creates a smooth experience for everyone involved.
Site Preparation Before Setup
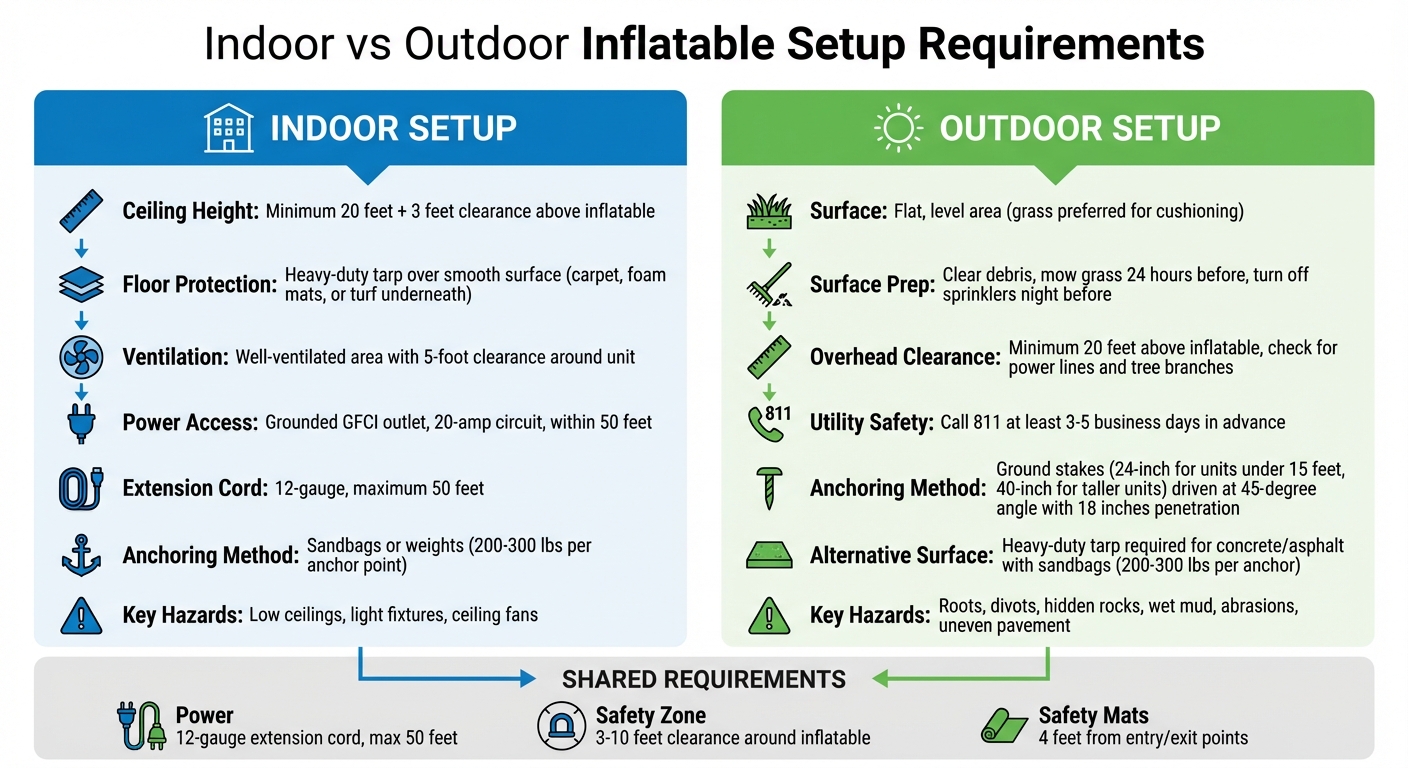
Inflatable Setup Requirements: Indoor vs Outdoor Comparison Chart
Setting up an inflatable safely starts with selecting and preparing the right location. If the site isn’t ready, it could lead to equipment damage, safety issues, or even event cancellations. Before the inflatable arrives, take a close look at the space and get it ready – whether you’re working indoors or outdoors. Here’s how to prepare each type of space effectively.
Preparing Indoor Spaces
For indoor setups – like in gyms, community centers, or event halls – there are a few key things to check:
- Ceiling Height: Make sure there’s at least 20 feet of clearance, plus an extra 3 feet above the inflatable for safety.
- Floor Protection: Use a flat, smooth surface covered with a heavy-duty tarp. Carpet, foam mats, or turf underneath can help prevent damage like abrasions or pinholes.
- Ventilation and Space: Keep the area well-ventilated, remove any obstacles, and maintain a 5-foot clearance around the inflatable to avoid overheating or interference.
- Power Access: Ensure a grounded GFCI outlet is available on a 20-amp circuit within 50 feet. Use a 12-gauge extension cord no longer than 50 feet to maintain stable power.
Preparing Outdoor Spaces
Outdoor setups require a bit more groundwork to ensure safety and stability:
- Surface Selection: Choose a flat, level area. Grass works best for cushioning and staking, but if you’re setting up on concrete or in a public park, use a heavy-duty tarp underneath.
- Debris and Surface Prep: Clear away debris and, if using grass, mow it 24 hours before setup. Turn off sprinklers the night before to keep the surface dry and stable.
- Overhead Clearance: Check for hazards like power lines, tree branches, or eaves. Keep at least 20 feet of clearance above the inflatable and try to position it in the shade to minimize UV exposure and overheating risks.
- Utility Marking: Call 811 at least 3–5 business days in advance to have underground utilities marked for safety.
- Anchoring: Use stakes appropriate for the size of the inflatable – 24-inch stakes for units under 15 feet and 40-inch stakes for taller ones. Drive them into the ground at a 45-degree angle for maximum stability.
| Surface Type | Best Anchoring Method | Key Hazards to Check |
|---|---|---|
| Grass | Ground stakes (24"–40") | Roots, divots, hidden rocks, wet mud |
| Concrete/Asphalt | Sandbags (200–300 lbs per anchor) | Abrasions, uneven pavement, cracks |
| Indoor Floor | Sandbags or weights | Low ceilings, light fixtures, ceiling fans |
| Gravel | Sandbags with a heavy tarp | Sharp stones, uneven surfaces |
Equipment and Accessories Checklist
Getting the right equipment ready before starting can save you from delays, safety concerns, or even damaging your inflatable. Forgetting a single item can turn a smooth setup into a chaotic situation. This checklist is designed to ensure you’re prepared for both indoor and outdoor installations, working alongside your site prep steps for seamless functionality and safety.
Required Equipment
Start with your power and electrical setup. Knowing how to replace inflatable blowers is vital, as a commercial blower is essential – make sure it has at least 1 HP and 9 amps to maintain steady pressure throughout the event. Use a 12-gauge, 3-wire extension cord, keeping it under 50 feet to avoid voltage drops. For added safety, connect a GFCI adapter to the extension cord before plugging it into a power source, especially if the area is damp.
For anchoring, choose the right tools for the surface. Grass installations need heavy-duty ground stakes, while hard surfaces like concrete or indoor floors require sandbags – plan for 200–300 lbs per anchor point. Protect your inflatable with a heavy-duty tarp or vinyl ground cloth to prevent surface damage.
Don’t forget transport and safety tools. A hand truck or dolly will help you move heavy equipment, while a sledgehammer is necessary for driving stakes. Safety goggles are a must when working with anchoring tools. Place safety mats at entry and exit points, extending at least 4 feet from the inflatable to prevent slips. Finally, include a maintenance and repair kit with vinyl glue (like SX-69), patches, a mild cleaner, a soft brush, and removable tape for marking any damage.
| Equipment Category | Essential Items | Specifications |
|---|---|---|
| Air Supply | Commercial Blower | Min 1 HP/9 amps; ensure intake is clear |
| Electrical | Extension Cord | 12-gauge, 3-wire; max 50 ft |
| Safety | GFCI Adapter | Required for shock prevention |
| Anchoring | Stakes / Sandbags | 18-inch stakes for grass; 200–300 lbs sandbags for hard surfaces |
| Protection | Ground Tarp | Heavy-duty vinyl to prevent pinholes |
| Transport | Dolly / Hand Truck | For moving heavy units |
| Maintenance | Repair Kit | Vinyl glue, patches, mild cleaner, removable tape |
Pre-Setup Inspection
Before starting, take time for a thorough inspection to ensure everything is in working order. Check for any visible rips, holes, or worn seams. Inspect structural components like mesh, netting, and bonding areas to confirm they are intact. Examine your blower and electrical cords for fraying, damage, or blocked air intakes. Make sure all plugs are secure and that deflation zippers and air vents are properly closed.
Review your anchoring hardware to confirm you have the correct number and size of anchors. Inspect all ropes, straps, and tethers for signs of wear. Ensure the inflatable is clean and free of moisture, residue, or sharp objects that could cause slips or punctures. If you find any damage during deflation, use removable tape to mark small tears or holes so they can be repaired before the next use. For deeper maintenance, fully inflate and clean the unit every 10 uses or at least once per quarter to catch early signs of wear.
Setup Instructions Step-by-Step
Once you’ve prepared the site and checked your equipment, it’s time to move on to the setup process. Safety should always be your top priority during every phase. Following the proper setup techniques not only protects the equipment but also ensures smooth operation throughout your event.
Tarp Placement and Unit Positioning
Start by laying out a heavy-duty tarp or vinyl ground cloth over the cleared area. Make sure it extends beyond the inflatable’s footprint to shield it from abrasive surfaces or moisture. Smooth out any wrinkles or folds to avoid friction that could damage the inflatable’s base.
Next, determine the correct orientation of the inflatable. The inflation tube should face the power source, ideally within 50 feet of a GFCI outlet, while the entrance should face the participants. Carefully unroll the inflatable over the tarp, ensuring the surface remains smooth to prevent damage. Typically, the inflation tube is located at the beginning of the roll, with the entrance at the opposite end.
For indoor setups, confirm that overhead clearances meet safety requirements. For outdoor installations, check for overhead power lines and ensure the wind won’t push the inflatable toward obstacles.
Once the unit is in place, you’re ready to secure it using the appropriate anchoring methods.
Anchoring the Inflatable
The anchoring method you choose will depend on the surface type. For outdoor setups on grass, use metal stakes – 24 inches for inflatables under 15 feet tall and 40 inches for taller ones. Drive each stake at a 45° angle, ensuring at least 18 inches of penetration into the ground. Place bottom anchors about 3 feet from the unit, and top anchors 7–12 feet away.
Before driving stakes, call 811 or your local utility company to mark any underground lines. Once the stakes are in, cover their exposed heads with cones or delineator posts to reduce tripping hazards.
For indoor setups or hard surfaces, use sandbags instead of stakes. Each anchor point should be weighted with 200–300 lbs to keep the inflatable secure. Evenly distribute the sandbags around the perimeter, attaching them to the manufacturer-specified anchor points. Use ratchet or cam buckle tethers to make quick tension adjustments.
"Always adhere to the manufacturer’s guidelines for the number and size of anchors required." – Magic Jump Inc.
Inflation and Final Setup
With the inflatable anchored, prepare it for inflation. Close all zippers, Velcro compartments, and unused air ports. Tie off any extra ports clockwise or secure them with rope to prevent air from escaping. Attach the blower, ensuring the hose remains untwisted and free of kinks.
Plug the blower into a GFCI outlet using a 12-gauge extension cord no longer than 50 feet. Turn on the blower and guide the inflatable upright as it fills with air. Most units will fully inflate within 2 to 5 minutes. During this process, smooth out any wrinkles to maintain an even surface.
Once inflated, test the stability of the anchors by gently pushing the walls. Place safety mats at entry and exit points, extending at least 4 feet outward. Use cones or delineator posts to create a "no-walk" zone around the blower, cords, and anchor points. Cover or tape down electrical cords to prevent tripping, and keep the blower running continuously to maintain inflation.
Safety Checks and Final Inspection
Anchor and Equipment Verification
Take a walk around the entire inflatable to inspect each anchor point. Make sure every tie-down ring and strap is properly secured – any loose connection can compromise the unit’s stability and safety. For setups on grass, stakes should be driven into the ground at a 45° angle pointing away from the inflatable, with at least 18 inches buried securely. On harder surfaces like concrete or asphalt, each anchor point should be weighted down with 200–300 pounds of sandbags or similar weights.
Gently push against the inflatable walls to check for stability. The structure should not shift or lift. Examine all ropes, straps, and buckles for signs of wear or damage, such as fraying. Additionally, ensure the blower is on a flat, stable surface with a clear and unobstructed air intake. Double-check that the inflation tube is securely attached to the blower for proper operation. The blower should also be connected to a GFCI outlet using a 12-gauge extension cord for safe power supply.
"Adhere to the manufacturer’s weight and capacity limits for the inflatable. Clearly communicate these limits to users and monitor compliance." – Titan Inflatables
Safety mats should extend at least 4 feet from all entry and exit points. Create a clearance zone of 3 to 10 feet around the inflatable to ensure safe operation. Keep a fire extinguisher nearby, specifically one rated for electrical fires, and make sure all operators are familiar with emergency deflation procedures.
After confirming all anchors and equipment are secure, move on to enforcing capacity limits and usage rules.
Capacity Limits and Usage Guidelines
Once the inflatable is properly anchored and equipment is verified, shift your attention to maintaining capacity limits for safe use. Clearly post signage displaying the maximum occupancy, weight, and age restrictions. For standard commercial bounce houses, the typical limit is 5 riders or a combined total weight of 500 pounds. Individual participants should weigh no more than 185 pounds and be between 36 and 55 inches tall. To minimize the risk of collisions, group participants by similar age, height, and weight, and avoid mixing toddlers with older kids.
Assign a trained supervisor to oversee the inflatable and enforce these rules. Before entering, participants should remove shoes, jewelry, eyeglasses, and any sharp items that could damage the inflatable or cause injuries. Check the interior of the unit for any debris or objects that could puncture the material. Lastly, if wind speeds exceed 15–25 mph, immediately deflate the inflatable and evacuate all participants to ensure safety. Once the event is over, follow a proper folding and packing routine to maintain the unit’s condition.
Conclusion
Setting up an inflatable successfully requires careful site preparation, proper equipment handling, and strict attention to safety guidelines. Following a clear checklist ensures every step – from preparing the site to conducting a final inspection – meets established safety standards. Whether your event is indoors or outdoors, the basics remain the same: pick a level surface, lay down protective tarps, secure anchors properly, and maintain constant supervision throughout the event. These precautions not only safeguard your guests but also help preserve your equipment.
"Proper inflatable setup and supervision don’t just ensure the safety of users – they also protect your investment." – Beyond Tent
Adhering to these steps can mean the difference between a fun-filled celebration and a preventable safety issue. This summary highlights the key actions needed for a smooth and secure inflatable setup.
Bouncy Rentals USA (https://bouncyrentalsusa.com) takes care of every detail, offering sanitized, insured equipment and professional installation. From assessing the site to anchoring inflatables securely, they handle it all so you can focus on enjoying your event. With a wide range of bounce houses, water slides, obstacle courses, and party extras, they provide everything needed to create a safe, memorable celebration.
FAQs
How do I know if my space is big enough?
When setting up an inflatable, measure its dimensions carefully and make sure to add at least 5 feet of clearance on all sides. This extra space is crucial for safe operation and setup. Always double-check your available space to ensure everything fits properly and avoid any last-minute surprises.
Can I set up on concrete or indoors without stakes?
Yes, you can set up inflatables on concrete or indoors without using stakes. Instead, you can anchor them with alternatives like sandbags or water weights. These options provide the necessary stability when stakes aren’t an option due to hard surfaces or indoor settings. Just make sure the inflatable is secured properly to keep it safe during use.
What should I do if the wind picks up during use?
If the wind starts to pick up, it’s crucial to act quickly. Turn off the blower right away, guide everyone out of the inflatable, and deflate it immediately. This becomes even more important if wind speeds go over 15 mph, as higher winds can make the inflatable unstable or even cause it to lift. Prioritizing safety in these conditions is a must.