
Obstacle course events are a fantastic way to energize students, encourage physical activity, and build teamwork. But pulling off a successful event requires detailed preparation. From defining goals and creating a budget to ensuring safety and organizing volunteers, every step matters. Here’s a quick breakdown of what you need to know:
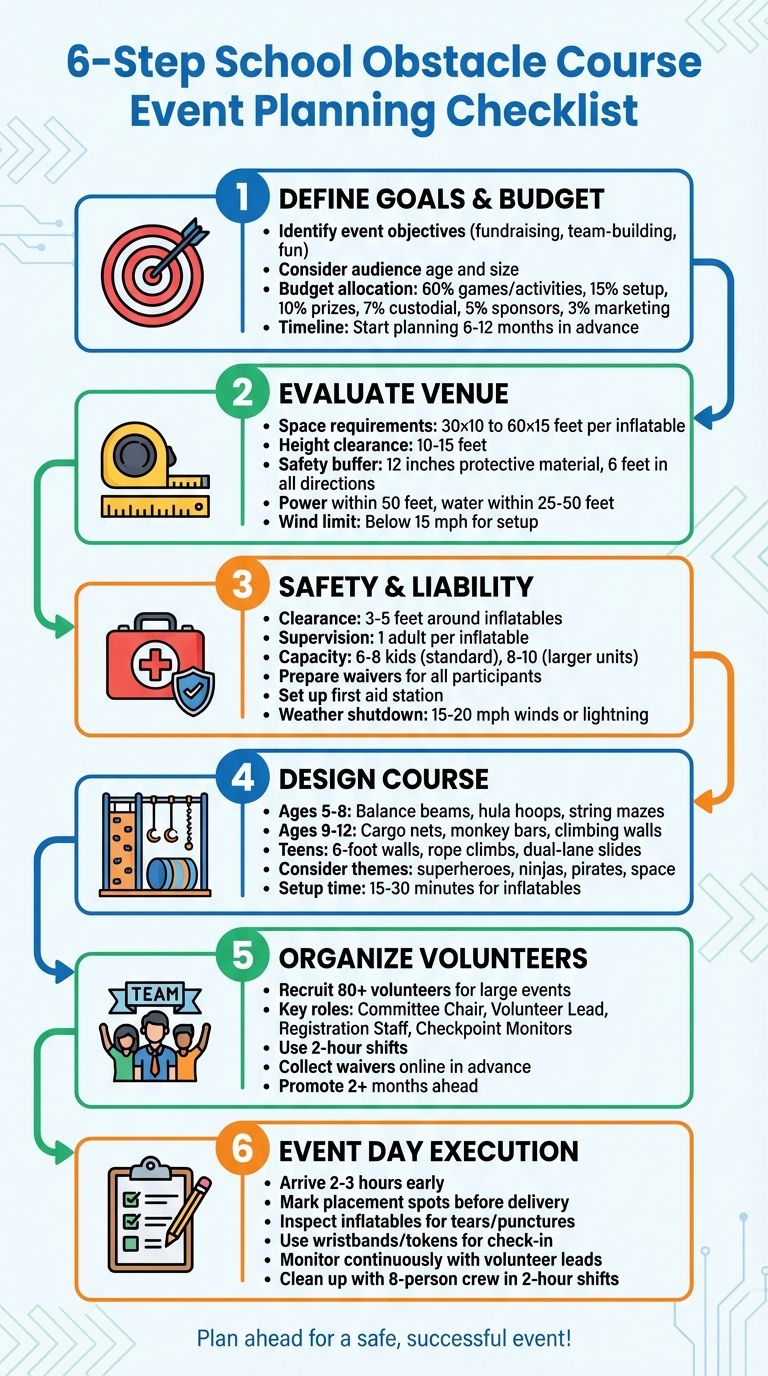
- Define Goals: Know the purpose of your event – fundraising, team-building, or just fun – and tailor activities to your audience’s age and size.
- Budget and Timeline: Allocate funds for rentals, setup, prizes, and marketing. Start planning 6–12 months in advance.
- Venue Prep: Measure space, clear hazards, and plan for weather issues. Ensure proper safety buffers and power access.
- Safety and Liability: Conduct thorough inspections, prepare waivers, and set up first aid stations. Follow strict supervision ratios.
- Obstacle Design: Choose age-appropriate challenges and consider themes to keep kids engaged.
- Volunteers and Registration: Assign clear roles, recruit a large team, and streamline check-in with pre-collected waivers.
- Event Day Execution: Arrive early for setup, inspect inflatables, monitor activities, and keep communication open.
6-Step School Obstacle Course Event Planning Checklist
Step 1: Define Event Goals and Requirements
Identify Event Objectives
Start by determining the purpose of your event. Are you organizing it to raise money for new playground equipment, encourage teamwork among students, or simply offer a fun break from the daily classroom routine? Your main goal will guide everything – from the type of obstacles you choose to how you promote the event.
Next, consider your audience. Younger kids (ages 3–12) tend to enjoy simpler activities like bounce houses and small obstacles, while older children (ages 5 and up) might prefer competitive racing lanes or more challenging climbs. The scale of your event also matters – a school carnival for 200 students is a very different scenario than a field day with 600 participants. Knowing your audience and expected turnout helps you decide how many inflatables to rent and how many volunteers you’ll need. For example, a larger event with eight outdoor stations might require over 80 volunteers to handle setup, shifts, and safety monitoring tasks.
Once you’ve nailed down your objectives and audience, it’s time to map out your budget and timeline.
Create a Budget and Timeline
Divide your budget into clear categories. Research shows that successful school carnivals often allocate their funds as follows: 60% for games and activities (like obstacle course rentals), 15% for general setup (tables, tents, etc.), 10% for prizes, 7% for custodial services, 5% for sponsor recognition, and 3% for marketing. Use a spreadsheet to track estimated costs and update it as you confirm vendor pricing.
Consider incorporating tiered sponsorships to expand your budget. Smaller sponsors could cover items like face painting supplies, while larger sponsors might fund big-ticket rentals. As Reventals suggests:
"Communicate how your event will utilize sponsor money and benefit the school, as well as how the business can benefit, too".
This approach not only helps stretch your budget but also builds stronger connections with your local community.
A solid timeline is equally important. Nearly half of event planners (48%) begin organizing their events 6 to 12 months in advance. Establish firm deadlines for tasks like reserving equipment, recruiting volunteers, and launching promotional efforts. Don’t forget to account for custodial fees, which often make up about 7% of your total budget. If your event runs beyond regular school hours, be sure to include after-hours cleaning costs in your planning.
Step 2: Evaluate the Event Space and Venue
Measure Space and Plan Layout
Start by measuring your venue with a tape measure and taking notes. Inflatable obstacle courses typically need between 30×10 feet and 60×15 feet, while bounce houses require 13×13 to 15×15 feet, and combo units take up 20×15 to 30×20 feet of space. Most inflatables are 10 to 15 feet high, so make sure there’s enough overhead clearance, free of branches, power lines, or other obstructions.
Take a close look at the ground, too. Clear away hazards like tree stumps, rocks, or uneven patches that could cause trips. If you’re setting up on grass, ensure the area is mostly level. For hard surfaces like asphalt or concrete, plan to create a safety buffer. Lay down at least 12 inches of protective material – such as mulch, sand, or rubber mats – extending 6 feet in every direction around each inflatable.
Don’t forget to check with your facilities manager about key logistics. Make sure there are power sources within 50 feet and water outlets within 25–50 feet. If the event is indoors, confirm that the HVAC system can handle proper ventilation. Also, ask about any venue-specific safety or evacuation protocols you’ll need to follow.
Once you’ve mapped out the layout, it’s time to plan for weather-related challenges.
Prepare for Weather Conditions
With the layout finalized, focus on handling potential weather issues. Only set up inflatables when wind speeds are below 15 mph to keep them safe and stable. Avoid setting up during heavy rain, as wet surfaces can become slippery and dangerous.
Stay on top of weather forecasts. Check a week in advance and again 24 hours before the event. If bad weather is expected, have a backup plan ready. This could mean moving the event indoors to a gym or cafeteria. Review your rental agreement’s cancellation policies and communicate your contingency plan ahead of time to volunteers, sponsors, and families. This way, everyone knows what to expect.
Step 3: Address Safety and Liability
Conduct Safety Checks and Inspections
Before the event kicks off, take time to inspect the entire course thoroughly. Clear away any debris, rocks, or uneven patches that could cause accidents. Double-check that inflatables are securely anchored and inflated according to the manufacturer’s guidelines. Electrical connections should be GFCI-protected, and cords must be kept well away from walkways to avoid tripping hazards. Maintain a 3–5 foot clearance around each inflatable. This not only helps prevent collisions but also ensures supervisors can move freely to monitor activity. A solid safety check lays the groundwork for managing liability and waiver processes effectively.
Prepare Waivers and Insurance
Once safety inspections are complete, focus on creating legal protections to manage risk. Draft a waiver that includes essential details such as your school or organization’s name, event specifics (date and location), and a clear explanation of potential risks. A valid waiver must provide "consideration", meaning participants gain something in return, like the opportunity to take part in the event. However, remember that waivers only cover simple negligence – they won’t protect against gross negligence, intentional misconduct, or illegal actions. As LegalTemplates explains:
"The releasee may still be held responsible for claims not covered under the terms of the agreement or resulting from gross negligence or intentional acts".
Incorporate the waiver and event rules into the registration process. Collect full names, email addresses, and emergency contact details for all participants and volunteers. Volunteers need their own waivers, and for minors assisting with the event, a parent or guardian must sign on their behalf. Additionally, specify which state’s laws will govern the agreement, and make sure to keep all signed waivers on file for your records.
Arrange First Aid and Supervision
Set up a first aid station in a central, easy-to-access location, stocked with essential supplies like bandages, antiseptic wipes, ice packs, and an emergency contact list. Assign at least one adult to supervise each inflatable. For standard bounce houses, limit the number of children to 6–8 at a time to avoid overcrowding and reduce the risk of injuries. Larger inflatables can accommodate 8–10 children.
For added safety, group participants by age or size to minimize the chance of accidents. Prohibit items like shoes, jewelry, sharp objects, food, and drinks inside the inflatables. Supervisors should also be trained to act quickly – shutting down equipment if winds exceed 15–20 mph or if lightning is detected. Keep emergency access routes clear, and if the event runs into the evening, use portable LED or string lights to illuminate walkways and prevent trips or falls.
| Safety Category | Protocol/Requirement |
|---|---|
| Supervision Ratio | Minimum 1 adult per inflatable unit |
| Standard Capacity | 6–8 children for standard units; 8–10 for larger units |
| Prohibited Items | Shoes, jewelry, sharp objects, toys, food/drinks |
| Weather Limit | Deflate if winds reach 15–20 mph or if lightning occurs |
| First Aid Supplies | Bandages, antiseptic wipes, ice packs, emergency contacts |
| Site Safety | Clear debris, 3–5 feet of clearance, GFCI-protected outlets |
Step 4: Design the Obstacle Course
Select Obstacles and Themes
When creating an obstacle course, consider the age of your participants so the challenges are both fun and appropriate. For kids aged 5–8, simple elements like balance beams, hula hoops, and string mazes work best. For those aged 9–12, you can step it up with cargo nets, monkey bars, and climbing walls. Teens, on the other hand, might enjoy more demanding obstacles like 6-foot walls, rope climbs, and dual-lane slides.
If your event includes a wide range of ages, you might want to design multiple courses or create shorter, simpler versions of a larger course. This way, younger participants can join in safely without feeling left out. Start with what you already have – gym mats, cones, and ropes are great basics. For more elaborate setups, you can rent high-impact items like inflatable courses. Adding a theme can elevate the experience, turning a simple obstacle course into an adventure. Popular themes like superheroes, ninjas, pirates, or outer space naturally lend themselves to exciting elements like climbing walls, racing lanes, and tunnels, keeping kids engaged and eager to participate.
Use Inflatable Obstacle Courses
Inflatable obstacle courses are an excellent choice for school events. They’re safe, easy to set up, and packed with fun. Featuring soft walls and padded landings, these inflatables can be ready in just 15–30 minutes, making them a convenient option. Over the past year, the popularity of inflatable courses has surged by 25%. Companies like Bouncy Rentals USA (https://bouncyrentalsusa.com) handle everything from delivery to setup and safety checks, ensuring your event runs smoothly.
Before booking, measure your venue. Most standard inflatable courses need a space of 30×10 to 60×15 feet, along with an extra 5 feet of clearance on all sides. For events with mixed-age groups, combo units that include bounce areas and slides are a great option. These versatile inflatables can accommodate kids aged 3–14 and offer a variety of activities, keeping everyone entertained without the hassle of managing multiple separate setups.
Step 5: Organize Volunteers and Registration
Assign Volunteer Roles and Staffing
Once your logistics are in place, it’s time to assemble a strong volunteer team to keep the event running smoothly. Plan for a group of over 80 volunteers to cover all stations and shifts effectively. Break tasks into manageable roles and appoint a Committee Chair to oversee the entire operation. A Volunteer Lead should be in charge of coordinating shift changes and assigning tasks on the day of the event.
Key roles to fill include:
- Registration Staff: Responsible for check-ins and verifying waivers.
- Checkpoint Monitors: Positioned at the starting line, finish line, and mid-course locations to ensure participant safety.
- Service Station Staff: Manage hydration stations, snacks, and cleanup. These roles are especially critical for courses with water or mud obstacles, where participants may need assistance rinsing off.
Consider recruiting Physical Education teachers, fitness instructors, or older students from middle or high schools. Students looking to fulfill volunteer hours – like those in the National Honor Society – can be a great resource.
To keep volunteers energized and committed, use two-hour shifts. Assign supervisory roles to adults while delegating more physical tasks to students. Provide every volunteer with course maps and detailed agendas so they can confidently assist participants and answer questions.
With your volunteer team in place, focus on setting up a seamless registration process.
Set Up Participant Registration
For registration to run efficiently, assign a Treasurer to manage ticket sales and track finances. A Purchasing Coordinator should handle supplies like wristbands, bibs, and other registration materials. Take advantage of your school’s tax-exempt status to save on costs.
To avoid long lines, station at least two people at each registration table. Use wristbands or colored bibs to identify participants who have completed check-in quickly. Whenever possible, collect waivers ahead of time using online registration platforms – this reduces paperwork and speeds up the process on event day. For those registering on-site, have pre-printed waivers, clipboards, and pens ready at every station.
If the event involves multiple time slots or age-based groupings, assign specific start times during registration. This helps prevent overcrowding and ensures a smooth flow of participants on the course. To maximize turnout, promote registration details through school newsletters, social media, and assembly announcements. Start spreading the word at least two months before the event to build awareness and excitement.
Step 6: Execute Event Day Setup
Set Up and Inspect the Course
Plan to arrive 2–3 hours before the event begins to allow plenty of time for setup and to address any unexpected issues. Before the delivery team gets to work, mark the placement spots for each obstacle using spray paint or stakes to ensure everything is positioned correctly. As the inflatables are being set up, check that each unit is fully inflated and firm – no sagging allowed. Take a walk around each obstacle to inspect seams, stress points, and safety mesh for any signs of tears or punctures. Double-check that emergency exits are clearly labeled and easy to access. If you’ve rented the equipment from a professional provider, their team will handle the setup and initial safety checks, but it’s still a good idea to do a final walkthrough yourself to ensure everything is secure and ready to go.
Once the course setup is complete and inspected, shift your focus to participant check-in and orientation.
Check In Participants and Provide Orientation
Use physical identifiers like wristbands, tickets, or tokens to streamline participant check-in. This helps keep things organized and ensures a smooth start to the event.
Monitor the Event and Handle Problems
With your safety protocols and volunteer roles already in place, keep a close eye on the event to address any issues quickly. Assign volunteers to key locations such as the start, finish, and mid-course areas to monitor the flow of participants and handle concerns as they arise. Choose one or two volunteer leads to oversee staff and manage problem-solving during the event.
Set up a clearly visible first aid station, ideally staffed by a school nurse or a trained volunteer, and make sure participants know its location before the event begins. Coordinate with your school’s facilities manager ahead of time to review evacuation plans and clarify roles in case of an emergency. Use tools like the school’s PA system or megaphones to provide real-time updates or safety announcements as needed. Finally, maintain open communication between the Committee Chair, Rides/Obstacle Coordinator, and checkpoint volunteers so any issues can be resolved quickly and efficiently.
Conclusion: Post-Event Tasks and Feedback
Clean Up and Return Equipment
Start the cleanup process as soon as the event ends. Carefully inspect all rented inflatables for any signs of damage, and report any issues to the rental company right away. Clear the area of trash, personal belongings, and debris to ensure a smooth pickup process, and make sure all access routes are free of obstacles.
Assign a dedicated cleanup crew to restore the venue to its original state. As Reventals points out:
"School events are fun but messy. The school might charge extra for cleaning up".
It’s a good idea to have around 8 volunteers working in 2-hour shifts to handle both setup and takedown tasks. Before calling it a day, confirm that all final payments and deposits are squared away with vendors.
If you rented equipment from Bouncy Rentals USA, their professional team can assist in resolving any issues during the pickup. Once the site is cleaned and cleared, you can shift your attention to reviewing how the event went.
Collect Feedback and Document Lessons
After the venue has been tidied up, take time to reflect while the event is still fresh in everyone’s minds. Distribute surveys to participants, parents, and staff, asking specific questions about what went well and where improvements are needed. Compare your spending to the budget categories and gather insights to help improve future events.
Create a "Lessons Learned" document to capture key takeaways. For example, evaluate whether your volunteer staffing plan worked as expected or which marketing efforts brought in the most attendees. Assess the rental service’s performance in terms of reliability, cleanliness, and communication to decide if you’d like to work with them again. Don’t forget to send thank-you notes or give a public acknowledgment to volunteers and sponsors – these gestures help strengthen community ties for future events.
These insights will serve as a valuable guide for planning your next obstacle course event. As LUXlife aptly puts it:
"The memories and lessons learned from an obstacle course challenge will stay with participants long after the event is over".
FAQs
What steps should I take to ensure student safety during a school obstacle course event?
To keep students safe during a school obstacle course event, it’s important to focus on proper setup, active supervision, and weather awareness.
Start by thoroughly reviewing the manufacturer’s instructions, paying close attention to weight limits and anchoring guidelines. Secure the obstacle course firmly with ground weights or stakes, ensuring all components are stable and secure before allowing any use. Assign enough supervisors to monitor the activity, placing at least one adult at each entrance and exit to enforce rules and oversee participants.
Create a safety zone around the obstacle course by marking the area with cones or tape. Make sure there’s at least 4 feet of clear space around the course, free of debris or tripping hazards like cords. Stick to the recommended capacity and age limits, keeping younger children separate from older ones to reduce the risk of injuries. Additionally, keep an eye on the weather – pause the event if winds exceed 15 mph or if temperatures fall outside the recommended safe range.
Before the event begins, conduct a detailed inspection of the equipment. Look for any signs of damage, such as tears or loose seams, and resolve these issues before students start using the course. By following these steps, you can ensure a safe and enjoyable experience for everyone involved.
What should I consider when choosing obstacles for different age groups at a school event?
When planning obstacles for a school event, it’s important to tailor the difficulty to the age and abilities of the participants. For toddlers (ages 2–4), go for soft, low-height options like tunnels, gentle ramps, and wide, easy-to-cross surfaces. Kids aged 5–8 can take on slightly more advanced challenges, such as small climbing walls, short slides, and balance beams – just steer clear of anything with high drops or sharp edges. For older kids and teens (ages 9–14), you can introduce more demanding features like taller walls, rope nets, and multi-lane racing setups, provided they meet safety standards.
Safety should always come first. Maintain at least 4 feet of clear space around obstacles, ensure everything is securely anchored, and have adequate supervision in place. Also, consider the venue’s layout – choose obstacles that allow smooth traffic flow, especially if different age groups will be using the course. To add some flair, design the obstacles around a fun theme, such as superheroes, sports, or seasonal decorations, to keep the event engaging and memorable.
What should I do if the weather takes a turn on the day of the obstacle course event?
Unexpected weather can throw a wrench in your plans, but a little preparation can go a long way in keeping your event on track. Start by keeping an eye on real-time weather updates through a trusted app or local forecast. Assign someone to monitor conditions closely for potential hazards like rain, strong winds, or lightning. If things take a dangerous turn – such as winds exceeding 20 mph while inflatables are in use or lightning detected within 8 miles – it’s best to pause or cancel the event immediately for everyone’s safety.
Always have a backup plan in place. Consider relocating to an indoor space like a gym or cafeteria, and double-check that the alternate location has power for essential equipment like blowers or fans. If the event must go on outdoors despite light rain or wind, take extra precautions: secure inflatables with additional anchoring and shield them with waterproof tarps. Be sure to communicate any changes quickly and clearly to students, staff, and parents. Document your decisions along the way so you can reference them for future events.
Need a little extra help? The team at Bouncy Rentals is just a call away. They can assist with weather monitoring, equipment adjustments, or even suggest alternative solutions to keep the fun going while staying safe.