When selecting an obstacle course for your event, focus on these key factors:
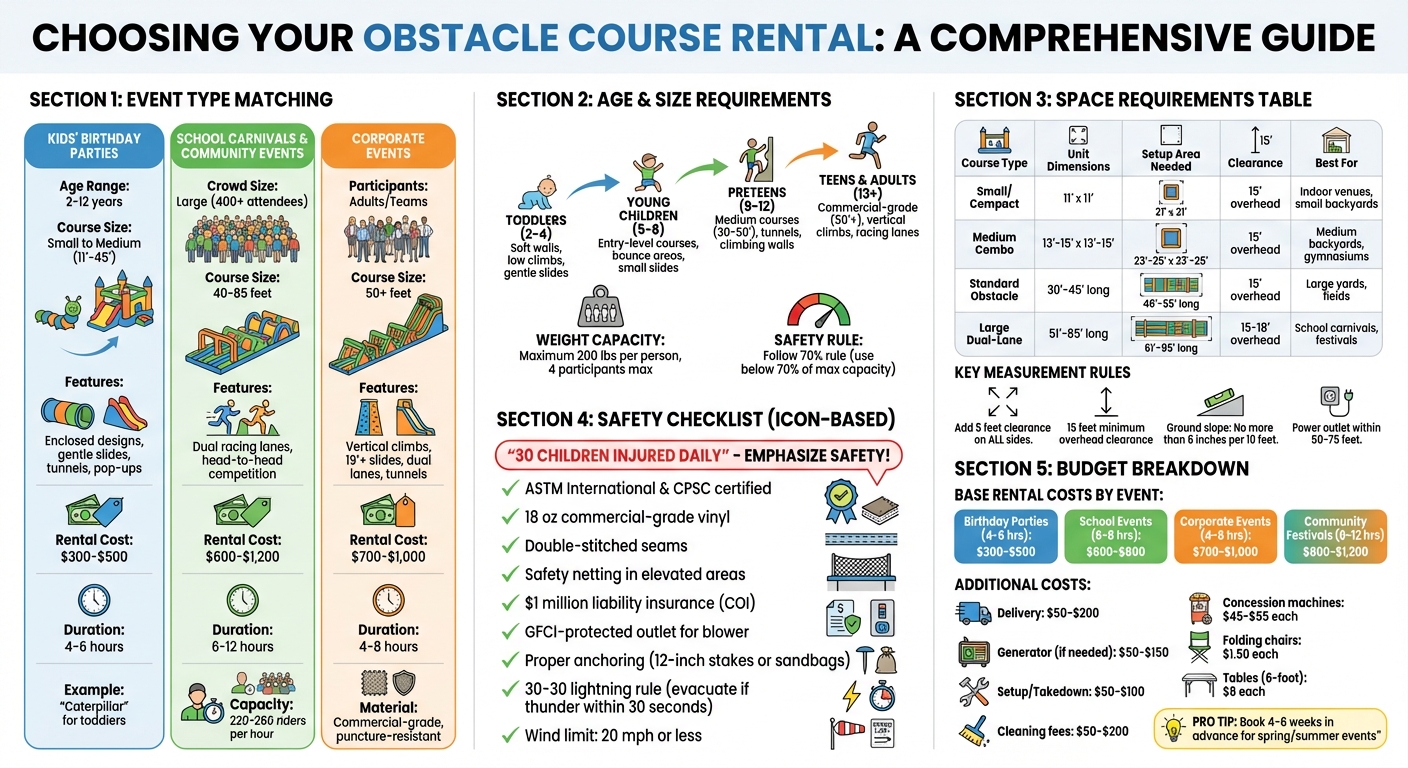
- Event Type: Match the course to your audience. For kids’ parties, choose smaller, safer designs. School carnivals and festivals benefit from dual-lane courses for faster flow. Corporate events need larger, more challenging setups. Many obstacle courses are perfect for adults and team-building activities.
- Age & Weight Limits: Ensure the course suits your guests’ age group and weight to maintain safety and prevent equipment damage.
- Venue Space: Measure your space, including length, width, height, and clearance. Outdoor setups allow larger courses, while indoor venues require compact options.
- Safety Standards: Choose rentals that meet ASTM and CPSC guidelines, with features like commercial-grade vinyl, safety netting, and proper anchoring.
- Budget: Costs range from $300 to $1,200 depending on size, duration, and event type. Book early for peak seasons and consider bundled packages for added savings.
Quick Tip: For large events, opt for dual-lane courses to accommodate high participant numbers efficiently. Always confirm safety certifications and inspect the setup area for hazards before installation.
Obstacle Course Rental Guide: Event Types, Sizes, and Costs Comparison
Step 1: Identify Your Event Type
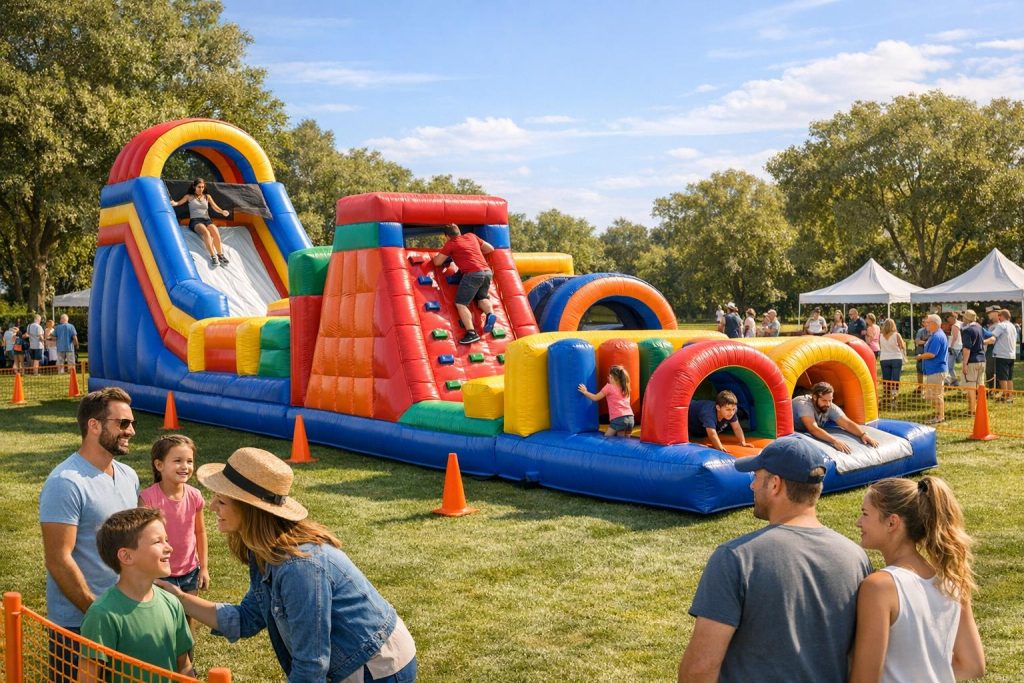
The first step is to align the obstacle course with the type of event you’re hosting. Whether it’s a toddler’s birthday party, a school carnival, or a corporate event, the setup should match the audience to keep everyone engaged and safe. By reviewing recommendations based on event types, you can make a well-informed choice.
Kid’s Birthday Parties
For toddlers (ages 2–6), smaller, enclosed designs like the "Caterpillar" are perfect. These setups feature low walls and gentle slides, prioritizing safety and fun. If your guests are in the 5–8 age range, consider units that combine bouncing and climbing activities. For older kids (ages 7–12), medium-sized courses with tunnels, pop-ups, vertical walls, and racing lanes strike the right balance between challenge and excitement. These features not only entertain but also ensure a safe experience. Expect rental costs for birthday parties to range between $300 and $500 for 4 to 6 hours.
School Carnivals and Community Events
When dealing with larger crowds, efficiency becomes essential. Longer obstacle courses, typically between 40 and 85 feet, with dual racing lanes are ideal for head-to-head competitions. These designs help keep lines moving quickly and add an element of excitement.
"The Dual Extreme Obstacle Course rental is considered more of a high volume obstacle course rental due to the high amount of people completing the course in such a short time. This would be your better choice if the host was a school or carnival." – Arizona Bounce Around
Such courses often double as eye-catching attractions at festivals and fundraisers. For school events, rental prices usually fall between $600 and $800 for 6 to 8 hours. Community festivals, depending on their size, may cost between $800 and $1,200 for 8 to 12 hours.
Corporate Gatherings and Adult Events
Corporate events or adult-focused gatherings call for more challenging setups designed for obstacle courses vs. inflatable games for teams. Look for obstacle courses that are at least 50 feet long, featuring dual racing lanes, vertical climbs, tall slides (19 feet or higher), and elements like tunnels and popup barriers. These features combine fun with safety, making them suitable for adult use. Always choose commercial-grade, puncture-resistant equipment specifically rated for adults. Rentals for corporate events typically cost between $700 and $1,000 for 4 to 8 hours. Be sure to confirm weight capacities, as residential-grade units are not suitable for commercial or adult applications.
Step 2: Consider Guest Age and Weight Limits
After deciding on your event type, the next step is to match the obstacle course to your guests’ age, weight, and size. Picking a course tailored to the right age group is essential for safety and protecting the equipment.
For toddlers (ages 2–4), look for units with soft walls, low climbs, and gentle slides. These features prioritize safety and ease of use.
Young children (ages 5–8) are better suited for entry-level courses or combo units that include bounce areas and small slides.
Preteens (ages 9–12) often enjoy medium-sized courses (30–50 feet) that include tunnels and climbing walls, adding a bit more challenge.
For teens and adults (ages 13+), commercial-grade courses (50+ feet) are ideal. These typically feature vertical climbs, fast slides, and competitive racing lanes for added excitement.
"Inflatable obstacle courses can be safe for ages 2 to adult – if matched with the right design and size." – JumpOrange Marketing Team
Commercial-grade inflatables are built with heavy-duty materials like Dura-Lite™ Vinyl, designed to handle higher weight capacities.
It’s important to avoid mixing toddlers with older children or adults to reduce the risk of collisions and prevent damage to the equipment. Always check the weight capacity with your rental provider and ensure participants can navigate the course independently, especially for units with slides or vertical climbs. Follow the manufacturer’s guidelines for weight limits, the number of users, and all safety instructions.
Once you’ve considered these factors, measure your venue space to confirm the course will fit comfortably.
Step 3: Measure Your Venue Space
Now that you’ve determined your event type and guest needs, it’s time to ensure your venue can handle the physical requirements of the obstacle course.
Measure Dimensions and Account for Clearance
Start by measuring the length, width, and height of your venue. For the setup area, add at least 5 feet of clearance on all sides to ensure safe operation. This extra space allows for smooth entry and exit and makes supervision easier.
When it comes to vertical clearance, make sure there’s at least 15 feet of overhead space above the course to avoid issues with obstacles like tree branches or power lines. Indoor venues need extra attention to ceiling height and any hanging fixtures such as lights or HVAC units. Most standard courses require between 15 and 18 feet of vertical clearance.
"Please provide at least an extra 5 feet on each side with 15 additional feet of clearance from tree branches and other obstructions for the bounce house." – Captain Carnival
Don’t forget to allow room for blower units, which are typically placed at the back or side of the course, along with space for entry ramps and exit slides. If you’re setting up on grass, check for underground pipes or cables before staking. For hard surfaces, clear away debris, and for grass setups, remove any obstacles like sticks or rocks. Also, ensure the ground is relatively level, with no more than a 6-inch slope per 10 feet.
Indoor vs. Outdoor Locations
Indoor venues work well for smaller, compact models designed to fit within ceiling height limits. These setups eliminate weather concerns but require sandbags for anchoring instead of stakes. Make sure power outlets are within 50–75 feet of the setup area.
Outdoor spaces, on the other hand, can handle larger obstacle courses (typically 30 to 60+ feet in length) and allow for secure anchoring with 12-inch stakes driven into the ground at all corners and along the sides. While outdoor setups offer more flexibility, you’ll need to watch out for overhead power lines and fixed obstacles like trees, picnic tables, or fences.
Once you’ve measured the space, compare it to the course dimensions to confirm everything fits.
Compare Course Sizes to Your Space
Here’s a quick guide to match common obstacle course sizes with your available space:
| Course Type | Unit Dimensions | Recommended Setup Area | Best For |
|---|---|---|---|
| Small/Compact | 11′ x 11′ | 21′ x 21′ | Indoor venues, small backyards |
| Medium Combo | 13′ x 13′ to 15′ x 15′ | 23′ x 23′ to 25′ x 25′ | Medium backyards, gymnasiums |
| Standard Obstacle | 30′ to 45′ long | 40′ to 55′ long | Large outdoor yards, fields |
| Large Dual-Lane | 51′ to 85′ long | 61′ to 95′ long | School carnivals, community festivals |
It’s always better to use the recommended setup area rather than relying solely on the unit’s dimensions. This strategy has allowed rental companies to successfully manage over 15,000 events. Once your measurements align with the suggested space, you’ll be ready to move on to verifying safety and quality standards. This includes understanding local safety laws for inflatable rentals to ensure full compliance.
Step 4: Check Safety and Quality Standards
Once you’ve confirmed that your venue can handle the obstacle course, it’s time to shift your attention to safety. This step is crucial because, across the country, about 30 children each day are treated for injuries related to inflatable bouncers. Ensuring your rental equipment meets strict safety guidelines is key to keeping everyone safe and having a smooth event.
Look for Certified and Inspected Equipment
Start by making sure the equipment complies with ASTM International and CPSC standards. Pay attention to the materials used – look for 18 oz commercial-grade vinyl, which is both puncture-resistant and fire-retardant. Features like double-stitched seams and safety netting in elevated areas are non-negotiable.
In some states, annual professional inspections are required. For example, in Texas, you can verify compliance through the TDI Current Inspections list. Before making any bookings, always ask for a certificate of insurance (COI) showing at least $1 million in liability coverage. Proper anchoring is equally important – use recommended stakes or weighted sandbags to secure the structure.
"Bounce houses ARE safe when: Rented from inspected, insured professional companies; Properly installed and anchored by trained crews; Used within manufacturer guidelines." – Inflatable Party Magic
Confirm Proper Setup and Maintenance
Professional delivery and setup play a big role in safety. Companies like Bouncy Rentals USA ensure their trained staff handle everything – from installation to pre-event safety checks. This includes inspecting the blower system and verifying anchor points to meet both local and national safety standards. They also clean their units with EPA-approved, hospital-grade disinfectants after every use.
Make sure the blower is connected to a GFCI-protected outlet to reduce electrical risks, and avoid using multiple extension cords linked together. Inspect the equipment thoroughly before use, checking for wear and tear, loose seams, or debris. Once setup is complete, double-check weight capacities and ventilation to ensure the structure is ready for participants.
Verify Weight Capacities and Ventilation
After installation, confirm the unit’s weight limits and airflow features. Most obstacle courses are designed to hold a maximum of 200 pounds per person, with no more than 4 participants at a time. To extend the life of the equipment, professional operators adhere to the "70% rule" – keeping usage below 70% of the maximum weight capacity helps prevent damage like seam stress or structural failure.
Safety mesh is another critical feature. It allows proper airflow and ensures supervisors have a clear view of participants. Make sure blower tubes are free from kinks or blockages, as these can affect internal air pressure. Keep an eye on the weather, too. Follow the "30-30 lightning rule": if you hear thunder within 30 seconds of seeing lightning, evacuate the course immediately and wait 30 minutes after the last thunder. Also, remember that a third of wind-related bounce house incidents happen at speeds of 20 mph or less, so always adhere to the manufacturer’s wind limits.
Step 5: Set Your Budget and Review Rental Packages
renting a large obstacle course usually costs between $400 and $700 for a 4–6 hour period, though prices tend to rise during peak seasons like summer, fall, and weekends due to higher demand. To get the most out of your money, explore different rental packages that align with your event’s needs and budget.
Compare Basic, Premium, and Custom Packages
Rental costs depend on factors like the size of the inflatable, added features, and the distance for delivery. Units with extras like climbing walls, slides, and tunnels are priced higher than animal obstacle courses vs. bounce houses. Delivery fees typically range from $50 to $200, but additional charges may apply for setups on concrete or at hard-to-access locations. If no power outlets are available within 115 feet, plan to spend $50–150 for a generator.
| Event Type | Rental Duration | Typical Cost Range |
|---|---|---|
| Birthday Parties | 4–6 hours | $300–$500 |
| School Events | 6–8 hours | $600–$800 |
| Corporate Events | 4–8 hours | $700–$1,000 |
| Community Festivals | 8–12 hours | $800–$1,200 |
Opt for all-inclusive packages that cover delivery, setup, and takedown to avoid unexpected service fees. Companies like Bouncy Rentals USA offer comprehensive packages that include the inflatable, blowers, anchoring systems, and extension cords, ensuring no hidden costs. However, always double-check your quote. Additional fees for setup or takedown can range from $50 to $100, and cleaning fees for heavily soiled units may cost $50 to $200.
Add Extra Equipment and Services
To elevate your event, think about renting add-ons like concession machines or furniture. Items like popcorn, cotton candy, or snow cone machines can enhance the fun and usually cost around $45–55 each when bundled. Bouncy Rentals USA offers these extras at competitive rates, making it simple to create a complete party package. Need seating? Folding chairs average $1.50 each, and six-foot tables cost about $8. Bundling these items together can save you roughly $29 to $30 compared to renting them separately.
Get More Value for Larger Events
For events with many guests, obstacle courses shine because they handle a high number of participants. According to Kyle, Owner of The Jump Party, these courses can accommodate 220–260 riders per hour, compared to just 50–60 riders for a standard bounce house. For large gatherings like school carnivals or community festivals expecting 400 or more attendees, a single obstacle course can keep everyone engaged. Kyle explains:
"Nothing quite gets the crowd going like an obstacle course, especially for older kids/young adults. The obstacle course will stay packed for the 400 riders".
If you’re planning a spring or summer event, book your obstacle course 4–6 weeks in advance to secure your preferred unit.
Conclusion
When choosing an obstacle course, it’s essential to match it to your event’s needs, whether that’s a bustling school carnival requiring quick racing lanes or a birthday party where exciting, intricate features will keep everyone entertained.
Make sure the setup area is flat, level, and free of debris. For outdoor setups, ensure a vertical clearance of 15–18 feet to avoid hazards like power lines or tree branches. Indoor venues demand extra attention to ceiling height, while outdoor locations offer more flexibility but require keeping an eye on the weather. Proper measurements and adherence to safety standards are key to a secure and smooth setup. This includes setting up a safety perimeter to keep participants and spectators safe.
Opt for commercial-grade materials, reliable anchoring systems, and mesh windows for ventilation. Bouncy Rentals USA provides sanitized, fully insured equipment, complete with blowers, anchoring systems, and extension cords – no hidden fees, just peace of mind for your event.
If you’re planning an event during the busy spring or summer months, aim to book 4–6 weeks in advance to secure your preferred obstacle course. With careful preparation and a dependable rental partner, your event is sure to be a hit.
FAQs
What safety features should I check before renting an obstacle course?
When choosing an obstacle course to rent, safety should be your top concern. Look for one made from commercial-grade, fire-retardant vinyl with features like padded edges and safety netting to minimize the risk of injuries. Make sure it has clearly stated age and weight limits, certified tie-downs and anchoring systems, and meets ASTM or CPSC safety standards for commercial use. It’s also a good idea to ask for documentation showing regular inspections and maintenance to confirm the equipment is well-maintained and safe for your event.
How do I make sure the obstacle course fits my event space?
To make sure the inflatable obstacle course fits your event space, here’s what you need to do:
- Check the course dimensions: Look at the length, width, and height details provided on the rental page. These measurements are key to knowing how much space you’ll need.
- Measure your venue: Use a measuring tape to check the available area at your location. Don’t forget to leave an extra 4–5 feet on all sides for safe entry, exit, and setup access.
- Inspect the area: Walk through the space to spot potential issues like narrow gates, uneven ground, low-hanging branches, or sprinkler heads. If the ground is soft, you might want to lay down mats or plywood to keep things stable.
By double-checking the course size and clearing the area, you’ll set the stage for a smooth and enjoyable event!
What impacts the cost of renting an obstacle course?
The price of renting an obstacle course can vary based on a few key factors. The size and space requirements of the course are major considerations – larger courses typically come with higher costs and might take more time to set up. Additionally, the type of event and the age group of participants can influence pricing, as courses designed for kids or adults often differ in complexity and features.
Other factors to think about include the quality of materials, seasonal demand, and any extras like staffing, extended rental hours, or equipment such as generators for power. To ensure you’re getting the most out of your rental, choose a course that fits both your event’s needs and the available space.