Connecting a water hose to an inflatable slide is straightforward but essential for a safe and fun experience. Here’s what you need to know:
- Choose the Right Spot: Place the slide on a flat, grassy area with no sharp objects. Ensure proper drainage and keep a clear buffer zone around the slide.
- Inspect Equipment: Check the slide for tears, the hose for dirt or damage, and ensure all connections are clean and secure.
- Gather Supplies: Use a standard garden hose, washers, and any necessary adapters. A ground tarp can protect the slide and improve cushioning.
- Attach the Hose: Locate the water inlet (usually labeled) and connect the hose tightly. Use plumber’s tape for extra sealing if needed.
- Test for Leaks: Turn the water on slowly and check for drips. Tighten connections if necessary and adjust water pressure for even flow.
- Secure the Hose: Route the hose safely to avoid tripping hazards, using stakes or guides if needed.
- Monitor Setup: Regularly check the connection and water flow during use to prevent interruptions or safety issues.
For hassle-free setup, consider professional services like Bouncy Rentals USA, who handle everything from delivery to takedown, ensuring a leak-free and safe experience.
Key Tip: Proper preparation and a secure connection ensure consistent water flow, protect equipment, and keep everyone safe while enjoying the slide.
Preparing the Slide and Hose for Connection
Getting your inflatable slide and equipment ready is a crucial step to avoid leaks and ensure everything runs smoothly. A little preparation upfront can save you from unnecessary hassles later and help keep the water flowing consistently for a safe and fun experience.
Set Up and Position the Inflatable Slide
Start by choosing a flat, open area free from sharp objects that could damage the slide material. Grass is an ideal surface because it provides natural cushioning and helps with water drainage.
Make sure to clear a 6–8 foot buffer zone around the slide. This extra space minimizes the risk of accidents and gives users room to move safely. Don’t forget to check overhead for hazards like tree branches or power lines that could interfere with the slide or pose safety risks.
Think about sun exposure, too. Position the slide so that areas like the climbing and seating sections are shaded as much as possible. This keeps the surface cooler and more comfortable for users throughout the day.
Water drainage is another key consideration. Place the slide where water can flow away from electrical equipment to avoid damage. This also helps prevent puddles from forming in areas where they might create safety issues.
When you’re ready, unpack the slide and lay it flat. Take care to unfold it completely without dragging it, as dragging could cause tears. Watch out for rocks, sticks, or rough surfaces that could snag the material.
Once everything is positioned, give all your equipment a quick inspection to make sure you’re set for a smooth setup.
Check the Equipment
Inspecting your equipment beforehand can save you a lot of trouble. Start with the slide itself, checking for any cuts, tears, or defects before inflating it. Pay close attention to seams and high-stress areas where damage is more likely.
Next, look at the water inlets and hose connectors. Clear away any dirt, leaves, or debris that could interfere with a secure connection. Even small obstructions can lead to leaks or loose fittings.
Make sure all seams, connections, and anchor points are in good shape. Pay special attention to the areas where the water system attaches to the slide. Locate the anchor points and confirm they’re ready to secure the slide properly.
For the blower, check that the air intake isn’t blocked. Inspect the blower for cracks, dents, or loose parts, and ensure the power cord is in good condition with a secure plug connection. Also, make sure all drainage plugs are closed before inflation – open plugs can lead to deflation during use.
If you suspect an air leak, grab a spray bottle filled with soapy water. Spray it on the slide and look for bubbles forming, which will help you pinpoint the problem areas that need fixing.
Collect Required Tools and Supplies
Before connecting the hose, gather everything you’ll need. A standard garden hose will work for most slides, but make sure it’s long enough to reach the water source without being stretched too tight.
You’ll also need hose washers and any adapters included in the manufacturer’s kit. Hose washers are especially helpful for creating a tight seal and preventing leaks at the connection points.
Consider laying down a protective ground tarp under the slide. This adds an extra layer of protection from ground moisture and provides additional cushioning.
If you want to improve water distribution, a DIY sprinkler hose kit could come in handy. These kits usually include PVC tubing, sprayer heads, elbow fittings, hose connectors, and zip ties. They’re a great way to customize how water flows across the slide.
For slides that need extra guidance for water hoses, vinyl cement glue can be used to attach hose guides. Check the manufacturer’s accessories for specific options that fit your slide model.
Finally, connect the garden hose to the slide’s water intake and secure it tightly. Properly securing the connection ensures consistent water flow and prevents interruptions during use.
With your slide set up and all tools in place, you’re ready to move on to connecting the hose.
Step-by-Step Guide to Connecting the Hose
With your slide positioned and your equipment ready to go, it’s time to connect the hose. Follow these steps to ensure a secure, leak-free connection that keeps the water flowing smoothly.
Find the Slide’s Water Inlet
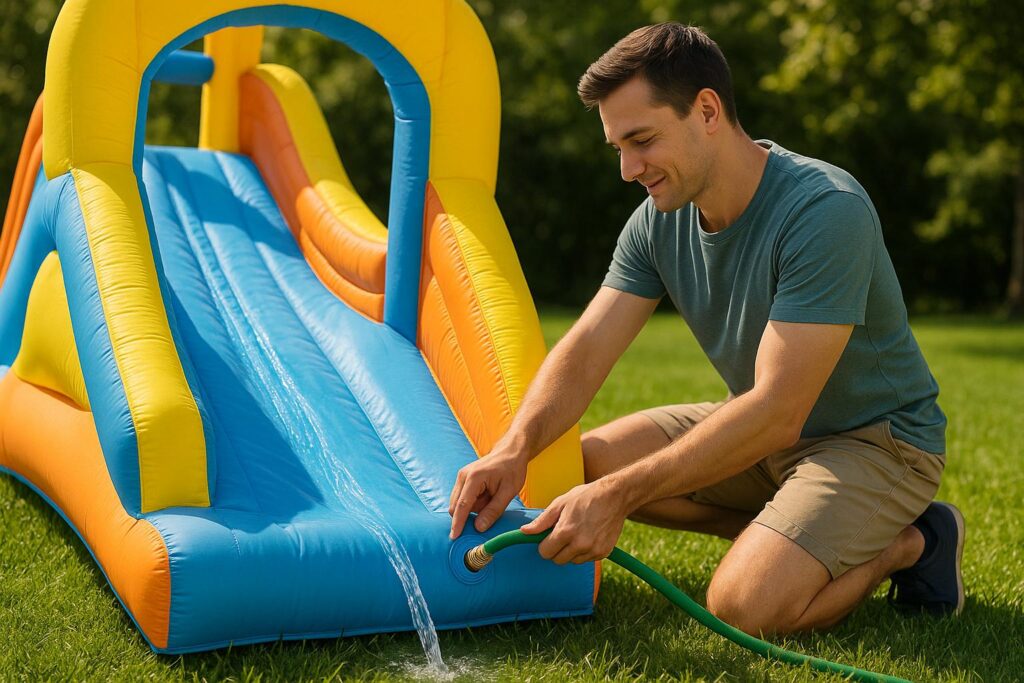
The water inlet is where you’ll attach the hose to supply water to the slide’s spray system. On most inflatable slides, this connection point is located near the base or side and is typically labeled "Water In" or marked with a hose symbol. It’s designed to fit standard garden hoses and channels water to the built-in misting or spray mechanisms.
Check for a threaded fitting or a quick-connect attachment. Larger slides may have multiple spray points or connections for integrated pools. In that case, start with the main water supply inlet. Once you’ve identified the correct inlet, you’re ready to attach the hose.
Connect the Hose to the Inlet
Now that you’ve found the inlet, align the end of your hose with the connection point. If it’s a quick-connect fitting, push it firmly until it clicks into place. For threaded connections, hand-tighten the hose until it feels secure.
If you need tools like pliers or a wrench, use them gently to avoid over-tightening, which could damage the fitting. Make sure the hose isn’t twisted or kinked near the connection, as this can restrict water flow and put unnecessary strain on the hose and inlet. Once the hose is securely attached, it’s time to check for leaks.
Test the Connection for Leaks
Turn the water on slowly to avoid a sudden pressure surge, which could cause splashing or water to spray in unintended directions. Gradually increase the flow as needed.
Keep a close eye on the connection point as water begins to flow. Watch for any drips or sprays where the hose meets the inlet. Even a small leak can reduce water pressure and impact the spray system’s performance over time.
If you notice a leak, turn off the water and tighten the connection slightly. Then, retest by slowly turning the water back on. Once the connection is secure and leak-free, check that water is reaching all spray points evenly and covering the slide’s surface effectively. Adjust the flow to achieve the desired level of slipperiness for the slide.
With the connection tested and working properly, you can move on to finalizing the setup and ensuring everything is ready for safe use.
Creating a Stable and Leak-Free Setup
After securely connecting the hose and ensuring there are no initial leaks, it’s time to take a few extra precautions to guarantee smooth water flow. These steps will help you avoid interruptions and keep the fun going without a hitch.
Add Washers or Plumber’s Tape
Rubber hose washers are your first line of defense against leaks at threaded connections. Look for a small black rubber ring inside the hose coupling – if it’s missing, worn, or damaged, replace it before attaching the hose to the slide. A fresh washer can make a big difference in preventing leaks.
If your threaded connections still feel loose after tightening by hand, plumber’s tape (commonly known as Teflon tape) can help. Wrap the tape 2-3 times clockwise around the male threads, ensuring the old tape is removed beforehand. This creates a tighter seal and reduces the chance of leaks.
For particularly stubborn leaks or emergency fixes, self-fusing silicone tape is a great option. It forms a strong, watertight seal that can handle the typical pressure of a garden hose, making it a handy backup.
Avoid Tripping Hazards
Safety is just as important as functionality. Carefully route the hose to prevent accidents while maintaining efficient water flow. Ideally, run the hose along the perimeter of your setup, away from high-traffic areas where people are walking or playing.
To keep the hose in place, use hose guides or stakes, especially in areas where it might shift during use. Pay close attention to spots where the hose crosses pathways or is near the slide’s entrance or exit. If it must cross a walkway, consider using a hose bridge or protective cover to prevent tripping and protect the hose from wear.
For added visibility, mark sections of the hose with bright tape or small flags, especially in areas where children are playing. This simple precaution reduces the risk of accidental kicks or pulls that could disrupt your setup.
Set Proper Water Pressure
Start with moderate water pressure and adjust gradually. Too much pressure can strain the connections or damage the slide’s internal water system, while too little pressure won’t provide enough coverage for safe sliding.
Once the hose is securely routed, turn on the water and monitor the spray pattern. The goal is even water distribution across the slide’s surface without excessive pooling at the bottom. Most residential water systems operate at 40-60 PSI, which is generally sufficient for inflatable slides.
If your water pressure is unusually high, consider using a pressure regulator. These devices, available at hardware stores, help maintain consistent pressure and protect both the hose and the slide’s internal components from damage caused by sudden spikes.
For slides with multiple spray points, ensure each outlet gets adequate water flow. If some areas seem dry while others are oversaturated, you may need to adjust the pressure or check for blockages in the slide’s internal water channels.
Safety and Maintenance Tips
Once you’ve secured the connection, it’s important to keep an eye on things to ensure everything stays safe and functional. Regular monitoring can help you catch any issues, like leaks, before they become bigger problems.
Keep an Eye on the Hose Connection
Water pressure can sometimes cause the connection to loosen over time. To avoid leaks, make it a habit to inspect the area where the hose attaches to the slide’s water inlet. Look for any dripping or spraying, and gently move the hose to check if it’s still firmly in place. If you notice any leaks or the connection feels loose, turn off the water immediately and tighten the connection before continuing.
Consider Professional Rental Services
Setting up a water hose for an inflatable slide might seem simple enough, but opting for professional rental services can save you time, effort, and potential headaches. With experts handling the setup, you can enjoy a secure, ready-to-go experience without lifting a finger.
Why Choose Bouncy Rentals USA?

If you’re looking for a seamless water slide experience, Bouncy Rentals USA has you covered. Their equipment is thoroughly inspected and professionally installed, ensuring a leak-free setup every time. They specialize in bounce houses, obstacle courses, and water slides, all designed with commercial-grade durability for continuous use. Plus, their gear is fully insured and meets industry safety standards, so you can relax knowing everything is in good hands.
But that’s not all – Bouncy Rentals USA offers more than just inflatables. They provide a range of party extras like cotton candy machines, popcorn makers, dunk tanks, and snow cone machines. Whether you’re hosting a kid’s birthday bash, a school carnival, or a neighborhood block party, their team ensures every piece of equipment is sanitized, delivered, and set up promptly by experienced professionals.
Easy Setup and Support
One of the best parts of renting from Bouncy Rentals USA is their full-service approach. Their team takes care of delivery, setup, and takedown, ensuring everything is connected and tested properly before they leave. They’ll position the slide, secure the water lines, and verify that everything is working perfectly.
If something goes wrong during your event, their 24/7 support team is just a text away at 631-557-0885. They also offer after-hours phone assistance and have an emergency road crew on standby to handle any technical issues. With this level of support, you can focus on enjoying the event while they handle the rest.
Renting is also a smart choice financially. Instead of spending $5,000 to $20,000 on commercial-grade equipment, you can rent what you need for a fraction of the cost. This not only saves you the expense but also eliminates the hassle of storing and maintaining a water slide year-round. And with expert setup and round-the-clock support, you’re guaranteed a stress-free experience from start to finish.
Conclusion: Enjoy a Safe and Fun Water Slide Experience
Setting up your water slide doesn’t have to be complicated. With the right approach, connecting your hose is simple and ensures everything runs smoothly. A proper connection avoids leaks, keeps water flowing evenly, and helps protect your equipment from unnecessary wear and tear.
Before anyone hops on the slide, double-check your setup. Slowly turn on the water and inspect the hose attachment for any drips or sprays – catching these early can save you from bigger issues later.
Taking care of your slide after the fun is over is just as important. Drain it completely, let it dry, and store it properly to avoid mold or damage. A little routine maintenance goes a long way in keeping your slide in great condition.
Safety should always be your top priority. Keep the area around the slide clear, supervise users at all times, and address any water flow or equipment problems as soon as they arise. If you’d rather skip the hassle altogether, you can always rely on professional services.
For an effortless and stress-free experience, check out Bouncy Rentals USA. They handle everything – from professional installation to thorough sanitization – so you can focus on the fun.
FAQs
What should I watch out for when attaching a water hose to an inflatable slide?
When attaching a water hose to an inflatable slide, it’s crucial to create a tight and secure connection to avoid leaks or interruptions in water flow. Double-check that the hose is firmly connected to the slide’s water inlet and properly tightened to prevent it from coming loose during use.
Also, inspect the hose for any kinks, twists, or blockages that might restrict water flow. If you notice any leaks at the connection point, try adding a rubber washer or applying plumber’s tape to achieve a better seal. These quick adjustments can help maintain steady water flow, ensuring endless fun on your inflatable slide.
How do I set the right water pressure for my inflatable slide to avoid damage?
To keep your inflatable slide in great shape and working properly, aim to maintain the water pressure at a moderate level – around 15 psi. Too much pressure can strain the seams and materials, which might lead to damage.
Opt for a hose with a larger diameter to ensure a steady water flow without overwhelming the slide. Also, be cautious not to overinflate the slide, as this can add unnecessary stress to its structure. By sticking to these tips, you can look forward to hours of safe and splashy fun!
What safety steps should I follow when using a water hose with an inflatable slide?
To set up your inflatable slide with a water hose safely, start by choosing a flat, level surface. Make sure the area is clear of obstacles like trees, fences, or power lines. Secure the slide firmly using stakes or weights to keep it stable during use. Placing a tarp underneath is a smart move – it helps shield the slide from sharp objects or uneven spots.
Stick to the manufacturer’s guidelines, especially regarding weight limits, and always keep an eye on kids while they play. Check the water hose regularly for leaks or loose connections to prevent slippery areas or unwanted water buildup. These simple steps can help ensure everyone has a safe and enjoyable time!