Folding and packing a bounce house the right way is crucial for extending its lifespan, preventing damage, and ensuring safety. Here’s a quick breakdown of the process:
- Clean and Dry Thoroughly: Remove debris, clean with mild soap, and ensure the bounce house is completely dry to avoid mold and material degradation.
- Deflate Carefully: Open all air ports and zippers, and use the walk-out method to push out trapped air.
- Align and Flatten: Smooth out wrinkles, align panels, and ensure all parts lie flat for easy folding.
- Fold or Roll Systematically:
- Fold side panels inward to form a rectangle.
- Roll tightly or fold in sections, depending on size.
- Secure and Store Properly: Use straps to hold the folded unit and place it in a storage bag. Store off the ground in a cool, dry space.
Key Tips:
- Never store a damp bounce house.
- Avoid harsh cleaners like bleach.
- Use straps or bungee cords to keep the material compact.
Following these steps ensures your bounce house stays in great condition and ready for future use.
Safety Checks and Preparation
Before starting the deflation process, make sure the bounce house is completely empty – no users, no objects, nothing left inside.
Clear the Area and Shut Down Power
Begin by turning off the blower and detaching it from the air inlet tube. Next, unplug the blower’s power cord from the wall outlet. Finally, open any deflation zippers or air outlets to let the air escape.
Clean and Dry the Bounce House
Once you’ve deflated the bounce house as part of your safety checks, the next step is cleaning it thoroughly. This isn’t just about keeping it looking good – proper cleaning helps prevent mold, extends the life of the material, and ensures it’s safe for use.
Remove Debris and Dirt
Start by removing any loose debris. Sweep or shake off dirt, leaves, and other particles from all surfaces, especially corners and seams where they tend to collect. For sticky spots or tougher grime, mix a mild soap solution – about 1 tablespoon of dish soap per gallon of warm water – and use a soft brush to scrub the affected areas.
Avoid using harsh chemicals like bleach or ammonia-based cleaners, as these can damage the vinyl material over time. If you’re dealing with stubborn stains, let the soap solution sit for 5–10 minutes before scrubbing. Don’t forget to clean the interior surfaces, such as walls, floors, and built-in features like slides or climbing areas. These areas are high-contact zones where bacteria and odors can build up if not properly cleaned.
Make Sure It’s Completely Dry
Drying the bounce house thoroughly is just as important as cleaning it. Any leftover moisture can lead to mold growth, especially during storage. Use clean towels to wipe down all surfaces, paying close attention to seams and crevices where water tends to collect.
If the weather permits, leave the bounce house partially inflated for 30–60 minutes in direct sunlight. This allows air to circulate and speeds up evaporation. Plus, sunlight’s UV rays can help kill bacteria and mold spores. If it’s cloudy or you’re indoors, set up fans around the deflated unit to help it dry faster. Whatever method you choose, make sure the material is completely dry before moving on to storage.
Prepare Accessories for Packing
While the bounce house is drying, take the time to clean and organize its accessories. This includes the blower, air intake tubes, ground tarps, stakes, repair kits, and instruction manuals. Wipe down the blower housing and check the air intake for debris. For ground stakes, inspect them for damage and clean them off as needed.
Coil power cords neatly to avoid kinks, and store them in a dry bag or container. Fabric components like tarps should also be dried thoroughly to prevent mold. Once everything is clean and dry, organize the accessories into labeled bags or containers so they’re easy to locate for the next use.
With the bounce house and its accessories prepped and ready, you’ll be set for deflation and proper folding in the next steps.
Deflate and Flatten the Bounce House
Once your bounce house is clean and dry, the next step is deflation. Doing this carefully is essential to avoid damage and ensure it folds up neatly for storage.
Releasing the Air
Start by turning off and unplugging the blower. Open all deflation ports and zippers to let the air escape. Most bounce houses have several air release points, usually located on the back or sides.
As the air begins to flow out, the structure will gradually collapse. Be patient and allow it to deflate naturally. Avoid removing stakes or sandbags too early – keeping the bounce house anchored during this process prevents it from shifting or catching wind, which could strain the material or damage the anchor points.
Using the Walk-Out Method for Trapped Air
Once the bulk of the air has escaped, you’ll need to remove any remaining pockets of air. This is where the walk-out method comes in. After the bounce house is mostly deflated and the anchors are removed, begin walking across the material to push out trapped air and any leftover moisture.
Start at the farthest point from the deflation ports and work your way toward them. Use steady, overlapping steps, pressing down on the vinyl in straight lines. Pay extra attention to corners and seams, as these areas are more likely to trap air.
For larger units or combo bounce houses with multiple chambers, tackle one section at a time. The idea is to guide the air consistently toward the open ports. If you notice any bulging areas, take additional time to flatten them completely.
Aligning and Flattening the Panels
With most of the air removed, it’s time to align the panels and prepare the bounce house for folding. This step is key to avoiding stress points in the vinyl during storage.
Start by pulling the corners into alignment and smoothing out wrinkles from the center outward. Make sure the walls, floors, and any attached features like slides are lying flat against one another.
For combo units with multiple sections, ensure all parts are properly aligned. The goal is to create a flat, rectangular shape with no twisted or bunched-up areas. Take the time to square everything up now – it’ll make folding much easier and help prevent damage during storage.
Finally, check that the blower tubes are lying flat against the main body of the bounce house without any twists or bulges. Doors and entrance flaps should also be smoothed out and aligned with the surrounding panels to prevent air from getting trapped when you fold it up.
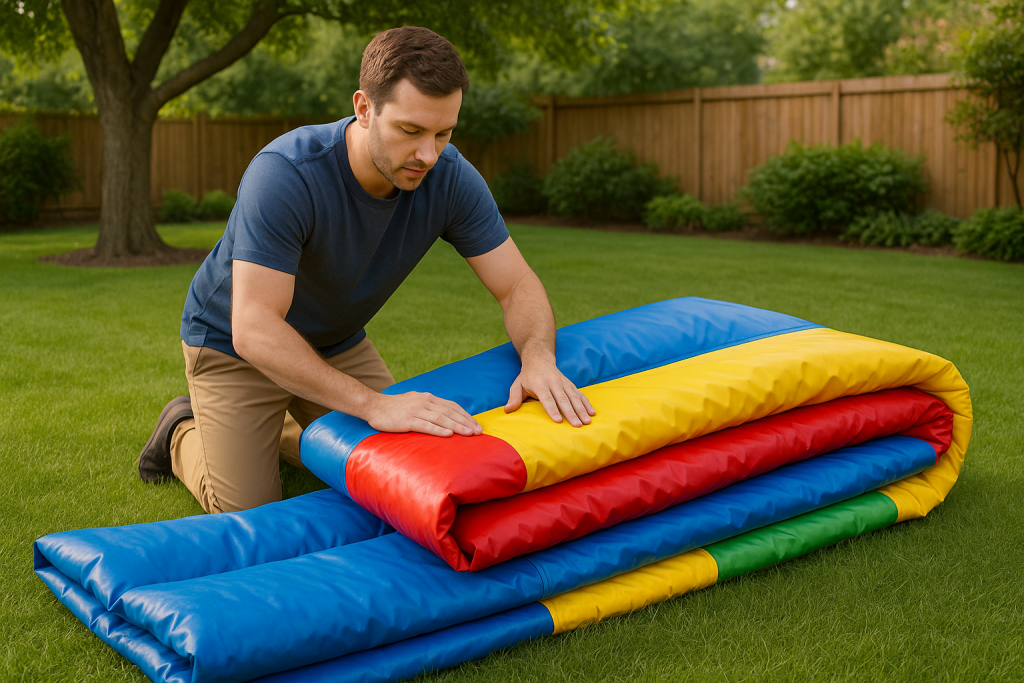
Fold and Pack for Storage
Once the bounce house is fully deflated and aligned, it’s time to fold and pack it for storage. The key here is to fold carefully and systematically to avoid putting unnecessary strain on the vinyl material.
Fold Panels Inward
Start by folding the longest side panels inward, bringing each side about one-third of the way toward the center to create a narrow rectangle. Leave all zippers and deflation ports open while folding – closing them can trap air, making the final package bulky or uneven.
The folded width should typically measure around 3-4 feet.
Pay close attention to the corners where multiple panels meet, as these areas can easily bunch up. Smooth out wrinkles or trapped air as you go, working from the fold line outward to push any remaining air toward the open deflation ports.
If the bounce house includes extras like slides or obstacle features, fold these inward first. This ensures they don’t stick out and keeps the final package neat and compact.
Roll or Fold for Storage
Decide whether to roll or fold the bounce house based on its size.
- For smaller units, rolling is often the better choice. Begin rolling from the end opposite the blower to keep the air tubes accessible. Roll tightly, pressing out air as you go. Most residential bounce houses can be rolled into a package with a diameter of about 18-24 inches.
- For larger models, folding tends to work better. Fold the material in sections, about 3-4 feet at a time, using an accordion-style method to create layers. Press each fold flat before moving to the next section. Folding usually results in a more compact package, making it easier to fit into storage bags.
For bounce houses larger than 20×20 feet, rolling can be cumbersome due to the sheer volume of material. Folding is generally more practical and produces a package that’s easier to handle and store.
Secure with Straps and Bag
Once the bounce house is folded or rolled, secure it immediately with straps or bungee cords. Use at least three straps for rolled units, spacing them evenly, and secure folded units every 2-3 feet. This prevents the vinyl from expanding back into its original shape.
Tighten the straps firmly, but don’t overdo it – over-tightening can create stress points in the vinyl. For larger commercial units, ratchet straps are a reliable choice, while heavy-duty bungee cords or rope work well for smaller residential models. Avoid thin elastic cords, as they lack the strength to hold the material securely and may snap under pressure.
Place the secured bounce house into a storage bag. If the original bag is unavailable or damaged, a heavy-duty tarp or canvas bag can work as a replacement. Make sure the bag is large enough to avoid forcing the bounce house inside, as this could damage both the material and the bag’s zipper or seams.
Finally, label the bag with the bounce house model, size, and the date it was packed. This small step simplifies inventory management and helps you rotate equipment to ensure even wear and tear.
Up next: proper storage placement and maintenance tips.
Storage and Maintenance Tips
Taking care of your bounce house doesn’t end with cleaning and folding – it’s about storing it the right way to protect it from damage and keep it in great condition for future use.
Choose a Dry, Elevated Storage Area
When it comes to storing your bounce house, location matters. Keep it indoors in a place like a garage, basement, or a spacious closet that’s cool, dry, and well-ventilated. Extreme temperatures can really take a toll on the material – heat can make the vinyl brittle, while freezing conditions might cause cracks. If you’re in an area with big temperature swings, consider renting a climate-controlled storage unit.
Don’t place the bounce house directly on concrete floors. Instead, use wooden pallets, metal shelving, or another raised surface. This helps prevent moisture buildup and avoids unnecessary wear and tear. Good airflow is key, so make sure the space is well-ventilated. Also, keep an eye out for pests, as they can cause mold, mildew, or other damage.
Label and Rotate Inventory
If you have multiple bounce houses, labeling and rotating your inventory can help you manage them better. This ensures you’re not overusing one while others sit unused.
Inspect Before Next Use
Before setting up your bounce house for its next event, give it a thorough inspection. Look for any signs of wear, damage, or pests that might have gone unnoticed during storage. A quick check can save you from surprises on the day of use.
Conclusion: Key Steps for Proper Folding and Packing
Protecting your bounce house and keeping it event-ready boils down to following a straightforward process. From cleaning to packing, each step plays a role in maintaining its condition. For a standard 13×13 ft unit, the entire process typically takes 30-90 minutes, with most of that time dedicated to drying, especially in less-than-ideal weather conditions.
Start with cleaning and sanitizing all surfaces right after use. Remove any debris and dry the unit thoroughly – moisture is your enemy here, as it can lead to mildew and unpleasant odors. Skipping this step can cause long-term damage, so it’s worth the extra effort.
When it’s time to deflate, do it systematically. Power down the blower, open all air ports, and walk across the unit to push out trapped air. This should take about 2-5 minutes and helps prevent bulky rolls and unnecessary stress on the seams. Once deflated, align the panels, fold the sides inward, and roll tightly toward the air ports for a compact and manageable bundle.
To avoid common mistakes, keep these in mind:
- Never pack a damp unit.
- Double-check for any air pockets.
- Align graphics properly to prevent creasing.
- Roll in the correct direction.
- Avoid direct storage on hard surfaces like concrete.
After rolling, secure the bundle with 2-3 heavy-duty straps spaced evenly, about 2-3 feet apart. The roll should be snug but not overly compressed. For added protection, place the unit in a storage bag or wrap it with a tarp, then store it off the ground to shield it from moisture and dirt.
Before the next event, a quick 2-minute pre-inflation check can save you from last-minute surprises. Inspect the label, straps, zippers, and outer vinyl for any issues that need attention.
If this all sounds like a lot to handle, consider outsourcing the work. Companies like Bouncy Rentals USA can take care of everything – from delivery and setup to cleaning and packing – so you can focus on enjoying the event while leaving the maintenance to the pros.
FAQs
Why should a bounce house be completely dry before storing it?
Storing a bounce house while it’s damp can cause mold, mildew, and bacteria to grow. This doesn’t just harm the material – it can also create health risks. Making sure the bounce house is completely dry before storing it helps protect its quality, increases its durability, and ensures it’s safe to use again.
What’s the best way to store a bounce house to keep it in great condition?
To keep your bounce house in great condition, it’s important to clean and dry it completely before putting it away. Any leftover moisture can lead to mold or mildew, so make sure it’s thoroughly dry. Store it in a cool, dry spot, away from direct sunlight, as prolonged exposure can fade or weaken the material. Try to avoid areas with drastic temperature changes or high humidity.
Using a heavy-duty storage bag or tarp adds an extra layer of protection against dirt, pests, and accidental punctures. When packing it up, make sure the bounce house is fully deflated and neatly folded. This not only saves space but also helps prevent creases. For storage, choose an elevated and easy-to-reach place to keep it safe from ground moisture or damage caused by stacking heavy items on top.
By following these steps, you’ll help ensure your bounce house is always in top-notch condition and ready for the next round of fun!
What’s the best way to clean tough stains off a bounce house without causing damage?
To tackle tough stains on a bounce house without harming the material, begin with a mild soap or all-purpose cleaner paired with a soft brush or cloth. Gently scrub the stained spot, being careful not to apply too much pressure, as this could damage the fabric. For more stubborn stains like mold or mildew, a diluted bleach solution can be effective. Just make sure to rinse thoroughly afterward to avoid any leftover residue or discoloration.
If you’d rather go with a natural approach, try a combination of vinegar and baking soda, which works wonders on many types of stains. Always test your chosen cleaning method on a small, hidden section first to make sure it’s safe for the material. Keeping your bounce house clean not only makes it look better but also helps it last longer!