Dunk tank windows often face two main problems: cracks and cloudiness. Cracks can grow quickly due to repeated impacts and water pressure, posing safety risks. Cloudy windows obstruct visibility, reducing the fun for participants. Replacing these windows is crucial for safety, functionality, and customer satisfaction, especially for rental businesses.
Here’s a quick breakdown of the replacement process:
- Tools & Materials: Use a replacement kit with a LEXAN™ panel, sealant, and hardware. Basic tools like a drill, screwdrivers, wrenches, and safety gear are essential.
- Preparation: Empty the tank, clean the area, and inspect the new panel for defects.
- Installation: Remove the damaged window, clean the frame, apply sealant, and secure the new panel. Test for leaks after curing.
- Maintenance: Regular cleaning prevents grime buildup. Proper storage and transport extend the tank’s lifespan.
Replacing a dunk tank window is a straightforward process, but attention to detail ensures a safe and durable result.
Tools and Materials You’ll Need
Make sure you have the right tools and materials on hand to replace the window safely and efficiently.
Required Tools and Materials
The centerpiece of your project will be a replacement window kit. For instance, TentandTable offers a Replacement Window Kit for EZ Dunker Dunking Booths, which includes everything you need: a LEXAN™ window panel, sealant, hardware, and detailed instructions. The kit comes with a 46" x 32" window and typically ships in two boxes. Prices for these kits usually range between $315.00 and $549.99, depending on the supplier and specific kit.
LEXAN™ panels are the go-to choice for dunk tank windows because they’re highly impact-resistant and offer excellent clarity. Avoid using regular glass or low-grade plastic, as these materials aren’t built to handle the pressure from water or repeated impacts during use.
Alongside the replacement kit, you’ll need some basic tools for installation. A cordless drill with multiple bits, along with both Phillips and flathead screwdrivers, will help with fastening. Adjustable wrenches in 7/16" and 1/2" sizes are ideal for most dunk tank hardware. A utility knife will come in handy for trimming excess sealant or removing old caulking.
For measuring and marking, grab a tape measure and pencil. Needle-nose pliers are great for handling small parts or stubborn hardware, and clean rags or paper towels will help you wipe down surfaces and clean up any extra sealant.
Lastly, don’t forget about safety. Proper protective gear is essential for a smooth and secure replacement process.
Safety Equipment
Replacing a window involves handling sharp edges and heavy materials, so safety gear is a must. Start with cut-resistant work gloves to shield your hands from sharp glass shards or metal edges while ensuring a firm grip. Make sure the gloves fit well for comfort and control.
Safety glasses are crucial to protect your eyes from flying debris, sealant splatter, or metal shavings. Look for wraparound designs that provide full coverage for added protection.
If the dunk tank has been sitting in storage, consider wearing a dust mask to avoid inhaling dirt and debris stirred up during the removal process. The confined space around the window can trap airborne particles, making this extra precaution worthwhile.
For prolonged work, knee pads can keep you comfortable and prevent strain. And finally, keep a first aid kit nearby with essentials like bandages, antiseptic wipes, and pain relievers, just in case you encounter any minor cuts or scrapes along the way.
Safety Steps Before You Start
Taking the right safety measures is crucial to prevent injuries and ensure your repair goes smoothly.
Preparing the Dunk Tank
Before diving into repairs, make sure the dunk tank is completely empty. Place it on a flat, solid surface to avoid any instability during the process. Uneven surfaces, like slopes or declines, can throw off the tank’s balance due to uneven weight distribution.
Use any stabilizing features available to secure the tank firmly in place. A stable setup is essential for safe and efficient repairs.
Clear the work area of any obstacles and ensure there’s adequate lighting. A clutter-free, well-lit space makes it easier to move safely and focus on the task at hand.
Safe Tool Usage
Before handling your new LEXAN™ window panel, give it a thorough inspection. Look for cracks, chips, or any defects that might compromise its performance during installation.
Wear properly fitted protective gear to handle the LEXAN™ panel safely. When lifting the panel, use proper techniques – bend your knees, lift with your legs, and maintain a firm grip. If the panel is large, work with a partner to minimize the risk of injury.
Keep your tools and materials organized. A tidy workspace reduces the chances of accidents.
If you’re dealing with broken glass from the old window, follow OSHA guidelines for cleanup. Use a broom and dustpan to collect the shards, and dispose of them in puncture-resistant containers clearly labeled for safety.
"You may think you have handled glass a thousand times, but hazards are still there. You can get comfortable working with glass and that can make you forget hazards. Don’t get too comfortable".
Step-by-Step Replacement Process
Once your workspace is ready and your safety gear is on, it’s time to replace the dunk tank window. Follow these steps carefully to ensure a watertight seal.
Removing the Damaged Window
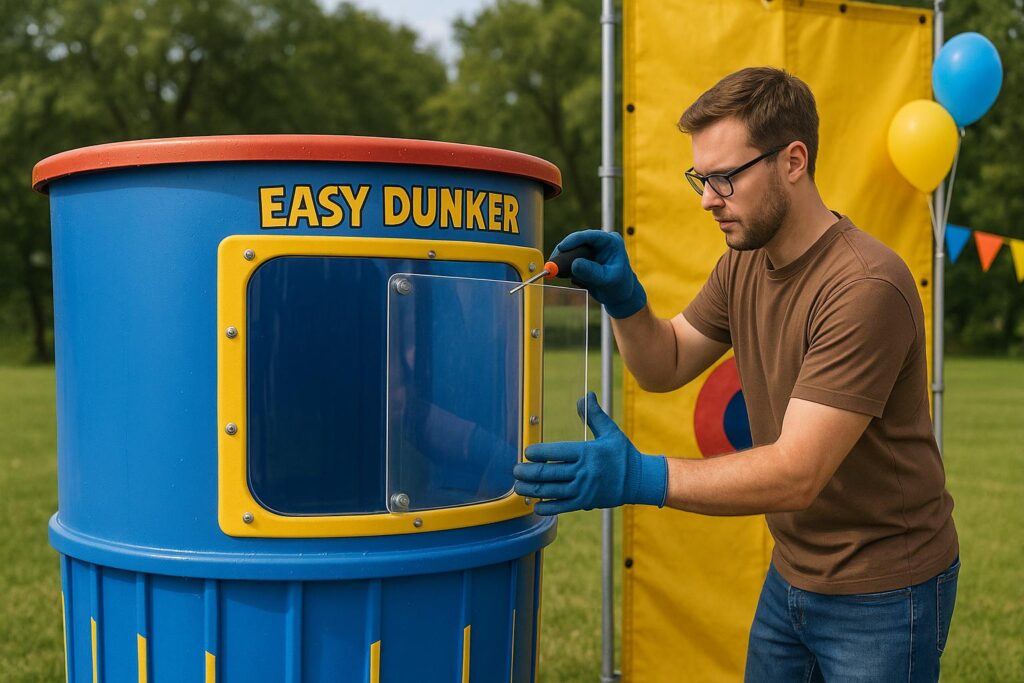
Start by identifying all the fasteners securing the damaged window. Most dunk tank windows are held in place by screws along the edges, though older models might use clips or brackets. Use a screwdriver or drill to remove each fastener carefully, and set them aside for reuse.
Once the fasteners are out, gently pry the window away from the frame. If the window is cracked but still mostly intact, support it at multiple points to prevent it from breaking further. For shattered windows, begin at one corner and remove the larger pieces first, then carefully clear away any smaller fragments.
With the old window removed, clean the frame thoroughly. Use a putty knife to scrape away any leftover sealant, caulk, or debris. The surface should be smooth and completely clean – this step is crucial for achieving a proper seal when installing the new window.
Preparing the New Window
Now that the frame is clean, it’s time to prepare the new window panel. Your replacement kit should include a LEXAN™ panel, waterproof sealant, hardware, and instructions. Before proceeding, double-check that the panel matches your dunk tank’s specifications.
Measure the window opening carefully, ensuring there’s about a quarter-inch of clearance on all sides for proper shimming. If the panel needs trimming, use a fine-toothed saw designed for plastic to create a smooth, even edge. Test-fit the panel in the opening to ensure it fits snugly without binding, and sand down any tight spots if necessary.
Clean both sides of the new panel with a mild soap solution and dry it thoroughly. This removes any dirt or residue that could interfere with the sealant’s adhesion.
Installing the New Window
Before installation, double-check that the frame is completely free of debris and old caulk. Apply a continuous bead of waterproof sealant along the bottom edge of the opening. Carefully position the new panel, centering it in place and using shims to keep it level.
Secure the panel using the screws or fasteners provided in the kit. Tighten the fasteners gradually and evenly to avoid putting too much pressure on the LEXAN™ panel, which could cause damage.
Once the panel is securely installed, seal the edges on the exterior. Use caulk to fill any gaps in the trim to prevent air leaks and ensure a snug fit.
Allow the sealant to cure completely before refilling the tank. Skipping this step could compromise the seal, leading to potential leaks and requiring you to redo the process. Patience here is key to a successful replacement!
Final Inspection and Maintenance Tips
Checking for Leaks and Stability
After the sealant cures, fill the tank with about 6 inches of water and let it sit for 30 minutes. Walk around the entire perimeter of the window, keeping an eye out for any water seeping through the frame. Pay extra attention to the corners and bottom edge – these areas are prone to leaks.
Look for visible signs of water damage like discoloration, stains, or bubbling around the window frame. Feel the frame and sill for any dampness, which could indicate a leak. If you notice moisture, drain the tank and reapply the sealant.
Inspect the caulk and sealant for cracks, gaps, or missed spots. Even minor gaps can lead to major water issues over time. For a more precise check, consider using a moisture meter to detect hidden leaks. These tools are affordable and widely available at hardware stores, offering an effective way to avoid expensive repairs.
To ensure the window’s stability, gently press on various parts of the panel. It should feel solid and secure, without any flexing or movement. If you detect instability, verify that all fasteners are properly tightened. A leak-free and stable window confirms your installation was done correctly.
Cleaning and Maintenance
Once you’re confident the window is leak-proof, regular cleaning will keep it clear and functional. Routine maintenance prevents dirt, grime, mold, and mildew from accumulating, which can harm the window’s material and reduce visibility. The trick is using the right cleaning products and techniques.
For general cleaning, use a vinyl-safe cleaning solution or a bit of Dawn dish soap. Apply the cleaner generously, then scrub gently with a soft-bristle brush, sponge, or rag. Rinse thoroughly to remove all soap residue, as leftover soap can attract more dirt.
Avoid chlorine-based cleaners or bleach, as these can weaken the material and compromise the window’s integrity. For disinfecting, stick to bleach-free disinfecting wipes, especially on frequently touched areas.
To tackle hard water stains, mix equal parts white vinegar and warm water. Apply the solution to the stains, let it sit for 5–10 minutes, and gently scrub with a non-abrasive sponge or brush. Rinse with clean water and dry thoroughly.
Use a soft, dry towel to wipe down the window, and let it air dry completely. While sunlight can help speed up drying, it won’t disinfect the surface. Never store the dunk tank while it’s still damp unless you plan to dry it the same day, as this can lead to mold and mildew growth.
Safe Storage and Transportation
Proper storage and careful transport are key to preserving the dunk tank’s condition. At the end of the season, disassemble the dunk tank entirely. This saves storage space and protects individual components from damage.
Store the seat and metal parts in a covered area to prevent rust and corrosion. Keep all components in a secure, weather-protected location. When disassembled, the dunk tank requires about 4′ x 4′ x 1′ of storage space, making it easy to fit into most storage facilities.
For transportation, the disassembled tank can fit into the bed of a pickup truck, an SUV, or even a minivan with the back seats removed. Use padding to protect the panels during transit and avoid stacking heavy items on top.
Before each use, do a quick visual inspection. Check for signs of fading, cracking, or warping that might have occurred during storage. Address any issues before filling the tank with water.
Regular upkeep should also include checking the tank’s air tightness, door operation, and liquid level alarm (if your model has one). Staying proactive with maintenance ensures your dunk tank remains a reliable and fun attraction for years to come.
Conclusion
Replacing damaged dunk tank windows isn’t just about keeping the equipment looking good – it’s a critical safety step. Broken or damaged windows can lead to serious risks, like sharp edges that might cause injuries or loose parts that could fail during use. Taking care of these issues right away helps create a safer experience for everyone involved.
The process is straightforward: remove the old window, prep the area, install the new window, and finish with a leak test. These steps ensure a secure and durable seal that stands up to regular use.
Maintenance doesn’t stop at installation. Routine care plays a huge role in extending the life of your dunk tank. As KC Supply Co. explains, “Regular and proactive storage tank maintenance is essential for optimal performance and longevity”. This same principle applies perfectly to dunk tanks – consistent upkeep keeps them safe and reliable.
FAQs
What are the signs that a dunk tank window needs to be replaced?
If the window on your dunk tank has visible cracks, fogging, or discoloration, it’s probably time to replace it. Other red flags include leaks, trouble opening or closing the window, or general wear and tear that might affect its safety or usability.
Taking care of these issues right away helps keep the dunk tank safe and fun for everyone. Safety should always come first when checking or replacing any part of your dunk tank.
How can I properly install a new LEXAN™ panel to ensure it’s secure and leak-free?
To install a new LEXAN™ panel securely and ensure it’s leak-free, here’s what you need to do:
- Use stainless steel or galvanized hex head screws paired with neoprene washers for added durability and a snug fit.
- Drill holes slightly larger than the screw shaft, placing them at least 1/2 inch to 1 inch from the panel edge. This extra space allows the panel to expand naturally without cracking.
- Be careful not to over-tighten the screws, as this can cause dimpling, which might lead to leaks.
Keep the protective film on the panel while cutting and drilling to protect it from scratches. Once installed, seal the edges using polycarbonate-compatible sealants or gaskets for a watertight finish. These steps will help keep your dunk tank window secure and in great condition for years.
What can I do to make my dunk tank windows last longer?
To keep your dunk tank windows in top condition and make them last longer, clean them regularly using a soft sponge or cloth with warm water and a bit of mild dish soap. After washing, rinse them thoroughly and dry them to prevent water spots from forming. Check the edges for any sharp spots and seal them with white silicone caulk to avoid leaks or further damage.
If you notice cracks or other issues, take care of them right away. Also, make sure to clean the hardware and apply a light lubricant to keep everything working smoothly. Regular upkeep not only keeps your dunk tank looking its best but also ensures it’s safe and ready for all the fun your events have in store!