Cleaning inflatables after events is critical for safety, hygiene, and maintaining your equipment’s lifespan. Neglecting this can lead to mold, odors, and damage, reducing your investment’s value. Here’s a quick guide:
- Preparation: Gather supplies like a shop vacuum, mild soap, and EPA-approved disinfectants. Inspect for damage or debris before starting.
- Dry Debris Removal: Use a vacuum or leaf blower to clear dirt and debris from seams and high-use areas.
- Washing and Sanitizing: Scrub with vinyl-safe cleaners, rinse thoroughly, and disinfect high-touch surfaces.
- Drying: Fully inflate and dry, using towels or a leaf blower to prevent mold.
- Storage: Roll (not fold), store in a dry, rodent-free space, and use talc or cornstarch to avoid sticking.
Clean after every use and deep clean every 5 uses. Proper care ensures safety, extends durability, and keeps customers happy.
Getting Ready to Clean
Before diving into the cleaning process, a little preparation goes a long way. Getting everything ready beforehand helps you avoid missed spots, accidental damage, or even injuries. Start by gathering your supplies, prioritizing safety, and giving your inflatable a thorough once-over.
Cleaning Supplies You’ll Need
Here’s what you’ll need to get started:
- For debris removal: A shop vacuum, broom, or leaf blower.
- For cleaning: Vinyl-safe cleaners like mild dish soap (e.g., Dawn) or a 3:1 water-to-vinegar mix.
- For disinfecting: An EPA-approved, non-bleach disinfectant. Be sure to check the label for the recommended dwell time, which is the amount of time the surface needs to stay wet for the solution to work effectively.
- Tools and extras: A soft-bristle brush, disinfectant wipes, microfiber towels, and rubber gloves.
Having these on hand ensures you’re ready to tackle dirt, germs, and grime efficiently.
Safety Steps to Follow
Safety first! Work in a well-lit, ventilated space, and always wear rubber gloves to protect your hands. Remove any detachable parts from the inflatable and check for small objects or debris that could damage the vinyl. Stick to non-toxic, biodegradable cleaning solutions – they’re gentler on both your equipment and the environment.
Inspecting the Inflatable First
Lay the inflatable flat on a waterproof tarp to protect it while you work. Walk the entire unit twice to spot any hidden issues, like punctures or debris. Pay extra attention to high-use areas – entryways, landings, and climbing spots tend to show the most wear and tear. Look for tears, rips, scuffs, stressed vinyl, fading colors, and any signs of mold or mildew.
Don’t stop there. Check behind flaps, inside crevices, and in the corners for debris that might be stuck. Flip the inflatable over to inspect the underside for ground damage. Cleaning can sometimes worsen weak spots, so identifying existing damage beforehand is key.
Mold can start growing on damp surfaces in as little as 24 to 48 hours, so catching moisture problems early helps prevent bigger issues down the line. This careful preparation not only protects your equipment but also ensures a safer, cleaner experience for everyone.
Removing Dry Debris
Before diving into wet cleaning or using any cleaning solutions, you’ll want to handle the dry debris on your inflatable. Skipping this step can lead to muddy streaks and a longer cleaning process, so it’s worth doing right.
Clearing Away Loose Dirt and Debris
Start by manually picking up large items like toys, wrappers, or any other noticeable debris hiding in corners or under flaps. Once the big pieces are out of the way, grab a shop vacuum to tackle the dirt embedded in seams and crevices. While a broom might work in a pinch, a vacuum makes the job quicker and more thorough, especially for those hard-to-reach areas where dirt loves to hide.
If you have an electric leaf blower, it’s a great tool for quickly blowing away loose grass, dust, and other small debris. Focus on high-traffic spots like entryways, climbing areas, and seams, as these tend to collect the most grime. For dried mud, let it fully dry before vacuuming – it’s much easier to remove once it’s no longer sticky or wet.
Setting Up the Inflatable for Cleaning
Once all the loose debris is cleared, it’s time to set up your inflatable for wet cleaning. The key here is to position it in a way that keeps it clean throughout the process. Lay it out on a clean, flat surface, such as a paved driveway or a heavy-duty tarp spread over grass. This prevents new dirt from sneaking in while you clean. Fully inflate the unit to ensure all surfaces, corners, and seams are taut and accessible.
If your inflatable has detachable parts – like steps, ladders, netting, or side rails – remove them now so you can clean those pieces separately. For the interior, sweep any remaining debris toward the exit to prevent it from spreading back into cleaned areas. Don’t forget to flip the inflatable over and vacuum the underside to clear out any ground debris. This step-by-step approach ensures you’re starting with a clean slate before moving on to washing and sanitizing.
Washing and Sanitizing
Once you’ve cleared away dry debris, the next step is tackling grime, stains, and bacteria to ensure your inflatable is safe and ready for use. A systematic approach works best: start by scrubbing key areas, follow up with a thorough rinse, and finish by disinfecting high-touch surfaces.
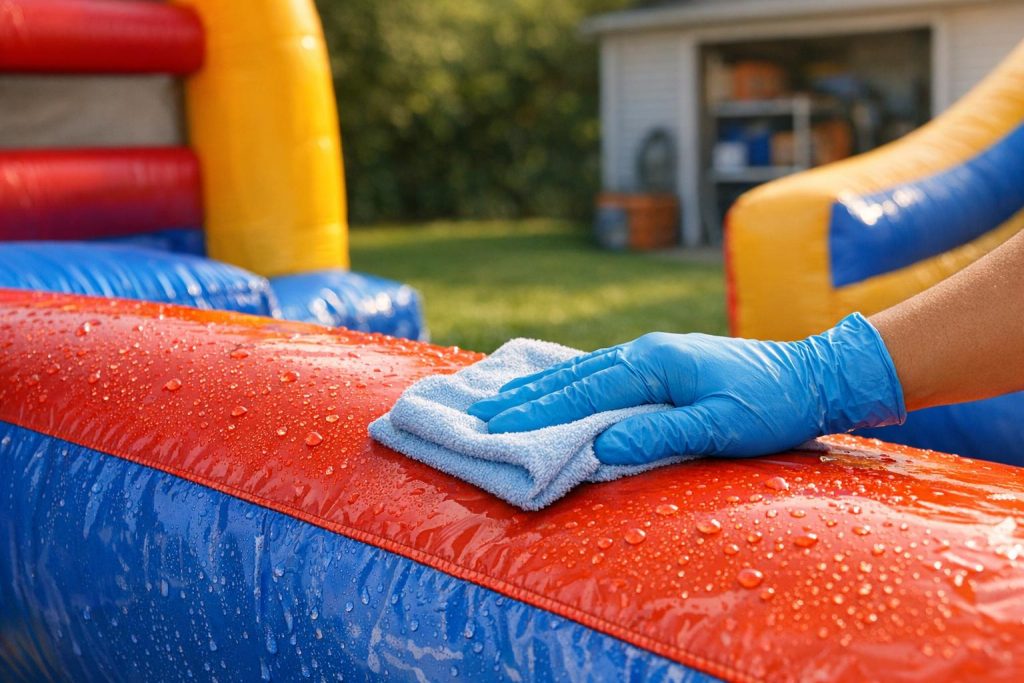
Scrubbing High-Use Areas
Pay extra attention to spots that see the most activity, like entrances, exits, landings, climbing walls, and slide surfaces. These areas tend to gather dirt, sweat, and oils from frequent use. Use a soft-bristle brush or a clean cloth to gently scrub the vinyl without damaging it. A simple yet effective cleaning solution can be made with three parts water, one part vinegar, and a small amount of bleach-free dish soap. Work methodically, starting at the back of the inflatable and moving toward the front to avoid spreading contaminants. For tougher messes – like dried gum, cake residue, or mud stains – focus on targeted scrubbing to lift the stains before they set into the material.
Rinsing Off Soap and Cleaning Agents
Once you’ve scrubbed the entire inflatable, grab a garden hose to rinse away all soap and cleaning solutions. Start rinsing from the back and move forward, ensuring every last bit of soap and residue is washed off. Be thorough, especially around seams, corners, and netting, where soap tends to collect. After rinsing, use clean towels to blot up any standing water, which helps prevent water spots and speeds up drying. Avoid using a high-powered pressure washer, as it can damage the vinyl or seams. If you do opt for a pressure washer, keep it on the lowest setting and maintain at least a 3-foot distance from the surface.
Disinfecting Touched Surfaces
With rinsing done, it’s time to disinfect. Any part of the inflatable that gets touched frequently – like railings, handles, and entry points – needs proper disinfection. Use bleach-free disinfecting wipes or an EPA-approved spray that eliminates 99.9% of germs, bacteria, and viruses. Wipe down these high-touch areas and let the disinfectant sit for the recommended dwell time as specified on the label. Unlike soap, disinfectants typically don’t require rinsing unless the product instructions say otherwise. For convenience, you might opt for CDC-approved no-rinse sanitizers like Arrow 150, which can be sprayed on and left to air dry.
Drying and Storing the Inflatable
After disinfecting your inflatable, drying it thoroughly is the next critical step to ensure it’s ready for safe storage.
How to Dry the Inflatable
To avoid mold and mildew, make sure the inflatable is completely dry. Start by keeping the unit inflated to allow airflow, then blot any standing water with a towel. Use a leaf blower to dry tricky spots like seams and straps. Placing the inflatable on a waterproof tarp during this process is a smart move – it keeps the base from soaking up moisture from the ground.
If the weather is sunny, drying becomes much easier as the heat speeds up evaporation. Check seams and thicker vinyl areas by touch; if they feel cool or damp, they need more time to dry. Pay extra attention to straps and thicker sections, as these tend to hold moisture longer.
Once everything is dry, you’re ready to inspect and store the inflatable.
Final Check Before Storing
Before putting the inflatable away, take a moment to inspect it thoroughly. Look over every seam, strap, and corner for tears, loose stitching, or any damage that might need repair. This quick check ensures the inflatable is in top condition for its next use and prevents small issues from turning into bigger problems.
How to Store Inflatables Correctly
Storing your inflatable properly is key to keeping it in great shape. Instead of folding it, roll the unit to avoid creases. If you’re storing it for an extended period, lightly dust the surface with talc or cornstarch to prevent sticking. Always place the inflatable on wooden pallets or stands to keep it off the ground – concrete floors can trap moisture and lead to contamination.
Choose a cool, dry, and rodent-free area for storage. Cedar blocks or peppermint oil can act as natural repellents to keep pests away. Store accessories like blowers, stakes, and extension cords in separate, clearly labeled bins to prevent damage or loss. During the off-season, check on your stored inflatables occasionally and rotate them to avoid permanent compression marks.
| Storage Factor | Recommendation | Purpose |
|---|---|---|
| Surface | Pallets or wooden stands | Protects against moisture from floors |
| Container | Breathable bags or mesh | Promotes airflow to prevent mildew |
| Pest Control | Cedar blocks or peppermint oil | Keeps rodents from damaging the vinyl |
| Long-term Care | Talc or cornstarch powder | Prevents vinyl surfaces from sticking |
How Often to Clean Your Inflatables

Inflatable Cleaning Schedule by Usage Level Guide
It’s important to clean your inflatable after every use. For light cleaning, spot-treat with a vacuum or broom to remove minor debris. However, a thorough wet cleaning, which involves scrubbing with a cleaning solution, is recommended at least once every five uses – or sooner if you notice stains or odors. Industry guidelines suggest scheduling a wet clean every five uses to maintain hygiene and functionality.
If the inflatable has been heavily used, exposed to food, or operated in muddy conditions, immediate wet cleaning is essential. Dirt, sweat, and microorganisms from heavy use can harm the fabric or seams if not promptly addressed. In fact, proper care can prevent up to 90% of incidents involving inflatables. For muddy or water-related activities, it’s best to clean the inflatable on-site before debris dries, as dried mud can damage the vinyl surface.
Cleaning Schedule by Usage Level
Here’s a quick guide to help you plan your cleaning routine based on how often and intensely the inflatable is used:
| Usage Level | Usage Frequency | After-Event Cleaning | Deep Cleaning | Seasonal Maintenance |
|---|---|---|---|---|
| Light | Occasional backyard use | Remove dry debris and sanitize spots | Every 5 uses or before storage | Deep clean, dry thoroughly, and apply storage powder |
| Moderate | Weekly rentals or small parties | Sanitize and inspect after each event | Full scrub-down monthly | Inspect seams, sanitize all surfaces |
| Heavy | Daily use at play centers or multi-day festivals | Complete sanitization after every use | Deep clean weekly | Vacuum tight areas, lubricate slides, and inspect anchor points |
Commercial rental businesses often schedule their deep cleaning during weekdays to ensure their equipment is ready for busy weekends. For winter months, consider using smaller inflatables indoors to avoid potential damage from frozen or muddy ground.
Sticking to these cleaning routines not only keeps your inflatables in great shape but also prioritizes safety for users. At Bouncy Rentals USA, we take pride in maintaining the highest safety standards through consistent care and maintenance, ensuring both durability and a safe experience for every guest.
Conclusion
A well-executed post-event cleaning routine is not just a box to check – it’s a cornerstone of safety, customer trust, and long-term profitability.
A detailed cleaning checklist helps ensure hygiene, prevent accidents, and extend the life of your equipment. As Happy Jump aptly states:
"Cleaning an inflatable water slide is essential to maintain its durability and ensure a safe and enjoyable experience for users."
Regular maintenance allows you to catch issues like punctures, loose seams, or sharp objects before they escalate into bigger problems. Plus, removing algae and mold keeps surfaces safe and slip-free, reducing the risk of falls.
Using EPA-approved disinfectants is key to eliminating 99.9% of germs, while proper drying prevents mold and mildew, which can pose respiratory risks. These steps go a long way in maintaining a safe and sanitary environment for your customers.
Clean, well-maintained inflatables also build customer confidence. As All Clean Exteriors puts it:
"A tidy, well-maintained area can make guests feel comfortable and valued."
Spotless equipment signals professionalism, encouraging repeat business and word-of-mouth referrals. On the flip side, neglecting maintenance can tarnish your reputation and lead to costly equipment replacements.
By addressing minor tears promptly with repair kits and storing units properly – off concrete floors and in climate-controlled spaces – you can prevent moisture damage and ensure your inflatables are ready for future events. This proactive care not only extends the lifespan of your equipment but also maximizes your return on investment.
Consistency is key: clean after every use, dry thoroughly before storage, and avoid harsh chemicals that can harm vinyl materials. A systematic approach like this safeguards your customers, preserves your assets, and reinforces your reputation as a professional, reliable service provider. At Bouncy Rentals USA, we take pride in these practices, reflecting our commitment to quality and safety for every event.
FAQs
How can I keep inflatables free from mold and mildew?
To keep your inflatables free from mold and mildew, it’s essential to clean them after every use. Begin by clearing away any debris, then wash the surface using a gentle, non-abrasive cleaner or sanitizer. After cleaning, make sure the inflatable is completely dry before deflating it – this step is critical to avoid trapped moisture. Finally, store it in a dry, climate-controlled space to shield it from humidity and dampness. Taking these steps will help maintain your inflatables in great shape for your next event.
What are the best products to clean and sanitize inflatables?
To properly clean and sanitize inflatables, start with an EPA-approved disinfectant – look for one that includes quaternary ammonium. Pair this with a mild detergent, such as dish soap, for general cleaning. For more stubborn stains, mold, or grime, try using a diluted bleach solution or a white vinegar mixture. Always stick to the manufacturer’s cleaning guidelines to keep the material safe and intact.
What’s the best way to store inflatables to keep them in great condition?
To keep your inflatables in great shape for years to come, store them in a cool, dry area away from direct sunlight and high humidity. Opt for breathable storage bags or mesh containers to allow airflow, and place them on pallets or tarps to keep them off the ground. Tossing in a few desiccant packs can help absorb moisture and ward off mold. Taking these steps not only prolongs the lifespan of your inflatables but also ensures they’re ready to shine at your next event!