
Inflatables are fun but require regular maintenance to ensure safety and durability. Proper care can prevent up to 90% of accidents and extend the lifespan of inflatables to 5–7 years. Neglecting maintenance risks safety, leads to costly repairs, and increases legal liabilities. Here’s what you need to know:
- Before Use: Inspect for tears, holes, and proper anchorage. Ensure blowers, cords, and zippers are functional. Check wind speeds (max 24 mph) and setup area for debris.
- Cleaning: Use mild soap or specialized cleaners. Remove debris, sanitize high-use areas, and dry thoroughly to prevent mold on bounce houses.
- Storage: Deflate completely, fold or roll carefully, and store in a cool, dry place. Avoid direct sunlight and moisture exposure.
- Routine Checks: Weekly cleaning, monthly sanitization, and annual professional inspections are essential for safety and compliance.
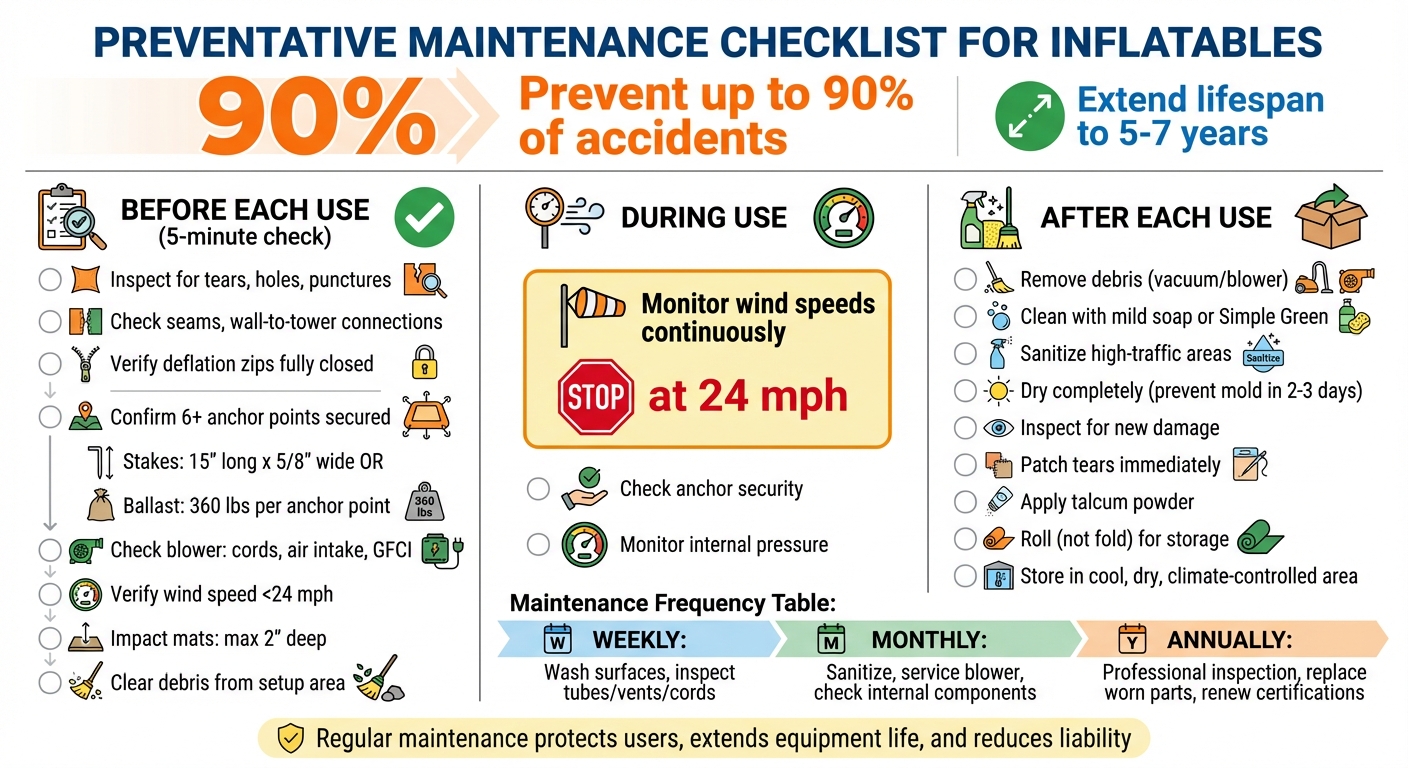
Inflatable Maintenance Schedule: Before, During, and After Use Checklist
Before Each Use: Inspection Checklist
Taking a few minutes to inspect your inflatable before each use can make a huge difference in preventing accidents and ensuring everything runs smoothly. A quick 5-minute check can help avoid operational hiccups and, more importantly, ensure guest safety and protect your equipment. Here’s how to go step by step through the structure, surface, and power components.
Check the Inflatable Structure
Start by looking over the fabric for holes, tears, thin spots, or punctures. Pay special attention to high-stress areas like the seams around the bed, step, and front apron. Also, check the wall-to-tower connections and corners – these areas tend to wear out faster. Once the inflatable is set up, step back and take in the overall shape. According to the Health and Safety Executive:
"If it looks misshapen or deformed there could be internal problems that make bouncing unpredictable and it should therefore not be used".
If you notice sagging, over-tension, or uneven areas, it could mean there’s internal damage that needs fixing right away.
Make sure deflation zips are fully closed before inflating, and check that safety netting is securely attached and not sagging. At the entrances, ensure that impact-absorbing mats are in place and correctly positioned – these mats should be no more than 2 inches deep.
Anchorage is another critical element. Every inflatable should have at least 6 anchor points, with each one firmly secured. Check anchor ropes for any signs of wear, like fraying or stretching, and if you’re using metal stakes, they should be at least 15 inches long and 5/8 inch wide with rounded tops. If stakes aren’t feasible, use ballast weighing at least 360 pounds per anchor point.
Examine Surface Cleanliness and Material
Before unrolling the inflatable, inspect the setup area for sharp objects, debris, or uneven ground that could damage the material. Once unrolled, follow the steps for cleaning bounce houses by using a vacuum or leaf blower to remove dirt, leaves, and grass from the surface and crevices. As Happy Jump advises:
"Before washing, clear out any loose dirt, leaves, and other debris with a vacuum or blower. This step prevents debris from scratching the surface during cleaning".
Look for signs of mold, mildew, or surface damage. If the fabric appears faded from sun exposure, it might have weakened, which could compromise its strength. Also, double-check that the inflatable is completely dry – moisture can make surfaces slippery and encourage mildew growth.
Inspect Blower and Power Source
The blower is essential for keeping the inflatable operational, so inspect it carefully. Look for frayed cords, loose connections, damaged plugs, or anything blocking the air intake like leaves, dirt, or fabric. Ensure the mesh guards over the air intake are intact and secure to prevent debris or fingers from getting into the fan.
Make sure all extension cords are heavy-duty, rated for outdoor use, and match the blower’s power requirements. No wires should be exposed, and all electrical components should be properly covered.
When you start the blower, listen for unusual sounds or excessive vibration – these could be warning signs of motor issues. Excessive heat is another red flag that the motor might be failing. Also, check that the inflation tube is tightly secured to the blower with straps to prevent air leaks.
For electrical safety, always use a Ground Fault Circuit Interrupter (GFCI) to reduce the risk of electrical shock. Test the GFCI before operation to ensure it trips correctly.
Summary Table
Here’s a quick overview of what to inspect:
| Inspection Category | Specific Items to Check |
|---|---|
| Inflatable Structure | Fabric condition, seams, wall-to-tower fixings, deflation zips, safety netting, shape. |
| Anchorage | Minimum 6 points, ropes (no fraying), stakes (15" x 5/8") or ballast (360 lbs per point). |
| Blower & Power | Mesh guards, air intake (clear of debris), non-return flap, GFCI safety, and cord ratings. |
| Safety & Setup | Internal air pressure, wind speed (<24 mph), impact mats, and debris-free setup area. |
Cleaning and Drying Steps
How to Clean Inflatables
Start by clearing away any loose debris with a vacuum or leaf blower. This step protects the vinyl from scratches when you start scrubbing. Once the surface is free of dirt, prepare a cleaning solution. You can use mild dish soap (like Dawn) or a specialized cleaner such as Simple Green or Matt-Kleen. Another option is a mix of three parts water, one part white vinegar, and a little dish soap.
Using a soft brush or sponge, scrub the inflatable, paying extra attention to high-traffic areas like entrances and slide transitions. Avoid stiff brushes or abrasive pads, as they can damage the vinyl. After scrubbing, rinse thoroughly with clean water to remove any soap residue that could lead to stains or slippery surfaces. If you spot mold, apply vinegar directly to the affected area, let it sit for a couple of hours, and then gently scrub it away. To finish, use a child-safe disinfectant spray like Lysol or Clorox to kill germs.
Following these steps regularly not only keeps your inflatables in good shape but also helps minimize risks associated with dirt and germs.
Drying and Preventing Odors
Once cleaned, drying your inflatable properly is crucial. Moisture left behind can lead to mold, which can permanently damage the unit. As MyADAcademy warns:
"Mold is the silent, slimy destroyer of bounce houses, and it’s every party rental operator’s nightmare".
Mold can start growing if a wet inflatable stays rolled up for more than two to three days. To dry quickly, inflate the unit and open opposite vent zippers to create cross-ventilation. Use towels or a chamois to soak up water from seams, Velcro strips, and other crevices. For better drainage, tilt the inflatable by propping one side up with a chair or dolly. Pay close attention to areas under slide liners, as they tend to trap moisture.
Drying in direct sunlight speeds up evaporation and helps eliminate mold spores. If sunlight isn’t an option, maintain a temperature between 70°F and 85°F for effective overnight drying. Before storing, sprinkle talcum powder or a manufacturer-recommended product to absorb any leftover moisture and prevent the vinyl from sticking.
These steps not only prevent odors but also keep your inflatable in top condition for future use.
After Each Use: Inspection and Storage Checklist
Post-Event Inspection
Once an event wraps up, take the time to thoroughly inspect the inflatable before packing it away. Pay close attention to the entire surface, especially corners and entry points, for any signs of punctures, tears, or worn areas. Check double-stitched seams carefully for loose threads, gaps, or fraying that might cause air leaks. Don’t forget to examine anchor points, D-rings, straps, and tie-downs for signs of wear or wind damage.
Inspect the safety netting for sagging or tears, and make sure weight limit tags and safety labels are still intact and easy to read. Take a close look at inflation tubes, air vents, and valves to ensure they’re free from blockages or damage. For blowers, check the intake for debris, inspect cords for wear, and listen for any unusual motor sounds. If you notice any damage, photograph it and keep a record for potential insurance claims.
Ensure all structural and anchoring components are still up to standard. If you find small holes or tears, patch them immediately using a vinyl repair kit rather than postponing repairs. After cleaning, apply a lubricant to zippers and closures to keep them functioning smoothly and prevent future issues. Staying on top of these steps helps protect both the safety of users and the longevity of your investment.
Once all repairs and inspections are complete, you can move on to folding and storing the inflatable.
Folding and Storage
When the inflatable is cleared for storage, start by deflating it properly. A deflator can help remove trapped air efficiently. Place a tarp on the ground to keep the surface clean while folding or rolling. Rolling is generally better than folding, as it minimizes wrinkles and reduces wear. If folding is unavoidable, avoid sharp creases and stick to a consistent folding method to prevent uneven wear over time.
Store the inflatable in a cool, dry, climate-controlled area, away from direct sunlight, which can cause fading and weaken the vinyl. Avoid placing it directly on concrete floors – use pallets, wooden stands, or shelving to keep it elevated and protect it from moisture. Keep blowers, stakes, and extension cords in separate, clearly labeled bins to prevent unnecessary damage. Instead of airtight plastic containers, opt for breathable bags or mesh containers to allow proper air circulation.
Maintenance Schedule
How Often to Perform Maintenance Tasks
A consistent maintenance routine is crucial for keeping inflatables safe and extending their lifespan. By following a structured schedule, you can catch potential issues early, avoiding costly repairs or liability risks.
Here’s how to keep your inflatables in top shape:
- Before every use: Perform a quick 5-minute safety check using the inspection checklist. This ensures the inflatable is ready for operation.
- During use: Monitor wind speeds with an anemometer. If speeds exceed 24 mph, stop using the inflatable immediately.
- After each event: Remove debris, clean any stains, and ensure the inflatable is fully dry before folding and packing for storage. This prevents mold growth and material damage.
Additional maintenance tasks by frequency:
- Weekly: Wash all surfaces with mild soap and warm water. Inspect inflation tubes, air vents, and electrical cords for any signs of wear.
- Monthly: Sanitize the inflatable with a vinyl-safe disinfectant to reduce germ buildup. Check the blower motor and examine internal structures like baffles and interactive features for damage.
- Annually: Arrange for a professional inspection by a certified technician. Replace any worn parts and renew safety certifications. As the HSE advises:
"An in-service inspection should be carried out periodically (maximum 12 months) to check independently that the inflatable device is in good condition and good repair."
Here’s a summary of maintenance tasks by frequency:
| Frequency | Task Type | Specific Actions |
|---|---|---|
| Before Each Use | Safety Inspection | Check for tears, holes, or loose stitching; verify anchor points; test the blower function. |
| During Use | Monitoring | Measure wind speed (stop at 24 mph); monitor internal pressure; check anchor security. |
| After Each Use | Maintenance | Remove debris; clean stains; inspect for new damage; ensure the inflatable is completely dry. |
| Weekly | Deep Care | Wash with mild soap and warm water; inspect inflation tubes, air vents, and cords. |
| Monthly | Detailed Audit | Sanitize with vinyl-safe disinfectant; service blower motor; inspect internal components. |
| Annually | Certification | Schedule a professional inspection; replace worn parts; renew safety certifications. |
Make sure to keep detailed records of all inspections, including wind speed readings and any repairs. This documentation not only helps track wear and tear but may also be required for insurance or regulatory compliance. If the inflatable is exposed to extreme weather, used beyond its limits, or shows visible damage, inspect it immediately instead of waiting for the next scheduled check.
Conclusion
Following this checklist is key to running safe and dependable inflatable operations. Regular maintenance can prevent up to 90% of inflatable-related incidents, shielding both users and your business from potential liability risks.
Keeping inflatables in excellent condition isn’t just about appearances – it’s about safety and reliability. As Henry, an expert at Bounce Horizon, puts it:
"Regular maintenance isn’t just about keeping your bounce house clean – it’s about ensuring the safety of children and protecting your investment."
This advice holds true whether you’re managing a single inflatable or an entire fleet.
At Bouncy Rentals USA, we’ve built our reputation on these principles. Every inflatable – whether it’s a bounce house, water slide, or obstacle course – is meticulously inspected and cleaned before delivery. Our equipment is fully insured and maintained to meet strict safety standards, ensuring a smooth experience from setup to takedown.
Documenting inspections also ensures compliance and reduces liability. Treating maintenance as an ongoing responsibility rather than a one-time task protects users, extends the life of your equipment, and enhances your business’s credibility.
The checklist provided here offers a straightforward guide to keeping inflatables in top condition. Stick to these practices, and you’ll notice the benefits: safer events, longer-lasting equipment, and satisfied customers at every gathering, from backyard parties to large-scale events.
FAQs
What should I do if my inflatable looks misshapen after inflation?
A misshapen inflatable can happen due to overinflation or uneven air distribution. To fix this, let out some air if it’s overinflated and make sure the air is evenly distributed. Also, inspect for any leaks or damage that might be causing the issue. Keeping the inflation pressure balanced and the air evenly spread is key to maintaining the inflatable’s proper shape.
How can I dry an inflatable quickly if I can’t leave it in the sun?
To dry an inflatable without sunlight, start by deflating it and draining any excess water. Then, use towels to thoroughly wipe it down, paying extra attention to seams and creases where water tends to collect. After that, reinflate the inflatable to allow better airflow, and set up fans or blowers to help speed up the drying process. Make sure to reposition or flip the inflatable periodically to ensure every part dries evenly. This method works well for shaded or indoor spaces where sunlight isn’t an option.
What maintenance records should I keep for insurance or compliance?
Keeping thorough records of your inflatables’ maintenance is essential. Make sure to document everything – inspection and repair logs, cleaning schedules, and safety checks. Regularly note inspections for tears, seam integrity, and general condition, along with any repairs or maintenance tasks completed. Additionally, keep track of setup procedures, anchoring checks, and weather-related safety evaluations, such as monitoring wind speed limits. These records not only show your commitment to safety standards but can also be critical for insurance claims or meeting regulatory requirements.