Cleaning water-based inflatables like slides and splash zones is essential for safety and durability. Stains from dirt, algae, sunscreen, and mold can weaken materials like PVC and vinyl, shorten the lifespan of your equipment, and create slippery surfaces. Here’s how to keep your inflatables clean and in good condition:
- Identify stains: Common types include dirt, algae, mold, sunscreen residue, and rust.
- Use the right tools: Soft-bristle brushes, microfiber towels, and non-abrasive sponges work best.
- Safe cleaning solutions: Warm water with mild dish soap, vinegar mixtures, baking soda paste, or vinyl-safe commercial cleaners.
- Avoid harsh chemicals: Bleach, strong solvents, and high-pressure washers can damage seams and colors.
- Dry thoroughly: Prevent mold by ensuring all surfaces, seams, and folds are completely dry before storage.
- Store properly: Keep inflatables in a cool, dry place using breathable storage bags.
Regular cleaning after each use, combined with proper drying and storage, prevents stains, ensures safety, and extends the life of your inflatables.
How to Identify and Assess Stains
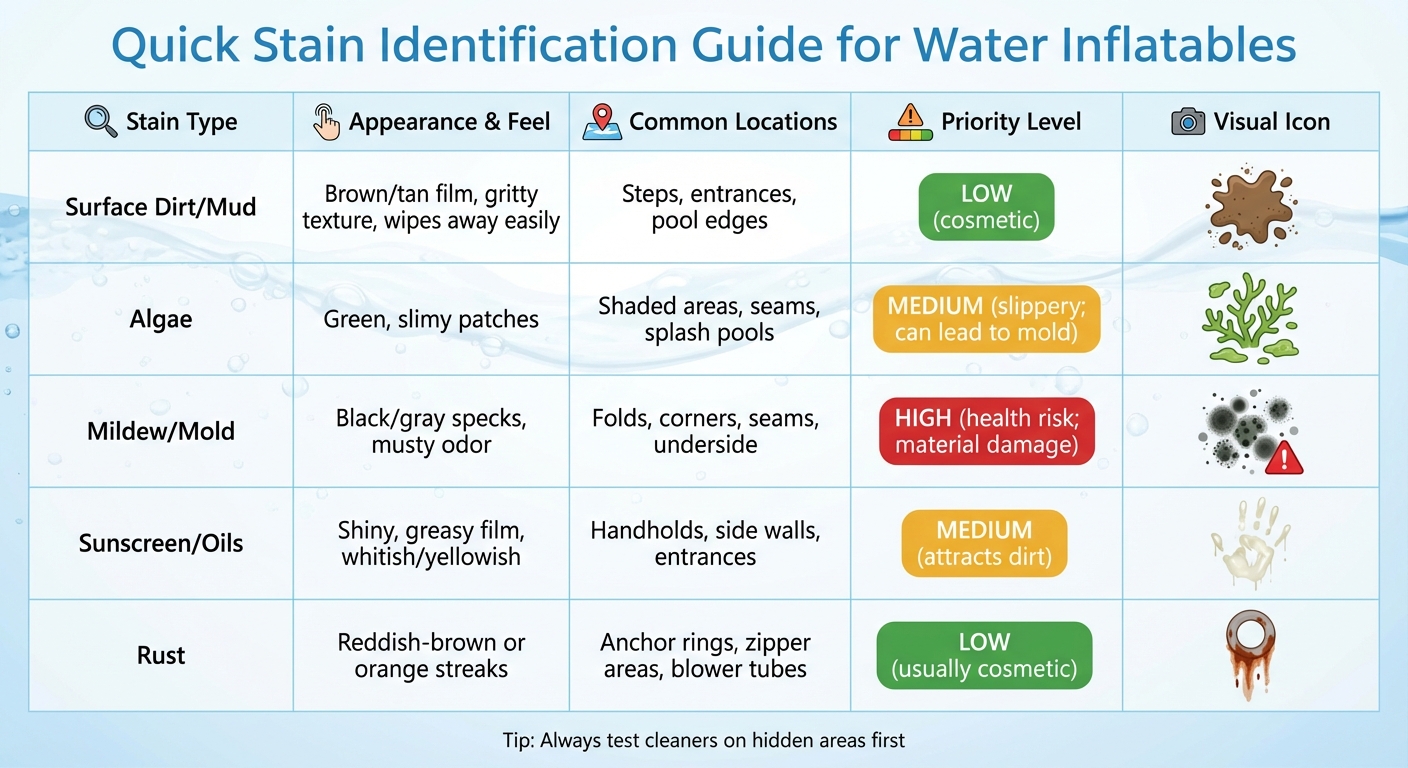
Common Inflatable Stain Types: Identification and Priority Guide
Common Stain Types
Before diving into cleaning, it’s important to figure out what kind of stain you’re dealing with. Here’s a breakdown of the most common ones:
- Surface dirt and mud: These show up as a brown or tan film, often found on steps, entrance ramps, and pool edges – basically, spots where kids frequently climb in and out. They feel gritty and can usually be wiped away easily with a damp cloth.
- Algae: Algae appears as green or dark green slimy patches, especially in areas that stay wet or shaded, like splash pools, seams, and folds. It feels slippery and tends to come back quickly if the area isn’t properly dried.
- Mildew and mold: These are more serious. They look like black, gray, or white patches and often come with that classic musty “old basement” smell. You’ll usually find them in corners, under folds, around stitched seams, or on the underside where moisture lingers longer. Unlike algae, mold doesn’t wipe off easily and can weaken both fabric and stitching over time.
- Sunscreen and body-oil residue: These leave shiny, slightly greasy patches, often on sidewalls, handholds, or slide lanes – basically, anywhere with frequent skin contact.
- Rust stains: These appear as reddish-brown or orange streaks, typically near metal hardware like anchor rings, zippers, or blower tubes that come into contact with the vinyl.
Here’s a quick reference table to help you prioritize:
| Stain Type | Appearance & Feel | Where to Look | Priority Level |
|---|---|---|---|
| Surface dirt/mud | Brown/tan film; gritty; wipes away easily | Steps, entrances, pool edges | Low (cosmetic) |
| Algae | Green, slimy patches | Shaded areas, seams, splash pools | Medium (slippery; can lead to mold) |
| Mildew/mold | Black/gray specks; musty odor | Folds, corners, seams, underside | High (health risk; material damage) |
| Sunscreen/oils | Shiny, greasy film; whitish/yellowish | Handholds, side walls, entrances | Medium (attracts dirt) |
| Rust | Reddish-brown or orange streaks | Anchor rings, zipper areas, blower tubes | Low (usually cosmetic) |
Once you’ve identified the stain, the next step is to inspect and assess its severity.
Inspection and Testing Methods
Start by fully inflating the unit and letting it dry. This makes it easier to spot problem areas, especially where the fabric stretches or water has pooled. Check the unit in a systematic way: begin with the exterior, move to the interior, and finish with the underside. Pay extra attention to seams, corners, under slide liners, and pool bottoms, as these spots often hide mold or algae.
As you inspect, use your senses:
- Sight: Look for color changes, streaks, or dull patches.
- Touch: Feel for slickness (algae or sunscreen), roughness (old dirt), or sliminess (mold).
- Smell: A musty odor can signal mildew, even before visible spots appear.
To check how serious a stain is, try wiping it with a damp white cloth. If it transfers easily, it’s likely surface dirt. If it doesn’t budge, it’s probably a deeper stain that needs stronger treatment.
Before applying any cleaner, test it on a small, hidden area – like under a flap or on the underside. Apply the cleaner, wait a few minutes, and check for any signs of damage, such as color fading, dullness, or stickiness. Many professionals use a “30–60 second test.” If scrubbing with a mild cleaner doesn’t make a difference in that time, the stain may require a stronger solution, but over-scrubbing could damage the vinyl.
For persistent stains, take a quick photo, note the location and date, and record what cleaner you used and how effective it was. Keeping this information handy can help track recurring issues and decide when it’s time for repairs or professional help.
Cleaning Tools and Safe Solutions
Once you’ve identified the type of stain you’re dealing with, having the right tools and cleaning solutions is key to getting the job done effectively and safely.
Cleaning Tools You’ll Need
Start by gathering a few essentials: a soft-bristle brush, microfiber towels, non-abrasive sponges, a spray bottle, and a garden hose with an adjustable nozzle. The soft-bristle brush is perfect for loosening dirt and algae from textured surfaces without scratching vinyl, while microfiber towels are ideal for wiping and drying. A spray bottle helps you target stained spots with diluted cleaners, and the garden hose with an adjustable nozzle ensures gentle rinsing. Be careful to avoid high-pressure settings, as they can damage seams.
Before you start wet cleaning, use a small broom or shop vacuum to clear away dry debris – this helps prevent scratches. Some professionals, like Bouncy Rentals USA, even use leaf blowers to remove loose dirt before cleaning. Make sure all your tools are non-metal and non-abrasive to protect seams and printed graphics. Here’s a quick look at estimated costs: soft-bristle brushes range from $5 to $15, microfiber towel packs (12–24 towels) cost about $8 to $20, and adjustable spray nozzles are priced between $8 and $25.
With your tools ready, you can move on to selecting safe cleaning solutions.
Safe Cleaning Products
For everyday dirt and body oils, a simple solution of warm water mixed with a mild, bleach-free dish soap works wonders. Just add a small amount of soap per gallon of water to create light foam that rinses off easily. This mixture is gentle on vinyl-coated fabrics and won’t harm seams or colors.
To tackle odors or light mildew, mix 3 parts water, 1 part white vinegar, and a dash of bleach-free dish soap in a spray bottle. This affordable option, with white vinegar costing around $2–$5 per gallon, is both effective and budget-friendly.
For tougher stains like greasy handprints or stubborn dirt, a baking soda paste (made by mixing baking soda with a little water) can do the trick. Apply it gently, scrub, and rinse thoroughly. For light-colored vinyl, 3% hydrogen peroxide is another option for addressing organic stains or mild mildew discoloration. Simply dab it on with a cloth, spot-test first, and rinse after a short time to avoid any fading. A 32-ounce bottle of hydrogen peroxide typically costs $1–$4.
If you’re dealing with older stains, embedded dirt, or more persistent mildew, consider vinyl-safe commercial cleaners designed for inflatables like bounce houses or water slides. These specialty products, priced between $15 and $40 per gallon, are formulated to clean effectively without harming PVC or protective coatings. Always follow the manufacturer’s instructions, avoid over-concentrating the cleaner, and test it on a hidden area first.
Steer clear of bleach and any bleach-based products – they can fade colors, weaken seams, and degrade vinyl over time, even when diluted. Likewise, avoid strong solvents, petroleum-based cleaners, high-alkaline degreasers, abrasive powders, steel wool, and stiff wire brushes. These can scratch surfaces, strip protective coatings, and damage artwork. Manufacturers warn that harsh chemicals not only harm inflatables but can also pose health risks. Stick to mild soap and water for the best results, and always avoid high-pressure rinsing to protect seams and graphics.
Step-by-Step Cleaning Process
Preparation Steps
Begin by placing your inflatable on a dry, flat surface free of debris. Open all drain valves and inflate the unit until it’s firm – this makes scrubbing easier and ensures water runs off rather than pooling. Before using any cleaning solution, grab a broom, handheld brush, or shop vacuum to clear away loose dirt, leaves, and debris. Pay close attention to high-traffic areas, checking for stubborn dirt, algae streaks, mildew, sunscreen stains, or rust from metal fixtures. These steps help protect the material and prepare it for a thorough cleaning.
Once prepped, you can tackle specific stains using the methods outlined below.
Cleaning Methods for Each Stain Type
- Dirt and Mud: Start with a quick rinse using a garden hose to wash away surface grime. Then, scrub small sections at a time with a mixture of warm water and mild dish soap, using a soft sponge or cloth. Work from top to bottom to avoid spreading dirt.
- Algae and Light Mildew: Use the same soap solution or a mold cleaner made for PVC and vinyl. Apply the cleaner, let it sit as directed, scrub gently, and rinse thoroughly.
- Heavy Mold or Dark Stains: For tougher mold, work outdoors and wear gloves and a mask for safety. Use a heavy-duty mildew remover approved for inflatables, allowing it to sit for the recommended time before scrubbing. Be aware that deep mold can sometimes cause permanent discoloration. If mold is widespread or seams are damaged, replacing the inflatable might be more practical than repeated cleaning attempts.
- Oily Residues (Sunscreen, Body Oils, Grease): Warm water and dish soap work well as a degreaser. Scrub the area with a soft cloth and rinse thoroughly to remove any slippery residue.
- Rust Marks: For rust stains from stakes or metal fixtures, use a vinyl-safe rust remover. Test it on a hidden area first, apply sparingly to the stained spot, let it sit briefly, then wipe clean and rinse thoroughly.
Finish by sanitizing high-contact areas like entry steps and handholds with a vinyl-safe disinfectant.
Rinsing and Drying
Proper rinsing and drying are essential to prevent mold and extend the life of your inflatable. Use a low-pressure hose to rinse each section thoroughly, working from top to bottom to remove all soap and residue. Avoid high-pressure washers, as they can force water into seams and glued areas, causing hidden mold and structural damage. Check surfaces like slides, stairs, and entrances for any slick spots, and re-rinse as needed until everything feels clean.
Remove any standing water from corners and folds using towels, a squeegee, or a wet/dry vacuum. Keeping the inflatable partially or fully inflated allows air to circulate, helping water evaporate from seams and textured areas. Use clean towels to dry visibly wet spots, then let the inflatable air-dry completely in the sun or a well-ventilated area. Make sure all hidden folds and pockets are dry before deflating and folding the unit for storage.
How to Prevent Stains and Maintain Equipment
Post-Event Cleaning
Tackling cleaning right after an event is key to keeping stains from embedding into the vinyl. While the inflatable is still fully inflated, hose down high-traffic areas like steps, slides, and seams. Use a soft cloth with mild soap to wipe surfaces before any residue has a chance to settle. Pay extra attention to corners, footholds, and stitching – these spots are notorious for trapping moisture and grime. After cleaning, make sure the inflatable is completely dry to prevent mold from developing. These simple steps, when done consistently, help protect the inflatable for the long haul.
For areas that get the most contact, such as entrances and handholds, use a bleach-free disinfectant or a commercial inflatable sanitizer. These products effectively remove body oils and bacteria without harming the vinyl. If sugary spills occur, clean them up immediately – sugar attracts dirt and can leave behind dark, stubborn stains. By combining regular post-event cleanups with monthly deep cleaning, you can significantly reduce stain buildup.
Proper Storage Methods
Good cleaning habits go hand-in-hand with proper storage. Keep inflatables in a cool, dry indoor location with low humidity. Use breathable storage bags or vented bins to avoid moisture accumulation. To protect the fabric from condensation or ground moisture, store inflatables on pallets or shelves, ensuring they’re elevated off bare concrete floors.
Before folding, remove all debris, and stick to the manufacturer’s recommended folding technique – this typically involves folding the outer edges inward and rolling toward the blower tube. This method helps avoid sharp creases and keeps printed surfaces intact. If you notice a musty smell, don’t store the unit; it’s a clear sign of hidden moisture that could lead to mildew stains. Also, steer clear of storing inflatables near heaters, hot pipes, or direct sunlight, as these can warp the vinyl.
At Bouncy Rentals USA, rigorous sanitization and storage practices ensure their inflatables remain in top condition between events.
Conclusion
Keeping your inflatable clean and stain-free doesn’t have to be a hassle – it just takes a consistent routine. Start with quick cleanups after each use, using mild, vinyl-safe cleaners, and always make sure it’s completely dry before storing. For dirt and mud, warm water and a bit of mild soap usually do the trick. Algae and mildew, on the other hand, call for gentler, non-corrosive treatments. Avoid harsh chemicals like bleach, as they can damage seams and fade colors. Taking these steps not only protects the material but also helps prevent slippery surfaces, making it safer for everyone.
Drying is key. Keep the inflatable inflated until every surface – especially those tricky corners, footholds, and seams – is thoroughly dry. Once it’s ready, store it in a cool, dry indoor spot, off the floor, and skip the plastic wraps that can trap moisture.
Companies like Bouncy Rentals USA set a great example with their professional cleaning routines. They focus on removing debris, treating stains, disinfecting high-touch areas, and ensuring everything is completely dry between rentals. This attention to detail keeps their inflatables safe, clean, and ready for anything from backyard parties to busy event schedules.
Whether you’re maintaining your own inflatable or renting from a reliable provider, the golden rule is simple: regular, light cleaning beats waiting for a big mess. With just a few household items, inflatable-safe cleaners, and proper drying and storage, you can keep your inflatable in great shape and ensure every event goes off without a hitch. Consistent care protects your investment and helps guarantee a fun, worry-free experience for everyone.
FAQs
What’s the best way to prevent mold on water-based inflatables?
To prevent mold from growing on your inflatables, make sure they’re completely dry before putting them away. After using them, wipe them down thoroughly and allow them to air dry in a well-ventilated space. Store them in a cool, dry location to avoid any moisture buildup. Giving them a regular cleaning with a mild disinfectant can also help keep them fresh and extend their lifespan. Taking these simple steps will ensure your inflatables remain clean and ready for your next outing!
What are the best cleaning solutions for inflatable materials?
When it comes to cleaning inflatable materials, the best choice is a mix of warm water and a mild liquid soap or gentle detergent. Stay away from abrasive cleaners, bleach, or harsh chemicals – they can harm the surface of the inflatable.
Once you’ve cleaned it, rinse thoroughly with clean water to remove any soap residue. Then, let the inflatable dry completely before you store or use it again. This step is key to avoiding mildew and keeping the material in good shape.
What’s the best way to store inflatables to keep them in great condition?
To ensure your inflatables last as long as possible, store them in a cool, dry, and covered space, preferably indoors or in a shaded area to shield them from sun exposure. Before putting them away, make sure they’re completely dry – this helps avoid mold and mildew. Fold them carefully, keeping them away from sharp edges or heavy objects that might cause tears or damage. These simple steps can help keep your inflatables in great condition and ready for your next use!