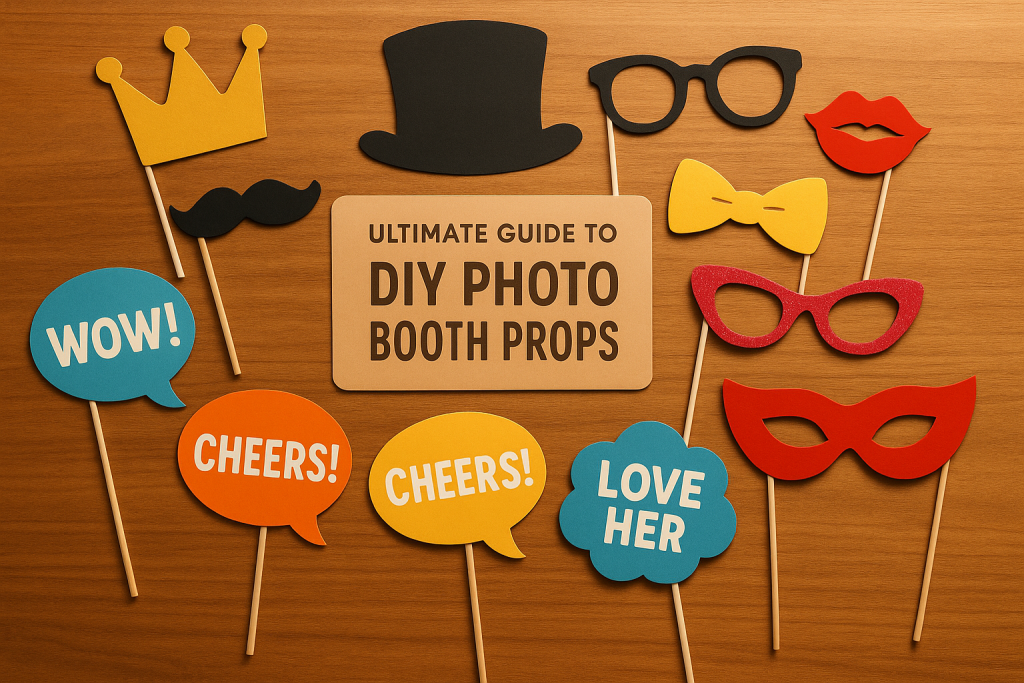
DIY photo booth props are a fun and cost-effective way to add personality to any event. Whether you’re hosting a wedding, birthday, or casual party, crafting your own props lets you match the theme, save money, and create memorable photo opportunities. Here’s what you need to know:
- Materials: Use cardstock, foam sheets, wooden dowels, and hot glue for sturdy, long-lasting props. Add flair with acrylic paint, glitter, or rhinestones.
- Tools: Essential items include scissors, craft knives, rulers, and paintbrushes.
- Templates: Find designs online through platforms like Etsy or local craft stores like Michaels.
- Themes: Tailor props to your event – mustaches and lips for any party, superhero masks for kids, or elegant signs for weddings.
- Budget: Creating 10 props can cost as little as $20, making it an affordable alternative to pre-made options.
- Storage: Organize props by material and store them in bins or boxes to keep them in good condition for future use.
Pair your handmade props with vibrant event rentals like bounce houses or water slides for even more engaging photos. With the right tools and a little effort, you can create props that elevate your event and leave guests with lasting memories.
Tools and Materials for DIY Photo Booth Props
Making your own photo booth props can be both fun and budget-friendly, especially when you have the right supplies. Most of these materials are affordable and easy to find at U.S. craft stores or online.
Key Supplies for Prop Creation
To create props that look great and hold up during an event, you’ll need a mix of sturdy base materials, reliable adhesives, and decorative elements.
- Base materials: Heavy-weight cardstock is a versatile option that comes in a variety of colors and finishes, including glitter for a touch of sparkle. Foam sheets and foam board are excellent choices for props that need extra durability. For larger signs or backdrops, poster board is a cost-effective option, while chipboard provides added sturdiness for props that need to maintain their shape.
- Support structures: Wooden dowels are perfect for handheld props like mustaches or speech bubbles, with ¼-inch dowels being the go-to size for most designs. For smaller or lightweight props, lollipop sticks work well, while craft sticks are ideal for kid-friendly projects.
- Adhesives: Hot glue is great for quick and secure bonds, while craft glue or 3-in-1 beacon glue works best for more delicate projects.
- Decorative elements: Acrylic paint offers excellent coverage and allows you to match colors to your theme. Glitter, whether fine or chunky, adds eye-catching effects, and stickers or stick-on gems are quick ways to elevate your designs. For props like glasses, clear plastic or cellophane can create realistic lenses.
- Wearable props: For items like masks or crowns, elastic string or ribbon ensures a comfortable fit and easy adjustability.
- Essential tools: Sharp scissors handle most cutting tasks, while craft knives are ideal for intricate designs. Rulers help with precise measurements, and a variety of paintbrushes give you control over both broad strokes and fine details.
Once you’ve gathered your supplies, the next step is to find templates and designs that match your vision.
Where to Find Templates and Designs
With your tools and materials ready, sourcing creative templates is the next step to bringing your props to life.
- Online retailers: Platforms like Amazon offer DIY photo booth prop kits that come highly rated. For example, Walmart’s 20-piece kit has earned a solid 4.6 out of 5 stars from 92 customer reviews.
- Digital marketplaces: Etsy is a treasure trove of downloadable templates, offering thousands of designs priced between $1.50 and $15.00. These templates often include editable files, letting you tweak colors, text, and sizes to fit your event theme.
- Craft supply stores: Stores like Michaels, Hobby Lobby, and Joann Fabrics are excellent for sourcing everything from wooden shapes to specialty paints. Many of these stores provide weekly coupons, so timing your shopping trips around sales can save you money.
- Oriental Trading: Known for party supplies, Oriental Trading offers themed prop kits that are both durable and affordable. These kits often include pre-cut shapes and easy-to-follow assembly instructions, making them perfect for beginners or larger events.
Shopping in person at local craft stores has its perks too. You can feel the materials before buying, get advice from knowledgeable staff, and take advantage of price-matching policies to ensure you’re getting a good deal.
For reference, creating 10 wooden photo booth props with wood pieces and craft paint typically costs about $20. Not only is this more affordable than buying pre-made props, but it also gives you the freedom to customize every detail to suit your event.
Prop Ideas for Different Event Themes
The right props can completely transform your event, turning it into an unforgettable experience. Whether you’re hosting a cozy gathering or a large-scale celebration, matching your props to the theme ensures your guests leave with plenty of fun memories.
Popular Prop Examples
Some props are timeless and work well for any event or age group. Mustaches and lips are always a hit, especially when oversized. You can easily make these by cutting mustaches from black cardstock and lips from bright red cardstock, then mounting them on wooden dowels for a playful touch.
Sunglasses are another versatile option. You can tailor them to your theme by creating heart-shaped frames for romantic events, star-shaped ones for Hollywood vibes, or oversized square frames for retro parties. Use colorful cardstock and clear cellophane for a realistic lens effect or leave them open for a cartoon-like look.
Speech bubbles and thought clouds bring a creative twist to any photo booth. Popular phrases like "OMG!", "Best Day Ever!", or "Party Time!" always get smiles. Leave some blank for guests to write their own messages using dry-erase markers – it’s an easy way to add a personal touch.
Themed hats and headpieces are perfect for adding character. Top hats fit formal occasions, while flower crowns are ideal for bohemian or garden parties. For kids, think animal ears, superhero masks, or glittery princess tiaras.
Signs and banners are both functional and fun. Use age numbers for birthdays or "Mr." and "Mrs." signs for weddings. Arrow signs like "Dance Floor This Way" or "Cake Over Here" not only guide guests but also add a playful element to your décor.
Event-Specific Suggestions
Weddings lean toward romantic and elegant props. Stick to classics like "Mr." and "Mrs." signs, heart-shaped sunglasses, and speech bubbles with phrases such as "Finally!" or "Happily Ever After." Match the wedding’s color scheme with cardstock in shades like blush pink, gold, or ivory for a cohesive look. Playful props like mustaches and red lips can add a bit of fun without disrupting the elegance.
Birthday parties are all about creativity, especially when tailored to the guest of honor. For milestone birthdays, large glittery numbers are a great choice. Kids’ parties can feature themed props – superhero masks for comic book fans, princess crowns for fairy tale lovers, or safari-inspired animal props. For adults, decade-specific props like ’80s sunglasses or ’90s accessories can bring nostalgia to the celebration.
Holiday gatherings come with ready-made themes. For Christmas, think Santa hats, reindeer antlers, and signs like "Ho Ho Ho" or "Merry & Bright." Halloween calls for spooky props like witch hats, vampire fangs, and pumpkin-shaped signs. Fourth of July events shine with red, white, and blue props, star-shaped sunglasses, and patriotic phrases.
Corporate events require a mix of professionalism and fun. Incorporate company logos into speech bubbles or signs while keeping the messaging appropriate. For team-building events, motivational phrases like "Dream Team" or "Success Squad" work well. Holiday office parties can merge seasonal themes with a professional touch.
Graduation parties are the perfect occasion for milestone-themed props. Graduation caps in school colors, rolled cardstock diplomas tied with ribbon, and signs featuring the graduation year make for meaningful photos. You can also customize props to reflect the graduate’s future plans, whether it’s their chosen career or college.
Using Bouncy Rentals Equipment with Props
Props truly shine when paired with the right event equipment. Bouncy Rentals’ party gear provides vibrant backdrops that make your DIY props stand out in photos, elevating your event’s overall vibe.
Bounce houses are a colorful and whimsical setting for photo booths. Their bright designs work perfectly with fairy tale or princess-themed props, making them ideal for kids’ parties or playful gatherings.
Water slides and splash zones are a natural fit for summer-themed props. Pair them with sunglasses, cardstock beach balls, and signs like "Making a Splash" or "Pool Party Fun." The tropical colors of the water equipment amplify the beachy, summer vibe.
Inflatable obstacle courses add energy and excitement, especially when matched with superhero or adventure-themed props. Guests can pose with capes, masks, or signs like "Challenge Accepted" before diving into the course. The bold designs of the obstacle courses naturally encourage dynamic, playful photos.
Cotton candy and popcorn machines create a nostalgic carnival atmosphere. Props like striped top hats, bow ties, and vintage signs reading "Step Right Up" or "Greatest Show on Earth" fit seamlessly with the theme. Even the treats themselves – colorful cotton candy and popcorn containers – make for fun photo props.
Dunk tanks offer unique photo moments. Use water-themed props like laminated signs or pose guests nearby with dry props, such as "Dunk the Boss" or "Making Waves" signs, for a humorous touch.
For the best results, align your prop colors and themes with your event equipment. Bright primary-colored bounce houses pair well with metallic gold or silver props, while classic black and white props provide a timeless contrast that pops against vibrant backdrops.
Step-by-Step Guide to Making DIY Photo Booth Props
If you’re ready to dive into creating your own photo booth props, this step-by-step guide has got you covered. Not only is it a fun and creative process, but DIY props also let you save money and add a personal touch to your event. With a little effort, you can make props that look just as good as anything you’d buy in a store.
Designing and Printing Props
Start by choosing your design platform. Canva and Adobe Illustrator are great options. Canva, in particular, offers tons of free templates that you can tweak with your own colors, text, and graphics. Its drag-and-drop features make designing a breeze, even for beginners.
When creating your designs, keep your printer’s limitations in mind. Most home printers work best with standard 8.5" x 11" paper. For larger props, you can print your design across multiple sheets and piece them together. Make sure to design at 300 DPI resolution for sharp, clear images that look great up close.
For durability, use 65-110 lb cardstock. This weight strikes the perfect balance – it’s sturdy enough to hold its shape but not too thick to cut easily. When it comes to colors, bold and bright shades photograph beautifully, especially under party lighting. If you’re printing at home, do a quick test print to check how your printer handles colors. Some printers struggle with deep blacks or vibrant reds, so you may need to adjust your design accordingly.
For oversized props or professional-quality results, consider using a local print shop. They can handle larger paper sizes and even laminate your props for extra durability. On average, printing and laminating an 18" x 24" prop costs around $15-25.
Once your designs are printed, it’s time to assemble and decorate.
Assembling and Decorating Props
Cutting your props neatly is essential for a polished look. Use a craft knife and metal ruler for straight edges instead of scissors, which can leave uneven lines. For curved shapes, sharp fabric scissors will give you better control. Always cut on a self-healing mat to protect your work surface and achieve clean cuts.
Proper mounting ensures your props stay sturdy during use. Attach 1/4-inch wooden dowels (about 12 inches long) with hot glue. This prevents the props from bending or flopping when held.
If you’re adding glitter, use spray adhesive to avoid a mess. Sprinkle glitter over a separate sheet of paper to catch the excess. Fine glitter gives a subtle, elegant sparkle, while chunky glitter is bolder and stands out more in photos.
For extra durability, laminate your props or cover them with clear packing tape. Lamination services at print shops typically cost $2-5 per piece. You can also enhance your props with fabric elements like felt, which doesn’t fray and comes in vibrant colors. Use fabric glue instead of hot glue for flexible, long-lasting bonds.
To add metallic details, try gold and silver leaf pens for intricate designs or metallic spray paint for larger areas. Just remember to spray in a well-ventilated area and let the paint dry completely – this usually takes about 24 hours.
Once your props are assembled, you can customize them to match your event’s theme.
Customizing Props for Events
Matching your props to your event’s color scheme ties everything together beautifully. For example, if you’re using equipment from Bouncy Rentals, think about how your props’ colors will complement the vibrant blues and reds of bounce houses or the playful carnival tones of cotton candy machines. Metallic gold or silver props can add an elegant touch to any setup.
Personalize your props by adding names, dates, or logos. Vinyl letter stickers create a clean, professional look, while paint pens let you add a more personal, handmade feel.
Consider the size of your props based on your event setup. Oversized props (12 inches or larger) work well for group photos or outdoor events where guests may be farther from the camera. For smaller, more intimate gatherings, smaller props (6-8 inches) are ideal.
If your event is outdoors, plan for weather challenges. Laminated props can handle light rain or humidity, and foam core backing adds extra sturdiness for windy conditions. Avoid using tissue paper decorations or loose glitter outdoors, as they won’t hold up well.
Make sure your props are safe and suitable for all ages. For kids, round off sharp corners and avoid small decorations that could pose choking hazards. For adults, feel free to include more intricate designs or humorous themes.
Lastly, be mindful of your audience when designing props. Avoid symbols or phrases that could be misunderstood or offensive. When in doubt, stick with universal designs like hearts, stars, or cheerful messages that everyone can enjoy.
To make sure you have enough props, plan for 2-3 props per guest at smaller events or 1 prop per 2 guests at larger gatherings. Having extras on hand is always a good idea in case some get damaged during the party.
Storing and Organizing Props
Keeping your DIY photo booth props in good condition starts with proper storage and organization. By grouping them by material and using the right storage solutions, you can protect them and make them last longer.
Tips for Storing Props
- Group by Material: Separate props based on their material – paper, wood, fabric, or metallic/glitter – to avoid damage.
- Paper and Cardstock: Lay these flat in file organizers or scrapbook boxes to prevent bending or creasing.
- Wooden Props: Stand them upright in sturdy plastic bins to minimize the risk of breaking.
- Fabric Props: Hang these in a garment bag to help them keep their shape.
- Metallic or Glitter Props: Use divided organizer boxes to avoid scratches and glitter transfer.
Conclusion
Making your own photo booth props is an easy and budget-friendly way to add a personal touch to any event. With just a few supplies like cardstock, wooden dowels, and craft glue, you can design props that perfectly fit your party’s theme. The trick is to plan ahead, pick sturdy materials, and store your creations properly so they’re ready to shine at future gatherings.
To keep your props looking their best, think about how you store them. Separating materials and using the right storage containers can help your handmade props last longer, ensuring they’re always ready to bring a little extra fun to your celebrations.
For an even bigger impact, pair your DIY props with professional party equipment. Check out Bouncy Rentals for bounce houses, water slides, and popcorn machines that can turn any event into a lively, photo-worthy experience. These extras help create a party atmosphere that guests won’t forget, encouraging them to snap photos and make memories.
When your custom props and professional gear work together, every piece of your event feels intentional and fun. By combining your creative touches with Bouncy Rentals’ high-quality entertainment options, you’ll set the stage for a celebration filled with unforgettable moments. So go ahead – design, store, and showcase your DIY props to make your next event truly stand out.
FAQs
How can I make DIY photo booth props that are sturdy and reusable?
To make your DIY photo booth props last through multiple events, start by selecting durable materials like wood, acrylic, or PVC foamboard. These options can handle frequent use without falling apart. For attaching decorations, go with strong craft glue or adhesives made for permanent bonding to ensure everything stays put. If you’re working with paper props, consider laminating them or adding a clear protective coating to shield them from wear and tear. These simple steps will help keep your props looking fantastic for any occasion!
How can I make sure my DIY photo booth props match my event’s theme and colors?
To make sure your DIY photo booth props align with your event’s theme and colors, start by picking materials like cardstock, fabric, or paint that match your chosen palette. Take cues from your event decor – think table settings, balloons, or backdrops – and stick to similar shades and patterns for consistency.
Add a personal touch by incorporating shapes or designs that suit the occasion. For instance, hearts work great for weddings, stars fit holiday parties, and fun, quirky shapes are perfect for birthdays. You can also jazz up your props with extras like glitter, ribbons, or stickers to pull the look together. With a bit of imagination, your props will seamlessly match the mood of your celebration!
How can I use DIY photo booth props to make events like weddings or corporate gatherings more fun and memorable?
DIY photo booth props are a great way to bring a personal touch and a lot of fun to any event. For weddings, think about using romantic-themed props like floral crowns, vintage-style frames, or chalkboard signs with heartfelt messages to match the mood of the day. Adding playful items like oversized sunglasses, mustaches on sticks, or glittery hats can encourage guests to loosen up and snap some unforgettable pictures.
For corporate events, aim for props that are engaging but still professional. Branded items like hats with the company logo, office-themed accessories, or custom signs that reflect the company’s identity work well. Pair these with a clean, stylish backdrop and simple yet classy props to strike the perfect balance between sophistication and fun. By customizing your DIY props to fit the event’s tone, you’ll help guests enjoy themselves while capturing moments they’ll love to look back on!