A tear in a bounce house can quickly turn into a safety hazard if left unrepaired. Acting fast and using the right tools can save you time and money. Here’s a simple breakdown:
- Find the Leak: Use the soapy water method or a flashlight to locate the damage. Mark the spot with chalk or a marker.
- Prepare the Area: Deflate the bounce house, clean the surface with soap and rubbing alcohol, and cut a patch at least 2 inches larger than the tear.
- Apply the Patch: Use vinyl cement, press the patch firmly, and let it cure for 24 hours under weight.
- Test the Repair: Inflate the bounce house and check for air loss using soapy water or by listening for hissing sounds.
DIY repairs work for small tears, but for larger damage or seam issues, professional help might be necessary. Regular maintenance, like cleaning and inspecting after every use, helps prevent future problems.
Pro Tip: Repair kits cost $10–$30 and can extend the life of your bounce house significantly.
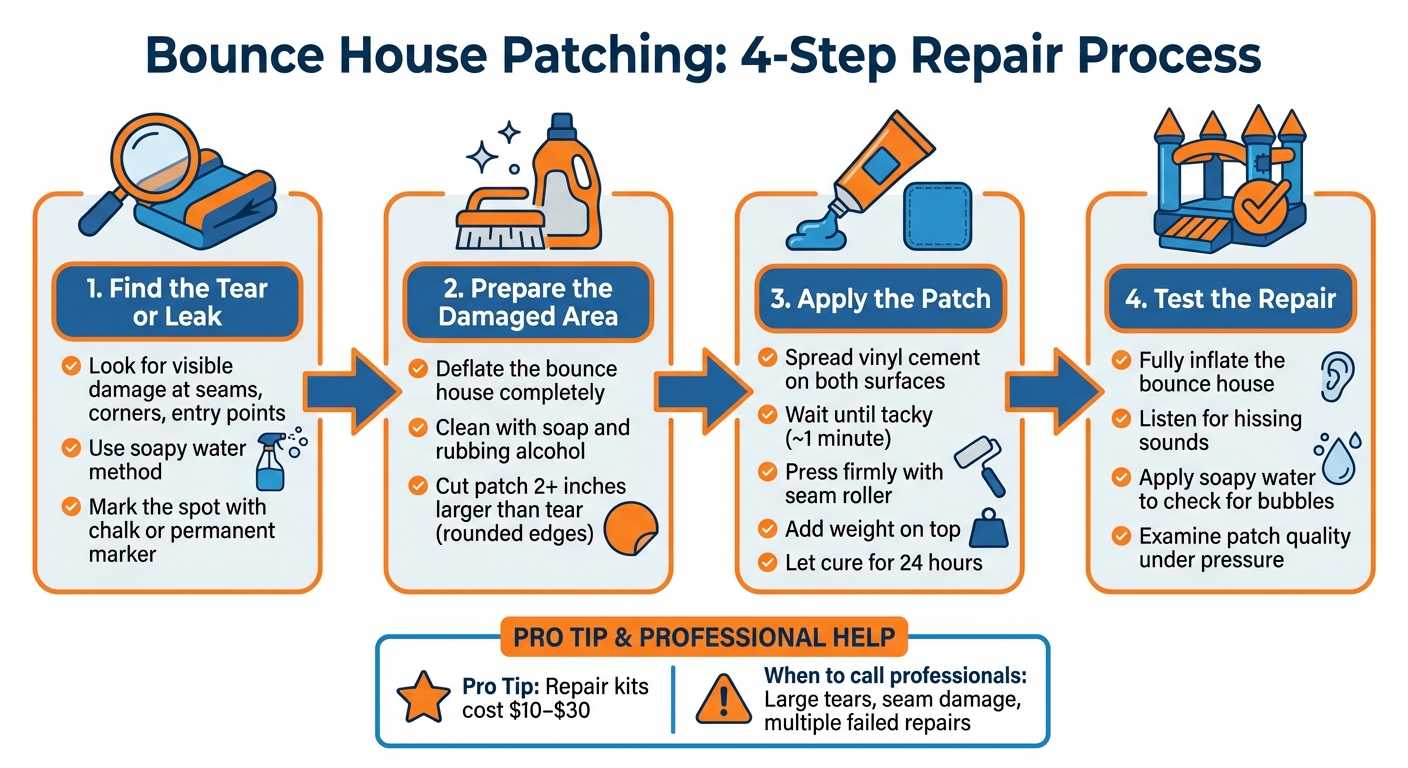
4-Step Guide to Patching a Bounce House Tear
Tools and Materials You’ll Need
Before you dive into repairing your bounce house, make sure you’ve got everything you need. Having the right tools and materials on hand not only speeds up the process but also ensures a sturdier and more reliable fix.
Basic Tools
The right tools make all the difference when it comes to fixing tears and keeping your bounce house safe and functional.
- Scissors: These are a must for trimming patch material to the right size. Be sure to round off the corners of your patches – sharp edges can snag on clothing or skin, causing the patch to peel over time.
- Permanent marker or chalk: Once you’ve located the leak (often using the soapy water test), these tools help you mark the exact spot for repair.
- Weights or heavy objects: Items like a pot of water or a stack of books work well to apply even pressure on the patch while the adhesive sets.
- Seam roller: Whether silicone or metal, a seam roller helps press out air bubbles and ensures the adhesive bonds fully. Don’t have one? A credit card or a kitchen rolling pin can also do the trick.
Repair Materials
Using the right materials is crucial for a long-lasting repair.
- Vinyl patches: It’s important to match the patch material to your bounce house – use vinyl patches for vinyl models and nylon patches for nylon ones. This ensures the patch and the bounce house expand and contract at the same rate, which helps maintain the repair’s integrity.
- Vinyl adhesive: Specialized adhesives like HH-66 or SX-69 are designed to create a strong, durable bond that can handle the stress of inflation and jumping. You can find vinyl repair kits for about $10 online, and "Tear-Aid" repair stickers are another budget-friendly option at under $10.
- Cleaning supplies: Prepare the surface by cleaning it with mild dish soap and then wiping it down with non-acetone rubbing alcohol to remove any oils. Use cleaning cloths or sponges for both cleaning and applying adhesive.
- TPU tape or vinyl stickers: For quick or temporary fixes, TPU tape or specialized vinyl stickers are great for small punctures.
- Sewing awl and nylon thread: If the tear is along a seam, reinforce it first by stitching it with a sewing awl (like the Speedy Stitcher) and strong nylon thread before applying a patch.
With these tools and materials ready, you’ll be well-equipped to tackle even the toughest bounce house repairs.
Step 1: Find the Tear or Leak
Look for Visible Damage
Start by carefully examining both the interior and exterior surfaces of the bounce house. Pay close attention to seams, corners, entry and exit points, and anchoring spots – these areas often endure the most stress. Signs of damage might include abrasions, loose threads, stretched fabric, or sections where the vinyl looks thin or fragile. If you notice a sagging area or a section that’s not as inflated as the rest, it could be a sign of a leak.
For tiny punctures that aren’t immediately obvious, try the "flashlight trick." Shine a flashlight from inside the bounce house and look for any light escaping through small holes.
If you’re still unable to spot the issue, move on to the soapy water method for a more thorough inspection.
Use the Soapy Water Method
The soapy water method is a reliable way to locate small, hard-to-find leaks. First, make sure the bounce house is fully inflated. Then, prepare a solution by mixing mild dish soap with water in a spray bottle. Adding a bit of glycerin or corn syrup can help the bubbles last longer. Spray this mixture onto areas you suspect might have a leak. If you see bubbles forming, you’ve found escaping air – and the source of the problem. As Samuel Turner from Storables.com notes:
"The presence of bubbles indicates that air is being released through a hole or puncture, allowing you to pinpoint the exact location of the leak".
Once you’ve identified the leak, rinse off any soap residue and let the bounce house dry completely in the sun. Any leftover soap could interfere with the patch sticking properly.
Mark the Damage
When you’ve located the leak using the soapy water test, mark the spot immediately. Use a permanent marker or chalk to ensure the area is easy to find later. Be careful not to scrub off the mark during cleaning. Finding the leak can be the most time-consuming part of the repair process – sometimes taking up more than half your total repair time – so keeping track of the location is essential.
Step 2: Prepare the Damaged Area
Deflate the Bounce House
After marking the tear, switch off the blower and unplug it from the power source. Make sure the bounce house is completely empty to avoid any safety risks. Deflating the bounce house is crucial because it provides a flat, stable surface for the repair. Attempting to patch it while inflated often leads to issues like air bubbles forming under the patch or the adhesive failing to set properly. For best results, move the deflated bounce house to a clean, quiet indoor workspace. Once deflated and secure, you’re ready to prep the area for a solid repair.
Clean and Dry the Surface
Start by cleaning the damaged area with a cloth or sponge and a mild dish soap diluted in water. This step is important because a clean surface allows the patch to stick properly. Afterward, use rubbing alcohol to remove any oils or residues that could interfere with the adhesive. Be thorough – clean several inches around the tear with both the soap solution and rubbing alcohol. Once clean, make sure the area is completely dry. Air drying works best, but if you’re short on time, gently blot the spot with a lint-free cloth. Moisture left behind can weaken the bond, so don’t skip this step. Now, you’re ready to cut the patch.
Cut Your Patch to Size
Using a pair of scissors, cut the patch material into a circle or oval. Rounded edges are less likely to snag or peel over time. Make sure the patch extends at least 2 inches beyond the tear on all sides to ensure a strong bond. If you’re using a pre-cut patch, trim it as needed to meet this size requirement. A properly sized patch is key to a durable repair.
Step 3: Apply the Patch
Spread the Adhesive
Start by preparing the repair area. Use medium-grit sandpaper to roughen the surface, then clean it with rubbing alcohol to remove any dust or oils. Next, apply a thin, even layer of vinyl cement – such as HH-66 or SX-69 – to both the patch and the damaged area. Wait about a minute until the adhesive feels tacky. As BumpNBounce suggests:
Coat the surfaces firmly, but do not overdo the glue. When the cement gets tacky, make the connection.
Once the adhesive is tacky, you’re ready to align and attach the patch.
Place and Press the Patch
Carefully align one edge of the patch with the repair area, then smooth it down gradually to avoid trapping air. Use a silicone seam roller to press the patch firmly from the center outward. If you don’t have a seam roller, a credit card or rolling pin works just as well. Check the edges for any lifting. If you notice gaps, apply more adhesive and press again. To maintain pressure, place wax paper over the patch and set a heavy object, like a pot of water, on top.
Let the Adhesive Cure
Once the patch is securely in place, let it cure for 24 hours before using the item again. Keep the heavy object on top during this time to ensure a strong bond. Be sure to follow the adhesive manufacturer’s instructions. As XJUMP emphasizes:
Once applied, press firmly on both sides of fabric until secure and leave aside for at least 24 hours before using again.
Step 4: Test the Repair
Inflate and Check for Air Loss
After letting the adhesive cure for 24 hours, fully inflate the bounce house and focus on the patched area. Once it’s inflated, turn off the blower briefly to eliminate background noise, then listen closely for any hissing sounds near the repair. You can also run your hand over the patch to feel for escaping air.
To double-check, use a soapy water solution on the patched area. If you see bubbles forming, it means air is still leaking. In that case, deflate the bounce house, apply more adhesive to the patch, and let it cure again. Make sure the previously sagging section now feels firm and consistent with the rest of the structure. This step confirms that the repair can handle normal pressure levels.
Examine the Patch Quality
With the bounce house fully inflated, take a close look at the patch to ensure it’s holding up. Check for wrinkles, air pockets, or edges that might be lifting. Press on the patched area to confirm it’s securely bonded under the internal pressure. If you notice any part of the patch starting to peel or catch, deflate the inflatable right away. Reapply adhesive and place a heavy object on the patch while it cures to ensure a stronger bond.
Once the patch is fully secure, you can take steps to maintain the bounce house and reduce the chances of future damage.
Maintenance Tips to Prevent Future Tears
Taking good care of your bounce house can go a long way in preventing tears. Before setting it up, clear the area of any debris, and use a tarp on hard surfaces to minimize friction. Keep shoes and sharp objects away from the inflatable during use.
After every use, inspect the entire bounce house for signs of wear, especially along the seams, which tend to experience the most stress. When packing it up, clean the surface thoroughly and ensure it’s completely dry before folding – this helps prevent mold and fabric damage. Store the bounce house in a cool, dry place inside a sturdy storage bag to protect it from moisture and pests. Repair kits for routine maintenance, like vinyl patches and sewing awls, are affordable, typically costing between $10 and $30. Regular upkeep is far cheaper than dealing with major repairs or needing a replacement.
When to Contact Bouncy Rentals USA for Help
Sometimes, no matter how much effort you put into DIY repairs, they just don’t cut it – especially when safety and functionality are on the line. While small punctures can often be patched up at home, more serious damage requires professional-grade tools and expertise. Issues like large tears, long gashes, or severe shredding demand industrial-strength adhesives and equipment to ensure a durable fix. Damage along seams or areas where stitching has come undone is particularly tricky, often requiring advanced sewing techniques or professional intervention. Knowing when to stop trying DIY fixes and turn to the pros is key.
Certain areas, like corners, anchor points, or spots that endure heavy use, are especially prone to stress. Even well-done patches in these high-stress zones might not hold up over time. If you’ve tried multiple repairs and your bounce house still won’t hold air during testing, it’s a clear sign to bring in an expert.
For those managing rental or commercial-grade inflatables, safety and compliance are non-negotiable. Professional repairs are the best route to ensure these units meet safety standards and insurance requirements. Bouncy Rentals USA specializes in these types of repairs, using industrial-strength materials and reinforced stitching that go far beyond what home repair kits can achieve. Plus, their equipment is fully sanitized and insured – an essential consideration when renting inflatables for events.
If you own a newer or high-value inflatable, professional restoration can also help extend its lifespan significantly. Above all, safety comes first. If you’re unsure whether your repair will hold or if the damage might pose a risk, don’t hesitate to contact Bouncy Rentals USA for a professional assessment.
Conclusion
Fixing a tear in your bounce house doesn’t have to be complicated. Start by identifying the leak, cleaning the area with rubbing alcohol, and cutting a rounded patch that’s about 2 inches larger than the tear. Apply vinyl cement, press the patch down evenly, and let it cure properly. Once patched, regular maintenance will help keep your bounce house in good shape.
Simple steps like using a tarp, clearing out debris, and inspecting the bounce house after each use can save you from costly repairs. Catching small issues early can also prevent the need for a full replacement.
For minor punctures, DIY repairs are often enough. However, larger tears or seam issues may require professional attention. If your patch doesn’t fully restore the bounce house’s strength, it’s best to call in the experts.
Bouncy Rentals USA specializes in heavy-duty repairs and offers insured, sanitized equipment to keep your bounce house safe and ready for fun. Whether you need a professional repair or advice on extending the life of your equipment, their team has the skills to ensure your bounce house stays in top condition for years to come.
FAQs
What should I do if the patch doesn’t fix the air leak in my bounce house?
If the patch doesn’t seal the air leak, it’s crucial to stop using the bounce house right away to prevent further damage or potential safety hazards. Make sure the patch was applied properly – this means the surface should have been clean and completely dry before sticking it on. If the problem continues, it might be time to reach out to a professional repair service or even look into replacing the damaged section. For a hassle-free alternative, consider renting a bounce house from a reliable provider like Bouncy Rentals USA for your next event.
How can I keep my bounce house from getting damaged in the future?
To keep your bounce house in great condition, start by giving it a thorough check after every use. While it’s still inflated, look for any small cuts, frayed edges, or loose seams. Pay attention to any hissing sounds, as they might signal a leak. Regularly cleaning the surface is also key – not only does it help prevent mold, but it makes spotting potential problems much easier.
Be mindful of sharp objects, excessive weight, and proper storage practices. Ensure kids take off their shoes and leave behind any toys or items that could puncture the vinyl. Clear the play area of rocks, sticks, or anything else that could cause damage, including pet claws. Stick to the manufacturer’s weight limits, especially around seams and corners, to avoid unnecessary strain on the structure. When it’s time to pack up, store the bounce house in a cool, dry spot. Folding it neatly on a clean tarp or placing it in a climate-controlled space will help protect it from wear and tear.
At Bouncy Rentals USA, we emphasize these simple steps: inspect, clean, and dry your inflatable after each use, keep the play area free of hazards, and store it properly. With consistent care, your bounce house can stay in excellent condition and provide plenty of fun for years to come.
When should I hire a professional to repair a bounce house tear?
If the tear in your bounce house is large, situated along a seam, or you’re not confident about handling the repair yourself, it’s wise to hire a professional. Tackling complicated damage without the right skills could affect the bounce house’s safety and longevity.
By opting for professional repair, you ensure the damage is fixed the right way, which helps preserve the bounce house’s lifespan and keeps it safe for everyone to enjoy.