Transforming a bounce house into a photo booth is a fun, affordable way to add energy and charm to any event. Unlike traditional setups, bounce houses offer vibrant colors, dynamic backdrops, and interactive photo opportunities for guests of all ages. Here’s a quick breakdown of how to pull it off:
- Pick the Right Bounce House: Match it to your event theme – princess castles, pirate ships, or sleek all-white options for formal occasions.
- Plan Your Space: Ensure enough room (e.g., 13×13 ft for standard units) and check for safety with flat surfaces and proper clearance.
- Decorate for Impact: Use themed props, colorful decorations, and lighting to enhance the photo area.
- Focus on Safety: Secure the inflatable properly, supervise guest traffic, and follow weather guidelines.
- Save Money: DIY decorations or rent packages from companies like Bouncy Rentals USA to simplify planning.
Bounce houses combine fun and functionality, making them a memorable addition to any celebration. Whether it’s a birthday party or a wedding, this creative twist ensures guests leave with smiles – and great photos.
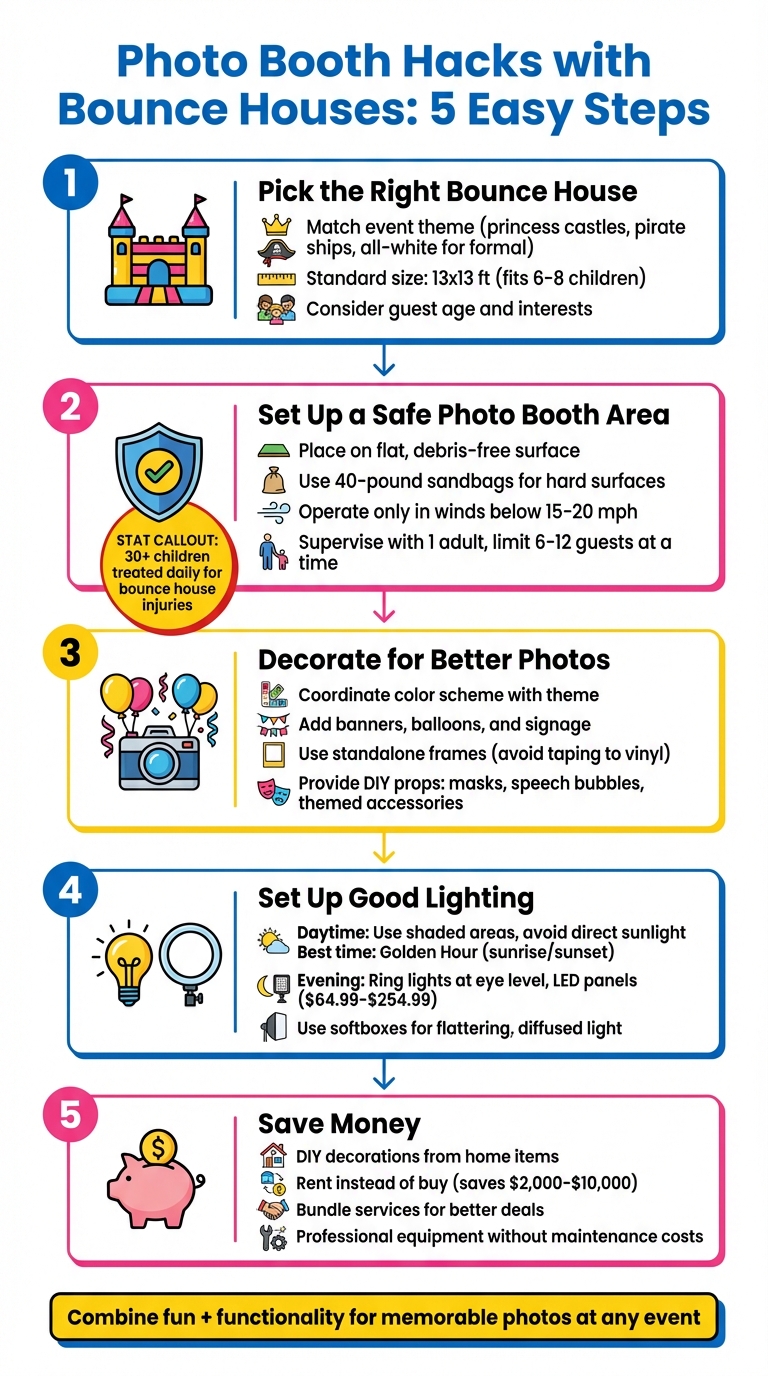
5 Steps to Create a Bounce House Photo Booth Setup
Step 1: Pick the Right Bounce House
Match Your Event Theme
Choosing the right bounce house can elevate your event and make it picture-perfect. For a princess party, a pastel castle creates a magical backdrop, while superhero-themed events shine with bold red, blue, and yellow designs. Hosting a formal occasion like a wedding or baptism? All-white bounce houses provide a sleek, neutral aesthetic that pairs beautifully with elegant décor. For corporate events, opt for branded or neutral inflatables that can incorporate company logos and subtle lighting – perfect for social media-worthy moments.
Consider the guest of honor’s interests as well. A standard 13×13-foot bounce house is great for smaller gatherings or mixed-age groups, accommodating around 6–8 children. If you’re catering to older kids or teens, combo units with slides or climbing walls add an interactive element. Planning a tropical summer event? Inflatable water slides in vibrant blues and greens fit the theme perfectly – especially when paired with extras like a snow cone station.
Once you’ve chosen a design, make sure your venue can handle the size and setup requirements.
Measure Your Space
Before anything else, grab a tape measure and confirm your venue has enough space for the bounce house. A standard 13×13-foot unit needs a flat area with an additional 3-foot safety buffer on all sides for the blower, entry ramps, and supervision. Larger combo units, such as those measuring 13×25 feet or more, require at least 15×30 feet of usable space.
Don’t forget to check the vertical clearance. Most bounce houses need 15–18 feet of overhead room. Be cautious of obstacles like low-hanging tree branches, power lines, or patio covers. Grass is ideal for staking the structure, but setups on concrete or pavement work fine when secured with sandbags or water barrels. Ensure your gate is wide enough for the deflated unit to pass through, and confirm that a standard 110-volt outlet is available within 50–100 feet of the setup area. Avoid using multiple extension cords, as this could damage the blower.
Lastly, match the bounce house size to your guest count and event type. From compact options perfect for toddlers to sprawling obstacle courses for larger crowds, there’s a unit for every occasion. Companies like Bouncy Rentals USA offer a variety of sizes to fit your needs and venue constraints.
Step 2: Set Up a Safe Photo Booth Area
Follow Safety Guidelines
When transforming a bounce house into a photo booth, safety should be your top priority. Start by placing the inflatable on a flat, debris-free surface. Grass works well since it provides natural cushioning, but if you’re using a hard surface, make sure to secure the bounce house with 40-pound-rated sandbags and place mats at entry and exit points for added safety.
Before allowing guests inside, inspect all closure points and ensure the blower is functioning properly. Only operate the bounce house in calm weather, with winds below 15–20 mph. If heavy rain or lightning occurs, deflate the inflatable immediately. According to the American Academy of Pediatrics, over 30 children are treated daily for bounce house-related injuries, making these precautions critical.
"Always ensure the bounce house is placed in a flat, open area, away from trees, powerlines, rocks and debris."
– Melissa Luxton, Trauma Outreach and Injury Prevention Coordinator, Banner – University Medicine
Appoint one adult to supervise the area at all times and manage the number of participants, keeping it between 6 to 12 at a time. This ensures both safety and smooth operation of the photo booth.
Organize Guest Traffic
To keep things running smoothly, create a clear, one-way path for guests entering and exiting the bounce house. Place the inflatable away from busy areas like refreshment tables or other activities, and make sure walkways are free of tripping hazards such as power cords or personal belongings.
Assign staff at the entrance and exit to direct the flow of people and prevent overcrowding. For events with mixed age groups, consider grouping guests by size or scheduling separate time slots for toddlers and older children to minimize the risk of collisions. Additionally, remind all participants to remove sharp objects or accessories that could damage the inflatable.
Step 3: Decorate for Better Photos
Add Party Decorations
The right decorations can turn a simple bounce house into an unforgettable photo backdrop. Start by choosing a coordinated color scheme that matches your party’s theme. For superhero parties, bold colors like red, blue, and yellow work wonders. If you’re going for a princess vibe, softer shades like pink and purple set the tone beautifully. Hosting a pirate-themed bash? Deep reds and blacks will create the perfect atmosphere, especially when using one of the top pirate bounce houses as your centerpiece.
To add personality, use banners and signage. For example, place a sign at the entrance with phrases like "Superhero Training Center" or use chalkboard signs with fun, themed messages for guests to pose with. Balloons are always a hit – cluster them around the bounce house to frame the area without obstructing the view. For an underwater theme, green and blue streamers can mimic seaweed, adding a whimsical touch.
When decorating, avoid attaching anything directly to the bounce house vinyl. Adhesives like duct tape can damage the surface or leave behind sticky residue. Instead, use standalone frames made from PVC piping or wood, positioned in front of the inflatable. For formal events, keep the decor simple and elegant to highlight the bounce house’s natural appeal.
Pair your decorated backdrop with fun photo props to make the experience even more engaging.
Provide Photo Props
Photo props add a playful element and keep guests entertained while they wait for their turn. DIY props are a budget-friendly option and easy to make. Use colored construction paper to create speech bubbles, masks, and party hats, then attach them to sticks. If you’re short on time, printable templates online can speed things up.
You might already have great props at home. Look for items like furry scarves, silky gloves, old costumes, bandanas, or oversized pajamas. Thrift stores are another treasure trove for quirky finds – vintage cameras, picture frames, steering wheels, or tea cups can add a unique touch. For themed parties, match props to the bounce house’s style: capes and masks for superheroes, cowboy hats and badges for a western theme.
"A variety of props keeps things fun and guests interested." – HGTV
Set up a prop station near the bounce house entrance to keep everything organized. Use a table to display items like small chalkboards for custom messages or bubble machines for some extra magic. Just ensure all props are safe for use near the inflatable – steer clear of sharp objects that could damage the vinyl.
Step 4: Set Up Good Lighting
Use Natural Light During the Day
When setting up during the day, take advantage of natural sunlight, but be mindful of its intensity. Direct sunlight can create harsh shadows and unflattering effects, especially under the eyes. The key? Place your weather-resistant bounce house in a shaded area where the light is softer and more even.
"Being in the shadow outdoors is great for photography." – Simple Booth
Consider setting up under a tent, canopy, or large tree to block direct sunlight while still keeping the area well-lit. If you’re in an open space, position your bounce house so guests face away from the sun to avoid glare and squinting. For the best photos, plan your event around the Golden Hour – that beautiful period just after sunrise or right before sunset. The warm, soft light during this time gives photos a lovely, natural glow.
If you have no choice but to set up during midday when the sun is directly overhead, try to create shade by positioning the bounce house near a building or wall. Once the sun sets, transition to artificial lighting to maintain the quality of your photos.
Add Lights for Evening Events
When daylight fades, artificial lighting becomes essential for clear and vibrant photos. Ring lights are an excellent choice for bounce house photo booths, thanks to their ability to evenly light faces while eliminating shadows. Position the ring light at or slightly above eye level for the best results.
For larger setups, LED panels are a great option. These lights offer adjustable brightness and color temperature, making them versatile for different settings. Budget-friendly LED panel kits start at $64.99, while professional-grade RGB sets can cost up to $254.99. Place your main light source at or above eye level to ensure even lighting, and consider adding umbrellas or softboxes for larger groups. Softboxes are particularly effective at diffusing light, creating a smooth, flattering effect that enhances every photo.
"Soft, flattering light is your secret weapon. It’s forgiving, it creates a welcoming atmosphere, and it guarantees every photo is a winner." – 1021 Events
For themed nighttime parties, LED wands can add a fun, colorful ambiance around the bounce house. Just be sure your primary light source is bright enough to counteract any colored lighting that might distort skin tones.
Step 5: Save Money on Your Photo Booth Setup
Get Creative with DIY Decorations
Why spend a small fortune on professional backdrops and props when you can make your own? Look around your home for items you can repurpose. Lightweight rugs, colorful quilts, or even bedsheets can create a vibrant, unique backdrop for your bounce house setup.
Want something more eye-catching? Gather materials you already have and let your creativity shine. For example, paint paper plates in bold colors and arrange them on a wooden pallet for an artsy display. Or, layer multiple plastic tablecloths to craft a bright, flowing curtain. Need an interactive touch? Cut a large "Polaroid-style" frame from cardboard or use masking tape to design a faux frame right on a blank wall. These small efforts can make a big impact without breaking the bank.
"The photo booth trend has become a low-cost addition to any party – as long as you’re okay with a little bit of work and a lot of creativity." – Michelle Boudin, SignUpGenius
If DIY isn’t your thing, you can save even more by renting complete party setups.
Opt for Rentals Instead of Buying
Buying professional photo booth equipment can cost anywhere from $2,000 to $10,000 upfront – not to mention the ongoing expenses for maintenance and storage. Renting, on the other hand, eliminates these headaches while still giving you access to high-quality, up-to-date equipment.
For example, companies like Bouncy Rentals USA offer fully insured and sanitized bounce houses, complete with professional delivery and setup included in the rental price. Many providers also let you bundle decorations and entertainment options – like cotton candy machines, popcorn makers, and other party essentials – into one package. This not only simplifies your planning but can also save you money by consolidating delivery fees. Plus, once the party’s over, everything gets picked up, leaving you with zero storage or maintenance concerns.
Conclusion
Transforming a bounce house into a photo booth is easier than you might think. Start by choosing an inflatable that fits your space and matches the theme of your event. Then, add some simple decorations and fun props to give your photos a unique flair. During the day, natural light works wonders, while spotlights can help you capture sharp, vibrant images in the evening.
Once you’ve set up a safe and well-organized area, you can take it a step further with creative details to make the experience even more memorable. Unlike traditional photo booths, a bounce house brings a sense of movement and fun, ensuring lively, candid photos filled with genuine smiles.
If you’re looking to simplify the process, Bouncy Rentals USA has you covered. Their services include insured, sanitized equipment and professional setup, making it easy to bring this idea to life. Want to go all out? You can bundle extras like cotton candy machines or popcorn makers for a seamless party experience – all without the hassle of juggling multiple vendors.
Make your next event unforgettable with a bounce house photo booth. Visit Bouncy Rentals USA to get started and let the fun, laughter, and picture-perfect moments take center stage!
FAQs
How can I make sure the bounce house photo booth is safe for everyone?
To keep your bounce house photo booth safe and enjoyable, begin by placing it on a flat, clean surface, free of debris, and away from hazards like trees, fences, or power lines. Use ground stakes to anchor it securely, or opt for heavy weights if you’re setting it up on a hard surface. Be mindful of the weather – skip using it in winds over 15 mph or during rain. Always stick to the manufacturer’s safety instructions, including capacity limits. Most importantly, have a responsible adult supervise at all times to ensure everyone stays safe and the fun doesn’t stop!
How can I decorate a bounce house photo booth on a budget?
Transforming a bounce house into a lively and budget-friendly photo booth is simpler than it sounds! Start by picking a theme that fits your event, then use easy DIY decorations to make it pop. Think colorful balloons, streamers, or LED string lights wrapped around the bounce house to create a festive vibe. For an eye-catching backdrop, hang patterned fabric or vinyl along the sides of the inflatable. Add a personal touch with handmade paper props, banner flags, or garlands crafted from items you already have lying around.
Want to save even more? Get creative with everyday items. Use a small table covered with a bright tablecloth as a prop station, and light things up with a ring light or portable LED lamp for great photo quality. Invite guests to bring quirky accessories like hats or sunglasses to add some flair to their pictures. With a clean, fully-inflated bounce house from Bouncy Rentals, your DIY photo booth is sure to steal the show – without breaking the bank!
What are the best lighting options for a bounce house photo booth at night?
When setting up nighttime bounce house photo booths, lighting plays a key role in making the inflatable’s colors pop and ensuring your photos look sharp and lively. A high-output LED panel or a ring light is an excellent choice for your main light source, providing steady, bright illumination that’s easy to power with a generator or portable battery. To minimize harsh shadows and give your photos a softer, more natural feel, try adding softboxes or LED wands on the sides for balanced lighting.
For an extra playful vibe, consider wrapping RGB LED strips around the bounce house frame. These colorful accents can add a fun, eye-catching element to your photos. Want to capture the thrill of guests mid-jump? A portable flash or strobe light can create striking action shots when used carefully. By combining these lighting techniques, you’ll make sure your bounce house photo booth is the star of the night, keeping the energy alive well into the evening!