When your bounce house blower fails to start, it can disrupt your plans quickly. The issue typically stems from one of these areas: power supply, motor problems, safety switches, or improper setup. Here’s a quick rundown of what to check:
- Power Supply: Test the outlet, reset tripped breakers, inspect the GFCI outlet, and examine the power cord for damage.
- Motor Issues: Look for signs like humming, grinding noises, or overheating. Check the reset button or capacitor if needed.
- Safety Features: Ensure the on/off switch is functioning and reset any tripped safety mechanisms, like GFCI or thermal switches.
- Setup Conditions: Use a dedicated circuit, avoid long extension cords, and ensure proper ventilation around the blower.
Routine maintenance, like cleaning air intakes and inspecting cords, can prevent most issues. If the problem persists, professional repair may be necessary. Proper care ensures your blower stays reliable and ready for every event.
Power Supply and Electrical Connection Problems
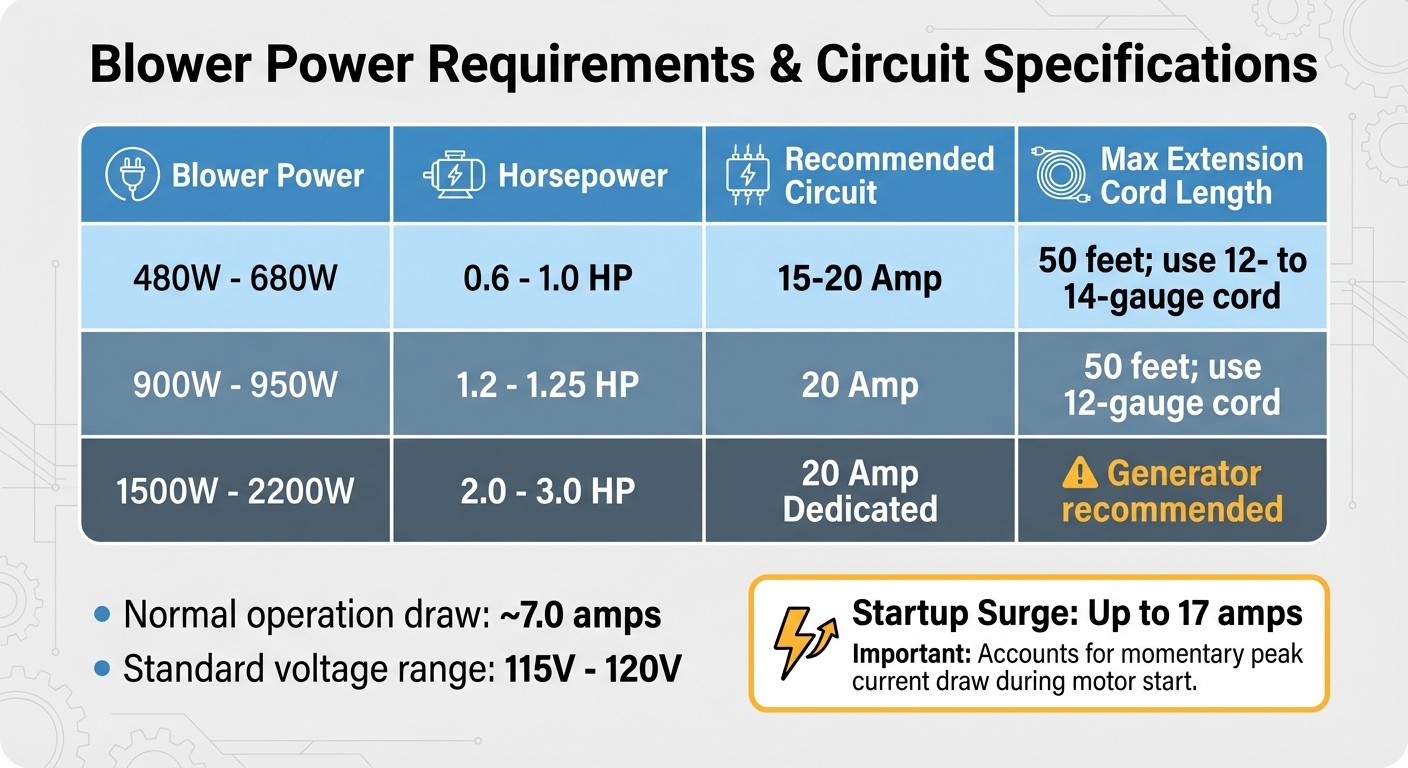
Bounce House Blower Power Requirements and Circuit Specifications
Electrical issues are a common culprit behind blower failures. Before jumping to conclusions about a faulty motor, first make sure the power source is functioning. A quick way to test this is by plugging in another device, like a lamp or phone charger, into the same outlet. If the device doesn’t power on, the outlet may be the problem.
Test the Power Outlet
Head to your circuit breaker panel to check for tripped breakers. Small blowers typically draw around 7.0 amps during normal operation, with startup surges reaching up to 17 amps. This sudden spike can trip breakers, especially if the blower shares a circuit with other devices. Look for breakers in the "OFF" or middle position and reset them.
GFCI outlets, commonly used in outdoor, kitchen, or bathroom areas, can also cause trouble. If the reset button on the outlet has popped out, press it back in until you hear a click. Keep in mind that a tripped GFCI outlet can disable multiple outlets downstream. Additionally, some outlets are controlled by wall switches – double-check that the switch is set to "ON." If you see scorch marks, discoloration, or feel heat around the outlet, stop using it immediately and call an electrician.
Examine the Power Cord and Plug
Take a close look at the power cord, inspecting it for any cuts, frayed sections, or soft spots that might indicate internal damage. Also, check the plug prongs for bending or corrosion. Ensure the plug fits snugly into the outlet, as loose connections can lead to intermittent power issues. Some blowers have a built-in reset button or fuse on the unit itself – if you spot a small red or black button, press it before considering replacing the cord.
Never use a damaged power cord. Exposed wiring poses serious risks of shock or fire, so if you notice any damage, replace the cord immediately.
Confirm Voltage and Circuit Capacity
Blowers are designed to operate within a specific voltage range, usually between 115V and 120V for residential models. Using an outlet with the wrong voltage can prevent the motor from starting, so check the blower’s specification label and ensure it matches your outlet’s voltage.
Extension cords can also cause issues. If you need to use one, opt for a heavy-duty, outdoor-rated cord of 12- or 14-gauge thickness and keep it under 50 feet. Longer cords can lead to voltage drops, which may damage the motor or trip your breaker. Ideally, use a 20-amp dedicated circuit for your blower and avoid running other high-power appliances, like refrigerators or air conditioners, on the same circuit.
| Blower Power | Horsepower | Recommended Circuit | Max Extension Cord Length |
|---|---|---|---|
| 480W – 680W | 0.6 – 1.0 HP | 15-20 Amp | 50 feet; use 12- to 14-gauge cord |
| 900W – 950W | 1.2 – 1.25 HP | 20 Amp | 50 feet; use 12-gauge cord |
| 1500W – 2200W | 2.0 – 3.0 HP | 20 Amp Dedicated | Generator recommended |
Once you’ve confirmed the power supply is in good shape, you can move on to checking the blower’s mechanical components in the next section.
Motor and Internal Component Problems
Once you’ve ruled out power supply issues, it’s time to shift your attention to the motor and internal components. If your bounce house blower still isn’t working despite a functioning power source, the problem likely lies within these areas. Spotting the warning signs can help you decide whether a quick fix is possible or if professional repair is needed.
Motor Failures
A completely dead motor usually gives no response – no noise, no airflow, and no reaction when you flip the switch. Partial motor failures, on the other hand, often come with telltale signs. Grinding or screeching noises typically mean the motor bearings are worn out, while a humming sound without any movement suggests the motor is getting power but lacks the torque to start spinning. If the blower feels unusually hot or gives off a burning smell, it may be dealing with internal defects or overheating issues. Another common symptom is the blower shutting down intermittently during use, which could point to problems with the thermal switch or aging motor windings.
Before jumping to conclusions about motor failure, check if your blower has a reset button – usually a small red or black button on the housing. Press it and try restarting the unit. If the motor hums but doesn’t spin, the capacitor might be the culprit (we’ll get to that shortly). A grinding noise or stiffness when manually turning the fan blade (with the power off) could mean seized bearings, which likely require professional replacement.
Capacitor and Wiring Defects
A motor that hums but doesn’t spin often signals capacitor trouble. The capacitor provides the initial electrical boost needed to get the motor moving. When it fails, the motor might hum without spinning – or it might need a manual push to get started. HVAC technician Daniel Plourde notes:
If the blower motor does not always start without giving it some help… most likely it is the capacitor that is bad for the motor.
A bad capacitor can also cause the motor’s thermal switch to trip repeatedly, shutting the blower off after only a few minutes.
Faulty wiring is another potential issue. Loose terminals, corroded connections, or shorted wires can disrupt the motor’s power supply. If your blower trips the circuit breaker immediately upon startup – even when connected to a dedicated 20-amp circuit – internal wiring problems might be the cause. Similarly, ground faults or poor grounding can trigger safety shutdowns, especially in newer units with advanced controls. Diagnosing these problems requires a multimeter; if you get an infinity reading, the part is defective and needs replacement. Because capacitor and wiring repairs involve live electrical components, it’s best to call a professional unless you’re experienced with electrical work. Also, don’t forget to check your warranty – many commercial blowers come with coverage ranging from 3 to 12 months – which could save you from out-of-pocket repair costs .
Once you’ve addressed or ruled out motor issues, move on to inspecting the capacitor and wiring for potential faults.
Control Switch and Safety Feature Issues
If you’ve confirmed the power supply and motor are in good shape but the blower still won’t work, it’s time to take a closer look at the control switches and safety features. A faulty switch or a triggered safety mechanism can easily silence the blower. Start by checking the on/off switch, and then reset any safety features that may have been activated.
Check the On/Off Switch
First, make sure the switch is set to "on." It’s not uncommon for switches to accidentally get bumped into the "off" position during transport or setup. If the switch is already on but the blower remains unresponsive, inspect the switch’s protective cover. Cracks or trapped moisture in the cover can interfere with the connection.
As noted by VEVOR:
The switch of this inflatable blower features a transparent top that can be closed when not in use to prevent humidity.
If the cover is damaged or holding water, dry it thoroughly and ensure it closes securely before trying again. Additionally, if the switch feels loose, makes crackling sounds, or resists movement, it may be worn out. Since this involves internal wiring, you’ll need a professional to replace it safely.
Reset Safety Switches
Most blowers are equipped with safety mechanisms to prevent hazards like electrical shocks, fires, or motor damage. The GFCI (Ground Fault Circuit Interrupter) plug, found on the power cord, is one of the most common safety features. It cuts power immediately if it detects moisture or an electrical fault. To reset it, simply press the Reset button until you hear a click.
Another important feature is the thermal reset button, typically located near the motor. This small red or black button activates if the blower overheats or experiences a power surge. According to one manufacturer:
Some models have reset buttons, which you can press to restore function.
Before pressing the thermal reset button, allow the blower to cool down for 15–30 minutes.
However, keep in mind that safety features aren’t infallible. Over time, they can become overly sensitive or stop functioning properly:
If these safety features fail, the blower may not operate correctly or could shut down unexpectedly.
If your blower keeps tripping its safety mechanisms despite proper use and adequate cooling time, the issue might lie with the safety switch itself. In such cases, professional inspection or replacement is recommended.
Overload and Environmental Conditions
Once power and motor issues are resolved, the focus shifts to ensuring the blower operates under the right conditions. Misusing the blower or placing it in unsuitable environments can lead to startup failures or sudden shutdowns.
Preventing Blower Overload
Blowers draw significantly more power during startup than during regular operation. This initial surge can trip breakers, especially if the blower isn’t connected to a dedicated 20-amp circuit. Running the blower without attaching the inflatable can also cause problems. Without the expected drop in amperage from the inflatable, the motor remains under strain, potentially overheating or tripping the circuit breaker.
If you’re using an extension cord, make sure it’s heavy-duty and suitable for the blower’s power needs. For longer distances, you might want to use a generator instead.
Creating the Right Operating Conditions
Place the blower in a well-ventilated area, ensuring several feet of clearance on all sides. Avoid confined spaces, direct sunlight, or proximity to heat sources. These conditions can cause the blower to overheat quickly, triggering the thermal safety switch before it even gets to work.
Set the blower on stable, level ground and secure it with the provided ground stakes. Uneven surfaces can cause vibrations that might shift the unit or block the air intake, leading to internal damage. Additionally, make sure the inflation tube connecting the blower to the bounce house is straight and free of any kinks. This ensures smooth airflow, reducing stress on the blower during startup.
Maintenance and Prevention Tips
Taking care of your blower doesn’t have to be complicated, but it does require consistent attention to a few important details. By following these habits, you can avoid most startup issues and keep your equipment running smoothly for years. Regular upkeep not only helps prevent problems but also complements any troubleshooting you’ve already done.
Perform Regular Inspections and Cleaning
Check the blower before every use. Start with the power cord – look for any cuts, fraying, or exposed wires, as these are common culprits behind startup failures. Then, inspect the air intake and exhaust for debris. Even a small blockage can disrupt airflow, leading to overheating or weak inflation.
Once a month, take a few extra steps. Tighten any loose screws and test the reset buttons to ensure everything is secure. If you hear rattling or grinding noises, it could mean internal components have shifted. Ignoring these sounds might lead to motor damage, so it’s best to address them early.
Store and Handle Equipment Correctly
Choose a dry, ventilated storage spot. Moisture is a major enemy of electrical components, causing corrosion and long-term motor damage. Before putting the blower away, make sure both the unit and any inflatables are completely dry. If your blower has a sealed switch cover, close it to protect the internal parts from humidity. Proper storage keeps your blower ready to perform when you need it.
To keep dust and environmental elements at bay, use a storage bag between uses. When moving the blower, take care to avoid damage. Use the built-in handle for short trips or a two-wheel dolly for longer distances. During operation, avoid placing the blower on rough surfaces like rocks, as they can cause unnecessary wear and tear.
Conclusion
To troubleshoot your bounce house blower, start with the basics: check the power source, inspect the on/off switch, and look for any debris blocking the air intake. If the safety switch has tripped, reset it. However, if the motor still doesn’t respond, the problem might be internal – like a faulty capacitor or wiring issue – which calls for professional repair.
Routine upkeep is just as important as quick fixes. As the admin of commercial-inflatable.com wisely states:
Proper maintenance and timely troubleshooting are key to preventing and addressing common issues with bounce house blowers.
Make it a habit to clean the air intake, store your equipment in a dry place, and inspect the cords before every use. These simple steps not only prevent startup issues but also help safeguard your investment. Considering that commercial bounce houses range from $1,500 to $3,000, a dependable blower is a must.
Most blower problems can be avoided altogether with consistent care. Following the tips in this guide ensures your equipment stays in top condition, whether you’re using a smaller 0.7 HP blower for residential setups or a powerful 2 HP unit for larger inflatables. Regular maintenance keeps your inflatables safe, reliable, and ready for action at every event.
At Bouncy Rentals USA, we take pride in maintaining our equipment to guarantee hassle-free, fun-filled events every time.
FAQs
Why is my bounce house blower humming but not starting, and how can I fix it?
If your bounce house blower hums but won’t start, the issue is usually tied to power, motor, or airflow problems. Start by confirming that the outlet is functional and the extension cord matches the blower’s power requirements. Double-check that the blower’s switch is fully engaged and inspect for any loose or damaged wiring. The humming noise often indicates the motor is trying to run but might be obstructed – clear out any debris from the intake or fan blades. Additionally, if the blower has overheated, allow it to cool for 10–15 minutes before attempting to restart it.
If these troubleshooting steps don’t resolve the problem, the motor could have a seized component or a faulty capacitor, which will likely need professional attention. For expert help, Bouncy Rentals USA offers inspections and repairs to ensure your bounce house is ready to provide safe, enjoyable fun at your next event.
How can I stop my bounce house blower from overheating?
To keep your bounce house blower from overheating, it’s important to let it rest after extended use. If it’s been running for a long time, give it at least an hour to cool down. Always position the blower in a well-ventilated spot to ensure proper airflow, which helps prevent overheating. When using it continuously, aim to limit operation to 20–25 minutes at a time, followed by a short break.
If you’re using additional equipment like a water pump, make sure to start the blower first before adding extra loads. This reduces the risk of heat buildup. Regular upkeep is also key – clean the blower vents and check for any blockages to help it operate more efficiently and avoid overheating.
How can I maintain my bounce house blower to make it last longer?
To keep your bounce house blower running smoothly and lasting longer, consistent upkeep is essential. Begin by checking the power source, cords, and plugs before each use to ensure they’re functioning properly. Clear any debris, such as dirt or leaves, from the intake and fan area, as blockages can lead to overheating and reduced performance.
Make it a habit to clean the blower’s filter and fan blades every 8–10 hours of operation. This helps maintain proper airflow and reduces strain on the motor. Always use the blower in a well-ventilated spot, and avoid running it non-stop for extended periods. A quick 5-minute break after every 30–45 minutes of use can go a long way in preventing overheating. Once you’re done, store the blower in a cool, dry place to protect it from moisture or rust.
If you use the blower frequently or for commercial purposes, think about scheduling an annual inspection with a professional technician, like the experts at Bouncy Rentals USA. This can help identify potential issues early and keep your equipment dependable for the long haul.