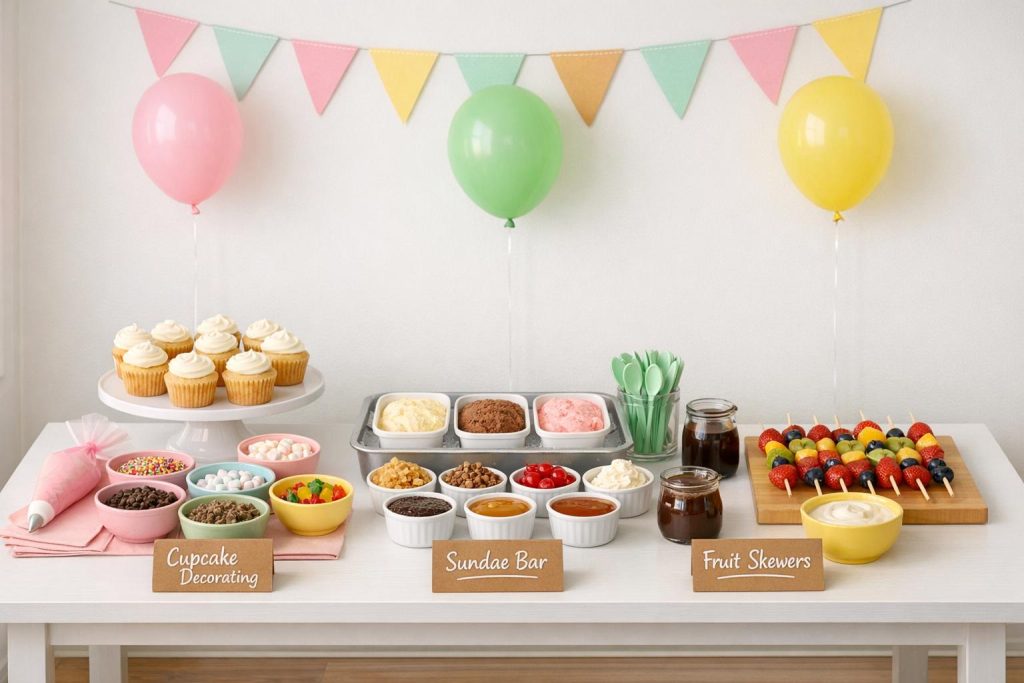
Kids’ parties are all about fun, and dessert stations can be the perfect mix of food and entertainment. From cupcake decorating to ice cream sundae bars, these setups let kids customize their treats while staying engaged. Here’s a quick breakdown of ideas:
- Cupcake Decorating: Kids create their own designs with frosting, sprinkles, and surprise fillings.
- Ice Cream Sundae Bar: Pre-scooped ice cream with toppings like crushed cookies, gummy bears, and whipped cream.
- Donut Wall: A fun, grab-and-go display with decorating options for extra fun.
- Chocolate Fountain: Dipping fruits, marshmallows, and pretzels into flowing chocolate.
- Candy Buffet: A colorful mix of candies displayed in jars for kids to scoop into bags.
- Cookie Decorating: Kids decorate sugar cookies with icing and toppings.
- Fruit Skewer Station: Healthy and interactive with pre-cut fruits and dipping sauces.
- Parfait Bar: Layer yogurt, fruits, granola, and toppings in clear cups.
- Mini Desserts Buffet: Bite-sized treats like brownie bites, macarons, and jelly cups.
- Unicorn Cupcake Station: Kids decorate cupcakes with pastel toppings and edible unicorn horns.
Each station is affordable, engaging, and easy to set up with simple tools like muffin tins, squeeze bottles, and cake stands. Whether you’re working with a theme or just want to keep kids entertained, these ideas bring creativity and fun to the party.
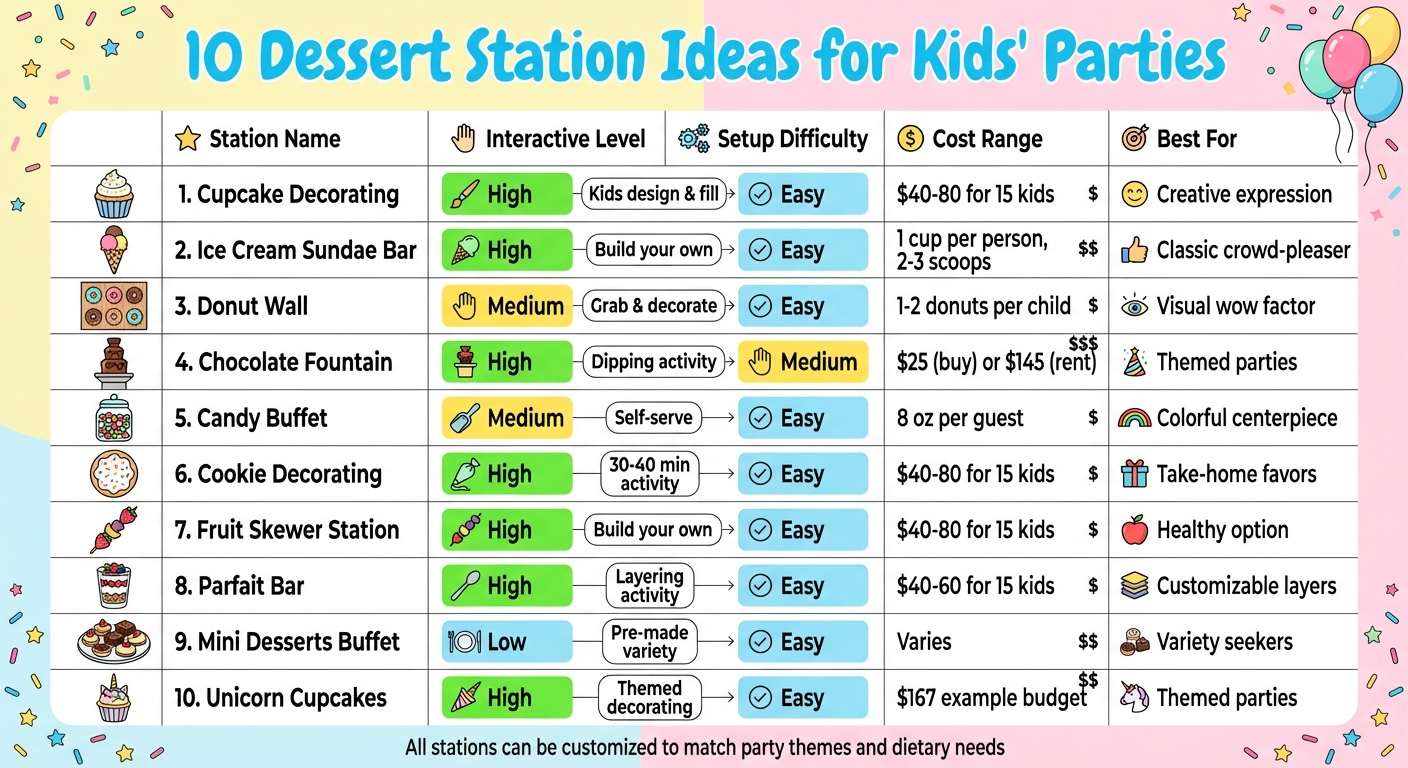
10 Dessert Station Ideas for Kids’ Parties: Quick Comparison Guide
1. DIY Cupcake Decorating Station
Interactive and Fun for Kids
A cupcake decorating station isn’t just dessert – it’s an activity that keeps kids entertained and engaged. Add an extra layer of fun by including surprise fillings like raspberry jam, lemon curd, Nutella, or pudding. A cupcake corer makes it easy for kids to add these hidden fillings before frosting their cupcakes, creating a delightful "what’s inside?" moment when they take a bite.
Want to up the ante? Host a themed cupcake competition for older guests. For an added twist, let kids mix and customize their own frosting colors. Set out white frosting with gel food coloring in small bowls, and once they’ve created their signature shades, transfer the frosting into piping bags. As Bri, Founder of Parties With A Cause, wisely points out:
If you host a birthday party and expect the kids to just have unstructured ‘fun’, you’re setting yourself up for disaster. Planning various activities for the guests helps keep things on schedule.
A well-organized setup ensures the station runs smoothly and keeps the fun going without a hitch.
Ease of Setup and Affordability
Creating a cupcake station doesn’t have to break the bank. Pre-fill disposable icing bags and secure them with knots to prevent leaks – this saves time and minimizes mess. Use cookie sheets or trays to define individual work areas, which will catch stray sprinkles and frosting for an easier cleanup process.
For displaying cupcakes and decorations, simple tiered displays can be made using inexpensive glass candle holders and platters. Stick to a single cupcake recipe and bake in bulk to keep costs low. Buying frosting and toppings in larger quantities also helps stretch your budget. The Better Baker Club highlights the appeal of this activity:
A cupcake decorating party is not just a fun way to celebrate a birthday; it’s also a wonderful opportunity for kids to express themselves in the comfort of your own home.
Variety of Treats and Customization Options
To please a wide range of tastes, offer at least three cupcake flavors – vanilla, chocolate, and blue velvet are reliable crowd-pleasers. Provide multiple frosting options and make decorating easier by using extra-large icing tips. As author Candida Jagger explains:
I recommend using extra-large icing tips for a cupcake station – because average people don’t typically have much experience decorating cupcakes, and larger tips make it easier.
For toppings, keep things tidy by organizing them in small containers. Great options include mini Oreos, sprinkles, gummy bears, mini chocolate chips, and sugar pearls. For crushed cookies, chill them ahead of time to maintain their texture. Mini serving spoons or tongs for each topping help keep everything neat and hygienic.
As a thoughtful touch, provide bakery boxes so guests can take their creations home. This doubles as a fun activity and a party favor, helping you save on additional costs.
This cupcake decorating station is a fantastic way to combine dessert with creativity, making it a highlight of any kids’ party.
2. Ice Cream Sundae Bar
Interactive and Fun for Kids
An ice cream sundae bar turns dessert into an exciting activity. Kids love the chance to create their own sundaes, and as Dannyelle from Life is a Party says:
When you hand a child sprinkles and let them build their own sundae, you’ve already won.
To make things smoother for younger kids, pre-scoop the ice cream into cupcake liners placed in a muffin tin and freeze them up to 4 hours ahead of time. This helps avoid long lines and keeps the ice cream solid while kids choose their toppings. Want to up the fun for older kids? Try a "Blind Ice Cream Taste Test" where they guess flavors.
Now, let’s talk about setting up your sundae bar in a way that’s practical and budget-friendly.
Ease of Setup and Affordability
Just like a cupcake station, a sundae bar is all about hands-on fun without breaking the bank. Buy candies and nuts in bulk and display them in mason jars or other inexpensive containers. For the ice cream itself, plan on 2–3 scoops per guest (around 1 cup per person). For a group of 15 kids, you’ll need about 4–5 pints or 2 half-gallons.
To keep the ice cream cold, place the containers in a galvanized tub filled with nugget ice, and add 2 tablespoons of salt to the ice – this helps it stay frozen longer. Use squeeze bottles for chocolate and caramel sauces to cut down on sticky messes, and provide a separate scoop for each flavor to avoid mixing flavors.
Variety of Treats and Customization Options
Stick with kid-approved flavors like vanilla, chocolate, strawberry, cookies and cream, mint chocolate chip, or birthday cake. Monika Boch offers a simple tip:
The classics – vanilla, chocolate, and strawberry – are best because you can easily build from them by adding toppings.
Include 8–12 topping options to keep things fun without overwhelming the kids. A good mix might include soft options like marshmallows, crunchy choices like crushed Oreos or chopped peanuts, and chewy treats like gummy bears. Don’t forget the essentials: whipped cream, rainbow sprinkles, and maraschino cherries. Be sure to offer at least one dairy-free option, like sorbet or oat milk ice cream, and clearly label it with its own scoop.
Once you’ve got your flavors and toppings ready, focus on making the setup visually inviting.
Visual Appeal and Thematic Creativity
A visually appealing setup draws kids in and makes the sundae bar experience even more enjoyable. Add height to your display with wooden crates, cake stands, or stacked books to showcase toppings at different levels. For a charming backdrop, use brown kraft paper cut into cone shapes and decorate with pastel tissue accents.
Organize the station in a logical order: start with the ice cream, followed by bowls or cones, then dry toppings, sauces, and end with spoons and napkins.
To tie everything together, match the setup to your party theme. Use pastel colors for a retro ice cream parlor vibe or blues for an "Under the Sea" theme. For added fun, set up a Lazy Susan so kids can spin it to pick their favorite toppings.
3. Donut Wall Display
Visual Appeal and Thematic Creativity
A donut wall brings an instant wow factor to any party, especially for kids. All you need is a pegboard and some 5-inch wooden dowels to create this show-stopping centerpiece. Catherine McCord, Founder of Weelicious, captures it perfectly:
This donut wall will be the talk of your next party!
To make it pop, alternate donut colors – classic chocolate, white, and pink – with rows arranged in fun patterns. Add a painted geometric design for extra flair. For a polished look, stagger every second row of dowels slightly to the right. Amp up the excitement with LED lights or a greenery backdrop that ties into your party’s theme. This display isn’t just eye-catching – it’s interactive, adding a playful twist to your setup.
Interactive and Fun for Kids
Beyond its visual charm, a donut wall doubles as an engaging activity for kids. Position the lower rows so younger children can easily grab their own treats. This hands-on element makes it fun for everyone, even picky eaters, to choose their donuts.
Want to take it up a notch? Turn the wall into a decorating station. Offer plain donuts alongside bowls filled with frosting, sprinkles, crushed nuts, fruit pieces, and more. Use squeeze bottles for frosting and muffin tins to keep everything tidy and accessible, making the decorating process as fun as the eating.
Ease of Setup and Affordability
A donut wall doesn’t have to break the bank. Save money by buying classic glazed donuts in bulk from your local bakery or grocery store instead of opting for pricier artisanal options. If the wall is a dessert addition, plan for one donut per child. If it’s the main treat, two donuts per child should do the trick.
For setup, lean the pegboard against a wall or secure it with a cookbook stand for stability. Attach the wooden dowels to the board with a hot glue gun to ensure they can hold the weight of the donuts. Use non-toxic paint, and let the donuts hang freely on the dowels to avoid direct contact with the painted surface.
Variety of Treats and Customization Options
Stick to donuts without fillings – they’re easier to hang and less messy. Offer a mix of flavors like classic glazed, chocolate frosted, white frosted, and pink with rainbow sprinkles. For toppings, provide options such as crushed nuts, coconut flakes, mini chocolate chips, fruit pieces, and, of course, rainbow sprinkles. To keep everyone safe, label any toppings containing common allergens (like nuts or dairy) and use separate serving tools to avoid cross-contamination.
4. Chocolate Fountain Station
Visual Appeal and Thematic Creativity
A chocolate fountain is a showstopper, especially for kids, thanks to its mesmerizing cascade of flowing chocolate. As Fanny Camota, Founder of Living Richly on a Budget, perfectly describes:
The visual appeal of seeing a flowing tower of chocolate will stun any chocolate lover.
For themed parties, you can take this visual delight to the next level. Use white chocolate as your base and mix in oil-based food coloring to match your party’s theme – pink for a princess party, blue for superheroes, or even a rainbow for a unicorn celebration. Add some flair to the setup with tiered trays or cake stands at varying heights, and use string lights or LED accents to make it pop. Beyond just looking amazing, this station is a hands-on experience kids will love. To keep the energy high, you can pair this with interactive inflatable games to keep them moving between treats.
Interactive and Fun for Kids
After grabbing attention with its visual appeal, the chocolate fountain becomes an interactive dessert playground. Kids can grab bamboo skewers or long toothpicks to safely dip their favorite treats into the flowing chocolate. To make it extra fun, set up the dipping options at a height they can easily reach. Offer a mix of healthier choices like strawberries, banana slices, and apple wedges, alongside sweet treats such as donut holes, brownie bites, and Rice Krispie treats. Don’t forget classics like marshmallows or pretzel rods for that sweet-and-salty combo. This setup not only entertains but also gives you control over costs and preparation.
Ease of Setup and Affordability
Setting up a chocolate fountain station is easier and more budget-friendly than you might think. Home chocolate fountains are available for around $25, while rentals typically cost about $145 per day for up to 50 guests. If the fountain is the main dessert, plan on using 1 pound of chocolate for every 10 guests. If you’re offering other desserts too, you can stretch it to 1 pound for every 20 guests. To keep the chocolate flowing smoothly, use standard chocolate chips mixed with vegetable oil in a 55%-to-45% ratio.
Variety of Treats and Customization Options
You can make your chocolate fountain station even more exciting by offering a wide variety of dipping treats. Here are some ideas to get you started:
| Dipping Category | Examples |
|---|---|
| Fresh Fruit | Strawberries, pineapple chunks, banana slices, apple wedges, grapes, melon balls |
| Baked Goods | Donut holes, brownie bites, Rice Krispie treats, pound cake cubes, mini waffles |
| Crunchy/Salty | Pretzel rods, graham crackers, Oreo cookies, vanilla wafers, potato chips |
| Confections | Large marshmallows, gummy bears, gummy worms |
Keep in mind that overly crumbly foods, like soft cookies or delicate cakes, can break apart and clog the fountain. Stick with dippers that hold up well and can stay at room temperature. For perishable fruits, rotate them from a cooler to keep them fresh throughout the event. Pre-melt your chocolate in the microwave (30-second intervals) or a double boiler before adding it to the fountain, as the fountain’s heater will only maintain warmth – it won’t melt the chocolate for you. This prep ensures everything runs smoothly and keeps the chocolate flowing all party long.
5. Candy Buffet Station
A candy buffet station is a delightful addition to kids’ parties, combining striking visuals with an interactive experience. It’s a fun twist on dessert tables, much like DIY cupcake or sundae bars, but with a colorful candy-filled flair.
Visual Appeal and Thematic Creativity
A candy buffet isn’t just a treat – it’s a centerpiece that can steal the show. To make it pop, use risers, wooden crates, or even stacked books under a tablecloth to create layers and depth. Symmetry works wonders here: arrange jars and containers evenly on both sides, with a standout centerpiece like a large jar of themed candy or a small decorative cake in the middle.
Color coordination is key to keeping the setup polished. Whether you’re going for a princess party with shades of pink, a rainbow theme for unicorn lovers, or soft pastels for a subtle vibe, the right palette ties everything together. Clear apothecary jars are perfect for showing off the candy’s bright colors, while backdrops like foil curtains, paper fans, or balloon garlands draw attention to the display. To take it up a notch, give the candies playful names that fit the theme, like calling Pop Rocks “Rock Fest” or Fruit Roll-Ups “Tongue Tattoos.” It’s these little details that make the station both fun and memorable.
Variety of Treats and Customization Options
A candy buffet is all about variety. Aim for 8 to 12 different types of candy, mixing these categories:
- Loose bulk candy like M&Ms or gumballs
- Individually wrapped treats such as lollipops or Airheads
- Specialty sweets like rock candy or cotton candy
- Filler candies like jelly beans or Sixlets
Including a mix of textures – gummy, sour, crunchy, and chewy – ensures there’s something for everyone. Bite-sized options like Skittles or chocolate-covered nuts are perfect because they’re easy for kids to scoop into their bags. Plus, bulk candy is generally affordable, making this setup as kind to your wallet as it is to your guests’ taste buds.
Ease of Setup and Affordability
Creating a candy buffet doesn’t have to break the bank. Plan for about 8 ounces of candy per guest. Bulk candy, which typically comes in 5-pound bags (about 80 ounces), can fill large jars without costing much. For example, a set of three apothecary jars in varying heights (12–14 inches) is available for around $39.98, but you can also find affordable jars and ribbons at local stores. To save even more, use inexpensive filler candies like gumballs or chocolate balls to occupy larger jars.
Interactive and Fun for Kids
What makes a candy buffet extra special is its interactive element. Arrange the table in three levels: shorter containers at the front, medium-height jars in the middle, and taller jars at the back. Provide small scoops, mini-tongs, and wide-mouth jars to make it easy (and hygienic) for kids to help themselves. For a personalized touch, let them decorate their treat bags with stickers or stamps before filling them. This not only adds an extra layer of fun but also doubles as a take-home party favor, ensuring the candy buffet is a hit long after the party ends.
6. Cookie Decorating Corner
Interactive and Fun for Kids
A cookie decorating corner transforms dessert into an activity that kids absolutely love. With icing bags in hand and sprinkles galore, they can craft edible creations with total freedom. Cookie decorating expert Meaghan Mountford shares:
Every time I’ve led a cookie decorating activity for kids – in my home, at festivals, or in the classroom – every single child attacked their cookies with a joyous fervor.
To keep things organized, give each child a paper plate with their name on it. This doubles as a decorating surface and a drying station, making it easy for them to take their cookies home without mix-ups. Adding googly eyes to the mix instantly brings personality to their designs. The beauty of this activity is how it adapts to different ages – little ones may finish quickly, while older kids might dive into detailed designs for up to 15 minutes.
Ease of Setup and Affordability
Setting up a cookie decorating station is straightforward and won’t break the bank. You can bake sugar cookies up to three days ahead and prepare royal icing a week in advance to save both time and money. For around 15 kids, expect to spend between $40 and $80, especially if you bake the cookies yourself instead of buying them.
Skip pricey tools like piping tips and couplers. Disposable decorating bags work perfectly – just secure them with rubber bands and snip the tips to the desired size right before the party starts. To avoid icing stains, clear the area of rugs and make cleanup easier by vacuuming fallen sprinkles afterward.
Variety of Treats and Customization Options
For young decorators, sturdy sugar cookies in simple shapes like stars, hearts, or circles are ideal. Royal icing made with meringue powder is a safe and reliable choice – it skips raw eggs and dries hard enough for kids to take their cookies home within an hour or two. Stick to bright, cheerful colors like red, yellow, green, and purple, steering clear of dark dyes like black or navy, which can stain clothes and skin.
Offer a mix of toppings such as festive M&Ms, gumdrops, mini marshmallows, and chocolate chips. Avoid nonpareil sprinkles – they tend to roll everywhere and create unnecessary mess. Plan for at least two or three cookies per child and ensure you have enough icing bags for everyone to avoid sharing conflicts. Keep plain store-bought cookies or graham crackers handy as backups for kids who finish early and want to keep decorating.
Visual Appeal and Thematic Creativity
Make the setup visually appealing by using cake stands, wooden crates, or tiered trays to add height and dimension to the table. Use muffin tins to organize toppings neatly and prevent them from rolling away, while also giving the station a polished look. For a fun, budget-friendly twist, ask guests to bring a jar of their favorite sprinkles to share – this adds variety without extra cost.
The activity usually lasts 30 to 40 minutes, making it an ideal centerpiece for the party. It keeps kids engaged and doubles as a take-home party favor. Like the cupcake and sundae stations, this cookie decorating corner is all about combining creativity and fun to ensure every child has a blast.
7. Fruit Skewer Station
This dessert station brings together a playful vibe with a healthier snack option, offering an interactive experience that’s as fun as it is delicious.
Interactive and Fun for Kids
A fruit skewer station turns snacking into an engaging activity. Kids love the freedom of creating their own skewers, picking their favorite fruits to assemble their masterpiece. And here’s the magic: when kids make it themselves, they’re much more likely to eat it. As Motherly explains:
Food stations aren’t just about feeding people – they’re entertainment, they’re an activity, and they magically convince picky eaters to try new things because kids made it themselves.
Even toddlers as young as 3 or 4 can join in by threading pre-cut fruit onto 6-inch bamboo skewers, while older children can pitch in with prep tasks like washing and sorting fruit. To keep things safe, cut small, round fruits like grapes in half and toss apples, bananas, or pears in lemon juice to keep them from browning.
Simple Setup on a Budget
Creating a fruit skewer station is easy and won’t break the bank. For around $40–$80, you can set up a station for 15 kids. Save money by choosing seasonal fruits and buying in bulk. Pre-cut the fruit into 1/2- to 1-inch pieces and arrange the station in a clear sequence: start with plates and skewers, then move to the fruit, and finish with napkins. This organized setup ensures everything runs smoothly while keeping the focus on fun.
Endless Options for Customization
Sort fruits by color – red (strawberries, watermelon), orange (mandarins, cantaloupe), yellow (pineapple, bananas), green (kiwis, green grapes), and blue/purple (blueberries, blackberries) – to encourage kids to make vibrant rainbow skewers. Add a creative touch by using mini cookie cutters to shape melons or pineapples; freezing the slices briefly makes cutting easier. For an extra treat, include dips like yogurt, chocolate fondue, or caramel sauce to pair with the fruit.
Eye-Catching Display and Themed Fun
Take the station up a notch by using cake stands, wooden crates, or risers to create varying heights, making the display visually appealing and accessible. For themed parties, give the fruits fun names to match the event – think "Magic Marbles" (grapes) for a wizard theme or "Cannonballs" (blueberries) for a pirate adventure. Add themed picks, decorative skewers, and playful decor like fruit-shaped balloons to tie it all together. This station not only entertains but also offers a healthier alternative to sugary treats without skimping on the fun.
8. Build-Your-Own Parfait Bar
Interactive and Fun for Kids
A parfait bar turns dessert into an engaging activity where kids can create their own layered treats. The appeal lies in giving them control over their choices. As Motherly explains:
The control factor is everything. When a four-year-old gets to decide exactly how much cheese goes on their taco [or fruit in their parfait], suddenly [it’s] the best food on earth.
Start with a yogurt or pudding base – think vanilla, strawberry, or even Angel Delight. Then, let kids pile on fresh fruits like strawberries, blueberries, or grapes. Add some crunch with granola, crushed graham crackers, or chocolate cookies. Finally, top it off with fun extras like mini marshmallows, chocolate chips, sprinkles, or gummy bears. The clear cups not only make it easy to layer but also showcase the colorful combinations.
Ease of Setup and Affordability
Putting together a parfait bar is simple and won’t break the bank. For about $40–$60, you can set up a station for 15 kids. Use family-sized tubs of yogurt to keep costs down and pick seasonal fruits for fresh flavors. A muffin tin works perfectly to organize the toppings, keeping everything neat and easy to access. Arrange the station in a logical order – start with cups and the base, then toppings, and finish with spoons and napkins. This setup encourages creativity without the mess.
Variety of Treats and Customization Options
What makes a parfait bar so fun is its flexibility. Offer multiple bases like vanilla yogurt or chocolate pudding. Add a variety of fruits – raspberries, watermelon, or pineapple chunks work well. For crunch, include options like cereal, toasted oats, or crushed Oreos. Complement these with drizzles such as honey, maple syrup, or chocolate sauce, and don’t forget whipped cream for the finishing touch. Label each ingredient with handwritten signs, and clearly mark allergens like nuts or dairy. To keep everything fresh, place yogurt and whipped toppings in bowls of ice or rotate them from the fridge.
Visual Appeal and Thematic Creativity
Make your parfait bar a visual treat by using cake stands, wooden crates, or risers to add height and dimension to the display. Tie it into your party theme by renaming toppings – call sprinkles “Unicorn Dust” or pineapple chunks “Tropical Treasures.” Add decorations like fruit-shaped balloons or themed tablecloths. The vibrant layers in clear cups double as a colorful centerpiece, making the station as delightful to look at as it is to eat.
9. Mini Desserts Buffet
Variety of Treats and Customization Options
A mini desserts buffet is a fantastic way to let kids enjoy a variety of treats without committing to full-sized portions. The secret lies in offering a mix of textures and flavors – think crunchy brownie bites, creamy parfaits, chocolate cake pops, and fruity gelatin cups. This variety not only keeps things fun but also encourages even the pickiest eaters to try something new. As Mum in the Madhouse puts it:
A kids’ dessert buffet is more than just a feast for the taste buds – it’s an experience that lets kids explore different flavors, textures, and creativity all in one place.
To make your buffet stand out, include a mix of baked goodies (like mini cupcakes, macarons, and brownie bites), fruit-focused snacks (such as chocolate-dipped strawberries and fruit skewers), breakfast-inspired bites (donut holes or mini waffles), and chilled options (pre-scooped ice cream bowls or colorful jelly cups). A mix of homemade and store-bought treats – like glazed donuts and macarons – can help you save time without sacrificing variety. This combination of options not only delights the palate but also ensures a smooth and interactive setup.
Ease of Setup and Affordability
A mini desserts buffet is more than just tasty – it’s an engaging activity for kids. The best part? You don’t need to spend a fortune to make it happen. Jennifer Sbranti, a graphic designer and stylist, highlights the practical side of these stations:
Dessert stations are always a hit and often serve as a giant "centerpiece" for a party. However, they can also deliver a BIG hit to your party budget… and fast! This is why I’m also a big fan of mini dessert stations.
Keeping costs low is simple with a few smart choices. Use small containers for toppings to maintain a clean and organized look, and pre-portion treats to avoid delays and keep things running smoothly. Opt for shatterproof containers instead of glass to make the setup kid-friendly and safe, especially with all the excitement in the air.
Visual Appeal and Thematic Creativity
The mini buffet isn’t just about taste – it’s a visual feast, too. Use cake stands, tiered trays, or wooden crates to add height and dimension, turning your dessert station into a centerpiece that wows. Place the most popular items at kids’ eye level for easy access. To tie the buffet into your party theme, get creative with names – call fruit rollups "Tongue Tattoos" or label Pop Rocks as "Rock Fest." Match the color scheme with sprinkles, M&Ms, or fresh fruit, and enhance the display with themed decor like balloons, greenery, or printable signs. Even on a budget, these touches make your setup look polished and party-ready.
10. Unicorn-Themed Cupcake Station
Interactive and Fun for Kids
A unicorn-themed cupcake station turns dessert time into an exciting, hands-on activity. Start with plain cupcakes topped with white frosting, and let the kids unleash their creativity. Provide twisty lollipops (cut in half) so they can "plant" edible unicorn horns into their cupcakes. For ears, offer white Air Heads candy that kids can cut into triangles and stick into the frosting. This DIY setup not only keeps kids entertained while waiting for other activities but also gives them the joy of eating their own custom creations. It’s a win-win for fun and engagement, blending perfectly with any unicorn-themed party.
Visual Appeal and Thematic Creativity
The station’s visual charm is just as important as the activity itself. Use tiered cupcake stands or towers to add height and make the display an eye-catching centerpiece. Fill the table with pastel-colored icings, rainbow sprinkles, edible glitter, and gold accents to enhance the magical vibe. Want to go the extra mile? Add a whimsical backdrop with pearl fringe curtains and star-shaped balloons to complete the scene. Jennifer Sbranti, founder of Hostess with the Mostess, captures the magic perfectly:
There’s something about ‘styled sugar’ that seems to act as a magnetic force and makes faces instantly light up!
Ease of Setup and Affordability
This station is not only fun but also easy on the budget. Jennifer Sbranti’s "Magical Unicorn Party" for her daughter’s 7th birthday in January 2019 is a great example. She kept the dessert table cost to $167 by pairing a professional $85 unicorn cake with affordable DIY treats. One standout hit? DIY sugar cone horns. To keep things simple, use store-bought cupcakes and focus your efforts on decorating elements. Printable signs and balloons can fill the table space without breaking the bank, and you can prepare chocolate rainbow horns ahead of time using molds and candy melts to cut down on stress on the big day.
Conclusion
Throwing a memorable party doesn’t mean sticking to just one dessert station – mix and match to fit your theme and budget. Pair an interactive DIY option, like an ice cream sundae bar, with a visually stunning display, such as a donut wall, to blend hands-on fun with effortless cleanup.
As Tanu Kaur, Creative Blogger at Bakingo, says:
Why settle for one sweet treat when you can have an entire table full? These dessert bar ideas are not just delicious – they’re the life of the party.
Combining engaging dessert stations with exciting party entertainment creates a seamless event experience. While kids burn off energy on a bounce house or inflatable obstacle course from Bouncy Rentals USA, the dessert station becomes a natural hub where they can recharge. This setup not only keeps the kids entertained but also gives you an extra 20 to 30 minutes to handle other party tasks.
Keep things practical and visually appealing by using risers and cake stands to add height and labeling treats for allergens like nuts, dairy, or gluten. Mixing homemade items with store-bought goodies can help you manage costs while still delivering an impressive spread. Small details – like themed printables, matching toppings, and shatterproof containers – can turn a simple dessert table into a showstopper.
These ideas work for any celebration, whether it’s a unicorn-themed party, a circus adventure, or a casual backyard gathering. The goal is to balance visual charm, interactive fun, and practicality, creating sweet memories for everyone.
FAQs
How many dessert stations should I set up?
Setting up three dessert stations for a kids’ party is a great way to keep the celebration lively and organized. This setup offers enough variety to delight the little guests without making things feel chaotic. To make it even more enjoyable, pick treats or themes that align with the party’s overall vibe – whether it’s a superhero adventure, a princess tea party, or a jungle safari. The key is to keep it fun and interactive!
What’s the least messy dessert station for kids?
The best way to keep a dessert station neat is by offering treats in small bowls or cups. Think pudding or single-serving desserts – these are simple for kids to manage and help cut down on spills. Plus, pre-portioned options are super convenient and perfect for little hands.
How do I handle food allergies at a dessert station?
Start by reaching out to parents ahead of time to ask about any allergies or dietary restrictions. When planning your menu, try to steer clear of common allergens such as milk, eggs, wheat, peanuts, and tree nuts. Make sure to clearly label treats that are free of allergens, so there’s no confusion. You might also want to include non-food prizes as an alternative to minimize exposure risks. Open communication with parents about ingredients and the potential for cross-contamination is key to making the dessert station safe and welcoming for everyone.