Transforming your backyard into an obstacle course is easier than you think, and it’s a fantastic way to keep everyone active and entertained. Whether you’re using household items or renting inflatables, here’s what you need to know:
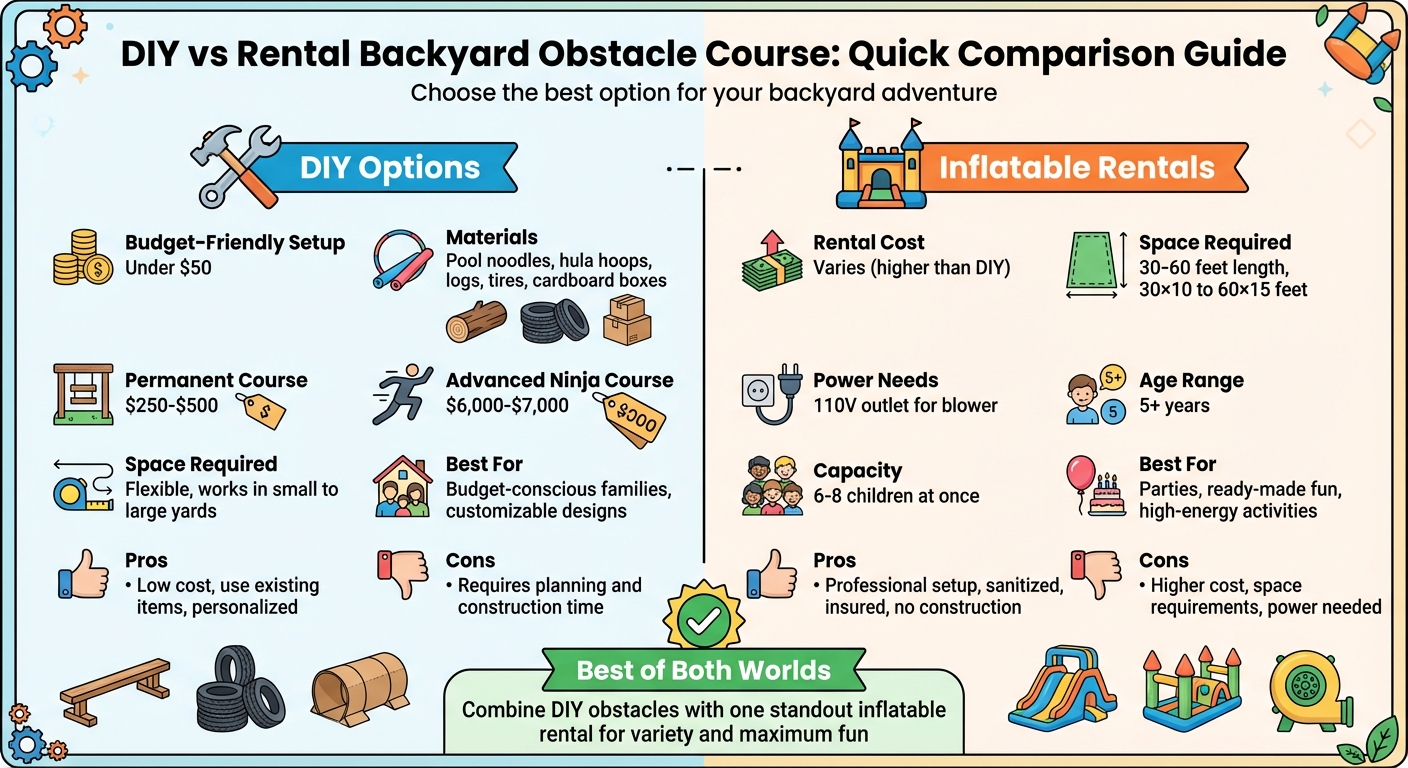
- DIY Options: Use pool noodles, hula hoops, logs, and tires for a budget-friendly setup (under $50). Permanent courses can cost $250–$500.
- Inflatable Rentals: Great for parties, these require 30–60 feet of space and cost more but are ready-made and high-energy.
- Planning Tips: Map out your yard, use natural features like trees or slopes, and tailor obstacles to participants’ ages.
- Safety First: Add foam mats, inspect obstacles, and ensure proper supervision.
Want a mix of DIY and rentals? Combine simple homemade obstacles with a standout inflatable for variety and fun. Whether it’s a kids’ party or a family day, a backyard obstacle course guarantees hours of activity.
DIY vs Rental Backyard Obstacle Course Cost and Space Comparison
Planning Your Backyard Obstacle Course
To create a backyard obstacle course that’s both fun and functional, thoughtful planning is key. Start by sketching out your yard’s layout to decide where each obstacle will go and how participants will move through the course. Take a walk around your space to evaluate factors like slope, drainage, and shade. If your yard has natural hills, they can add an extra layer of challenge, like climbing or sliding elements.
Make sure your yard has enough space for the course you want to build. For example, inflatables from Bouncy Rentals USA typically need between 30 and 60 feet of length. You’ll also need a 110V power outlet for the inflatable blower. Don’t forget to check your property lines and any HOA or zoning regulations that might affect structure heights or noise levels. A little preparation now will save you headaches later when it’s time to bring your plans to life.
Measuring Your Space and Using Natural Features
Take advantage of what your yard already offers. Trees, logs, or even a slight incline can become part of your obstacle course design. If you’re building permanent structures, you might need to install posts set about four feet deep in sturdy soil. For a more precise plan, consider using 3D modeling tools like SketchUp to create a scale model of your course. This can help you visualize how everything will fit together and ensure your design flows smoothly.
Safety and Age-Appropriate Design
"Safety means a commitment to safety – it doesn’t just happen on its own." – Eastern Jungle Gym
Safety should always come first. Use proper landing surfaces, like mulch or foam mats, to reduce the risk of injuries. For permanent builds, opt for sturdy materials like 6×6 pressure-treated posts instead of 4x4s for better stability.
Tailor the course to fit the ages and skill levels of participants. For toddlers (ages 2–5), keep challenges close to the ground. Simple setups like hula hoops or pool noodles as stepping stones work well. Grade school kids (ages 6–12) can handle balance beams or basic strength tasks. Meanwhile, teens and adults may enjoy higher and more demanding obstacles, such as hanging challenges. Encourage everyone to wear athletic shoes to improve traction and protect their feet during activities.
Planning Checklist
After measuring your space and addressing safety concerns, finalize your setup with a clear plan. Before anyone starts the course, hold a quick safety briefing and warm-up. Set ground rules like “hustle but don’t run” and emphasize respecting personal space. Inspect the course for hazards, secure any loose items, and test the stability of each obstacle.
Plan your budget early. A simple DIY course can cost around $200, while more durable setups might range from $250 to $500. If you’re aiming for a high-end Ninja Warrior-style course, costs can go up to $6,000–$7,000 . Renting inflatables? Coordinate with Bouncy Rentals USA to ensure smooth delivery and setup so everything is ready when it’s time for the fun to begin.
Materials and Equipment You’ll Need
Creating a backyard obstacle course doesn’t have to drain your wallet. In fact, you can often pull it together using items you already have at home, with a few extra purchases or rentals to round things out. The trick is knowing how to make the most of what you’ve got and where to invest for the best results.
DIY Materials and Tools
Start by raiding your home for everyday items that can double as obstacles. For example, pool noodles can transform into tunnels, hurdles, or even targets for ball tosses. Hula hoops? They’re great as agility rings or crawling tunnels. Even cardboard boxes, blankets, chairs, and laundry baskets can be turned into belly crawl stations or navigation zones with a little creativity.
If you’re looking for something sturdier, natural and reclaimed materials are excellent options. Logs, stumps, boulders, and old tires can be repurposed into balance beams or jumping platforms. Planning something more permanent? Basic lumber, like 2x4s and plywood, is ideal for constructing balance beams or small climbing walls. For example, you can build a simple wooden balance beam for under $30, and a set of 30 cones costs about the same amount.
"Putting together a backyard obstacle course for kids is really not that hard or expensive. For this past obstacle course, we spent under $50 on materials." – Jac of All Things
For a more advanced, "Ninja Warrior"-style course, you’ll need heavier-duty materials. Think 6×6 pressure-treated posts, 2×8 horizontal beams, carriage bolts (two per joint), joist hangers, and hammock hooks. Tools like a drill, extended bits, a mitre saw, clamps, and a sturdy ladder are essential for construction. Don’t forget safety gear and ground stakes to secure lightweight obstacles.
Looking for a show-stopping centerpiece? Inflatable options might be just what you need.
Inflatable Options from Bouncy Rentals USA
While DIY obstacles are fun and practical, adding an inflatable obstacle course can take your setup to the next level. Companies like Bouncy Rentals USA offer inflatables that work well for kids’ parties and even adult gatherings. They handle everything – from delivery and setup to safety checks. Plus, their equipment is sanitized and fully insured, so you can focus on enjoying the event.
Budget Planning for Materials and Rentals
Once you’ve mapped out your materials, it’s time to think about costs. If you’re building more permanent structures with lumber and tires, expect to spend between $250 and $500. For a professional-grade ninja course with heavy posts, climbing holds, and concrete installations, the price jumps to around $4,400 to $5,100.
If you prefer pre-made options, Ninja Warrior kits on Amazon typically range from $80 to $200, while a backyard zip line costs about $300. For inflatable rentals, factor in those costs when planning your budget. Combining a few DIY obstacles with one standout rental piece is often the best way to provide variety and keep your guests entertained.
Designing Your Obstacle Course
Once you’ve finalized your budget and gathered all the necessary materials, it’s time to bring your vision to life by mapping out the obstacle course. This is where you decide which obstacles to include, how they’ll flow, and the overall theme that will tie everything together. Think of this step as turning your plans into a fun and functional layout.
Types of Obstacles and Their Functions
A well-rounded course should include a mix of obstacles targeting balance, agility, strength, and coordination. Here’s a breakdown of obstacle types and their purpose:
- Balance Obstacles: These help improve equilibrium and muscle coordination. Use 2×4 lumber for balance beams, bricks for stepping stones, or even tree trunks for hops.
- Agility Challenges: Activities like tire jumps, weaving through cones, or hula hoop runs enhance quick movements and eye-foot coordination.
- Strength Stations: Rope climbs, salmon ladders, medicine ball carries, and other upper-body challenges build core, arm, and grip strength.
- Crawling and Tunnel Obstacles: Crawling through cardboard boxes, drainage pipes, or pool noodle tunnels improves spatial awareness and coordination.
- Accuracy and Skill Stations: Activities like tossing balls into buckets, hitting Nerf targets, or shooting hoops refine eye-hand coordination and problem-solving skills.
Here’s a quick reference table for DIY obstacle ideas:
| Obstacle Type | Primary Skill Developed | DIY Material Examples |
|---|---|---|
| Balance Beam | Balance/Equilibrium | 2×4 lumber, cinder blocks, fallen logs |
| Tunnels | Spatial Awareness | Cardboard boxes, pool noodles, drainage pipes |
| Agility Run | Agility/Coordination | Tires, hula hoops, road cones |
| Climbing Wall | Upper Body Strength | Plywood, rock-climbing holds, rope ladders |
| Throwing Station | Eye–Hand Coordination | Buckets, bean bags, Nerf guns, hula hoops |
Themed Course Ideas
Adding a theme to your obstacle course can make it more exciting and immersive. Here are a few ideas:
- Ninja Challenge: Channel your inner "Ninja Warrior" with zig-zag agility stations, rope climbs, and balance beams.
- Carnival Theme: Perfect for younger kids, this theme can include ring toss games with pool noodles and cones or "bobbing for apples" in a small wading pool.
- Jungle Adventure: Transform tunnels into "caves", use rope swings as "vines", and set up a "coconut toss" for throwing stations.
Make sure to adjust the difficulty based on your audience. For toddlers (ages 3–5), stick to simple tasks like jumping into hula hoops or walking along a rope. For older kids (6 and up), add more complex elements like balance beams, rope climbs, or timed challenges. If you’re looking for a centerpiece, companies like Bouncy Rentals USA offer inflatable obstacle courses that fit themes like jungle expeditions or competitive races, with sizes ranging from 30 × 10 to 60 × 15 feet for kids ages 5 and up.
Layout Designs for Different Backyard Sizes
The size of your backyard will influence how you arrange the course. Here’s how to make the most of your space:
- Small Backyards: Use compact clusters and multi-purpose items like folding chairs (for crawling under) or laundry baskets (for ball tosses). Extend the course into a garage or side yard to maximize the run length. Incorporate existing structures like trees for rope climbs to save space.
- Medium Backyards: Zig-zag patterns work well here, increasing the course’s travel distance without requiring a long, straight stretch. A ninja-style course typically needs about 80 to 120 square feet.
- Large Backyards: Design the course around the perimeter to allow for running between stations while keeping the center open for other activities. Consider dividing the yard into zones, such as:
- A water zone with PVC sprinklers.
- A Nerf challenge area.
- A strength zone with logs or tires.
Before you start building, make safety a priority. Mow the lawn and clear the area of rocks, sticks, or hidden debris. Sand any wooden structures like balance beams to avoid splinters, and check local rules or zoning laws if you’re adding permanent features like climbing walls or zip lines.
Safety and Event-Day Management
Creating an obstacle course is just the beginning; making sure it’s safe and running smoothly is just as important. A detailed pre-event inspection and a solid management plan are key to reducing risks and ensuring everyone has a great time. Here’s a closer look at the essential steps for safety checks, event management, and handling rental equipment.
Pre-Event Safety Inspection
Safety starts with preparation. Go over all the safety measures you planned earlier to confirm the event space is secure. Check every obstacle thoroughly, and perform stress tests to ensure they can handle more than the expected load. As World Ninja Sport advises, builders should aim to "overbuild" their obstacles to withstand double or even triple the anticipated stress:
"OVER BUILD – whatever you think the strength should be for something, double or triple it then buy the material to suit." – World Ninja Sport
Make sure all surfaces are smooth and treated with anti-slip tape to prevent slips and falls. Hard surfaces like wooden beams, playground borders, or railroad ties should be padded with foam or mats for extra protection. Use football cones or temporary fencing to clearly mark course boundaries, keeping participants within the designated area.
Set up hydration stations near the finish line with water and snacks like bananas to keep participants refreshed. Finally, ensure emergency access routes are unobstructed so first responders can quickly reach any part of the course if necessary.
Managing the Event
Once safety checks are done, shift your attention to managing the event itself. Start with a pre-run briefing where participants can warm up and go over the rules. Highlight any tricky obstacles and let participants know it’s okay to skip them if needed. For events with timed runs, you might add a small penalty – like five jumping jacks – for skipped obstacles to keep things moving smoothly.
Timed runs not only add structure but also help prevent congestion on the course. Don’t forget to schedule regular rest breaks to help participants avoid overexertion.
Safe Integration of Rental Equipment
If you’re using rental inflatables, such as those from Bouncy Rentals USA, make sure they’re integrated safely into the event. These inflatables typically require anywhere from 30 × 10 feet to 60 × 15 feet of space and are designed for participants aged 5 and up. Ensure there’s plenty of room for safe entry and exit, and assign an adult to supervise the blower and enforce the 6–8 child occupancy limit.
Keep the area around slide exits clear of any DIY obstacles to avoid accidents, and make sure participants don’t climb on the netting or anchor points. While companies like Bouncy Rentals USA handle setup and initial safety checks, ongoing supervision throughout the event is crucial to maintaining safety.
Conclusion
With a bit of planning and creativity, building a DIY backyard obstacle course is a fantastic way to get kids moving and enjoying the outdoors. The U.S. Department of Health and Human Services recommends at least 60 minutes of daily physical activity for children, and these courses offer a fun way to meet that goal while cutting down on screen time. Plus, they help kids develop gross motor skills, balance, and spatial awareness.
You don’t need a big budget to get started – DIY courses can cost less than $50 if you use items you already have at home. To keep things interesting, include a mix of activities like crawling, jumping, and balancing. Tailor the obstacles to your audience: younger kids might enjoy themed, low-impact challenges, while older kids often thrive on timed races and strength-based tasks. If you’re lucky enough to have natural features like trees or hills in your yard, use them to add variety without spending extra.
For an extra layer of excitement, consider combining your DIY setup with inflatable rentals from Bouncy Rentals USA. While homemade obstacles add a personal touch, inflatables bring high-energy elements like climbing walls and giant slides that are hard to replicate on your own. These rentals typically require spaces ranging from 30×10 feet to 60×15 feet and are designed for kids ages 5 and up, offering both safety and durability for larger gatherings. Blending DIY and rental options can create a well-rounded, action-packed experience.
Whether you stick to a fully DIY approach or mix in rental equipment, your backyard can become an adventure zone that delivers hours of fun and physical activity. Just remember to prioritize safety, as mentioned earlier, to ensure the experience is both enjoyable and secure for everyone involved.
FAQs
What are the best ways to keep participants safe on a DIY backyard obstacle course?
When setting up a DIY backyard obstacle course, prioritizing safety is an absolute must. Start by clearing the area of potential hazards such as rocks, sticks, or uneven ground – these can lead to trips and falls. Use durable, weather-resistant materials for your obstacles, and make sure everything is securely anchored. For inflatables, consider using tie-downs or sandbags to keep them stable. Clearly mark the course boundaries with cones or tape to help participants stay within a safe zone.
Design your obstacles to suit the age and skill level of the participants. For younger children, keep obstacle heights below 5 feet and provide soft landing areas like foam mats or rubber padding. Steer clear of sharp edges, frayed ropes, or wobbly structures that might pose a risk of injury.
Supervision is key. Assign an adult or a designated "safety captain" to monitor each section of the course. Keep a first-aid kit nearby, just in case. Before starting, check the weather – postpone the activity if it’s too windy, rainy, or excessively hot. With thoughtful planning and careful oversight, your backyard obstacle course can be a safe and enjoyable adventure for everyone!
What affordable materials can I use to create a DIY backyard obstacle course?
Creating a backyard obstacle course on a budget is simpler than it sounds! Start by looking around your home for items you can reuse. Things like old tires, wooden pallets, PVC pipes, pool noodles, garden hoses, and cardboard boxes can easily become balance beams, tunnels, or hurdles. You can even use natural elements in your yard – tree branches, slopes, or sand patches – to add some creative challenges without spending a dime.
If you need to buy a few extras, stick to affordable options like plastic traffic cones (usually $1–$2 each), sandbags, hula hoops, or jump ropes. Check out local dollar stores, hardware stores, or even yard sales for great deals. By combining these low-cost finds with repurposed materials, you can build an engaging obstacle course that’s both fun and wallet-friendly – keeping your total cost under $50!
How do I pick the best inflatable rental for my backyard size?
To pick the perfect inflatable for your backyard, start by measuring the available flat area. Clear the space of any obstacles, then measure its length and width in feet. Be sure to leave 3–5 feet of extra room on all sides for safety and to accommodate equipment like stakes and blowers. Compare these measurements to the inflatable’s dimensions, which are typically provided (e.g., 12 × 12 ft or 18 × 24 ft). If your yard is smaller than 15 × 15 ft, stick to compact inflatables. Medium-sized spaces (15 × 15 ft to 25 × 25 ft) can handle mid-sized options, while larger areas can fit bigger setups like obstacle courses or oversized bounce houses.
You’ll also need a nearby 120 V outlet to power the blower. If the outlet is far, use an extension cord, but make sure it’s placed where no one will trip over it. Secure the inflatable using sandbags or stakes, and double-check that the area is free of debris and doesn’t have any overhead obstructions.
Lastly, think about how many guests you’re hosting. Small inflatables are ideal for 5–10 kids, medium ones can entertain 15–25 participants, and larger units are great for 30+ guests. By measuring your space, ensuring power access, and choosing an inflatable that matches your guest list, you’ll create a safe and enjoyable setup for everyone. For added peace of mind, Bouncy Rentals USA provides sanitized, insured inflatables and will confirm all requirements during the booking process to make things hassle-free.