Setting up a DIY photo booth can save you hundreds of dollars compared to professional rentals, but it comes with challenges like managing equipment, lighting, and guest flow. Here’s how to make the process smoother:
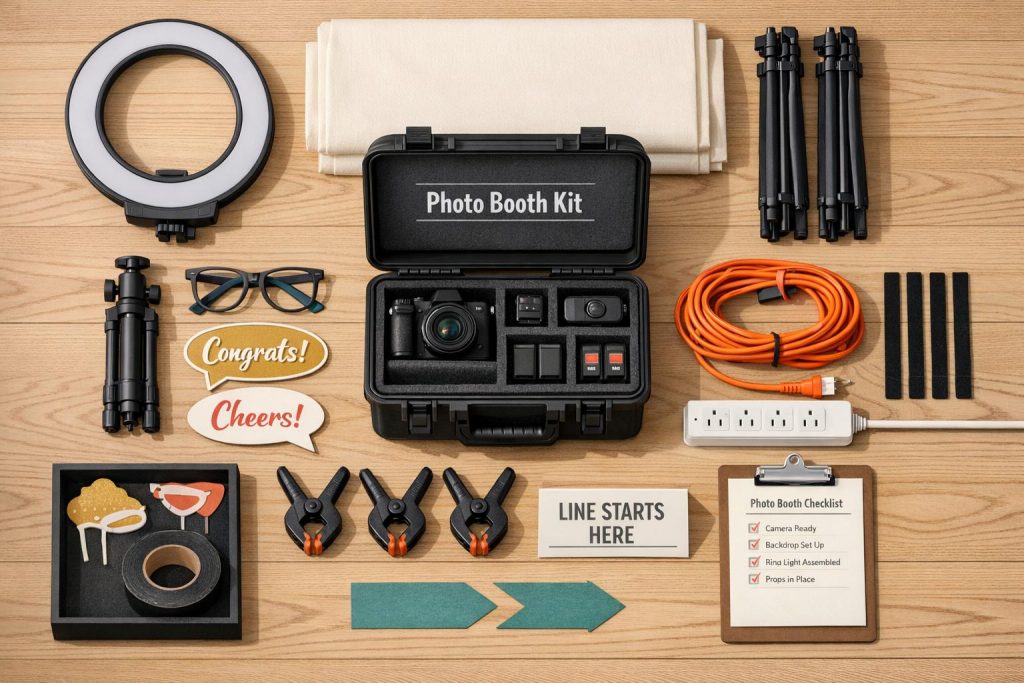
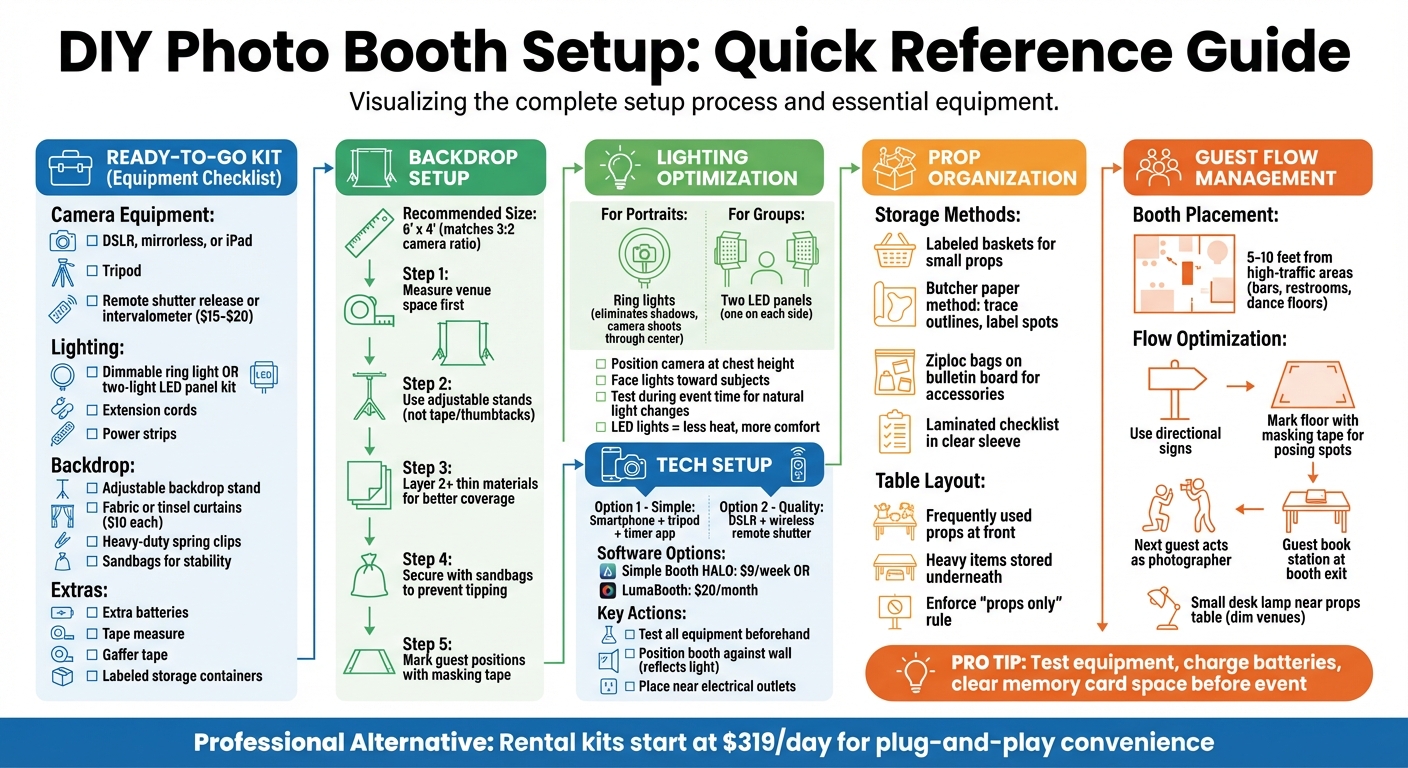
- Prepare a Ready-to-Go Kit: Include essentials like a camera (DSLR or smartphone), tripod, ring lights, backdrops, and props. Add extras like extension cords, sandbags, and gaffer tape.
- Secure Your Backdrop: Use inflatable backdrops or traditional stands and sandbags to prevent tipping. Layer thin materials for better coverage.
- Optimize Lighting: Use ring lights for portraits or LED panels for group photos. Test lighting to avoid shadows or dim images.
- Streamline Tech Setup: Test cameras, remotes, and apps beforehand. Keep everything near power outlets.
- Organize Props: Store props in labeled containers or use the butcher paper method for quick setup and cleanup.
- Plan Guest Flow: Place the booth away from high-traffic areas, mark posing spots, and use signs for directions.
With preparation and the right tools, you can create a hassle-free photo booth that delivers great results without breaking the bank.
DIY Photo Booth Setup Checklist: Essential Steps and Equipment Guide
Common Problems with DIY Photo Booth Setups
Setting up a DIY photo booth can be frustrating, especially when the challenges start long before the party even begins. Gathering all the necessary equipment – camera, tripod, lighting, backdrops, DIY photo booth props, and smaller essentials like extension cords, surge protectors, USB cables, sandbags, and gaffer tape – can quickly become overwhelming. Missing any of these items could delay your setup or even create safety hazards.
"Within 10 minutes of opening my photo booth, one light stand toppled, damaging the umbrella attachment. This mishap was easily preventable with sandbags." – Tim Lewis, Improve Photography
Backdrops often pose their own set of issues. Lightweight stands can easily tip over in crowded spaces, and smaller backdrops (anything under 6′ x 4′) tend to expose unwanted clutter in photos. Using thin, single-layer materials can appear unprofessional – stacking two layers of fabric helps create better coverage.
Lighting is another common stumbling block. Overhead venue lights often cast harsh shadows, while dim areas can lead to blurry, low-quality images. If your flash isn’t synced properly, the autofocus may struggle, causing delays and missed moments.
"Even though random lights at your event – like ceiling lights or even windows – might make the room feel bright, they are likely to illuminate your subjects in an un-flattering way." – Simple Booth
Finally, unfamiliarity with your equipment can make the process even harder. Double-checking specialized items like tripod mounts and Mini-USB cables before the event can save you from last-minute technical issues. Addressing these common pitfalls ahead of time will make your photo booth setup smoother and more efficient.
Quick Setup Solutions for DIY Photo Booths
Build a Ready-to-Go Kit
Having a pre-packed kit can save you from last-minute chaos. Your essentials should include a reliable camera – whether it’s a DSLR, mirrorless, or even an iPad – a sturdy tripod, and a remote shutter release or intervalometer (typically $15–$20). Add a dimmable ring light or a two-light LED panel kit for proper lighting. Don’t forget backdrop equipment like an adjustable stand, fabric or tinsel curtains (around $10 each), and heavy-duty spring clips. Practical extras like extension cords, power strips, extra batteries, a tape measure, and gaffer tape are also must-haves.
For an automated experience, consider photo booth software. Options like Simple Booth HALO start at $9 per week, while LumaBooth costs about $20 per month. Store everything in clearly labeled containers for easy access. If you’re hosting a bigger event, fun extras like cotton candy machines or popcorn makers from Bouncy Rentals (https://bouncyrentalsusa.com) can add to the entertainment while guests wait for their turn.
Once your kit is ready, the next step is setting up a flexible and secure backdrop.
Choose Adjustable and Stable Backdrop Stands
Using adjustable backdrop stands makes setup easier and more reliable than relying on tape or thumbtacks. A 6′ x 4′ backdrop works perfectly with the 3:2 horizontal ratio of most cameras, keeping guests framed nicely. Before setting up, measure your venue space and mark guest positions on the floor with masking tape.
"Backdrop stands would also be of great help to ensure a quick and easy setup, and keep your backdrop in place." – Adorama
To prevent accidents in busy areas, secure the stands with sandbags. If you’re using thin materials like tinsel curtains, layering two or more will improve coverage and create a more polished look.
With the backdrop sorted, it’s time to focus on lighting to make those photos pop.
Use Ring Lights or LED Panels for Easy Lighting
Good lighting is essential for professional-quality photos. Ring lights are fantastic for close-up portraits, as they eliminate shadows by allowing the camera to shoot through the center of the light. For larger groups, a two-light LED panel kit – one positioned on each side – provides even, flattering illumination. Plus, LED lights produce less heat, keeping the booth area comfortable for guests.
Set your camera at chest height, position the lights to face your subjects, and test the setup during the event’s planned time to account for any natural light changes. Many LED lights also offer color-changing options, so you can match the lighting to your party theme – think blue for an ocean vibe or white for a winter wonderland.
Set Up Camera and Tech Efficiently
For a simple setup, a smartphone on a tripod with a timer app can work wonders. If you want higher-quality images, opt for a DSLR with a wireless remote shutter release. Photo booth apps with live preview features are especially helpful, as they let guests see themselves and adjust their pose before the shot.
Test all your equipment ahead of time to ensure everything runs smoothly. Position your booth against a wall to reflect light back onto your subjects, creating even lighting. Make sure your setup is near electrical outlets to power devices like LED panels and ring lights. A little prep goes a long way in ensuring your photo booth is a hit!
Organizing Props and Managing Guest Flow
Store Props in Labeled Baskets
Keeping props organized can save you a ton of time during setup and cleanup. Use labeled baskets or repurposed containers to store smaller props, ensuring they don’t get lost or tangled in the chaos of an event. A clever trick is the butcher paper method: cover your table with butcher paper, trace the outline of each prop, and label the spots. This makes setup a breeze and helps you keep track of everything.
"The butcher paper method is great if you don’t have a permanent table… props can be packed into boxes, the table neatly folded, and the paper rolled up." – Kerry Hishon, Theatrefolk
To make the most of your space, place frequently used props at the front of the table, while heavier items can be stored underneath. For smaller accessories, try attaching Ziploc bags to a bulletin board – this keeps your table surface free for other items. A laminated checklist is another handy tool. Slide it into a clear plastic sleeve and use a dry-erase marker to check items off during setup and teardown. Finally, enforce a strict "props only" rule for the table, so guests don’t clutter it with drinks or personal belongings.
Once your props are sorted, it’s time to focus on creating a well-organized booth area for guests.
Create a Clear Photo Booth Area
Where you place your booth can make or break the flow of your event. Ideally, set it up 5–10 feet away from high-traffic areas like bars, restrooms, or dance floors to avoid congestion while keeping it accessible. Use clear directional signs to guide guests to the booth and keep the line moving smoothly. For extra efficiency, mark the floor with masking tape to show guests where to stand – this speeds up posing and ensures everyone stays in focus.
"Aim to place your photo booth about 5-10 feet away from one of the busiest areas… This will prevent congestion in high foot traffic areas without hindering photo booth engagement." – Simple Booth
To keep things running seamlessly, encourage the next person in line to act as the photographer for the current group in the booth. If you have a guest book station, place it right next to the booth exit, complete with glue and pens, so guests can add their photos without wandering back into the posing area. For dimly lit venues, consider adding a small desk lamp near the props table. This helps guests locate items without disrupting the event’s ambiance. These small adjustments can make a big difference in keeping everything on track and avoiding unnecessary delays.
Conclusion
Creating a DIY photo booth doesn’t have to take up a ton of your time. With thoughtful planning and the right tools, you can have a setup that’s both efficient and fun. Make sure to test your equipment, charge all your batteries, and clear enough memory card space to avoid any last-minute hiccups.
To make things even easier, consider automating parts of the process. Apps like Simple Booth HALO (starting at $9 per week) are designed to enhance the guest experience by handling much of the work for you. That way, you can enjoy your event without being stuck behind the camera all night.
"A photo booth app for your iPad is important so guests can see a live preview from the camera and know where to stand… so you won’t need an attendant to take every picture manually." – Simple Booth
When it comes to equipment, simplicity and reliability are key. A single ring light and dummy batteries can make setup faster and prevent issues during the event. For more formal or high-stakes occasions, professional rental kits (starting around $319/day) might be worth considering. These kits offer plug-and-play convenience and peace of mind, ensuring everything runs smoothly.
And don’t stop at just the photo booth! Party rentals can elevate your event even further. Companies like Bouncy Rentals provide everything from inflatable obstacle courses and water slides to cotton candy and popcorn machines. All rentals are sanitized, insured, and set up by professionals, leaving you free to focus on what’s most important: enjoying the celebration and creating unforgettable memories with your guests.
FAQs
What’s the cheapest DIY photo booth setup that still looks good?
You can set up a fun DIY photo booth for less than $20 using basic, inexpensive materials. Start with a backdrop – festive wrapping paper works great and typically costs about $6. Tape it securely to a wall to create the perfect background. Then, head to a dollar store for props like hats, beads, or themed accessories, which can cost as little as $1 each. This simple setup is a budget-friendly way to create a lively and eye-catching photo booth for your event.
How far should the camera be from the backdrop for group photos?
For group photos in a DIY photo booth setup, place the camera roughly 6 to 7 feet away from the backdrop. This spacing helps achieve good lighting and clear image quality, minimizing shadows or overly dark areas. Depending on your space and equipment, you can tweak the distance to get the best results.
How do I get prints or share photos instantly at the event?
For quick photo prints, a wired USB connection paired with a print server ensures fast and dependable results. If you prefer wireless printing, connect your device to a dedicated Wi-Fi network and use an AirPrint-compatible printer for seamless operation. When sharing photos digitally, send them through text messages, email, or apps featuring real-time galleries. If you’re offline, you can queue your digital shares to send automatically once Wi-Fi is available again.