Cleaning inflatable obstacle courses is essential for safety, hygiene, and extending their lifespan. Regular maintenance prevents mold on bounce houses, eliminates germs, and keeps your investment in top condition. Here’s a quick breakdown:
- Step 1: Remove Debris – Clear dirt and particles using a shop vacuum or leaf blower to avoid scratches during cleaning.
- Step 2: Spot Clean Stains – Use mild soap, water, and baking soda for tough stains like grass or ink.
- Step 3: Wash and Rinse – Scrub all surfaces gently with a soft brush, then rinse thoroughly with a garden hose.
- Step 4: Disinfect – Apply a vinyl-safe disinfectant to kill bacteria and viruses, focusing on high-contact areas.
- Step 5: Dry Thoroughly – Wipe excess water, air dry in sunlight, and ensure no moisture remains before storage.
Proper cleaning not only protects users’ health but also prevents costly repairs or replacements. Follow these steps to keep your inflatables safe, clean, and ready for every event.
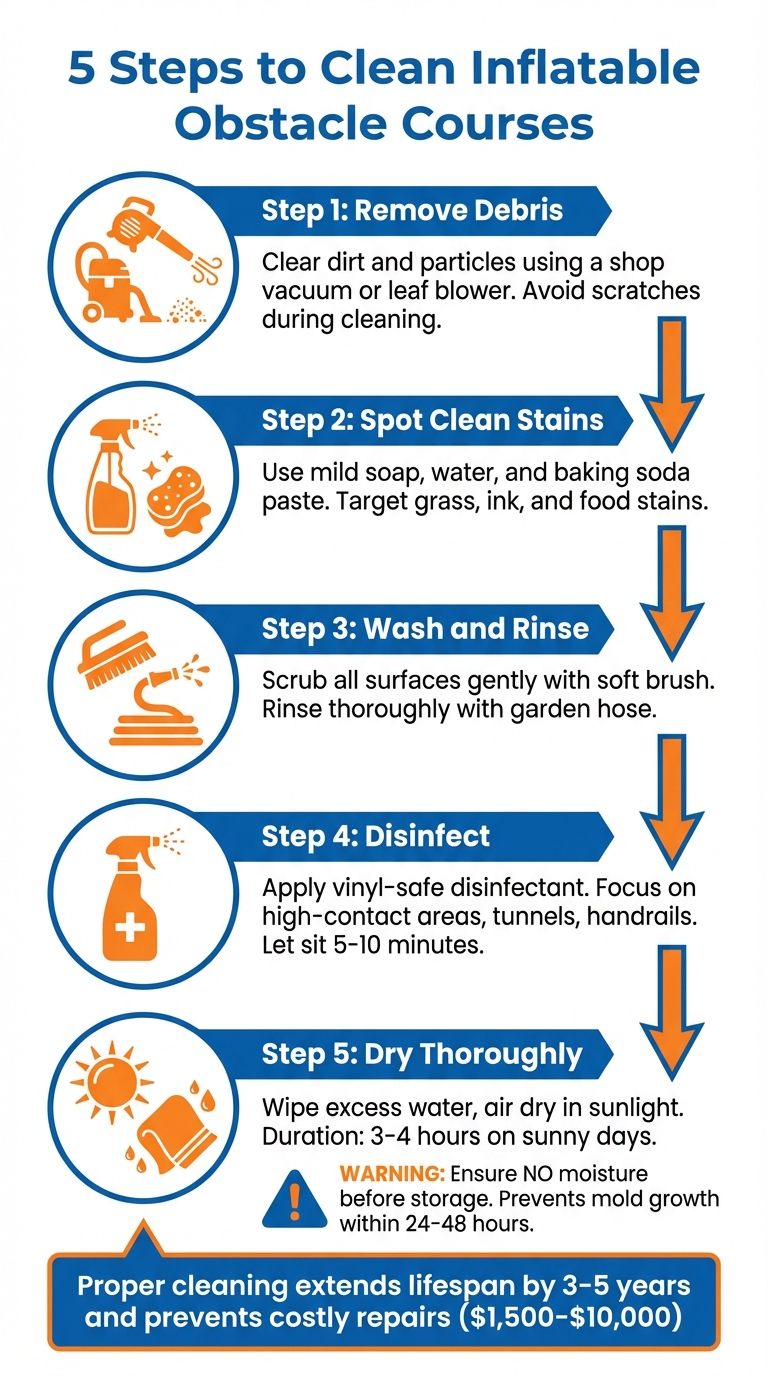
5-Step Process for Cleaning Inflatable Obstacle Courses
Cleaning Supplies You’ll Need
To keep your inflatable’s vinyl surface in great shape, you’ll need the right tools and solutions. Most of these items are budget-friendly and essential for effective maintenance.
Basic Tools
Start with a shop vacuum or leaf blower to clear away loose debris – this helps prevent scratches during cleaning. For scrubbing, stick with soft brushes or sponges to avoid damaging the vinyl. Stiff brushes are a no-go.
Microfiber towels are perfect for drying since they’re super absorbent and help reduce the risk of mold or mildew forming in seams or crevices. If you already see growth, follow a guide to clean mold from inflatables safely. A garden hose works well for low-pressure rinsing, while a bucket makes mixing cleaning solutions more convenient. Don’t forget to lay down a heavy-duty tarp to shield the underside of your inflatable from wear and tear while you clean.
Safe Cleaning Solutions
For general cleaning, mix a mild dish soap like Dawn with warm water – it’s gentle yet effective for vinyl surfaces. If you’re dealing with tougher stains, try a baking soda and water paste as a spot treatment.
Once the washing is done, disinfect using a sanitizing checklist and a vinyl-safe, child-safe spray. For greasy spots, a concentrated all-natural cleaner like The Wash Off Bounce House Cleaner (about $32.00 per gallon) paired with a magic eraser works wonders.
Be cautious with your cleaning agents – avoid anything ammonia-based or undiluted bleach, as these can harm the vinyl. If you must use bleach, dilute it at a 10:1 ratio (water to bleach) and rinse thoroughly afterward. To finish up, spray silicone on zippers and access panels to keep them functioning smoothly.
Step 1: Prepare and Remove Debris
Set Up Your Cleaning Area
Start by selecting a flat, dry spot to work on. Lay out your deflated obstacle course on a clean, sturdy tarp. This creates a buffer between the vinyl and the ground, protecting it from scratches or damage. Avoid using surfaces like asphalt, gravel, or dirty concrete, as they can harm the vinyl coating.
Make sure the unit is completely deflated before you begin. If it’s a large obstacle course, using a vacuum deflator attachment can help you remove trapped air more effectively. For more on managing these units, see our guide to inflatable obstacle course rentals. Pay special attention to areas that fold inward, as these spots often collect moisture and debris.
Next, remove all accessories. Take off stakes, sandbags, and blower tubes, and store them in clearly labeled bags. Leaving metal stakes inside can puncture the vinyl, while cleaning blower housings separately keeps dust and grass clippings from overheating the motor. If your unit includes detachable parts like slide covers or steps, remove them for separate cleaning. This not only prevents potential damage but also allows you to focus on cleaning the vinyl itself.
Once everything is laid out and accessories are removed, you can move on to clearing away loose dirt.
Clear Away Loose Dirt
Use a shop vacuum or a leaf blower to get rid of loose debris on the surface. Start with the large flat areas, then move on to seams, corners, and crevices. A vacuum with a hose attachment works best for reaching tight spots where dirt tends to hide.
This step is crucial because removing debris now prevents particles from scratching the vinyl during scrubbing. For larger areas, a leaf blower can quickly clear away grass clippings and loose dirt, saving you time and effort.
Step 2: Spot Clean Stains
Once the debris is out of the way, it’s time to tackle those pesky stains.
Mix Your Cleaning Solution
Start by inspecting the inflated unit to locate stains, then deflate it for easier cleaning. Pay special attention to entry points, exits, and high-traffic areas – these spots often bear the brunt of dirt and grime. Don’t forget to check slide channels, interior corners, and seams where food, grass, or liquids tend to accumulate. Mark these problem areas with painter’s tape so you can find them quickly later on.
To make your cleaning solution, mix mild dish soap (like Dawn) with warm water in a bucket. Add white vinegar using a 3:1 ratio – three parts water to one part vinegar. This combo is gentle on vinyl but tough on stains, and the vinegar naturally disinfects, taking care of bacteria and mold without relying on harsh chemicals.
For more stubborn stains, like grass, marker ink, or food coloring, whip up a paste using baking soda and a small amount of water. Keep in mind, the longer a stain sits, the harder it is to remove. So, addressing stains promptly is always a good idea. This is especially true for high-use items like inflatable games for team building.
Scrub Stained Areas
Use a soft-bristle brush or microfiber cloth to apply the soap and vinegar solution. Scrub in small, circular motions, starting at the edges of the stain and working inward to avoid spreading it further. Skip stiff brushes – they can scratch the vinyl and damage its waterproof coating.
If a stain refuses to budge, apply the baking soda paste directly to the spot. Let it sit for 2–3 minutes, then gently scrub. Rinse thoroughly with clean water from a garden hose to ensure no soap residue is left behind. Any leftover residue can attract dirt, leaving a sticky mess that makes future cleaning even harder.
Step 3: Wash and Rinse the Entire Surface
After spot cleaning, it’s time to give the entire unit a thorough wash.
Clean All Surfaces
Keep the inflatable partially inflated during cleaning, similar to the process used for cleaning bounce houses. This prevents water from pooling in hidden areas. Mix mild dish soap with warm water in a bucket, then grab a soft brush, sponge, or microfiber cloth. Start scrubbing the exterior walls, working your way to the interior. Pay extra attention to seams, corners, and high-touch spots like entryways and handrails – these areas are magnets for dirt and germs. Work section by section to ensure no spot is missed. Avoid stiff brushes or pressure washers, as they can damage the vinyl coating, fade colors, or weaken seams.
Rinse Completely
After scrubbing, rinse everything thoroughly. Use a standard garden hose with normal water pressure – pressure washers are a no-go; they can harm the vinyl and compromise its waterproofing. Start rinsing at the top and let the water carry the soap down and away from the inflatable. Keep rinsing until the water runs clear, without any bubbles or suds. Double-check seams to ensure no soap remains. As Reservety explains, "Soap residue left on vinyl attracts dirt, creates a sticky surface, and can degrade the material over time". A proper rinse not only prevents these problems but also helps maintain the inflatable’s durability.
Once rinsing is complete, move on to disinfecting all surfaces in Step 4.
Step 4: Disinfect All Surfaces
After washing and rinsing, disinfection is a crucial step to get rid of remaining pathogens and prevent mold from forming. While washing removes dirt and soap residue, disinfection tackles germs, bacteria, and viruses. Skipping this step could risk health issues and lead to mold growth in as little as 24–48 hours. Ignoring this process might result in costly repairs ranging from $200 to $500 per unit – or even full replacements that could cost anywhere from $1,500 to over $10,000 in severe situations.
Choose a Safe Disinfectant
Pick an EPA-approved disinfectant that’s safe for vinyl surfaces. Some effective choices include:
- Hydrogen peroxide: Mix one part of a 3% solution with two parts water.
- Isopropyl alcohol: Use a concentration of 70% or higher.
- Commercial vinyl-safe products: Look for disinfectants labeled for inflatable surfaces.
- White vinegar: Combine equal parts vinegar and water as a natural alternative.
Avoid using full-strength bleach or ammonia-based cleaners, as they can damage the vinyl and strip colors. If you decide to use bleach, make sure to dilute it with water at a maximum ratio of 10:1 and rinse thoroughly afterward.
Apply the Disinfectant and Let It Work
Spray or wipe the disinfectant onto all surfaces, paying extra attention to high-contact areas like tunnels, obstacles, and handrails. Use a sprayer to target hard-to-reach spots, such as seams, corners, and netting, where germs tend to hide. Let the disinfectant sit for the amount of time recommended by the manufacturer – typically 5 to 10 minutes. For example, hydrogen peroxide needs 10 minutes, while isopropyl alcohol evaporates quickly and doesn’t require rinsing.
After the disinfectant has done its job, rinse the surfaces with clean water unless you’re using a product like isopropyl alcohol that evaporates on its own. Once rinsing is complete, make sure to dry the unit thoroughly before moving on, similar to the process for cleaning bounce houses after use.
Step 5: Dry Completely
Drying your inflatable thoroughly is crucial to avoid mold growth. Even slight dampness during storage can create the perfect environment for mold to develop within just 24 to 48 hours. Once mold seeps into seams, it can leave behind permanent odors. On the other hand, proper drying and storage can add an extra 3 to 5 years to your equipment’s lifespan.
Wipe Away Excess Water
Start by removing any standing water with microfiber towels. Focus on areas like slide channels, interior corners, and seams, as these spots tend to hold moisture. Tilt the inflatable to help drain trapped water, and then wipe down all surfaces thoroughly. For stubborn moisture in seams and crevices, a leaf blower can be a handy tool to push water out of the stitching.
Air Dry in Sunlight
Run the main blower for 30 to 60 minutes right after cleaning to circulate air through the interior, reaching areas that are difficult to dry by hand. Afterward, let the inflatable air dry in direct sunlight, or if the weather is humid, use box fans and dehumidifiers. On a sunny day, drying can take around 3 to 4 hours. Sunlight not only speeds up drying but also helps minimize microbial growth. Avoid high-heat drying methods, as they can damage PVC or vinyl materials. Double-check that every part of the inflatable is completely dry before moving to storage.
Check Before Storing
Before deflating, run your hand along the seams to check for any damp spots. If you find moisture, continue drying and inspect hard-to-reach areas. Dust the vinyl with talcum powder before folding to absorb any lingering moisture and prevent the material from sticking together. To control humidity inside the storage bag, place 2 to 4 silica gel packs inside. Always perform the final drying and folding on a clean tarp rather than directly on concrete. Following these steps will help preserve your inflatable and keep it in great condition for years to come.
Maintenance Tips for Long-Term Use
Taking care of your equipment goes beyond just cleaning – it’s about ensuring the durability and safety of your investment over time. For inflatables, proper maintenance can make a huge difference. Considering that commercial units can cost upwards of $10,000, following the right maintenance practices can add an extra 3 to 5 years to their lifespan. Neglecting this can lead to damage and costly replacements, which range from $1,500 to $5,000 per unit.
How Often to Clean
"Clean after every single use, no exceptions" – Reservety
It might be tempting to skip cleaning if your inflatable looks clean, but that’s a mistake. Residues like body oils, grass particles, and food can break down the vinyl over time. To protect your equipment, clean it thoroughly after every rental. Additionally, before storing your inflatable for the season, give it a deep clean to remove any hidden contaminants that could harm the material during long periods of inactivity.
Regular cleaning is just the first step; proper storage is just as essential.
Proper Storage Methods
Where and how you store your inflatable matters. Always keep it in a climate-controlled space, ideally between 50°F and 80°F, to prevent the vinyl from becoming brittle or overly soft. When storing, roll the unit instead of folding it – rolling helps avoid creases that could weaken the material over time.
Avoid placing the inflatable directly on concrete floors, as these can trap moisture and cause condensation. Instead, use wooden pallets or heavy-duty tarps to create a moisture barrier. To keep rodents from nesting in the vinyl, add cedar blocks or sachets of peppermint oil around the storage bags.
Cleaning Solution Comparison
Choosing the right cleaning solution is another key part of maintenance. Here’s a quick breakdown of the options:
| Cleaning Solution Type | Advantages | Disadvantages | Suitability |
|---|---|---|---|
| Mild Dish Soap (e.g., Dawn) | Safe for vinyl; removes oils and dirt effectively. | Requires thorough rinsing to avoid attracting more dirt. | Best for general, routine cleaning. |
| Vinyl-Safe Disinfectant | Kills germs and bacteria; essential for health safety. | Must ensure it is non-bleach/non-ammonia based. | Best for sanitizing after high-traffic events. |
| Baking Soda Paste | Effective for stubborn stains like grass or markers. | Requires localized scrubbing and rinsing. | Best for spot-treating specific stains. |
| Bleach/Ammonia (Harsh Chemicals) | Strong cleaning power. | Avoid: Strips colors, damages vinyl coatings, and weakens seams. | Not Recommended for inflatable materials. |
Beyond cleaning the inflatable itself, don’t forget to check the blower. Clean the intake screens and housing regularly, as debris buildup can lead to overheating and motor failure, or you may eventually need to replace your inflatable blower. After cleaning, apply silicone spray to the blower tube and access zippers to keep them lubricated and prevent fabric tears or seizing.
Conclusion
Keeping your inflatable obstacle courses and games clean doesn’t have to be complicated. By following five straightforward steps – removing debris, spot-treating stains, washing and rinsing, disinfecting, and thoroughly drying – you can maintain its condition effectively. Each step serves a purpose: clearing debris helps avoid scratches, disinfecting tackles harmful pathogens, and proper drying prevents mold growth.
"Keeping your inflatable clean will not only increase its life by preventing mold, mildew, and the general stink factor, but it will do wonders for its appearance as well." – Landmark Creations
Regular cleaning isn’t just about how it looks; it’s about ensuring safety, extending its lifespan, and maintaining a professional standard. Skipping these steps could lead to expensive replacements, which can range from $1,500 to $5,000 per unit. Plus, cleaning gives you a chance to check for early signs of wear, such as issues with seams, zippers, or mesh panels. By sticking to this routine, you’ll keep your inflatable in top shape – clean, safe, and ready for action.
FAQs
Can I use a pressure washer on an inflatable obstacle course?
Yes, a pressure washer can be used to clean an inflatable obstacle course, but it’s important to stick to a gentle pressure setting to prevent any damage. For sanitizing, opt for an anti-bacterial cleaning solution, and make sure to follow the manufacturer’s cleaning guidelines closely. Always test a small, inconspicuous area first to confirm the material can handle the pressure, as excessive force might lead to tears or warping.
What disinfectant is safe for vinyl inflatables?
If you’re looking for a safe option to clean your vinyl inflatables, Captain Phab Inflatable & Vinyl Cleaner is an excellent choice. This water-based, eco-certified cleaner is completely solvent-free, making it safe for all inflatable surfaces, including vinyl materials. For the best results, be sure to carefully follow the product’s instructions.
How do I know it’s dry enough to store?
To keep your inflatable obstacle course in great shape, make sure it’s completely dry before storing it. Pay extra attention to seams and corners, as these areas can trap moisture and lead to mold or mildew. Once dry, store it in a clean, dry space where the temperature stays between 50°F and 90°F. This will help prevent material damage and ensure it’s ready to use the next time you need it.