Inflatables are a big investment, with bounce houses costing $1,500–$5,000 and obstacle courses exceeding $10,000. Proper maintenance can extend their lifespan by 3–5 years, saving you thousands in repair or replacement costs. Most damage happens in storage, not during use. Mold can develop in just 24–48 hours if stored damp, leading to remediation costs of $200–$500 per unit. A seasonal maintenance plan prevents these issues, keeps equipment safe, and ensures customer satisfaction.
Here’s what you need to know:
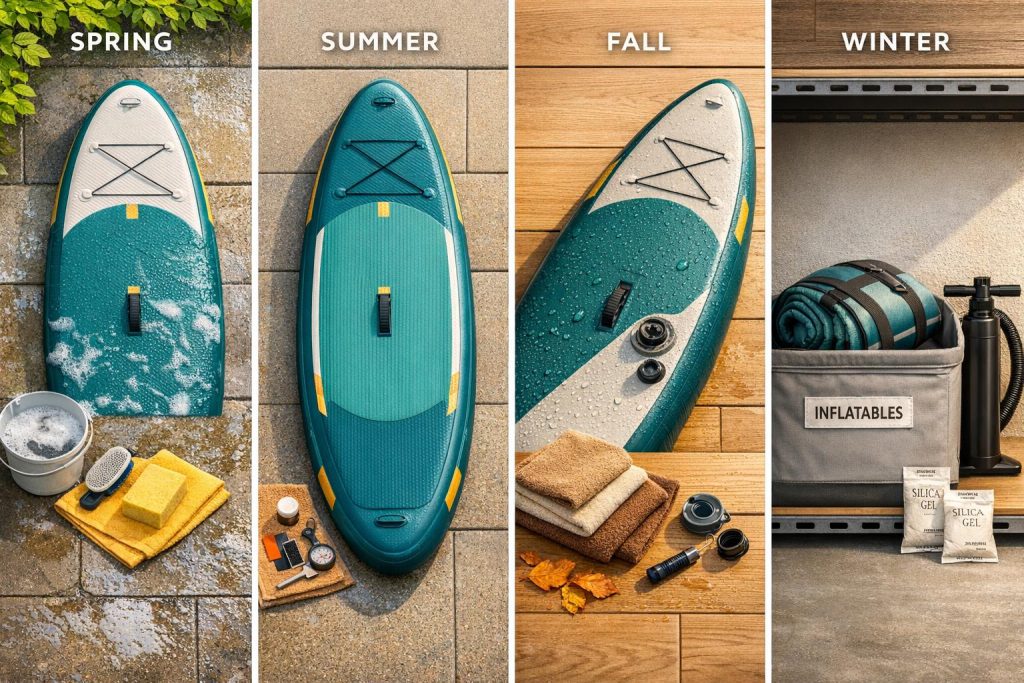
- Spring: Deep clean after winter storage, inspect seams, and patch or replace leaking units.
- Summer: Clean daily, apply UV protection, and check for wear after heavy use.
- Fall: Prepare for storage with thorough cleaning, drying, and pest prevention.
- Winter: Store in a climate-controlled space, monitor for moisture, and rotate units.

Year-Round Inflatable Maintenance Schedule by Season
Spring Maintenance Checklist
Begin by clearing away any loose debris. Then, scrub all surfaces using warm, soapy water (a mild dish soap like Dawn works well) and a soft-bristle brush. Rinse thoroughly to ensure no soap residue is left behind. Once rinsed, apply a vinyl-safe disinfectant spray and let it sit for the recommended amount of time before drying. This initial cleaning lays the groundwork for a detailed inspection and repair process.
Deep Cleaning After Winter Storage
After removing debris, shift your focus to deep cleaning. Proper drying is key here. Inflate the unit and run the blower for 30–60 minutes to circulate air through the interior. Use clean towels to soak up any standing water in slide channels, corners, and seams. Pay special attention to folds and seams, as these spots are particularly vulnerable to mold growth.
Avoid using bleach, ammonia-based cleaners, or pressure washers – these can strip colors, weaken seams, and damage the vinyl coating. Instead, apply silicone spray to blower tubes and access panel zippers. This helps prevent them from sticking or tearing the fabric.
Inspecting Seams, Valves, and Blowers
With the unit clean and dry, inflate it fully and walk through the interior. Look for white stress lines along fold points, which may signal weakened vinyl that could crack or leak soon. Also, check the stitching for fraying, loose threads, or gaps, especially in high-impact areas like entry points and slide channels. Use painter’s tape to mark any weak seams for easy identification during repairs.
Pay close attention to these components:
- Zippers: Ensure they open and close smoothly.
- Air intakes and outlets: Confirm they are free from obstructions.
- Blower intake screens: Clean and wipe down the housings.
- Power cords: Look for cracks in the insulation or damage caused by tight knotting during storage.
Run the blowers for several minutes in a dry environment to check for unusual noises, vibrations, or overheating. Lastly, hand-tighten all D-rings, buckles, and metal hardware, as these can loosen over time due to storage or vibrations. A thorough inspection here helps prevent structural issues and extends the life of your equipment.
Testing for Leaks and Making Repairs
Inflate the unit and listen carefully for any hissing sounds. To pinpoint leaks, mix dish soap with water and apply it to suspected areas – escaping air will create visible bubbles at the leak site. Use painter’s tape to mark these spots for easy reference.
When repairing a leak, start by cleaning the area with mild soap and water. Sand the spot lightly to roughen the surface, which helps the adhesive bond better. Cut a patch slightly larger than the leak, rounding the corners to prevent peeling over time. Apply vinyl cement to both the patch and the inflatable, let it become tacky, and press the patch firmly from the center outward to remove any air bubbles. Secure the patch with masking tape and allow the adhesive to cure for 24 hours before inflating the unit again. Addressing leaks promptly minimizes downtime and protects your equipment.
| Leak Identification Method | Best For | Procedure |
|---|---|---|
| Visual Inspection | Large tears and seam rips | Lay the unit flat and examine high-wear areas like corners and edges. |
| Soapy Water Test | Hidden or tiny pinholes | Spray soapy water on the surface and watch for bubbles. |
| Pressure/Listening | Slow leaks in quiet areas | Inflate the unit and listen closely for faint hissing while applying gentle pressure. |
Summer High-Use Maintenance Routine
Summer brings intense sunlight, high temperatures, and heavy foot traffic – factors that can accelerate wear and tear on inflatables. To ensure safety and extend the life of your equipment, a proactive maintenance routine is key, especially during high-activity summer events.
Daily Cleaning and UV Protection
Cleaning after every use is a must. Even if a unit looks clean, dirt, grass clippings, and oils can linger and gradually break down the vinyl material. Use a mild dish soap like Dawn mixed with warm water, and gently scrub the surfaces with a soft-bristle brush or microfiber cloth. Rinse thoroughly with a garden hose until the water runs clear – leftover soap can attract dirt and harm the material. Once cleaned, apply a vinyl-safe disinfectant spray, allowing it to sit for the recommended time before drying.
After washing, keep the inflatable inflated for 30–60 minutes to air dry completely. Blot any remaining water immediately to prevent mold, which can start forming within 24–48 hours if stored damp. Before deflating, run your hand along seams to check for moisture. If any is detected, keep the blower running until it’s fully dry.
UV rays can damage vinyl, causing cracking, brittleness, and fading. To counter this, apply a UV protectant spray like 303 Aerospace Protectant to create a protective layer. Since sun intensity peaks between 10 AM and 4 PM, try to avoid scheduling events during these hours. Additionally, extreme heat above 100°F (38°C) can soften vinyl and weaken adhesives in seams and patches, so monitor temperatures closely.
Frequent Wear Inspections During Peak Season
After cleaning, inspect the inflatable thoroughly for signs of wear caused by heavy use. Every time you set up or take down the unit, walk around it while fully inflated to check for slow leaks or loose stitching. Pay close attention to anchor points, entrances, slide channels, and high-traffic sections where stress is highest. Also, inspect D-ring attachments, anchor straps for fraying, and blower intake screens for blockages.
"Small problems caught early are $10 patches; ignored problems become $500 repairs." – Reservety
Clean blower housings and intake screens daily to prevent overheating and motor failure caused by dust and grass clippings. Lubricate blower tube and access panel zippers with silicone spray to keep them from seizing due to dirt buildup. Make sure to keep a basic repair kit – complete with patches, adhesive, and cleaning wipes – in each inflatable’s storage bag for quick on-site fixes.
Shaded Setup and Hydration Stations
Proper setup can significantly reduce heat-related damage during summer events. Place inflatables in shaded areas, like under trees or next to buildings, to minimize direct sunlight. Prolonged exposure to the sun can cause the air inside the tubes to expand, potentially leading to overinflation and weakened seams. Use a pressure gauge, such as the K-Pump Kwik Check Gauge, to monitor internal pressure. In direct sunlight, pressure can spike from the recommended 2.5 psi to around 4.0 psi.
If the surface gets too hot, lightly spray it with cool water to lower the temperature. Always lay a tarp beneath the inflatable during setup and deflation to protect the underside from wear and debris. When the inflatable isn’t in use, cover it with a tarp to shield it from harmful UV rays. These straightforward steps help reduce wear, keeping your equipment safe and functional during the busiest months of the year.
Fall Transition and Pre-Storage Maintenance
As the busy season wraps up, getting your inflatables ready for winter storage takes more than just a quick clean-up. These steps help transition your equipment from active use to storage, ensuring it stays in great shape for years to come.
Post-Season Cleaning and Drying
Start by cleaning your inflatable with a mix of mild dish soap and warm water. For a deeper dive, see our ultimate guide to cleaning bounce houses. Use a soft-bristled brush to scrub all surfaces, paying extra attention to seams and corners. Make sure to rinse thoroughly to remove any soap residue. Avoid using bleach or harsh chemicals, as they can damage the material.
If you notice any mildew, tackle it with a solution of white vinegar and water. The key step here is drying – completely drying. Inflate the unit fully and let it air out for 30–60 minutes to ensure all moisture inside is gone. Use towels to blot any standing water, especially in hard-to-reach spots like slide channels and corners. Even a little dampness can lead to mold growth within 24–48 hours.
"Storing a damp inflatable can lead to mildew, foul smells, or material breakdown – all of which can shorten the life of your investment." – Inflateo
When folding the inflatable for storage, roll it loosely to minimize stress on the material. Detachable components like slides or basketball hoops should be removed and stored separately. Once the unit is clean and dry, it’s time to check for damage and pests.
Damage Inspection and Pest Prevention
While the inflatable is still inflated, carefully inspect high-stress areas – anchor points, entrances, and high-traffic zones – for any loose stitching, small tears, or punctures. Addressing these minor issues now with a patch kit can save you from bigger headaches down the road.
Also, be on the lookout for signs of pests, like chew marks or droppings. To discourage pests, store the inflatable in a sealed but breathable container, such as a heavy-duty vinyl storage bag or a plastic bin with air holes. Keep the unit off the ground by using pallets or a sturdy shelf. Natural deterrents like cedar blocks or peppermint oil sachets placed around the storage area can help keep critters away, but avoid placing traps or poison inside the inflatable itself. Once you’ve ensured the unit is pest-free and intact, focus on controlling moisture.
Moisture Control Methods
Store your inflatables in an environment between 50–80°F with relative humidity below 50%. Avoid placing them directly on concrete floors, which can draw in moisture. Instead, use wooden or plastic pallets or lay down a heavy-duty tarp as a barrier. To keep the air dry, place 2–4 reusable silica gel packs inside breathable storage bags, like canvas or mesh bags, or loosely closed vinyl bags.
It’s a good idea to check on your stored inflatables every 4–6 weeks during the off-season. Open the storage bags to look for any signs of dampness, musty odors, or pest activity. Rotate their position every 2–3 months to prevent permanent compression marks. Taking these precautions can add 3–5 years to the lifespan of your inflatables. On the flip side, neglecting proper storage could lead to mold removal costs of $200–$500 per unit – or even force you to replace them entirely, which can run anywhere from $1,500 to $5,000 or more.
Winter Storage Best Practices
Taking care of your inflatables during the off-season can make a big difference in their longevity. With the right approach, you can keep them in great condition for over a decade. On the other hand, poor storage habits might lead to material failure in just a few years.
Temperature-Controlled Storage Spaces
Cold weather is tough on inflatables. When exposed to freezing temperatures, the materials can become brittle and prone to damage. To avoid this, store them in a climate-controlled space, ideally between 50°F and 80°F. Temperatures below 50°F can weaken the material, while stuffy attics or unventilated areas can cause seams to separate over time.
For those in humid areas like the Gulf Coast or the Southeast, a dehumidifier is a smart addition. Keeping the relative humidity below 50% helps prevent mold, mildew, and material degradation. Another bonus of indoor, climate-controlled storage is protection from UV rays, which can fade colors and weaken the vinyl over time.
Blower Maintenance and Storage
Don’t overlook the blower! Before storing it, wipe down the motor housing with a damp cloth, check the power cord for any signs of wear, and clear any debris from the air intake screens.
Store blowers in the same climate-controlled space as the inflatables. To protect them from dust, place them on a shelf or pallet and cover them with a breathable cloth. This setup allows air circulation while keeping dust at bay. When coiling power cords, keep them loose to avoid kinks or damage to the wires.
Monthly Rotation and Inspections
Even in storage, inflatables need some attention. Every 4–6 weeks, open the storage bags to check for dampness, musty smells, or signs of pests. Rotating the units every 2–3 months can help prevent permanent compression marks. If possible, store inflatables at 30–40% pressure to maintain material flexibility and avoid deep creases.
Maintenance Tools and Supplies
Seasonal maintenance becomes a breeze when you’re equipped with the right tools and supplies. These essentials make cleaning, repairs, and storage more efficient while protecting your investment in inflatables. Considering the cost of inflatables, having the proper maintenance gear is a must. The good news? Most of these supplies are affordable and can last for several seasons. Let’s break down the key items you’ll need for each stage of your maintenance routine.
Start with the basics: mild dish soap (like Dawn), soft-bristle brushes, and microfiber cloths for everyday cleaning. For repairs, stock up on a commercial vinyl patch kit, flexible adhesive, repair tape (such as Tear-Aid or Tenacious Tape), and isopropyl alcohol to prep surfaces. Silicone spray is great for lubricating zippers and preventing fabric tears, while desiccant packs help control moisture during storage.
Here’s a handy table summarizing the tools, their uses, how often to use them, and typical costs:
| Tool / Supply | Purpose | Frequency of Use | Typical Cost Range |
|---|---|---|---|
| Mild Soap & Soft Brush | Cleaning vinyl surfaces | After every use | $10 – $30 |
| Vinyl-Safe Disinfectant | Sanitizing high-touch areas | After every use | $15 – $40 |
| Vinyl Patch Kit & Adhesive | Fixing punctures and seam leaks | As needed | $15 – $50 |
| Repair Tape (Tear-Aid/Tenacious) | Quick or emergency repairs | As needed | $5 – $25 |
| Silicone Spray | Lubricating zippers and panels | Monthly or pre-storage | $10 – $20 |
| Desiccant (Silica) Packs | Absorbing moisture during storage | Every 2–3 months | $10 – $30 |
| Heavy-Duty Tarp | Protecting the ground during folding | Every setup/teardown | $20 – $100 |
| Industrial Blowers/Fans | Drying surfaces thoroughly | After every wet use | $150 – $500 |
For effective repairs, always clean the area with isopropyl alcohol before applying patches to ensure a strong bond. And remember, avoid using bleach, ammonia, or pressure washers – these can strip the vinyl coating and damage seams.
When preparing for long-term storage, pest prevention is key. Place deterrents like cedar blocks or peppermint oil sachets near your storage area. To locate pinhole leaks, use a spray bottle filled with soapy water and look for bubbles forming at the leak site. For larger units, a vacuum deflator can help remove trapped air and make storage more manageable.
Safety Standards and Documentation
A solid maintenance plan isn’t just about keeping your inflatables in good shape – it’s also about thorough safety documentation. This ensures your equipment meets high standards year after year. Keeping detailed records not only protects your investment but can also extend the lifespan of your inflatables by 3–5 years. These records track maintenance, usage, and repairs, and they’re invaluable for insurance claims or resolving disputes.
Inspection Record-Keeping
Start by setting up a digital inventory for each inflatable. Track key details like purchase dates, maintenance history, rental counts, and condition reports. After every rental, inspect each unit for tears, punctures, loose stitching, or worn anchor points. If you spot damage, photograph it immediately – both before and after repairs. This visual proof helps you monitor recurring issues and strengthens your insurance claims when needed.
To keep your team consistent, use laminated checklists for setup, teardown, and cleaning procedures. During the off-season, inspect your inflatables every 4–6 weeks for signs of moisture, mold, or pests. Rotate their positions every 2–3 months to avoid compression damage. Don’t forget about the blowers – check and replace air filters monthly during peak season, and clean intake screens to prevent motor overheating.
Temperature and Usage Guidelines
Temperature plays a big role in the safety and durability of inflatables. Vinyl becomes brittle in cold weather, so avoid using inflatables below 32°F. The sweet spot for both operation and storage is between 50°F and 80°F, where the material stays flexible and durable. On the flip side, temperatures above 100°F can soften the vinyl and weaken adhesives. If you’re operating in hot conditions, keep a close eye on seam integrity and provide shade whenever possible. Keep a log of storage temperatures to ensure your inflatables stay within safe ranges during the off-season.
| Temperature Range | Effect on Inflatable Material | Safety/Maintenance Action |
|---|---|---|
| Below 32°F (0°C) | Vinyl becomes brittle | Avoid unfolding or use; risk of cracking |
| 50°F – 80°F (10°C – 27°C) | Ideal operating/storage range | Standard maintenance and use |
| Above 100°F (38°C) | Vinyl softens; adhesives weaken | Monitor seam integrity; provide shade if possible |
These guidelines are also helpful when evaluating your equipment at the end of the season.
Next Season Preparation
Use the off-season to review your maintenance logs and identify equipment nearing the end of its lifespan. Look for inflatables with high rental counts or frequent repairs so you can plan ahead for replacements. This proactive approach helps you avoid costly emergency purchases during peak season. Pay special attention to patterns of recurring damage – if certain areas consistently wear out, those units may need professional reinforcement or even retirement.
For example, if you run a business with 20 inflatables and lose just two units each year due to preventable damage, you could face replacement costs between $3,000 and $10,000 annually. Keeping detailed records helps you make smarter decisions about repairs, reinforcements, or replacements before the busy season kicks off.
Conclusion
Creating a seasonal maintenance schedule for your inflatables isn’t just about keeping your equipment in good shape – it’s about safeguarding a major investment and ensuring every rental is safe and dependable. With bounce houses costing between $1,500 and $5,000, and obstacle courses often exceeding $10,000, proper upkeep can extend their lifespan by 3–5 years, keeping your business profitable for the long haul.
It’s simple: small repairs now can save you from major expenses later. For example, a business with 20 units that doesn’t prioritize proper storage could face $3,000–$10,000 in avoidable replacement costs each year. But it’s not just about the money – well-maintained inflatables also build trust with your customers. People expect clean, odor-free, and reliable equipment that won’t deflate mid-party.
Consistency is what makes all the difference. Regular tasks like deep cleaning after winter, daily checks during summer, thorough drying before proper storage, and monthly inspections in winter help prevent issues like mold, vinyl damage, and seam tears. Remember, mold can start growing in as little as 24–48 hours if a unit is put away even slightly damp. Staying on top of these routines ensures your equipment meets the highest standards.
At Bouncy Rentals, we stick to these maintenance practices year-round. That’s why every bounce house, water slide, and obstacle course we deliver is thoroughly cleaned, fully functional, and ready to provide hours of fun. Our dedication to quality care guarantees you’ll always get professional-grade inflatables you can count on.
FAQs
How do I dry an inflatable fast enough to prevent mold?
To keep mold at bay, make sure your inflatable is completely dry before storing it. You can use fans to speed up the drying process and inspect for any lingering condensation. Adding desiccant packs during storage is another smart move – they help soak up any remaining moisture. Taking these steps to dry and control moisture is key to preventing mold growth.
When should I patch a leak myself vs. call a professional?
If you’re dealing with a small tear or hole in your inflatable, you can handle the repair yourself using a repair kit, vinyl adhesive, or patch. Just make sure you follow the proper cleaning and preparation steps to ensure the fix holds. However, for larger leaks, structural damage, or spots that are tough to access, it’s smarter to bring in a professional. This ensures your inflatable stays safe and durable, particularly before storing it or after it’s been heavily used.
What’s the best way to store inflatables to avoid moisture and pests?
To keep inflatables in good condition and free from moisture or pests, start by cleaning them thoroughly with mild soap. Rinse them well and ensure they are completely dry before storing. Choose a storage spot that’s cool and dry, ideally between 50–80°F. Use breathable covers to prevent condensation buildup.
Adding pest deterrents in the storage area is a smart step, and it’s important to check periodically for any signs of pests or moisture. To further protect your inflatables, rotate their position every few months – this simple step can help extend their lifespan significantly.