A well-placed backdrop can elevate your inflatable event by creating a photo-friendly space, streamlining guest flow, and adding visual appeal. Whether you’re working with bounce houses, water slides, or themed inflatables, the right setup ensures safety, stability, and style. Here’s a quick guide:
- Materials: Use sturdy frames like pipe-and-drape systems ($159.95–$379.95) with durable fabrics (400–600 denier polyester for outdoors). Anchor with stakes, sandbags, or water weights.
- Placement: Maintain a 2–4 ft safety perimeter around inflatables. Choose flat, hazard-free surfaces and avoid power lines or blower units.
- Setup Tips: Assemble frames securely, stretch fabric evenly, and accessorize with props or lighting. Ensure stability with weighted bases or stakes, especially outdoors.
- Customization: Add balloon garlands, LED lighting ($1,000–$3,000), or themed signage for a personalized touch. Use modular banners for themed events.
- Maintenance: Inspect anchor points every 2–4 hours. Keep a repair kit handy and monitor for wind speeds over 15–20 mph.
A thoughtful setup not only enhances event aesthetics but also ensures safety and smooth guest experiences.
Materials Needed for Inflatable Event Backdrops
Basic Backdrop Materials
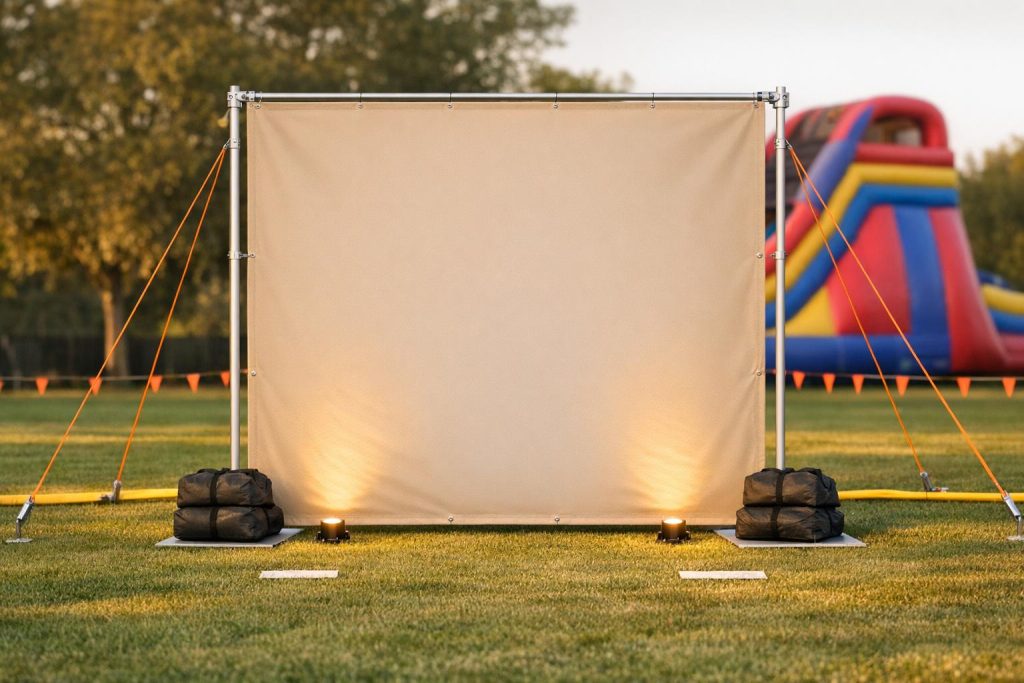
A solid frame is the backbone of any inflatable event backdrop. For tension fabric displays, lightweight aluminum collapsible frames are a popular choice – they’re easy to transport and set up. When working on larger setups, pipe and drape systems with telescopic pipes, brackets, and L-shaped supports provide a sturdy solution. Depending on the size, these frames typically range in price from $159.95 to $379.95.
For the backdrop surface, 400–600 denier polyester is the go-to material for outdoor events. This fabric’s thickness and strength make it resistant to wear and tear, with higher denier numbers offering greater durability against wind. Adding PVC or urethane coatings makes the material UV-resistant and waterproof, which helps prevent fading and water damage. If you’re aiming for a polished, wrinkle-free appearance (perfect for photos), tension fabric is an excellent option. For formal occasions, materials like satin, chiffon, or organza can add a touch of elegance.
Outdoor setups also require reliable anchoring. On grass or dirt, heavy-duty ground stakes are effective, while weighted sandbags or water bags work better for concrete, asphalt, or indoor spaces. When properly secured with tether ropes and D-rings, professional-grade backdrops can handle wind speeds of 20–30 mph. If inflatable elements like arches or pillars are part of your design, you’ll need electric air blowers and a dependable power source to keep them inflated during the event.
Once you’ve got the basics covered, you can elevate your setup with custom touches.
Optional Add-Ons for Customization
Take your backdrop to the next level with these optional enhancements.
LED lighting is a game-changer for evening events. Internal or external LED systems not only improve visibility but also create a dramatic effect that enhances photos. These systems can add anywhere from $1,000 to $3,000 to your budget. Many inflatable backdrops vs. traditional photo booths even include 16-color LED systems that can be adjusted to match your event’s theme.
Decorative elements and props can further personalize your backdrop. Items like balloons, streamers, paper flowers, and greenery are budget-friendly ways to add depth and visual interest. For corporate or branded events, consider GOBO logo projectors or custom neon signs to create a professional and eye-catching display. As MVP Visuals highlights:
Inflatables offer size and movement that traditional signs don’t. They’re more dynamic and easier to see. They create an experience, making them memorable for anyone who passes by.
Choosing the Right Placement for Backdrops
Positioning Around Inflatable Attractions
When setting up backdrops near inflatable attractions, safety and accessibility should be your top priorities. Always maintain a 2–4 foot clear perimeter around each inflatable. This buffer ensures smooth guest flow, gives supervisors a clear view of activities, and keeps backdrops from obstructing entry or exit points.
Choose a flat, level surface free from hazards to keep your backdrop stable and equipment secure. If possible, take advantage of natural windbreaks like fences, hedgerows, or walls. These can help reduce wind interference and add extra stability to your setup.
Avoid placing backdrops near power lines, overhead obstacles, or blower units. Keep extension cords out of walking paths, or use cable protectors if they must cross high-traffic areas to prevent trips and falls. Plan your event layout and game stations carefully, designating specific zones for entry, inflatables, a photo area with the backdrop, and exits. This thoughtful organization helps create a seamless experience for guests.
The right placement not only ensures safety but also boosts guest interaction and elevates the overall event design. But remember, the backdrop’s location should also maximize its visibility and photo opportunities.
Photo and Guest Accessibility Considerations
To make the most of your backdrop, place it where guests naturally gather for photos – near entrances, by dessert tables, or at the end of a driveway where people first arrive. Keep it separate from inflatables to avoid overcrowding and distractions.
Enhance the backdrop’s appeal with balloon garlands or props along the edges. These additions can frame guests in photos and prevent the setup from looking too flat. For indoor events, double-check that the ceiling height and room dimensions can comfortably accommodate the backdrop.
For evening events, lighting is essential. Use perimeter lights and reflective markers to ensure the backdrop and its anchoring points are visible and safe for guests. These small details can make a big difference in both safety and the overall guest experience.
Step-by-Step Guide to Setting Up Backdrops
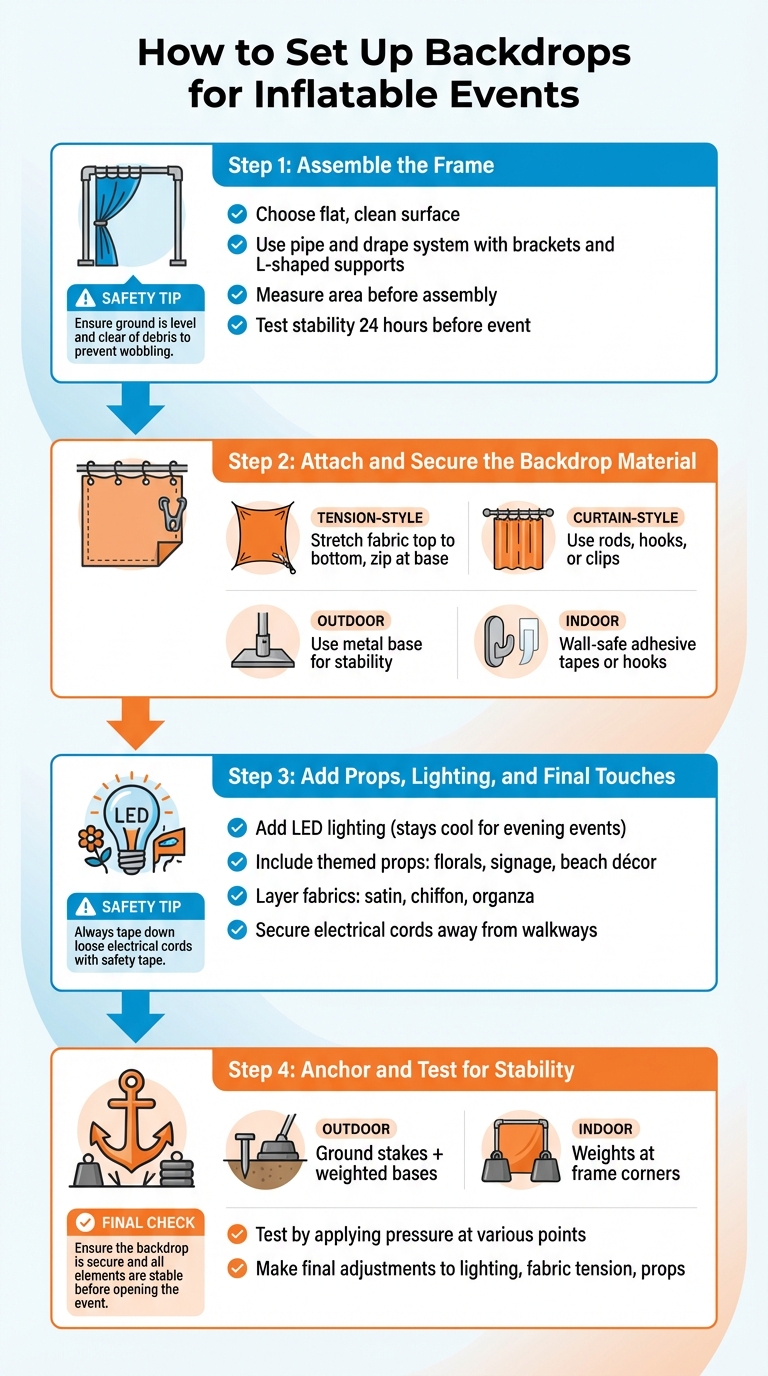
4-Step Guide to Setting Up Backdrops for Inflatable Events
Step 1: Assemble the Frame
Start by choosing a flat, clean surface for your setup. A pipe and drape system is a reliable option for creating a portable and adjustable framework to support your backdrop.
Before assembling, measure the area where the backdrop will go – whether it’s behind a cake table or near an event entrance. Use sturdy hardware like brackets, L-shaped supports, and adjustable poles to ensure the frame can handle the weight of your material. For lightweight or DIY setups, curtain rods with hooks or wooden pallets can work, but these are better suited for indoor spaces or places with minimal wind. Once the frame is built, test its stability at least 24 hours before the event. This gives you time to fix any weak spots and confirm that it can support your chosen material.
Once your frame is secure, you’re ready to attach the backdrop material.
Step 2: Attach and Secure the Backdrop Material
If you’re using a tension-style setup, stretch the fabric over the frame, starting at the top and working your way down. Zip it closed at the base and secure it to the metal support. For curtain-style backdrops, use rods, hooks, or clips, adjusting the tension to avoid sagging. Outdoor setups often call for a metal base for added stability, while lightweight materials can be attached with wall-safe adhesive tapes or hooks in low-wind conditions.
"Pull the fabric over the frame and wrap up the frames from the top to bottom and zip up, then pull them on the metal base." – LookOurWay
Once the backdrop is securely in place, you can focus on enhancing its appearance with lighting and props.
Step 3: Add Props, Lighting, and Final Touches
Bring your backdrop to life with LED lighting and props that match the event’s theme. Use string lights or LED fixtures to create ambiance, and include themed elements such as floral arrangements, beach décor like shells and palm trees, or custom signage featuring the guest of honor’s name. Since LED lights stay cool, they’re perfect for evening events.
For added depth, layer fabrics like satin, chiffon, or organza. Be sure to secure electrical cords away from walkways using weatherproof extension cords. When the event is over, remove all lighting and props before folding or storing the backdrop to avoid damage.
Step 4: Anchor and Test for Stability
To keep your backdrop steady, use sandbags, stakes, or weighted bases. Outdoor setups benefit from a combination of ground stakes and weighted bases to withstand wind, while indoor setups may only need weights at the frame’s corners. Once anchored, test the structure by applying pressure at various points and walking around it to ensure everything is stable and secure. This step ensures the setup won’t interfere with guest movement or access to attractions.
Before guests arrive, make final adjustments to lighting angles, fabric tension, and prop placement. If the weather is unpredictable, have extra anchoring materials ready and check the setup periodically during the event.
Design Tips for Themed Backdrops
Matching Backdrops to Event Themes
Choosing the right color scheme is key to tying your backdrop together with inflatables and décor. For example, a carnival or fair theme comes alive with a red and white striped backdrop, perfectly complementing popcorn machines and cotton candy stations. On the other hand, summer events thrive on tropical tones like bright yellows, blues, and greens, which pair seamlessly with water slide rentals and misting tents.
Modular themed banners are a game-changer. These panels, easily attached with velcro, can transform a standard bounce house into anything from a superhero HQ to a princess castle or even a dinosaur adventure. As Trisha Aquino from A Perfect Party Rental puts it:
A themed inflatable becomes more than just entertainment – it becomes the centerpiece of your event.
Seasonal events call for special touches. Winter gatherings can feature backdrops with snowmen or polar bear designs, while summer parties shine with beach-themed elements like faux palm trees and beach balls. You can also create a "concession zone" by placing themed backdrops behind popcorn or cotton candy machines. Not only does this make these areas stand out, but it also turns them into perfect photo spots.
To elevate your theme even further, consider incorporating inflatables from Bouncy Rentals USA.
Incorporating Bouncy Rentals USA Equipment into Designs
Your backdrop and inflatables should work together to create a cohesive look. Giant 3D inflatable replicas – like oversized popcorn boxes or soda bottles – placed near concession stands make for unforgettable focal points, keeping guests engaged throughout the event.
For evening events, LED lighting adds a magical touch. Use it on archways or inflatables for a stunning effect. Ruth Wu, Special Events Manager at Ronald McDonald House of Orange County, shares:
We initially bought this arch for our 5K Walk but have since used it at almost every event we have! It takes no more than 15 minutes to assemble and storage is equally as easy.
To make your backdrop and branding pop in photos, use high-contrast colors and textures. This ensures that logos and themed messages are easily visible, even from a distance. Adding patterns can also enhance the overall visual appeal. For events that happen regularly, wrap-around banners with velcro attachments are a smart choice. They allow you to update sponsor logos, event dates, or hashtags with minimal effort between occasions.
Maintenance and Safety Tips During Events
After setting up your backdrop, keeping it safe and secure throughout the event is just as important as the initial installation.
Securing Backdrops Against Wind and Weather
Wind can be a serious challenge for backdrop stability. If wind speeds go beyond 15–20 mph, it’s time to halt operations. On sandy surfaces, the threshold is even lower – just 10–12 mph [19,20]. Since weather conditions can change quickly, keep an eye on forecasts and monitor throughout the day.
The way you anchor your backdrop depends on the surface. For grassy areas, steel stakes work best. Use stakes that are 18–30 inches long and at least 5/8 of an inch thick. Drive them into the ground at a 45° angle, pointing away from the backdrop. This ensures a strong grip. Make sure the stakes are flush with the ground, leaving only the attachment loop visible to reduce tripping hazards while maintaining stability. On hard surfaces like concrete or asphalt, weighted anchors such as sandbags or water barrels are essential. Each anchor point should weigh at least 40 lbs [19,20].
Ratchet straps are your go-to for maintaining firm tension. Whenever possible, position your backdrop near walls, temporary fencing, or even vehicles to shield it from direct wind. If the ground is wet or soft, increase stability by adding extra weights, as damp soil may not hold stakes securely.
Once your setup is secure, shift your attention to regular inspections and quick fixes.
Quick Adjustments and Repairs
Anchor points should be checked every 2–4 hours. Movement from nearby attractions or guest activity can loosen fasteners over time.
"Inspect all anchor points every 2–4 hours during use – vibration and movement loosen anchors over time, and regular re-tightening is required." – Hero Kiddo Inflatables
Keep a maintenance kit on hand with essentials like extra ratchet straps, heavy sandbags, adhesive tape, and removable hooks [3,19]. If you notice the backdrop sagging or tilting during the event, strengthen weak areas with discreet L-shaped supports or adjustable poles. For hard surfaces, placing non-slip mats or tarps under the frame can help prevent sliding.
Wrinkles or sagging fabric are red flags that supports might be loose and need immediate attention. Assign someone to keep an eye on the backdrop, especially in areas near high-energy attractions where guests might lean on or tug at the structure. If the backdrop’s stability is compromised or a blower malfunctions, clear the area right away to ensure safety.
Conclusion
Creating backdrops for inflatable events can be simple if you stick to a few key steps. Safety should always come first – use 18–24 inch steel stakes at a 45-degree angle for grass surfaces, or at least 40 lbs of sandbags per anchor point for hard surfaces. Regularly check these anchor points every 2–4 hours, especially if wind speeds reach 15–20 mph or more. To elevate the look, consider adding balloon garlands, eye-catching signage, and props to create a more dynamic, three-dimensional design rather than a plain, flat wall.
A thoughtfully designed backdrop does more than just decorate – it transforms your event space into something memorable. When paired with inflatables and seasonal games and well-chosen party accessories, it creates a cohesive, photo-worthy environment that guests will talk about long after the party ends.
FAQs
What backdrop size fits my inflatable setup?
When choosing a backdrop, size matters based on the space you have and the look you’re going for. For tighter spaces, smaller backdrops like 4ft or 6ft are a great fit. If you’ve got more room to play with, an 8ft backdrop can make a bold statement. To get it just right, measure the area behind your inflatable and aim for a backdrop between 6ft and 8ft wide. This size will enhance the inflatable without overpowering the space.
Do I need permits or venue approval for a backdrop?
When planning an inflatable event, especially in public areas or for larger crowds, you might need a permit or venue approval to set up a backdrop. Local regulations often require permits to ensure compliance and help you avoid potential fines. It’s a good idea to contact your local city office or the venue well in advance to confirm what’s needed and make sure everything is in order.
How do I power lights safely near inflatables?
To safely power lights around inflatables, use 12-gauge or thicker extension cords. This ensures they can handle the electrical load without overheating. Keep the cords as short as possible – ideally under 25 feet – and avoid daisy-chaining multiple cords together. Regularly check for any signs of damage, like fraying or sparks. Following these steps and adhering to safety guidelines will help you avoid electrical hazards and keep your inflatable setup secure.