
Good lighting is the key to great photos. Whether it’s a casual party or a formal event, the right setup can transform your DIY photo booth into a professional-looking experience. This guide covers everything you need to know, from affordable lighting options to positioning techniques. Here’s a quick breakdown:
- Lights to Consider: Ring lights for even facial lighting, LED panels for larger spaces, strobe flashes for sharp images with DSLRs, and LED wands for creative effects.
- Modifiers: Use umbrellas, softboxes, or reflectors to soften light and reduce shadows.
- Power Options: AC power for reliability or battery-powered LEDs for portability.
- Setup Tips: Position lights at a 45-degree angle, test settings, and adjust brightness for consistent results.
- Troubleshooting: Fix uneven lighting, match color temperature, and manage heat or power issues.
Proper lighting ensures sharp, flattering photos and minimizes common problems like harsh shadows or distorted colors. Ready to get started? Let’s dive in.
Equipment You’ll Need for Photo Booth Lighting
DIY Photo Booth Lighting Equipment Comparison Guide
Setting up a DIY photo booth doesn’t have to break the bank, but it does require smart choices when it comes to gear. The goal is to find equipment that balances cost-effectiveness with performance. Your lighting setup should focus on three essentials: enough brightness to handle ambient light, wide coverage to avoid harsh shadows, and adjustable color temperature for natural-looking skin tones.
Selecting Your Light Sources
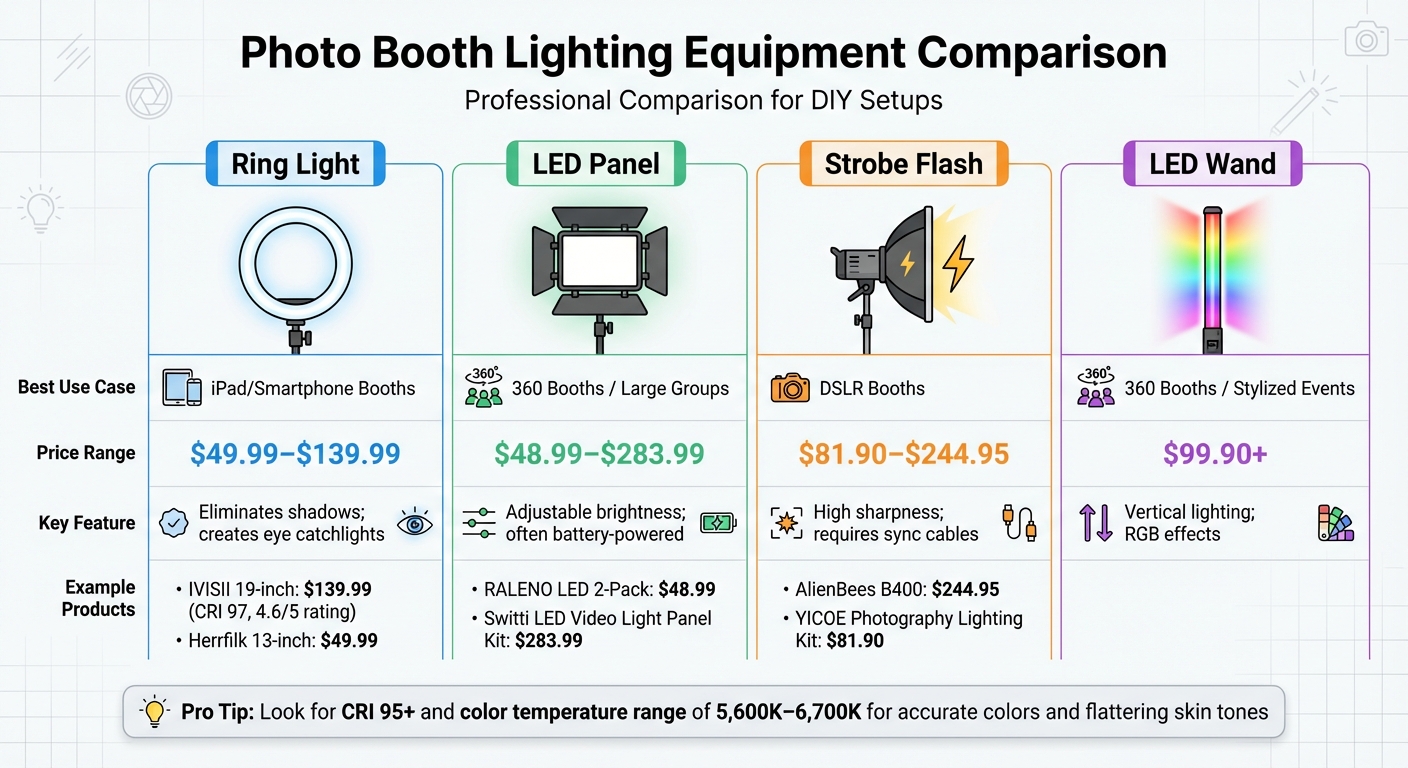
The type of light you choose depends on your booth’s style and the event venue. Ring lights are a popular choice for iPad or smartphone booths, providing even lighting and eliminating shadows on faces. For instance, the IVISII 19-inch ring light ($139.99) boasts a CRI of 97 for accurate colors and has a 4.6/5 rating on Amazon. If you’re on a tighter budget, the Herrfilk 13-inch model is available for $49.99.
For larger groups or more flexibility, LED panels are a great option. The RALENO LED 2-Pack ($48.99) offers adjustable brightness and runs on rechargeable batteries, making it ideal for outdoor or remote setups. If you’re aiming for professional-grade sharpness with a DSLR, strobe flashes like the AlienBees B400 ($244.95) provide powerful bursts of light to freeze motion. However, these require sync cables to work with your camera.
"White LEDs can make your photos (and guests) look pale and sad, so get a light panel that includes yellow or orange LEDs so you can adjust the color temperature." – Calvin Sims, Booth.Events
When choosing lights, aim for a Color Rendering Index (CRI) of 95 or higher and a color temperature range between 5,600K and 6,700K. This ensures accurate colors and flattering skin tones, even under challenging lighting conditions.
| Light Type | Best Use Case | Price Range | Key Feature |
|---|---|---|---|
| Ring Light | iPad/Smartphone Booths | $49.99–$139.99 | Eliminates shadows; creates eye catchlights |
| LED Panel | 360 Booths / Large Groups | $48.99–$283.99 | Adjustable brightness; often battery-powered |
| Strobe Flash | DSLR Booths | $81.90–$244.95 | High sharpness; requires sync cables |
| LED Wand | 360 Booths / Stylized Events | $99.90+ | Vertical lighting; RGB effects |
To improve the quality of your lighting, consider adding modifiers to your setup. You can also enhance the guest experience by creating DIY photo booth props that complement your lighting.
Light Modifiers and Accessories
Raw light can create harsh shadows and unflattering highlights, but modifiers help soften and control it. Umbrellas are a simple and affordable choice. The 20-inch Impact white shoot-through umbrella is known for its consistent, soft light and works well for quick setups and group photos. However, umbrellas offer less directional control compared to other options.
Softboxes are a step up, providing even softer shadows by diffusing light through fabric panels. The YICOE Photography Lighting Kit ($81.90) is a beginner-friendly option with a 4.6/5 rating on Amazon. For more advanced users, the Switti LED Video Light Panel Kit ($283.99) offers better build and precision.
"Larger light sources have softer shadows and bigger coverage areas." – Simple Booth
Reflectors are another handy tool, bouncing light to fill in shadows without needing extra power. White reflectors produce natural light, silver ones add cooler tones, and gold reflectors bring warmth. For a DIY option, you can use a white foam board secured with clamps. Gels, or colored filters, can also be used to adjust the mood or match ambient lighting, but use them sparingly to avoid distorting skin tones.
With your lighting sorted, the next step is ensuring your setup has reliable power and portability.
Power and Portability Options
A solid power solution is crucial for keeping your photo booth running smoothly. For venues with accessible outlets, stick to AC power for consistent performance. Always pack heavy-duty extension cords, power strips, and gaffer’s tape to secure cables and avoid tripping hazards. Before the event, test your entire setup on one power strip to ensure you won’t overload circuits.
For mobile setups, battery-powered LEDs are a game-changer. Models like the NEEWER Advanced 2.4G ($64.99) come with rechargeable batteries for cord-free operation. Many lights also support Sony NP-F series batteries, which can be hot-swapped to keep your booth running non-stop. Some compact LEDs even work with standard USB power banks, making them highly portable.
If you’re using a DSLR, consider a dummy battery that connects to an AC outlet or external battery pack. This prevents your camera from shutting down during long events. Always have spare batteries, extra cords, and a backup power strip on hand to avoid interruptions.
How to Set Up Your Photo Booth Lighting
Position your photo booth about 5–6 feet away from the backdrop to ensure even lighting. This helps minimize harsh shadows, prevent overexposed faces, and make sure every guest looks their best. From here, you can fine-tune your lighting setup using tried-and-true techniques for consistent and flattering results.
Three-Point Lighting Setup
The three-point lighting method is a go-to for achieving professional, balanced lighting. Start with the key light, your main light source, placed at a 45-degree angle from the camera and slightly above eye level. This positioning helps avoid unflattering shadows. Next, add a fill light on the opposite side, set to a lower intensity, to soften any remaining shadows. Finally, include a backlight positioned behind the subject to create separation from the backdrop and add depth to the shot.
If you’re working with only one light, center it and angle it downward at 45 degrees for the most even coverage.
"Having the light high, centered and angled down gives you the most consistent lighting for ALL subjects in the frame." – Photo Booth Training
Avoid using uplighting (lighting from below) unless you’re intentionally going for a dramatic or spooky effect.
Controlling Light Brightness and Angles
Start by performing a "blackout" test: turn off all booth lights and adjust your camera settings – ISO 100–200, shutter speed 1/160s, aperture f/8 – until the test shot is nearly black. Once that’s done, turn your booth lights back on and adjust their brightness until you achieve the perfect exposure. This approach helps eliminate interference from ambient light, such as overhead fixtures or nearby windows, which can cause unwanted color shifts or uneven shadows.
To soften harsh shadows, move the light closer to the subject or use a larger light modifier. Bigger modifiers not only create softer shadows but also provide better coverage for group shots. If guests are wearing glasses, adjust the main light’s angle to redirect reflections away from the camera lens.
Testing and Making Adjustments
Once your lights are set up, thoroughly test your setup to ensure everything looks great. Take test shots before guests arrive to check for proper exposure and balance. Use Manual Focus to lock in the sharpest point on your ideal subject, and secure the focus ring with tape to prevent it from shifting in low-light conditions.
"A larger, closer light source always equals softer, more flattering light. Moving your main light just a foot closer can completely change the look." – Admin, 1021 Events
Review your test shots carefully. Look out for issues like blown-out highlights, uneven lighting, or color inconsistencies, and make adjustments as needed. For example, reposition your lights, use larger modifiers, or add a fill light to address any dark areas. If people on the edges of group photos appear under-lit, try moving your light further back to expand its coverage. Finally, test your setup with different group sizes – solo shots, pairs, and larger groups – to confirm that your lighting remains consistent throughout the event.
Lighting Techniques for Different Events
Every event comes with its own set of lighting hurdles. What works beautifully in a hotel ballroom might fall flat at an outdoor wedding or a nightclub reception. Tailoring your lighting setup to the venue and time of day is key to capturing consistently great photos, no matter where your booth is stationed.
Indoor Event Lighting
Indoor venues often feature a mix of artificial lighting – fluorescent office lights, warm tungsten bulbs, or even colorful uplighting from DJs. These can clash with your photo booth’s lighting, creating color casts or awkward shadows. The goal? Make your booth’s lighting the primary source to minimize interference from ambient light.
One solution is using adjustable bi-color LED panels (3200K–5600K range). These allow you to fine-tune the color temperature to complement or neutralize the room’s lighting. For spaces with warm, yellow tones, shift your LEDs to a warmer setting. In cooler, fluorescent-lit spaces, move toward a cooler tone. This adjustment helps balance out harsh lighting, especially from white LEDs.
In smaller venues like office break rooms or tight reception halls, compact lighting options like ring lights or LED wands are ideal – they save space while still offering great illumination. For larger ballrooms with high ceilings, position your main light slightly above eye level and angle it downward at 45° to create natural, flattering light with minimal shadows.
Be cautious when bouncing light off colored walls or ceilings. For example, green walls can cast an unwanted tint on your subjects. In these cases, direct modifiers like softboxes are your best friend, as they help you control exactly where the light falls. While indoor setups focus on neutralizing artificial light, outdoor setups require strategies to tackle the challenges of natural light.
Outdoor Event Lighting
Outdoor events bring their own unique challenge: the sun. It’s the one light source you can’t overpower. The best approach? Block it. Use tents, canopies, or large screens to create a controlled environment. Setting up in the shade of a building or under a big tree can also help avoid harsh, shifting shadows.
"The one light you can never outcompete is the Sun. When setting up your photo booth for an outside event, you’re better off blocking the sun." – Simple Booth
Natural daylight typically falls within the 5600K to 6700K range. Adjustable LED lights can help you match this range, blending artificial lighting seamlessly with the natural environment. Position your booth so guests face away from bright or changing light sources, keeping the foreground exposure consistent.
Outdoor setups also come with logistical challenges, like limited access to power. Portable generators or battery-powered LED panels are a must-have. Additionally, secure your backdrops and lights with heavy-duty stands and anchors to prevent wind from disrupting your setup.
Low-Light and Nighttime Events
Dark venues like nightclubs, evening receptions, or dimly lit bars require a completely different approach. Autofocus often struggles in these conditions, so it’s better to switch to manual focus. Set the focus to a pre-determined "sweet spot" where guests typically stand, and use tape to lock the focus ring in place for consistency.
Strobe flashes are ideal for low-light settings. They produce quick bursts of light that freeze motion and ensure sharp, well-lit images. Strobes can also overpower ambient lighting, such as DJ lasers or purple uplighting, which might otherwise cast unflattering hues. However, if your booth offers video or GIF features, continuous LED lighting is essential, as strobes aren’t suitable for those formats.
To eliminate ambient light interference, try the blackout technique – this isolates the flash and ensures consistent color balance. If ambient lights are unavoidable and disrupt the color scheme, consider switching to a black-and-white filter for a timeless, elegant look.
Common Lighting Problems and How to Fix Them
Even the most carefully planned lighting setups can run into problems. Here’s how to tackle some of the most common issues.
Fixing Uneven Lighting and Shadows
Harsh shadows, especially under the eyes, often happen when lights are positioned too high. To fix this, adjust your light stands so they’re at eye level. This simple tweak helps create a more natural and flattering look. If shadows are still an issue, try using larger light modifiers like softboxes or umbrellas to diffuse the light and soften those shadows. For group photos, consider adding extra fill lights to evenly illuminate everyone.
These small changes can make a big difference in achieving consistent, professional-quality lighting.
Matching Color Temperature
Mixing light sources with different color temperatures – like warm tungsten lights and cool LED lights – can lead to unnatural skin tones and off-color photos.
"White LEDs can make your photos (and guests) look pale and sad, so get a light panel that includes yellow or orange LEDs so you can adjust the color temperature." – Calvin Sims, Booth.Events
To address this, use adjustable LED panels with a range of 3,200K to 5,600K to better match the ambient lighting. If you’re working with flash units, colored gels can help balance out temperature differences. For tricky lighting situations – like purple DJ uplighting or intense neon club lights – you can use a strong strobe to overpower the ambient light or switch to a black-and-white filter to eliminate unwanted color casts. Always set your camera’s white balance manually to keep skin tones looking natural and consistent.
Managing Heat and Power Supply
Lighting isn’t just about distribution and color; keeping your equipment running smoothly is just as important. Heat buildup can cause equipment to malfunction, especially during long events or in enclosed setups. Opt for lights with built-in cooling systems, such as internal fans or aluminum casings, to manage heat more effectively. Dummy batteries can also help provide continuous power without overheating. For example, the AlienBees B400 features a cooling fan that:
"really valuable in an enclosed tower or shell." – Chris Lydle
If you’re using studio strobes, consider replacing traditional modeling lights with LED bulbs, which run much cooler.
Before the event, scout the venue to locate power outlets and determine if you’ll need extra-long extension cords. Pack additional power supplies like extension cords, power strips, and backup batteries, and secure all cables to the floor with gaffer’s tape to prevent accidents. One crucial safety tip: never attempt to disassemble flash units to address power issues. The capacitors inside can hold between 330 and 500 volts, even when unplugged, and can pose a serious risk.
Final Tips for Photo Booth Lighting Success
You’ve got your setup and troubleshooting strategies down, but a few extra steps can make sure your photo booth lighting runs smoothly from start to finish.
Plan ahead. A few days before the event, visit the venue at the same time of day as the event to observe how the ambient light behaves. This gives you a chance to pinpoint potential challenges, locate power outlets, and figure out whether you’ll need extension cords or power strips. Knowing the space in advance can save you from any last-minute surprises when guests arrive.
Before things kick off, try the "Blackout" method to ensure your controlled lighting is the only source in play. This step helps you take full control of the lighting environment, preventing interference from ambient light.
Once the ambient light is neutralized, lock in your settings for consistent results throughout the event. Switch to manual focus (MF) and adjust the focus on a subject standing in the "sweet spot." Use gaffer’s tape to secure the focus ring so it doesn’t accidentally move. For color consistency, set a custom white balance using either a "Flash" preset or a custom reading – avoid auto white balance, as it can shift between shots, leading to uneven skin tones.
"The heart of a truly great photo booth isn’t the fancy camera or the cool backdrop – it’s the light. Soft, flattering light is your secret weapon." – 1021 Events
Be prepared for anything. Pack extra batteries, cables, and power accessories to avoid interruptions. When making adjustments, take it slow – move one light at a time, test the results, and then tweak further if needed.
FAQs
What are the best lighting options for a small DIY photo booth?
For a small DIY photo booth, you’ll want lighting options that are simple to use, affordable, and capable of creating flattering photos. Ring lights are a popular pick because they deliver even, soft lighting that highlights facial features while reducing harsh shadows. Plus, they’re compact, easy to set up, and can be mounted around a camera or smartphone to give your photos a polished, professional vibe.
Another solid choice is constant LED lights, which are flexible, budget-friendly, and easy to adjust. By placing them thoughtfully, you can cut down on shadows and maintain steady brightness. To take your lighting to the next level, try adding light modifiers like diffusers or reflectors. These tools help soften and shape the light, making it more flattering. For a small space, combining a ring light with adjustable LED panels can create a sleek and well-lit photo booth setup that’s perfect for capturing great shots.
What’s the best way to set up photo booth lighting that flatters all skin tones?
To ensure flattering photo booth lighting for all skin tones, focus on using soft, diffused light that reduces harsh shadows and bright spots. Tools like softbox lights, ring lights, or LED panels with adjustable color temperatures are ideal for creating a natural, evenly lit appearance. Proper light placement is crucial – position the lights to illuminate faces evenly, steering clear of direct overhead lighting that can create unflattering shadows.
You can also enhance the setup by incorporating diffusers or reflectors to soften the light even further, giving everyone a smooth, radiant glow. Adjustable lighting is a game-changer, as it allows you to fine-tune the brightness and color balance to suit various skin tones and event settings, ensuring every guest looks their best in the photos.
What are the best power options for outdoor photo booth setups?
When setting up an outdoor photo booth, having a dependable and portable power source is essential, especially since standard electrical outlets may not always be accessible. A portable power station or a high-capacity battery pack can keep your lighting, camera, and other gear running seamlessly throughout the event. To make the right choice, calculate the total power needs of your equipment beforehand.
Opting for energy-efficient lighting, like LED panels, ring lights, or softboxes, is another smart move. These options not only conserve power but also provide consistent, high-quality lighting. To elevate your setup, try balancing natural light with artificial sources, and use tools like reflectors or diffusers to achieve a more polished and professional look. With the right preparation and gear, your outdoor photo booth will be ready to deliver stunning results every time.