Planning a spring garden party with bounce houses can be simple and enjoyable. Here’s how to make it happen:
- Set Your Budget and Guest List: Decide on the number of guests and how much you want to spend. Allocate funds for inflatables, food, and decorations. Plan for $30–$60 per guest.
- Prepare Your Yard: Create zones for inflatables, seating, and food. Measure your space and ensure it’s clear, level, and safe for setup.
- Rent the Right Inflatables: Choose bounce houses or slides based on the ages of your guests and the size of your yard. Confirm power needs and setup details with your rental company.
- Add Decor and Food: Use pastel colors, fresh flowers, and easy-to-eat snacks like sliders and fruit skewers. Consider fun extras like popcorn or cotton candy machines.
- Organize Activities and Timeline: Include lawn games or DIY stations for variety. Use a checklist to keep your planning on track from setup to cleanup.
Pro Tip: Work with a professional rental company like Bouncy Rentals USA to handle delivery, setup, and safety guidelines, so you can focus on enjoying the party.
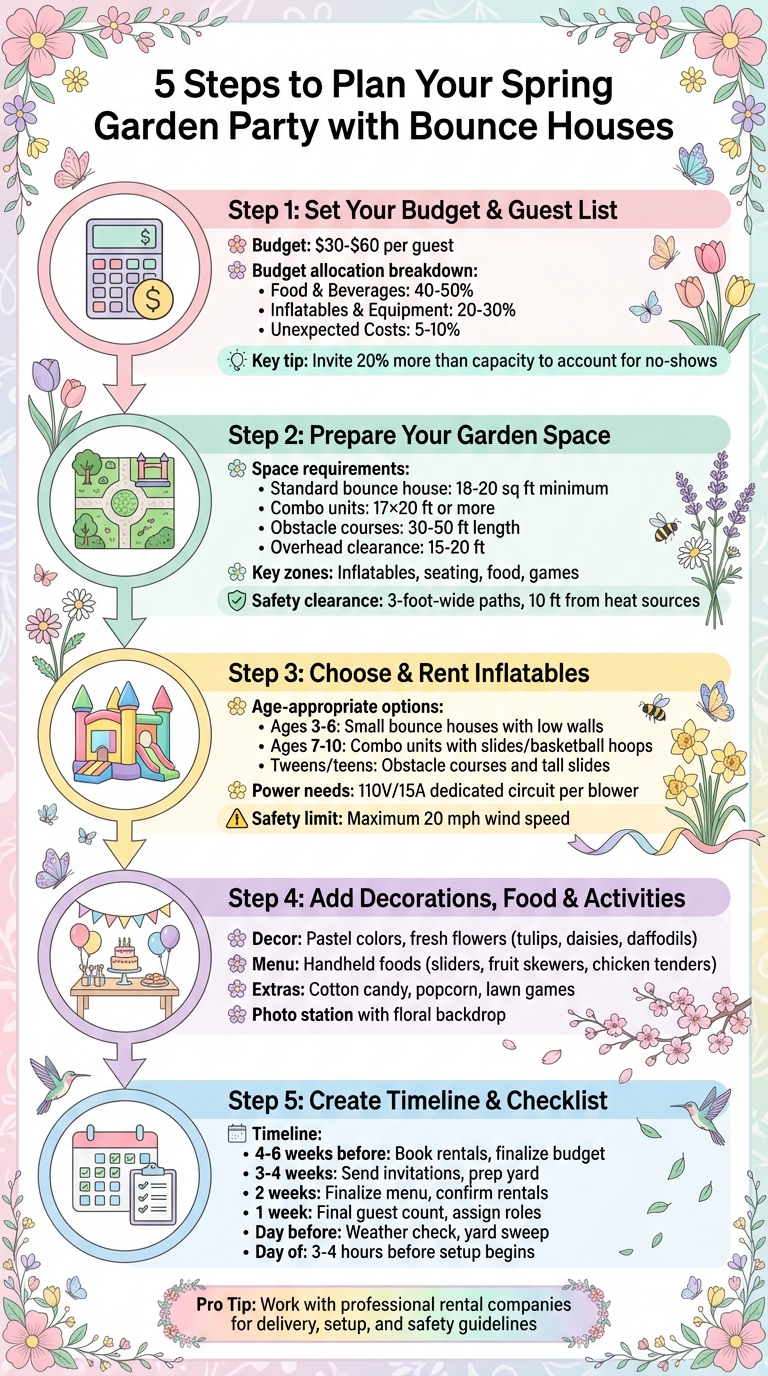
5-Step Guide to Planning a Spring Garden Party with Bounce Houses
Step 1: Set Your Budget and Party Basics
Decide on Guest List and Party Goals
Start by estimating how many guests your garden can comfortably accommodate. Be sure to leave enough space for inflatables, seating, and food areas. To account for no-shows, invite about 20% more people than your maximum capacity allows. Use this maximum number to guide your decisions on safety measures and rental needs . Also, think about the age range of your guests. If the party is mostly for preschoolers, prioritize smaller bounce houses and plenty of seating for parents. For a mixed-family gathering, include inflatables for kids and a quiet area where adults can relax.
Next, figure out the main focus of your event. Are you planning an energetic play day for kids, a laid-back springtime gathering for adults, or a mix of both? This decision will help you decide how to split your budget among inflatables, food, and decor . For example, a kid-centered party might feature multiple inflatables and simple food like pizza and hot dogs. On the other hand, a "garden brunch" might focus more on elegant table settings and light entertainment, with perhaps one bounce house to keep kids occupied . Picking a theme – like "spring picnic" or "backyard carnival" – can also streamline your planning and spending decisions.
Once you’ve nailed down your guest list and party goals, allocate your budget wisely to balance inflatables, food, and decor.
Set Your Budget
Plan for party expenses to range between $30 and $60 per guest. Divide your budget into key categories: inflatable rentals, food and drinks, decorations and tableware, seating or furniture, and any extra entertainment like music or face painting . A good rule of thumb is to allocate 40–50% of your budget to food and beverages, 20–30% to inflatables and equipment, and 5–10% for unexpected costs .
Take advantage of bundled rental packages from companies like Bouncy Rentals USA, which often combine popular inflatables like bounce houses or obstacle courses with extras like cotton candy machines or water slides at a lower price than renting each item separately . For a family-friendly garden party, consider a package that includes a bounce house, a small water slide, and a concession machine. This option can keep kids entertained for hours and might offer better value than spending the same amount on extra decorations. Be sure to provide details like your event date, delivery address, surface type, and the age range of your guests early on to ensure you get the right equipment and accurate quotes.
Track all your expenses, even for smaller items like disposable tableware, ice, or extra decorations . Lock in your key rentals and finalize your budget at least a month before the party. Stick to your original goals to avoid last-minute additions that could push you over budget .
Step 2: Prepare Your Garden Space
Plan Your Party Layout
Start by measuring your yard to create specific zones for inflatables, seating, food, and games. For each bounce house, plan for about 18–20 square feet to ensure there’s enough room for safety clearance, blower access, and tie-downs. Larger inflatables, like combo units or obstacle courses, might need up to 25–40 feet in length or more. Use a tape measure to mark the corners with stakes or cones, and make sure there are no trees, fences, or overhead lines in the way.
Place inflatables in an area that’s easy to supervise. Arrange seating between the inflatables and the food area, and keep food stations away from entrances to minimize spills. Set up lawn games in a separate section, and create a shaded, quiet zone for adults or younger kids at a safe distance from the main activities.
Make sure there are clear, 3-foot-wide paths between zones, and avoid blocking doorways. Keep inflatables at least 10 feet away from heat sources like grills, fire pits, or heaters. Look for a flat, level area with grass or smooth turf – avoid gravel, rocks, rough concrete, low-lying spots that collect water, steep slopes, or areas with exposed roots or sprinkler heads.
Once you’ve finalized your layout, it’s time to prep your yard to meet these requirements.
Get Your Yard Ready
A week before the party, mow and edge your lawn to create a smooth, even surface. Clear away debris, hazards, and any overgrown plants. Check your sprinkler schedule and turn it off the day before and the day of the event to keep the lawn dry for guests and equipment.
Make sure there’s a nearby 15–20 amp outdoor outlet available for each inflatable blower or use approved extension cords. Choose the driest, most level area of your yard for inflatables. If the ground is damp, set up temporary pathways to avoid muddy spots. On the day of the party, hose off patios and furniture, and remove any new debris.
Before the event, reach out to Bouncy Rentals USA to confirm the size, power needs, and setup details for each inflatable. Share photos or a simple sketch of your yard that highlights slopes, trees, or obstacles. Coordinate setup and pickup times to ensure everything runs smoothly.
Step 3: Choose and Rent Your Inflatables
Pick Inflatables for Your Guest Ages and Space
When selecting inflatables, consider the ages and energy levels of your guests. For toddlers and younger kids (ages 3–6), a small bounce house with low walls and a simple entrance is ideal. These designs help prevent falls and keep little ones safe. For slightly older kids (ages 7–10), a combo unit – featuring a bounce area and extras like a slide or basketball hoop – can keep them entertained for longer. For tweens, teens, and even adults, obstacle courses and taller slides provide the challenges and competitive fun they’ll enjoy.
If you’re hosting a mixed-age group, renting separate inflatables can be a smart move. For example, set up a small bounce house for toddlers alongside a larger obstacle course for older kids. This way, everyone has a space suited to their activity level. To ensure safety, post clear age and height guidelines near each inflatable. Companies like Bouncy Rentals USA make it easy to match inflatables to your needs by providing detailed specifications for their bounce houses, combo units, obstacle courses, and water slides.
Don’t forget to measure your yard. A standard 13×13 ft bounce house needs at least 15×15 ft of clear space, leaving room for the blower, anchoring, and safety clearance. Larger units, like combo inflatables, may require 17×20 ft or more, while obstacle courses can stretch 30–50 ft in length. Also, check for overhead clearance – most inflatables need 15–20 ft of vertical space to avoid obstacles like tree branches, power lines, or roof eaves. Grass is the best surface since it softens landings, but if you’re setting up on concrete or pavers, ask the rental company about adding mats for extra cushioning at entry and exit points.
Once you’ve chosen inflatables that fit your space and guest list, it’s time to prepare for delivery and setup.
Prepare for Delivery and Setup
Most inflatables, like standard bounce houses or small slides, use a single blower that plugs into a standard 110V/15A household outlet. Locate outdoor GFCI outlets near your setup area, and make sure each blower is connected to a dedicated circuit to avoid tripping breakers. If the nearest outlet is more than 50–100 ft away, ask the rental company about heavy-duty extension cords or generator rentals. Avoid using power strips or lightweight extension cords, as they can’t handle the load safely.
Before delivery, clear all access paths from the street or driveway to the setup area. Remove obstacles like trash cans, toys, garden tools, or furniture, and unlock gates to provide at least 3–4 ft of clearance for the delivery crew’s dolly. If stakes will be used for anchoring, mark any sprinkler heads or shallow utility lines to prevent damage. Refer to your yard layout from Step 2 to confirm the setup area is ready. Keep pets indoors during setup, and plan to be present when the crew arrives to walk them through your layout and confirm inflatable placement. Standard bounce houses typically take 30–60 minutes to set up, while larger or multiple units may take longer.
Once the inflatables are installed, following safety guidelines will help ensure a fun and safe experience for everyone.
Follow Safety Guidelines
Assign an adult to supervise each inflatable at all times. Stick to the posted capacity and weight limits – for instance, many 13×13 ft bounce houses allow up to 6–8 small children or a total weight of 600–800 lbs. Group participants by age and size to minimize the risk of collisions, and make sure everyone removes shoes, glasses, jewelry, and sharp objects before entering. Prohibit flips, wrestling, climbing on walls or nets, and sliding headfirst.
Never operate inflatables in bad weather. Rain, lightning, or winds over 20 mph can make them unsafe. The CDC has reported a sharp rise in bounce house injuries, with more than 30 children treated daily in U.S. emergency rooms in 2010 alone. Many wind-related accidents occurred when inflatables lifted off the ground in winds exceeding 20–25 mph. This is why most rental companies set 20 mph as the maximum safe wind speed. If the weather takes a turn, clear the inflatable immediately and follow the company’s instructions to power it down and deflate it.
Choosing a professional provider like Bouncy Rentals USA adds an extra layer of safety and convenience. Their equipment is thoroughly cleaned between rentals and fully insured, meeting industry standards and often required by venues or HOAs. One customer, Dylan Hoy, shared his experience renting for his son’s birthday: "The castle was super clean, and the team was professional." Companies like this also provide written safety instructions, clear rules, and trained staff for delivery and setup, letting you focus on enjoying the party instead of troubleshooting equipment issues.
Step 4: Add Decorations, Food, and Activities
Now that you’ve nailed down your budget, venue, and inflatables, it’s time to take your party up a notch with thoughtful decor, food, and activities. These finishing touches will create a lively and memorable atmosphere for guests of all ages.
Decorate with a Spring Theme
Set the tone with pastel tableware in shades like pink, mint, yellow, blue, and lavender. These soft colors highlight the spring vibe while complementing the bold bounce houses without overwhelming the space. Fresh flower centerpieces featuring seasonal blooms – think tulips, daisies, daffodils, or hydrangeas – can be arranged in mason jars, small vases, or even rustic tin buckets for a charming touch. To keep the outdoor feel consistent, use natural materials like rattan trays, jute table runners, wooden crates for snacks, and terracotta pots filled with herbs.
For added flair, string up lights, paper lanterns, or bunting around the yard. Just make sure all hanging decorations are safely positioned away from the entrances and blower areas of the inflatables. Want a picture-perfect moment? Set up a simple photo spot with a floral garland or a pastel balloon arch, giving guests a fun backdrop with the bounce houses in view.
To avoid accidents, secure outdoor signs, balloon clusters, or arches with weighted bases. Keep fragile items like glass vases or candles on a designated "grown-up" table, well away from areas where kids are playing. For spaces closer to the action, opt for unbreakable plastic vases or battery-operated candles.
With your decor in place, it’s time to think about keeping everyone fueled for fun.
Plan Your Menu
Go for easy-to-eat, handheld foods that guests can grab and enjoy while mingling. Favorites like sliders, mini sandwiches, chicken tenders, and fruit skewers are perfect. Be sure to include at least one vegetarian or vegan option – like veggie wraps – and a gluten-free choice, such as lettuce-wrap sandwiches. Since kids will be bouncing around, keep snacks light during playtime and save heavier food for before the inflatables start or during a designated food break to avoid upset tummies.
For drinks, a large dispenser of fruit-infused water (try citrus, cucumber, or berry) is a refreshing option. Pair it with a sweet beverage like lemonade or iced tea. If you’re serving alcoholic drinks, keep them clearly separated from the kids’ drink station, and make sure all beverages are kept in shaded areas to stay cool.
Want to add a playful touch? Carnival-style treats like cotton candy and popcorn are always a hit. Companies like Bouncy Rentals USA make it easy by offering concession machines for cotton candy, popcorn, and snow cones, along with the supplies to operate them. These snacks, made fresh on-site, bring a festive vibe without requiring much effort. Just set up concession stations away from the inflatables to avoid sticky fingers or spilled snacks inside the bounce houses. Adding a small hand-wiping or sanitizing station nearby is a smart move too.
With food and drinks ready to go, round out the fun with some engaging activities.
Include Other Activities
While the inflatables are the star attraction, offering additional activities ensures there’s something for everyone. For younger kids, simple outdoor games like bubbles, sidewalk chalk, ring toss, and giant Jenga are always crowd-pleasers. Older kids and teens might enjoy cornhole, relay races, or other competitive games.
For mixed-age groups or adults, consider setting up lawn games like bocce ball, croquet, or horseshoes. A photo scavenger hunt – such as finding a pink flower or snapping a selfie by the bounce house – can involve everyone and add an interactive twist.
Create separate areas for active games and relaxed crafts to suit different energy levels. A DIY station is a great addition – think flower crown-making or decorating small flower pots with spring designs. To set the mood, curate a playlist with upbeat tracks for playtime and mellow tunes for meal breaks. If you want to go all out, hiring a DJ can add an extra layer of fun.
These thoughtful additions ensure your party offers variety, keeping guests entertained and engaged long after the initial excitement of the bounce houses. From decor to activities, every detail helps create a memorable celebration.
Step 5: Create Your Party Timeline and Checklist
A well-organized timeline can save you from last-minute chaos and let you actually enjoy your event. Breaking the planning process into manageable steps – from booking to cleanup – helps keep everything on track.
Build Your Planning Timeline
Once you’ve sorted out your venue and rentals, it’s time to map out your timeline. Start planning 4–6 weeks in advance. Use this time to finalize your budget, guest list, and party goals. Be sure to book your bounce houses and extras like cotton candy or popcorn machines with Bouncy Rentals USA as early as possible to lock in your preferred choices.
Three to four weeks before the party, send out invitations with all the key details – date, time, location, and a backup rain plan. Begin prepping your yard by mowing, trimming, and clearing debris. Sketch out a layout for where everything will go – bounce houses, food stations, seating, and lawn games – and check if you’ll need electrical access for inflatables or concession machines.
Two weeks out, finalize your menu, keeping in mind any dietary restrictions. Confirm your rental details with Bouncy Rentals USA and arrange for any additional seating or shade if needed. By one week before, finalize your guest count, assign roles to helpers (like someone to meet the delivery crew or supervise the bounce house), and continue tidying up your yard. Prepare a detailed day-of checklist so nothing gets overlooked.
The day before the party, check the weather forecast and adjust your backup plan if needed. Do a thorough yard sweep to remove sticks, rocks, or anything that could cause trips or falls. Pre-stage furniture, tables, and décor as much as possible. Confirm delivery times with Bouncy Rentals USA by calling 203-505-5309 or emailing Charleston@bouncyrentalsusa.com. Prep any non-perishable food, chill drinks, and pack a go-bag with essentials like extension cords, trash bags, sunscreen, and first-aid supplies.
Use a Day-of Checklist
Having an hour-by-hour checklist will make the setup process stress-free. Three to four hours before guests arrive, do a final yard check and mark off the inflatable area with cones or flags to keep it clear for the delivery crew. Two to three hours before, meet the Bouncy Rentals USA team to confirm the placement and setup of the inflatables. Use this time to arrange décor, signage, and activity zones.
One to two hours before the party, set up the food while keeping cold items chilled. Place trash and recycling bins in accessible areas. Thirty to sixty minutes before guests arrive, start your music, turn on any lights, and do a final walkthrough using your checklist. Assign someone to supervise the bounce house, double-check your safety rules sign, and snap a few photos of the setup before the fun begins.
Handle Post-Party Cleanup
When the party’s over, a quick and organized cleanup will save you time and effort. Start as soon as the guests leave. Collect trash from all areas and do a final sweep of the inflatable zone, removing toys, confetti, or anything sharp before Bouncy Rentals USA arrives for pickup. Make sure access paths are clear and confirm pickup times.
Sort recyclables, walk the yard for any forgotten items, and lightly rake and water the grass where the inflatables were to help it recover. With an efficient system, you can wrap up the cleanup in just a couple of hours and restore your yard to its original state. For extra tips, check out the "How to Clean Party Rentals Fast" blog post on Bouncy Rentals USA’s website.
Conclusion
Planning a spring garden party with bounce houses can be a breeze if you approach it step by step. Start by outlining your guest list and setting a budget. Make sure to measure your space, carve out areas for inflatables, dining, and seating, and reserve your bounce house well in advance. Add a touch of spring charm with seasonal decorations, a menu featuring fresh salads and fruits, and a few lawn games to ensure everyone has a great time. To stay on track, use a planning timeline and a checklist to guide you from setup to cleanup.
With Bouncy Rentals USA, you can leave the heavy lifting to the pros. They handle delivery, setup, and removal of bounce houses, water slides, and fun extras like cotton candy and popcorn machines. Their equipment is fully insured and thoroughly sanitized, and their team walks you through safety and usage tips – so you can relax and enjoy your party without worrying about the logistics.
FAQs
What steps can I take to ensure bounce houses are safe at my spring garden party?
To ensure bounce houses are a safe and enjoyable part of your party, start by making sure they’re firmly anchored to prevent any shifting or tipping. Place them on flat, stable ground, well away from trees, fences, or other obstacles that could pose a risk. Always keep an eye on children while they play and stick to the weight and age limits recommended by the manufacturer. Throughout the event, check regularly for any signs of damage or deflation, and make sure the bounce house remains clean and dry. Following these steps will help keep the fun going while prioritizing safety.
How do I pick the best inflatables for different age groups?
When picking inflatables for your event, think about the size, design, and safety features to suit the age group of your guests. For younger kids, typically between 3 and 7 years old, smaller bounce houses with soft sides and lower heights work best. These are safer and more manageable for little ones. For older kids and teens, larger inflatables like combo units with slides or obstacle courses bring more fun and a bit of a challenge.
Make sure the inflatables are built with safety in mind and match the age group using them. This reduces the risk of injuries and ensures everyone can enjoy the event without worry.
What’s the best way to stick to a budget when planning a spring garden party with inflatables?
To keep your garden party budget-friendly, start by prioritizing the must-haves – think bounce houses or water slides that align with your party’s size and theme. Booking during less busy times or seeking out package deals can help you cut costs. Skip unnecessary extras like concession machines or multiple inflatables to avoid overspending.
Planning ahead makes all the difference. Request quotes early and stick to options that meet your needs without going over the top. With a little foresight, you can host a fun and memorable event without breaking the bank.