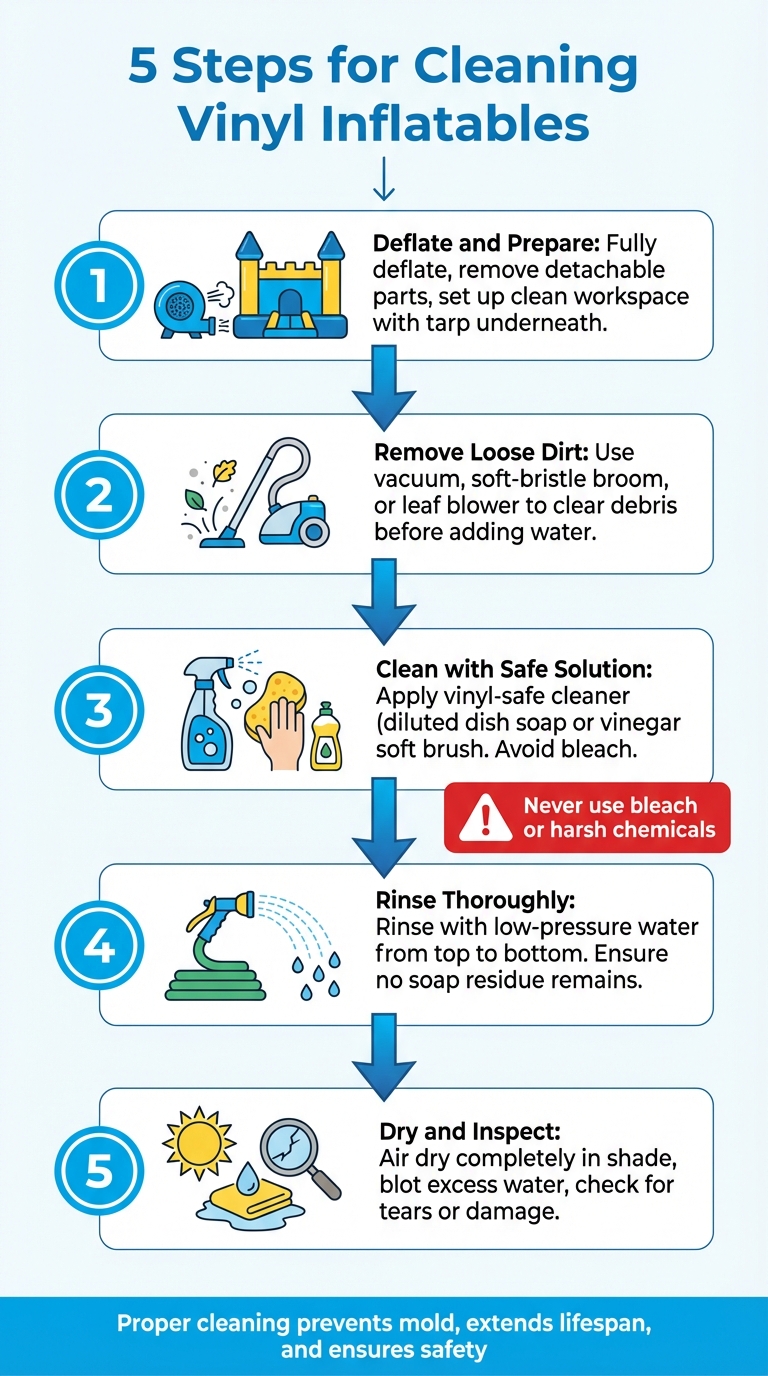
Keeping vinyl inflatables clean is crucial for their longevity and safety. Regular cleaning removes dirt, germs, and moisture that can cause damage or health risks. Follow these five steps to maintain your inflatable:
- Deflate and Prepare: Fully deflate the inflatable, remove detachable parts, and set up a clean, dry workspace with a tarp underneath.
- Remove Loose Dirt: Use a vacuum, soft-bristle broom, or leaf blower to clear away debris before introducing water.
- Clean with a Safe Solution: Apply a vinyl-safe cleaner (like diluted dish soap or vinegar mix) using a soft brush or sponge. Avoid bleach or harsh chemicals.
- Rinse Thoroughly: Rinse with low-pressure water to remove soap and dirt, ensuring no residue remains.
- Dry and Inspect: Air dry completely in a shaded area, blot excess water, and check for tears or damage.
These steps help prevent mold, extend the inflatable’s lifespan, and ensure a safe play environment. Whether you own or rent, proper care keeps your equipment in top condition.
5-Step Process for Cleaning Vinyl Inflatables
Step 1: Deflate and Prepare the Inflatable
Start by fully deflating the inflatable and setting up a clean workspace. Turn off and unplug the blower, then open all zippers and deflation flaps to let the air escape. This reduces strain on the seams and fabric, making the process easier and safer.
As the inflatable deflates, remove any detachable parts like ladders, netting, or side rails to avoid damage or snagging as the material collapses. Don’t forget to clear out small items like keys, jewelry, crayons, or toys that could puncture the vinyl. A leaf blower can help push out stubborn air pockets and remove any lingering moisture.
Once deflated and free of potential hazards, you’re ready to set up your workspace.
Set Up a Clean Work Area
Choose a dry, flat surface with good airflow to unroll the inflatable. A grassy area works well, as long as it’s free of mud, wet leaves, or fresh lawn clippings. Always lay down a waterproof tarp first – this protects the underside of the inflatable from dirt and debris while keeping contaminants from transferring to other parts of the unit.
Instead of dragging the inflatable across rough surfaces like concrete, which can cause tears, use a dolly to move it if needed.
Remove Dust and Loose Dirt
Before introducing water or cleaning solutions, clear away any loose dirt to avoid scratching the vinyl.
Once the inflatable is laid out flat, use a shop vacuum, handheld vacuum, soft-bristle broom, or leaf blower to remove surface debris like sand, crumbs, twigs, or dust. Pay special attention to seams, corners, and crevices where dirt tends to collect. This step ensures a smoother cleaning process and protects the material from unnecessary wear.
Step 2: Clear Away Loose Dirt and Debris
After the initial dry cleaning, it’s time to bring in water to wash away lingering surface dirt. This step ensures that dry debris doesn’t turn into abrasive mud that could damage the material.
Rinse with Low-Pressure Water
Grab a garden hose and set it to a low-pressure stream to gently rinse off dust, mud, and loose dirt. The key here is to avoid high pressure – strong streams can tear vinyl or force water into seams, which could lead to long-term damage. If you’re using a pressure washer, keep the pressure at 1,500 psi or lower and maintain at least 12 inches of distance between the nozzle and the surface.
"Start by hosing down the vinyl float to remove any loose dirt or debris. This initial rinse helps prevent scratching during the cleaning process." – Floatie Kings
Work from top to bottom so gravity helps pull the dirt downward and off the surface. Be cautious around seams, attachment points, and trim – these areas are more prone to damage from direct water pressure.
Once the main surface is clean, shift your attention to those hard-to-reach spots.
Clean Seams and Crevices
Pay close attention to seams, corners, and crevices where dirt often hides. Use a soft brush or sponge to gently scrub out any grime without scratching the vinyl.
"Look at all the crevices and behind the flaps. You’d be surprised what kids leave in the bounce house." – Event Hawk
Lift flaps, check behind slide liners, and inspect vent zippers to remove hidden dirt and moisture. Don’t forget to lift the sides or even flip the unit to rinse the bottom seams, as dirt tends to collect where the inflatable meets the ground.
This detailed cleaning ensures the inflatable is ready for the next step.
Step 3: Apply Cleaning Solution and Scrub
After clearing away loose dirt, it’s time to tackle stains and sanitize the vinyl with a safe cleaner and gentle scrubbing.
Pick a Cleaner That’s Safe for Vinyl
Go for a mild, pH-balanced cleaner specifically designed for vinyl. Options like Dawn, Simple Green, OdoBan, or Zep are great choices. Prefer a DIY option? Mix three parts water with one part white vinegar, then add a few drops of dish soap (make sure it’s bleach-free). This homemade mix works just as well as store-bought cleaners and is easier on your wallet.
Steer clear of bleach, chlorine, or harsh chemicals like Methyl Ethyl Ketone (MEK). These can damage the vinyl, fade its color, and leave behind residue. The only exception? A diluted bleach solution can be used sparingly for isolated mold spots.
"Never use bleach, abrasive cleaners, or solvents, as they can damage the bounce house material." – Magic Jump Inc.
Use Soft Tools for Scrubbing
Once the cleaning solution is ready, apply it to one section of the vinyl at a time. Avoid spraying the entire inflatable at once – this prevents excess cleaner from pooling in seams, which could lead to mold growth. Use a soft-bristle brush, sponge, or clean rag to scrub the surface. For tight spots like seams and crevices, a soft toothbrush works wonders.
Focus on high-traffic areas like railings, landings, zippers, and sidewalls, as these spots tend to accumulate the most grime. Scrub firmly to lift dirt but be careful not to damage the vinyl. Cleaning from top to bottom is a smart move – gravity helps pull the dirt down as you work.
Step 4: Rinse Completely
After you’ve finished scrubbing, the next crucial step is to rinse away all the cleaning agents. Leaving behind any residue can not only irritate the skin but also damage the vinyl over time.
Rinse from Top to Bottom
Start rinsing at the highest point of the inflatable and let gravity do the work. Use a garden hose on low pressure or, for tougher spots, a power washer set to its lowest setting and held at least three feet away. For smaller areas, a wet rag can be just as effective if you don’t want to set up the hose.
"Once you’re done scrubbing, rinse the bounce house thoroughly to ensure there’s no soap or residue remaining." – Wojin Inflatables
To prevent water from pooling in flat areas, you can tilt the inflatable by propping one side up with a sturdy chair or dolly. This simple trick helps the water drain off efficiently.
Check for Soap Residue
After the first rinse, take a close look at the seams, crevices, and flaps – these areas tend to trap soap bubbles and residue. Run your hand along the surface and even give it a quick sniff; if you detect any residue or lingering odor, rinse the area again.
Once you’re sure all the soap is gone, use clean towels to wipe down flat surfaces. For those hard-to-reach spots or deep crevices, a leaf blower or shop vacuum can come in handy to remove standing water and speed up the drying process [8, 13]. With the inflatable thoroughly rinsed and free of soap, you’re ready to move on to drying and inspecting for any potential damage.
Step 5: Dry and Check for Damage
After rinsing, make sure the inflatable is completely dry to avoid mold and maintain its condition. Any lingering moisture in the vinyl can lead to mold and mildew growth within just 24 to 48 hours. Once mold sets in, it can cause permanent stains, weaken the stitching, and create persistent odors that are very difficult to eliminate.
"Moisture is the number one enemy of bounce houses." – Wojin Inflatables
Air Dry in the Shade
Keep the inflatable upright and fully inflated during the drying process. This allows air to circulate across all surfaces, including seams and tight corners. Place it in a shaded area with good airflow to prevent direct sunlight from causing fading or damage to the vinyl over time. Depending on the size of the inflatable and weather conditions, drying may take anywhere from a few hours to over a day.
Blot Excess Water
Even with airflow, water often collects in seams or flat sections. Use clean towels to blot these areas, ensuring no moisture remains. A leaf blower can be especially helpful for drying hard-to-reach spots and removing water from crevices and the underside of the unit.
Once the inflatable is completely dry, inspect it for any signs of damage.
Check for Tears and Wear
While the inflatable is still inflated, carefully examine all surfaces for potential damage. Small holes or tears are easier to spot when the vinyl is stretched. Pay close attention to seams, stitching, and areas that endure heavy use, as these are more prone to wear and tear. Open vent zippers to check for internal moisture or hidden damage.
| Inspection Area | What to Look For |
|---|---|
| Vinyl Surface | Tears, holes, rips, or permanent stains |
| Seams & Stitching | Loose threads, fraying, or signs of mold/mildew |
| Crevices | Trapped debris (like rocks, sticks, or toys) or pooled water |
| Safety Features | Damage to netting, ladders, or side rails |
"It is crucial to repair the rips and tears when small. You will face more serious issues later if you put the repairs off." – Reservety
Use a repair kit to fix small tears right away – addressing these early can help avoid larger structural problems down the line. Once you’re confident the inflatable is completely dry and damage-free, deflate it and store it in a cool, dry area, away from moisture and heat.
Cleaning Supplies You’ll Need
When it’s time to clean your vinyl inflatable, having the right supplies on hand can make all the difference. Using the proper tools ensures you clean efficiently while protecting the vinyl from damage. The wrong products, however, can lead to permanent harm.
Recommended Supplies
Start with soft-bristle brushes or sponges to gently remove dirt without scratching the surface. A shop vacuum with a crevice attachment is perfect for pulling out debris like sand or grass from deep seams before introducing any water. For cleaning, go with a mild dish soap or a simple DIY mix: three parts water, one part vinegar, and a few drops of bleach-free dish soap.
To tackle moisture, microfiber towels are excellent for blotting water from seams, where mold tends to grow. A leaf blower can help dry hard-to-reach crevices. Lay down a waterproof tarp under the inflatable to prevent new dirt or punctures while you work. For disinfecting, opt for bleach-free wipes like Lysol or Clorox to kill bacteria and viruses without harming the vinyl’s protective coating.
These supplies will help you clean thoroughly while keeping your inflatable in great condition.
What Not to Use
Some products can cause serious damage to vinyl and should be avoided. For instance, bleach is notorious for fading colors and breaking down fabric. As Wojin Inflatables warns:
"Bleach will almost always cause color fading".
If you must use bleach to address mold, dilute it in a 50/50 water mix and apply sparingly, only to the affected area.
Avoid high-pressure washers, which can force water deep into seams, making them hard to dry and increasing the risk of mold. Similarly, stay away from abrasive tools like steel wool or stiff brushes – they can create tiny scratches that trap dirt and weaken the vinyl over time. Lastly, steer clear of solvents or harsh chemicals that strip away the vinyl’s protective coating, leading to brittleness.
Conclusion
Keeping vinyl inflatables clean is a straightforward process that involves five key steps: deflating and prepping, removing debris, scrubbing with a vinyl-safe cleaner, rinsing thoroughly, and drying while inspecting for damage. Skipping steps like removing debris can lead to faster material wear, and neglecting to dry properly opens the door for mold and mildew, which can cause permanent stains and unpleasant odors.
Regular cleaning does more than just maintain appearances – it extends the life of your inflatable and helps eliminate health risks like MRSA, the flu, and pink eye. Plus, it allows you to spot potential issues such as tears, loose seams, or hidden debris that could lead to injuries during use.
If you’d rather not worry about cleaning, Bouncy Rentals USA has you covered. They take care of everything, from thorough sanitization between rentals to a second round of disinfection upon return. Their team also handles delivery, setup, and safety checks, so you can focus on enjoying your event with peace of mind knowing the equipment is clean, insured, and ready for action.
Whether you’re maintaining your own inflatable or renting from Bouncy Rentals USA, proper cleaning is essential to keep your unit safe, hygienic, and always ready for fun.
FAQs
What cleaning products work best for vinyl inflatables?
When it comes to cleaning vinyl inflatables, you can’t go wrong with a simple soap and water mix. A bit of dish soap combined with warm water does the trick, or you can opt for vinyl-safe commercial cleaners like Simple Green, OdoBan, or Lysol. Just make sure to follow the dilution instructions on the label to keep the material intact.
Stick to gentle methods – harsh chemicals like bleach are a no-go, as they can discolor or weaken the vinyl over time. Use a soft cloth or sponge to apply your cleaning solution and carefully scrub away any dirt without scratching the surface.
How do I keep my inflatable mold-free?
To keep your inflatable mold-free, ensure it’s completely dry before putting it away. After cleaning, carefully wipe it down and allow it to air-dry in a shaded, well-ventilated spot. Once it’s fully dry, store it in a cool, dry area, away from any moisture or humidity. Even a tiny bit of leftover water can cause mold or mildew to develop, so don’t rush the drying process. Take the time to do it right.
What should I do if I notice tears or damage while inspecting a vinyl inflatable?
If you notice any rips or damage while inspecting the inflatable, stop cleaning right away. Set it aside and take care of the issue before using it again. For small repairs, you can use a repair kit approved by the manufacturer. If the damage seems more serious, it’s best to reach out to the rental company for professional repairs. Keeping the inflatable in proper shape is key to ensuring both safety and longevity.