Inflatable repair kits are essential for fixing minor damages like punctures, cuts, and tears in bounce houses, water slides, and other inflatables. These kits save time and money while keeping your equipment operational. Here’s what you need to know:
- Key Components: Most kits include vinyl cement adhesive, PVC patches, sewing tools, seam rollers, and scissors. Higher-end kits may also have specialized tools like valve wrenches and velcro patches.
- Cost: Basic kits start at $5, while commercial-grade options range from $47 to $129.95, offering more durable materials and tools.
- Repair Process: Locate the damage using leak detection methods like soapy water or listening for leaks, clean the area with rubbing alcohol, and apply a patch with adhesive. Allow 2-24 hours for curing.
- Maintenance Tips: Clean inflatables after use, store them dry, and inspect regularly for damage to extend their lifespan.
Investing in the right repair kit and following proper maintenance practices ensures your inflatables stay safe, functional, and ready for use.
What’s Inside an Inflatable Repair Kit
An inflatable repair kit is your go-to solution for fixing minor damages efficiently. Depending on the kit’s price, you’ll find varying tools and materials. Basic kits, starting at around $5.00, cover simple vinyl repairs, while commercial-grade options, priced at about $47.00, include heavy-duty supplies for more demanding fixes. Here’s a breakdown of the essential components that help you tackle repairs like a pro.
Adhesives and Sealants
Adhesives and sealants are the backbone of any repair kit, providing the strength and durability needed for a reliable fix. A standout product in this category is vinyl cement, such as HH66, which chemically bonds patches to the inflatable surface. Unlike general-purpose glues, these specialized adhesives are designed specifically for PVC and vinyl materials, ensuring a waterproof and long-lasting hold. For smaller issues like pinholes, sealants offer a quick and effective solution.
It’s crucial to match the adhesive to your inflatable’s material. Most inflatables, like bounce houses and water slides, are made from vinyl or PVC, so using the right glue is key. Keep safety in mind – these adhesives are flammable and emit strong odors, so always work in a well-ventilated area away from open flames.
Patches and Reinforcement Materials
Repair kits typically include PVC or vinyl patches, often in a variety of colors to blend with your inflatable. Professional-grade kits may feature heavy-duty 15-oz PVC vinyl patches, built to withstand outdoor elements and frequent use. For small punctures, pre-cut patches are convenient, while larger rolls allow for custom-sized fixes. To ensure a secure bond, patches should extend 1 to 2 inches beyond the damaged area on all sides.
For more extensive damage, like large tears, sewing tools are indispensable. Items such as industrial-grade waxed polyester thread, sewing awls (like the Speedy Stitcher), and both curved and straight needles provide the necessary reinforcement before applying a patch. Cutting patches into round or oval shapes can further reduce the risk of peeling edges.
Additional Tools
The right tools can make all the difference in achieving a durable repair. Common items like rubbing alcohol or mild soap help clean the repair area, ensuring a strong adhesive bond. Seam rollers are great for removing air bubbles and flattening patches, while scissors and markers allow you to trim and outline the damaged area with precision.
Some advanced kits include extras like seam rippers for accessing internal damage, valve wrenches to replace faulty valves, and velcro patching strips for modular repairs. These additional tools enhance your ability to handle a variety of repair scenarios, ensuring every fix is as sturdy as the last.
How to Repair an Inflatable: Step-by-Step
3-Step Inflatable Repair Process: Find, Prepare, and Patch
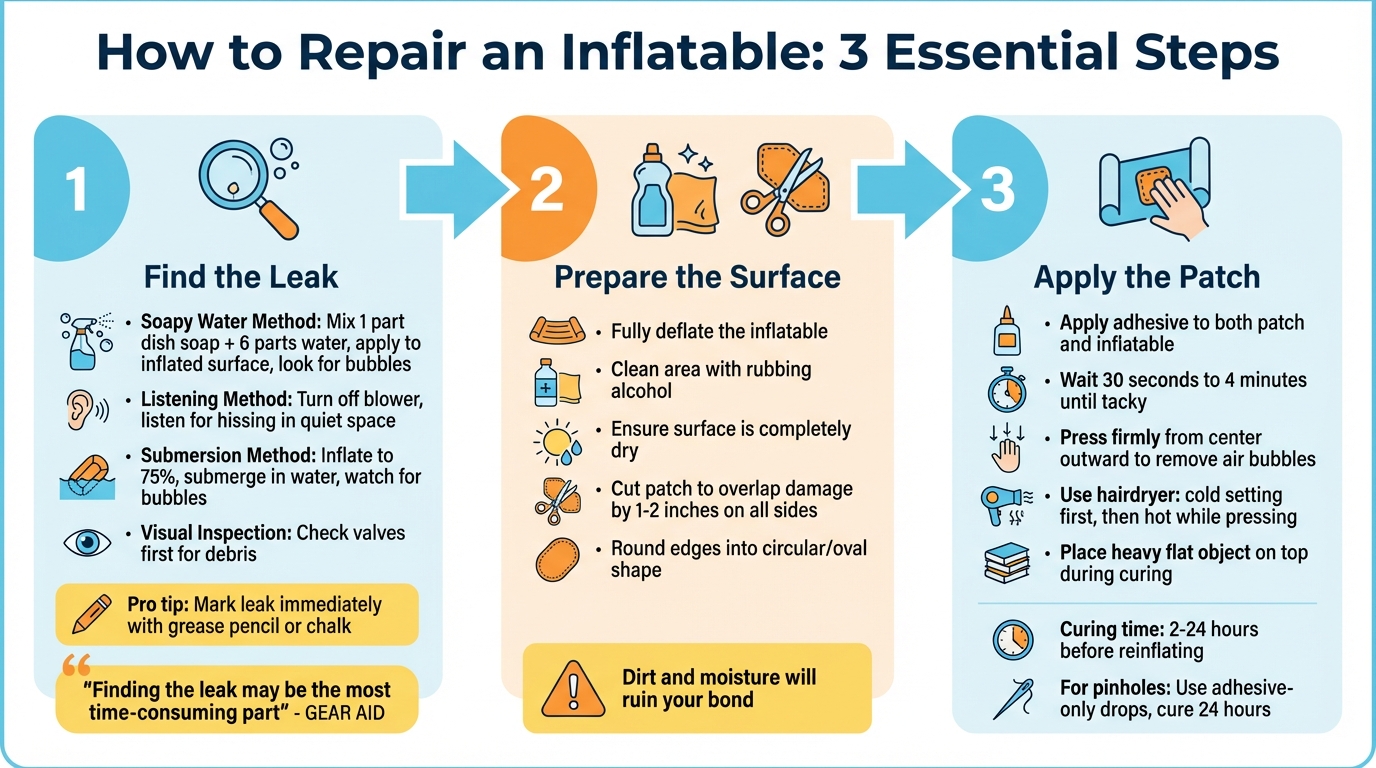
Fixing an inflatable involves three key steps: finding the leak, preparing the surface, and applying the patch. Skipping any of these can compromise the durability of your repair.
Finding Leaks or Damage
Start by checking the valves. Leaks often occur when debris like sand or grit prevents the valve flap from sealing properly. Use an air pump to clear out any foreign particles before assuming the material itself is damaged. If a Boston valve is leaking, try tightening it with a valve wrench before moving on to patching.
For fabric punctures, the soapy water method works wonders. Mix one part dish soap with six parts water and apply it to the inflated surface. Escaping air will create bubbles, helping you pinpoint the leak. Adding a small amount of glycerin or corn syrup can improve bubble formation, making it easier to spot the problem .
"Finding the area where your inflatable is leaking may be the most time-consuming part of the process." – GEAR AID
For large inflatables like bounce houses, turn off the blower after inflation and listen for a hissing sound in a quiet space. Proper cleaning and maintenance of these units also helps prevent mold and material degradation. Smaller items or removable tubes can be partially inflated (about 75%) and submerged in water to spot escaping bubbles. Once you find the leak, mark it immediately with a grease pencil, non-permanent marker, or chalk – just keep in mind the mark might disappear when the inflatable is deflated.
| Method | Best For | Pros | Cons |
|---|---|---|---|
| Listening | Large leaks | Quick; no tools needed | Hard in noisy areas; misses pinholes |
| Soapy Water | All leak sizes | Accurate; pinpoints exact spot | Messy; requires cleanup afterward |
| Submersion | Small/removable items | Reliable for tiny leaks | Impractical for large inflatables |
| Visual/Feeling | Obvious damage | No equipment needed | Tedious; easy to overlook small punctures |
Once you’ve located and marked the leak, you’re ready to prepare the surface for repair.
Preparing the Surface for Repair
A properly prepared surface is essential for a strong adhesive bond. Fully deflate the inflatable and lay it flat on a clean, dry surface . Clean the area around the leak using rubbing alcohol, which evaporates quickly and leaves no residue – ideal for ensuring the adhesive sticks well.
"Dirt and moisture will ruin your bond." – Crocpad
Make sure the surface is completely dry before continuing. Even a tiny amount of moisture can weaken the bond, causing the patch to peel off within days . Cut your patch material so it overlaps the damaged area by at least 1–2 inches on all sides. Round off the edges into a circular or oval shape to avoid peeling .
Applying the Patch or Sealant
Spread adhesive evenly on both the patch and the inflatable, then wait until it becomes tacky – this usually takes 30 seconds to 4 minutes . Firmly press the patch onto the inflatable, smoothing from the center outward to remove air bubbles.
For a stronger bond on PVC materials, use a hairdryer. Start with a cold setting to dry the adhesive until it’s tack-free, then switch to a hot setting while pressing firmly with a flat tool. This creates a permanent, weld-like bond. To reinforce the adhesion during curing, place a heavy, flat object – like a wood block or diving weight – on top of the patch.
Allow the adhesive to cure for 2 to 24 hours before reinflating. For small pinholes, a few drops of specialized repair adhesive may be enough – no patch required. Let it cure for 24 hours .
Following these steps ensures a solid repair that keeps your inflatable in working condition, saving you time and money in the long run.
How to Choose the Right Repair Kit
Once you’ve got the hang of repair techniques, picking the right kit becomes key to making sure your fixes last.
What to Look For
Start with material compatibility. Most party inflatables are made from PVC vinyl, while pool toys might require kits designed for materials like rubber, neoprene, or Hypalon. Not sure what material you’re dealing with? Check the interior color. PVC is usually the same color inside and out, while Hypalon often has a different interior color.
Next, consider the repair method. Adhesive-and-patch kits are ideal for creating strong, permanent seals on high-pressure equipment. For quick fixes on lighter items like holiday inflatables, peel-and-stick patches can do the job, but they won’t hold up for heavy-duty uses like commercial bounce houses. Tiny pinholes? Adhesive-only sealants, like Coghlan’s AirStop, can seal those without needing a patch.
It’s also helpful to choose kits with multi-colored patches to better match your inflatable. Look for professional-grade adhesives that provide waterproof, durable bonds. Tools like seam rollers, brushes, or sewing awls can make your repairs easier and more effective. If your inflatable is used outdoors, opt for adhesives that are waterproof and UV-resistant to withstand sun exposure.
Pricing can give you a good idea of what to expect. Basic kits, priced around $5.00, typically include a few patches for a single material type. Mid-range kits, costing $10.00 to $15.00, often include quick-curing adhesives and a larger supply of patches. For heavy-duty or commercial use, expect to spend $20.00 to $50.00 or more. These kits usually come with industrial-grade adhesives, sewing tools, and specialized materials like mesh or netting.
Repair Kits for Party Inflatables
For commercial bounce houses and water slides, you’ll need repair kits designed for heavy-duty use. Standard moonwalk repair kits, priced between $47.00 and $49.99, come packed with essentials like eight multi-colored 15-oz PVC vinyl patches, 4 oz. of vinyl cement, a sewing awl with industrial thread, mesh, rainbow netting for window repairs, and a seam ripper. These kits cover most common repairs rental operators face.
If you want to go all out, premium moonwalk repair kits offer even more. At around $129.95, these include sixteen multi-colored patches, a full pint (16 oz.) of vinyl cement, a 1 lb spool of industrial thread, five seam rippers, velcro patches, and even a DIY deflation zipper. The storage bag doubles as a sandbag anchor once emptied – a great bonus for rental businesses.
A special shoutout goes to rainbow netting, the large-squared mesh used in bounce house windows. It requires specific patches not found in standard kits. Tools like seam rippers are crucial for opening up an inflatable’s internal structure without damaging the vinyl further, making internal patching possible. Meanwhile, sewing awls are tough enough to punch through multiple layers of thick commercial vinyl, where regular needles would fail.
For rental operators or frequent party hosts using inflatables from companies like Bouncy Rentals (https://bouncyrentalsusa.com/), investing in a premium kit is a smart move. The larger adhesive supply and specialized tools mean you can tackle multiple repairs without constant resupply. Once you've got the right kit, keeping up with maintenance will help extend the life of your inflatables.
Maintenance Tips to Avoid Damage
Taking proper care of your inflatables can save you from frequent repairs and extend their lifespan. A little effort in prevention can make a big difference.
Cleaning and Storage
After each use, follow these steps for cleaning bounce houses by vacuuming or blowing off loose dirt, then scrubbing gently with mild soap and a soft brush to avoid scratches. Pay extra attention to high-traffic areas like entry points, using circular motions to clean effectively. If the inflatable was exposed to chlorinated pool water or saltwater, rinse it thoroughly with fresh water to protect the vinyl from chemical damage.
Make sure the inflatable is completely dry before storing it to prevent mold and mildew. Use microfiber towels to wipe it down, and allow it to air dry fully. As Happy Jump explains:
"Proper maintenance ensures the material stays strong and prevents early wear".
When storing, roll the inflatable instead of folding it to avoid creating stress points that could lead to cracks. Keep it in a cool, dry place away from direct sunlight, as UV rays can weaken the material and cause fading. To prevent moisture issues, elevate the inflatable off concrete floors using pallets or shelves. Check on your stored unit every 3–4 weeks during the off-season to catch any signs of moisture or pest problems early. Regular inspections will help ensure your cleaning and storage efforts are paying off.
Regular Inspections
Before and after each use, inspect your inflatable for any damage. Look for punctures, tears, small holes, or abrasions on the surface, and examine seams and stitching for signs of fraying or separation. If you notice soft spots or uneven, bulging areas, these could indicate blown baffles – internal structural issues that typically require professional repair.
For slow air leaks, start by checking the valve, as sand or grit can prevent it from sealing properly. Use an air pump to clear out any debris. To pinpoint hard-to-find leaks, apply a mixture of dish soap and water to the inflated surface; bubbles will form where air is escaping.
Safe Usage Guidelines
Proper cleaning and inspections are essential, but following safe usage practices is just as important for preventing damage. Always use a ground tarp to protect the bottom of the inflatable from sharp objects and abrasives. Rake the setup area beforehand to remove sticks, rocks, and debris. Stick to weight capacity limits to avoid overloading the seams and stressing the material. Enforce a "no shoes" rule, and keep sharp items like jewelry, keys, and pets away from the inflatable. Instead of dragging it across surfaces, use a dolly or hand truck for transport.
Conclusion
This guide has covered essential tools, techniques, and maintenance tips for ensuring lasting repairs on inflatable equipment. For event operators, having a dependable inflatable repair kit is a must. As Hero Kiddo Inflatables emphasizes:
"Knowing how to fix your lightweight commercial-grade bounce house is essential to ensure uninterrupted enjoyment and safety for users".
A well-stocked repair kit allows you to handle minor punctures immediately, minimizing downtime and keeping operations smooth. Quick fixes not only protect your investment but also ensure your guests remain satisfied.
Understanding your kit’s components and knowing when to patch or replace is key to effective repairs. Always use adhesives designed for specific materials like PVC or vinyl – household glues won’t hold up. Techniques such as rounding the edges of patches and allowing a full 24-hour curing period help create durable bonds that stand the test of time.
Routine maintenance and proper repair methods significantly extend the lifespan of your inflatables. Regular inspections can catch small issues early, while proper cleaning and storing your bounce house help prevent damage altogether. As MinyeFun points out:
"Understanding basic repair techniques can save you money and extend your investment’s lifespan significantly".
FAQs
How do I know if my inflatable is PVC, vinyl, or Hypalon?
To figure out what material your inflatable is made of, take a close look at its surface and color. Hypalon stands out with its matte finish and a dark gray or black interior when deflated. If you sand it, the surface turns suede-like. On the other hand, PVC or vinyl has a glossy finish and maintains the same color on both sides. That matte texture is the giveaway for Hypalon.
When should I sew a tear instead of just using a patch?
Sewing works best for fixing small, clean tears or seams, as it allows you to securely stitch the material and bring back the inflatable’s strength. This approach is especially helpful in spots where adhesive patches might not stick well or could eventually come loose. On the flip side, patching is ideal for larger or oddly shaped holes where stitching alone may not provide a reliable fix.
How can I make a patch repair last longer outdoors?
To make sure an outdoor patch repair holds up over time, start by cleaning and drying the damaged area completely. This step is crucial to ensure the adhesive sticks properly. Choose a reliable adhesive, such as PVC vinyl glue, and press the patch firmly onto the surface. For better durability, cut the patch slightly larger than the tear to cover the area fully. You can also use a hairdryer on a cool setting to help the adhesive bond securely, while keeping moisture and dirt at bay.