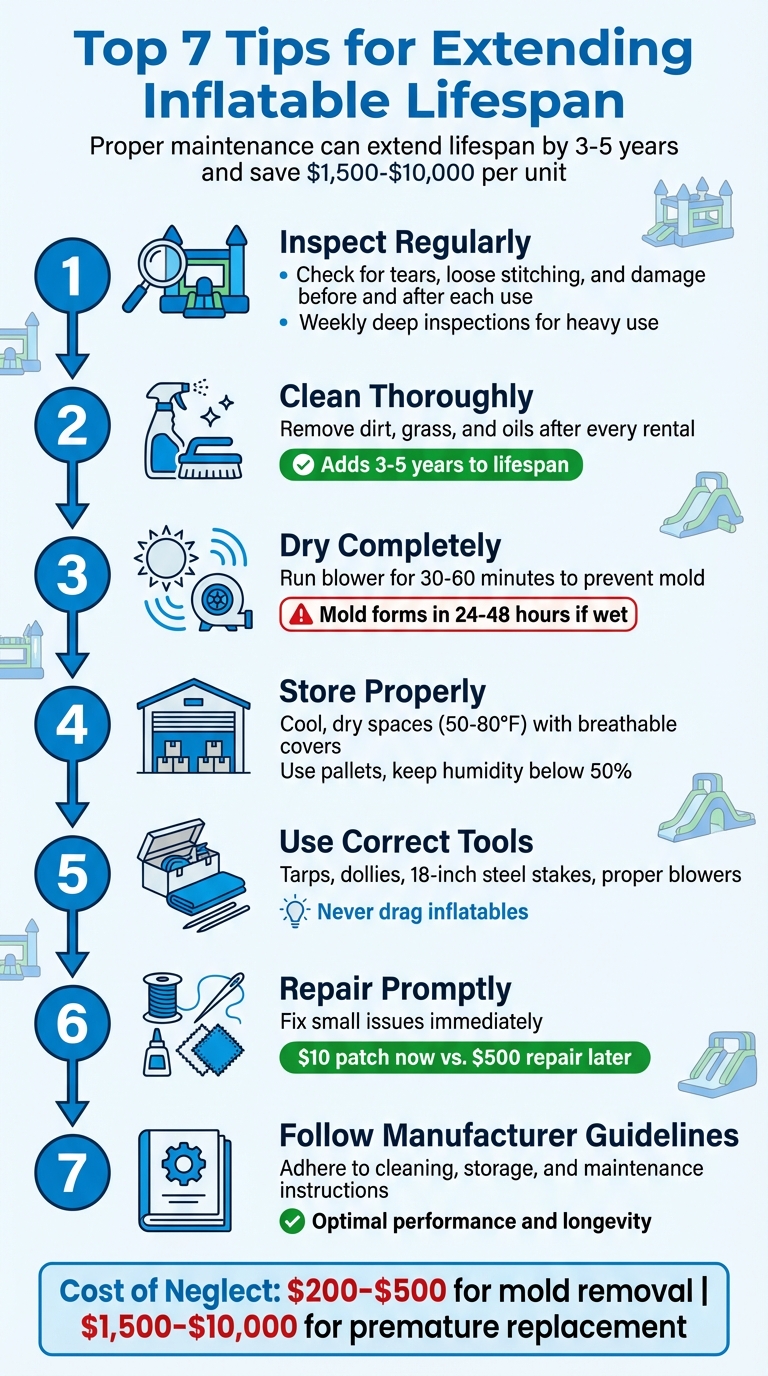
Maintaining inflatables properly can save you thousands of dollars and extend their lifespan by 3–5 years. Neglecting care could lead to costly repairs or replacements, ranging from $1,500 to over $10,000 per unit. Here’s how to keep your inflatables safe, durable, and profitable:
- Inspect regularly: Check for tears, loose stitching, and other damage before and after each use.
- Clean thoroughly: Remove dirt, grass, and oils after every rental to prevent vinyl deterioration.
- Dry completely: Moisture can cause mold within 24–48 hours, leading to permanent damage.
- Store properly: Use cool, dry spaces with breathable covers to avoid mold and material cracking.
- Use correct tools: Protect inflatables during setup and takedown with tarps, dollies, and proper anchoring. It is also vital to set up a safety perimeter to keep the unit and users secure.
- Repair promptly: Fix small issues immediately to avoid costly repairs later.
- Follow manufacturer guidelines: Adhere to cleaning, storage, and maintenance instructions for optimal performance.
7 Essential Steps to Extend Inflatable Lifespan by 3-5 Years
1. Inspect Equipment Before and After Every Rental
Inspection and Maintenance Frequency
Before each rental, take five minutes to inflate the unit and check for tears, loose stitching, or anchor issues. After the rental, while the inflatable is still inflated, inspect it again to catch any new damage that might have occurred during use. For inflatables that see frequent use, add deeper, more thorough inspections to your routine to catch hidden problems.
For heavily used units, conduct a weekly deep inspection that focuses on critical areas like inflation tubes, air vents, and electrical components. Schedule monthly professional inspections to assess blower motors and internal structures, and ensure annual certifications to meet safety standards. Extra inspections should follow extreme weather events, overloading, or setups on rough surfaces.
To make inspections more precise, use practical tools. Painter’s tape can mark damage on inflated units, helping you decide whether to patch or replace the inflatable, while laminated checklists help ensure no step is missed. Take photos during inspections to document wear patterns and track the condition of your equipment over time.
Here’s a quick reference table to identify wear and tear across different parts of your inflatable:
| Inspection Category | Specific Signs of Wear & Tear |
|---|---|
| Vinyl Body | Punctures, small tears, white stress lines, worn slide channels |
| Structural | Loose stitching, separated seams, sagging sections |
| Anchoring | Frayed straps, stretched webbing, corroded D-rings |
| Blower/Electric | Clogged filters, cracked cord insulation, debris in vents |
| Safety/Access | Seized zippers, dirt in zipper teeth, worn entrance steps |
Pay close attention to white stress lines along fold points – these indicate weakening material and potential leaks. Check blower power cords for knots, as they can damage internal wiring, and inspect D-rings for signs of corrosion or fatigue. If a seam feels damp, run the blower immediately to dry it out and prevent mold from forming within 24–48 hours.
2. Clean Inflatables After Each Use
Cleaning and Hygiene Practices
After completing your inspections, cleaning your inflatable immediately is key to keeping the vinyl in good condition and ensuring it lasts longer. Even if the unit looks clean, always clean it after every rental. Grass, dirt, food residue, and body oils can weaken the vinyl over time if not removed. Start by clearing away loose debris with a vacuum or soft broom. Then, wash the entire inflatable using a mixture of warm water and mild dish soap, like Dawn. Use a soft brush to avoid damaging the surface.
Rinse thoroughly with a garden hose to remove all soap residue. After washing, spray a vinyl- and kid-safe disinfectant on high-touch areas, such as entrances and slides, to kill germs and bacteria. For tough stains, treat them right away with a baking soda paste or a vinyl-safe stain remover to stop them from setting. Once cleaned and disinfected, drying the inflatable properly is crucial to avoid damage.
Stay away from undiluted bleach, ammonia-based cleaners, or pressure washers, as these can harm the material. If you must use bleach, dilute it in a 10:1 ratio and rinse immediately. Don’t forget to clean the blower housings and intake screens separately to prevent overheating.
To dry the inflatable, keep it inflated for 30–60 minutes after washing so the interior surfaces can air-dry completely. Use clean, absorbent towels to remove standing water in areas like slide channels, corners, and seams, as these are prone to mold growth if left damp. Once dry, apply silicone spray to lubricate zippers on the blower tube and access panels, preventing them from sticking.
"Clean after every single use, no exceptions. Grass, dirt, food residue, and body oils break down vinyl over time." – Reservety
Consistent cleaning can add 3–5 years to an inflatable’s lifespan. Skipping this step could result in costly repairs, like $200–$500 for professional mold removal or $1,500–$5,000 for replacing the unit prematurely.
3. Dry Completely Before Storing
Storage Environment and Conditions
After cleaning your inflatables, ensuring they are completely dry before storing them is essential to prevent mold damage. Moisture left behind can lead to mold growth within just 24–48 hours, which can permanently damage the vinyl, especially at the seams where mold is nearly impossible to remove once embedded.
To dry thoroughly, run the blower for 30–60 minutes to circulate air through hidden areas like seams and interior corners. While the blower operates, use clean, absorbent towels to soak up any remaining water from slide channels, corners, and other areas prone to pooling. On humid days, consider adding box fans or dehumidifiers to speed up the drying process. These steps are critical for fully protecting your inflatables before storage.
"Deflating a wet bounce house is the single most common cause of mold." – Reservety
Before deflating, carefully check every seam and stitching line for dampness. If you find any moisture, continue running the blower and inspect folds and creases during deflation. These hidden areas are common spots where moisture can linger and lead to mold growth. By taking these precautions, you can help ensure your inflatables remain in excellent condition.
4. Store in a Cool, Dry Location
Storage Environment and Conditions
Storing your inflatables correctly is just as important as cleaning and drying them. Understanding why regular cleaning matters is the first step in a comprehensive maintenance routine. The ideal storage conditions are temperatures between 50°F and 80°F (10°C–27°C) with humidity levels below 50%. Extreme temperatures can wreak havoc on inflatables – vinyl becomes brittle and cracks when it dips below 32°F, while heat above 100°F can soften the material and weaken the adhesives used in the seams.
Avoid placing inflatables directly on bare concrete floors. Concrete can pull moisture from the ground, leading to condensation underneath, which promotes rot and mold growth. Instead, place your inflatables on wooden or plastic pallets or use industrial shelving to create a moisture barrier and improve air circulation.
When it comes to covering your inflatables, always opt for breathable canvas or mesh bags. Airtight plastic bags trap moisture, which can lead to mold growth in as little as 24–48 hours. To further control moisture, include 2–4 large silica gel or desiccant packs in each storage bag. These packs should be replaced or recharged every 2–3 months.
Additionally, ensure your storage area is free from direct sunlight and away from harmful chemicals like gasoline, lawn treatments, or solvents. Both UV rays and chemical fumes can degrade vinyl material over time.
| Storage Factor | Ideal Condition | Risk of Improper Storage |
|---|---|---|
| Temperature | 50–80°F (10–27°C) | Brittle vinyl below 32°F or weakened adhesives above 100°F |
| Humidity | Below 50% | Mold and mildew growth, leading to permanent odors |
| Surface | Pallets or shelving | Moisture wicking from bare concrete floors |
| Covering | Breathable canvas or mesh | Condensation buildup in airtight plastic bags |
During the off-season, inspect stored inflatables every 4–6 weeks for signs of moisture, odors, or pests. Rotate them every 2–3 months to prevent compression damage. By following these storage guidelines, you can extend the lifespan of your inflatables by an additional 3 to 5 years, potentially saving $1,500 to $5,000 per unit in replacement costs. Proper storage isn’t just about keeping your equipment safe – it’s about maximizing its value and ensuring it’s ready for use when you need it.
5. Use the Right Tools for Setup and Takedown
Follow Manufacturer Instructions
Setting up and taking down your inflatable correctly is just as important as cleaning and storing it properly. These steps play a big role in keeping it in good shape and avoiding unnecessary repairs or replacements.
Using the right tools is crucial. For example, laying a heavy-duty tarp under the inflatable during setup helps protect it from sharp objects on the ground. Instead of dragging the inflatable – which can cause damage – use a dolly or lift it carefully to avoid tears from debris.
When anchoring, use 18-inch steel stakes for grass or 40-lb sandbags for pavement. Ensure the blower matches the inflatable’s requirements (typically 1 HP or 1,200W) and keep the inlet tube straight for proper airflow. For power cords, secure them with Velcro wraps to prevent tangling and potential wire damage.
During takedown, a vacuum deflator is a game-changer for larger inflatables (15 x 15 feet or bigger). It removes trapped air and prevents moisture buildup, which can lead to mold or mildew. Roll the inflatable tightly toward the blower tube, avoiding repeated folds that could cause permanent creases or leaks. Always store stakes, sandbags, and blowers in separate, labeled bags to prevent punctures.
For maintenance, spray silicone on blower tubes and zippers to keep them working smoothly. Also, having a portable repair kit on hand – complete with vinyl patches, adhesive, and a small roller – can save you from costly repairs down the line. A $10 patch now can save you from a $500 repair later.
6. Fix Damage Right Away with Quality Repair Kits
Inspection and Maintenance Frequency
When you spot minor damage during inspections, don’t delay – address it immediately. A quick $10 patch today can save you from a hefty $500 repair bill down the line. Pay close attention to high-stress areas and look for white "stress lines" along folds, a telltale sign that the vinyl might be wearing out.
Adherence to Manufacturer Instructions
After identifying damage, stick to repair methods recommended by the manufacturer. A professional-grade repair kit is your best bet. These kits typically include heavy-duty vinyl patches in various colors, HH-66 Vinyl Cement (an industry-standard adhesive known for its waterproof and heat-resistant properties), a seam roller to eliminate air bubbles, alcohol wipes for surface preparation, and scissors to trim patches into rounded shapes to prevent peeling. Expect to pay between $59.00 and $79.99 for professional kits, though budget-friendly options are available starting at $20.99.
Here’s how to patch effectively:
- Following a checklist for sanitizing inflatable rentals, clean the damaged area with rubbing alcohol to remove oils and dirt.
- Cut a patch that extends 1–2 inches beyond the damaged spot, rounding the corners to reduce peeling.
- Apply adhesive to both the patch and the damaged surface, letting it set for 30 seconds to 2 minutes until tacky.
- Press the patch firmly from the center outward to remove air bubbles.
- Allow the adhesive to cure for 24 hours before using the inflatable again.
For larger tears (over 4–6 inches) or damage along seams, it’s better to call in a professional. Avoid using household glues or duct tape – these temporary fixes can fail under pressure and end up causing more harm than good.
7. Follow Manufacturer Instructions and Safety Rules
Adherence to Manufacturer Instructions
To get the most out of your inflatable and protect your investment, stick closely to the manufacturer’s manual. By following their care guidelines, you can extend the lifespan of your inflatable by an extra 3–5 years. These instructions often emphasize the same cleaning, inspection, and storage practices mentioned earlier, but with added specifics tailored to your particular product.
Pay special attention to rolling techniques. Proper rolling helps distribute stress evenly, preventing permanent creases that could lead to leaks. Folding along the same lines repeatedly can weaken the material, creating potential failure points. Train your team on the manufacturer’s recommended folding methods and use setup and takedown checklists to avoid over-stretching seams. These steps not only improve safety but also help your inflatable last longer.
Inspection and Maintenance Frequency
Incorporate the manufacturer’s inspection recommendations into your routine. Use their checklists for post-rental walkthroughs, weekly deep inspections for frequently used units, and off-season checks every 4–6 weeks. If your inflatables are in heavy rotation, remember to perform monthly maintenance on blowers to prevent overheating and keep everything running smoothly.
Storage Environment and Conditions
Store your inflatables in line with manufacturer guidelines, ideally in a space with temperatures between 50°F and 80°F. Use pallets to keep them off the ground and rotate storage positions every 2–3 months. This prevents compression marks and ensures the material stays in good condition.
Cleaning and Hygiene Practices
Stick to mild soap when cleaning your inflatables – harsh chemicals can strip the color and weaken the seams. Allow enough time for the inflatable to air-dry completely, as mold can start forming within 24–48 hours. If mold does develop, remediation can cost anywhere from $200 to $500 per unit, so this step is crucial.
Conclusion
Taking proper care of your inflatables is simpler than you might think and can make a huge difference in how long they last and how much you save in the long run. By sticking to these seven key steps – regular inspections, thorough cleaning, complete drying, proper storage, using the right tools, quick repairs, and following manufacturer instructions – you can protect your investment and keep your equipment in top shape.
The financial upside is hard to ignore. Good maintenance can extend the life of your inflatables by years, while neglect can lead to early replacements that range from $1,500 to $10,000 or more per unit. For example, a business managing 20 inflatables could lose 2 units annually to preventable damage, resulting in $3,000–$10,000 in unnecessary expenses.
"Small problems caught early are $10 patches; ignored problems become $500 repairs." – Reservety
At Bouncy Rentals USA, these maintenance steps are part of the routine. Every bounce house, water slide, and obstacle course undergoes detailed cleaning, inspection, and storage to ensure it reaches your event in perfect condition. When you rent from a company committed to equipment care, you’re guaranteed inflatables that are safe, clean, and ready to bring joy to kids and adults alike.
Whether you’re an owner or a renter, following these practices ensures you get the most out of your inflatables. Start implementing these steps today to enjoy long-lasting performance, safety, and savings for years to come.
FAQs
How do I prevent mold in my inflatable?
To keep mold at bay, start by cleaning your inflatable using mild soap and a soft brush. Once cleaned, rinse it thoroughly to remove any leftover residue. Make sure the inflatable is completely dry before storing it – moisture is a breeding ground for mold and mildew. Store it in a dry, well-ventilated space and check on it regularly to ensure it stays in good shape. A consistent routine of cleaning, drying, and proper storage is essential for avoiding mold issues.
What repairs can I do myself vs. hire a pro for?
You can tackle minor fixes yourself, like patching small tears or punctures, with tools such as repair kits, vinyl glue, or heavy-duty tape. Keeping up with regular cleaning and inspections can help you spot damage early, making DIY repairs much easier.
However, for bigger problems – like large tears, damaged seams, or structural issues – it’s smarter to call in a professional. These types of repairs often need specialized tools and skills to ensure everything stays safe and lasts longer.
What’s the best way to store inflatables off-season?
To keep your inflatables in top shape during the off-season, start by giving them a good cleaning. Use mild soap and a soft brush to scrub away dirt and grime, then rinse thoroughly. Make sure they’re completely dry before storing to avoid mold or mildew.
Find a cool, dry spot for storage – away from direct sunlight and sharp objects. To protect them further, keep them off the floor by placing them on shelves or in sturdy containers. This will help prevent damage and ensure they’re ready to use when the season rolls around again.