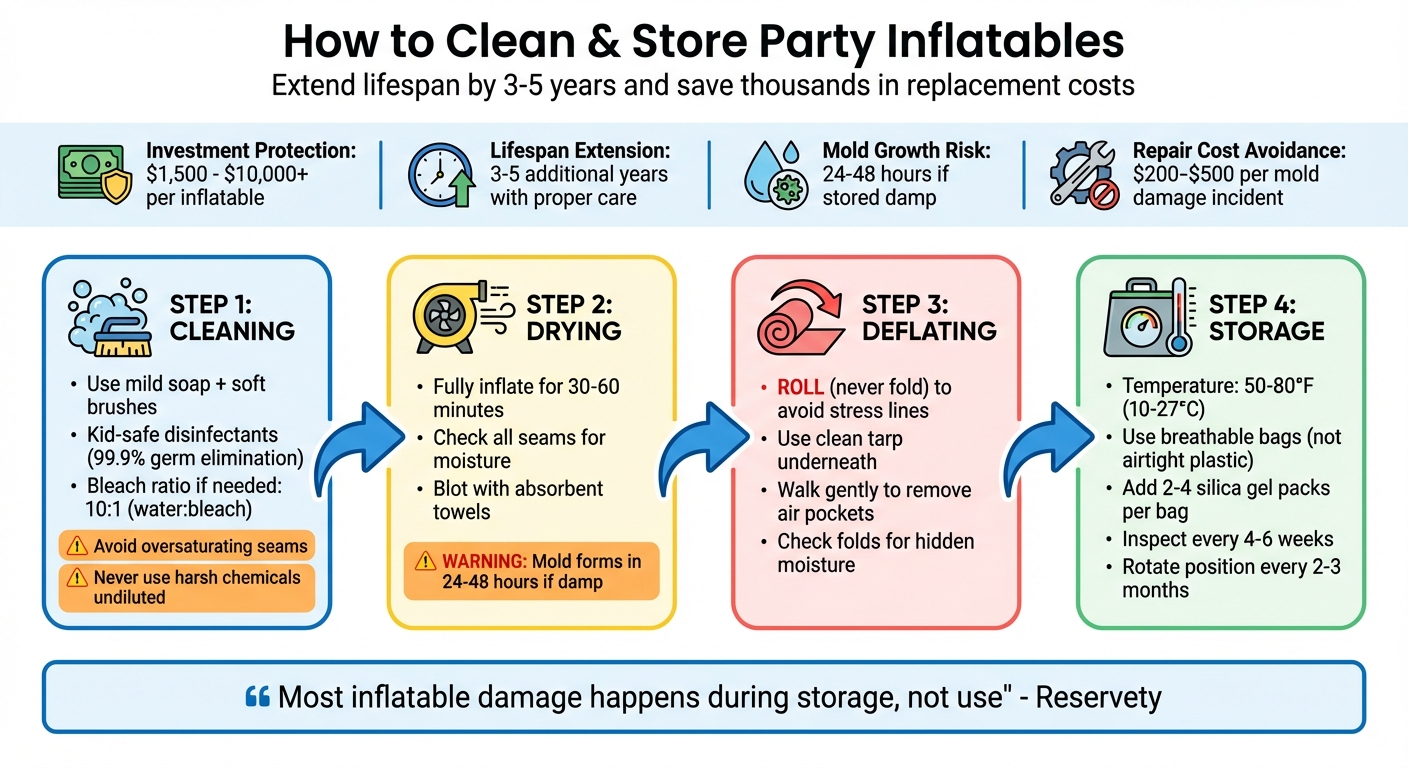
Party inflatables are expensive, with costs ranging from $1,500 to over $10,000. Proper cleaning and storage can extend their lifespan by 3–5 years and prevent costly repairs or replacements. The key is to clean thoroughly, dry completely, and store in a climate-controlled, pest-free space. Neglecting these steps can lead to mold, mildew, material damage, and safety issues. Here’s how to do it right:
- Cleaning: Use mild soap, soft brushes, and kid-safe disinfectants. Avoid harsh chemicals like bleach unless diluted (10:1 water-to-bleach ratio). Rinse thoroughly, and never oversaturate seams or blower areas.
- Drying: Fully inflate for 30–60 minutes to dry interior surfaces. Check seams for hidden moisture and blot with towels. Mold can form in 24–48 hours if stored damp.
- Deflating: Roll instead of folding to avoid stress lines and damage. Use a clean tarp and ensure no air pockets remain.
- Storage: Keep in a cool, dry space (50–80°F), use breathable bags, and add silica gel packs to absorb moisture. Inspect every 4–6 weeks for pests or moisture.
These steps save you money, prevent damage, and ensure your inflatables are always ready for safe, clean use.
4-Step Guide to Cleaning and Storing Party Inflatables
Cleaning Supplies You’ll Need
Having the right cleaning supplies is key to keeping your inflatable in great shape while avoiding damage.
Mild Soap and Cleaning Solutions
Stick to gentle, non-abrasive cleaners to protect the vinyl. Some effective options include:
- Mild dish soap mixed with water or diluted white vinegar for a natural approach.
- Vinyl-safe commercial products like Simple Green or Seventh Generation. Avoid ammonia-based cleaners and undiluted bleach.
As Reservety explains, "Bleach, ammonia-based cleaners, and pressure washers damage vinyl coatings, strip colors, and weaken seams. Stick to mild soap and vinyl-specific products". If you need to use bleach for stubborn stains, dilute it carefully – no stronger than a 10:1 water-to-bleach ratio – and rinse thoroughly to avoid harming the material.
Once you’ve chosen a cleaning solution, make sure you have the right tools for applying it.
Soft Brushes and Non-Scratching Sponges
Soft-bristled brushes are great for scrubbing away dirt, especially in textured areas and seams where grime tends to build up. For general cleaning and delicate spots, non-abrasive sponges are a safer option – they’re gentle on vinyl but less effective for deep stains.
Microfiber cloths are perfect for wiping surfaces clean and drying without leaving streaks or lint behind. Use a soft broom or handheld brush to sweep away loose debris before cleaning. For harder-to-reach areas, a shop vacuum or handheld vacuum with a brush attachment can help. Avoid stiff-bristled brushes, steel wool, or rough sponges, as they can scratch the vinyl and lead to leaks over time.
Disinfectants for Sanitization
To sanitize your inflatable, follow a sanitization checklist and choose kid-safe, non-toxic disinfectants. Some good choices include bleach-free disinfectant wipes, alcohol-based wipes with at least 70% isopropyl alcohol, or EPA-approved solutions like Lysol, OdoBan, or Awesome.
These commercial-grade disinfectants can eliminate 99.9% of germs, bacteria, and viruses. Many professional rental companies rely on specialized sanitizers like Arrow 150, a CDC-approved product that doesn’t require rinsing or wiping. Always check the product label for the recommended contact time, and test a small area first to ensure it doesn’t cause discoloration.
Using the right cleaning supplies and tools will help extend the life of your inflatable and keep it looking its best.
How to Clean Party Inflatables
Once you’ve gathered your cleaning supplies, it’s time to dive into the steps for a thorough cleaning process.
Remove Debris and Check for Damage
Start by removing loose debris like grass, leaves, sand, and dirt. Use a soft broom or a handheld vacuum with a brush attachment to clean the surface. Clearing debris before using water is essential to avoid creating mud.
While you’re at it, inspect the inflatable for any signs of damage. Pay close attention to high-stress areas like anchor points, D-rings, and entrances, as these spots often show wear and tear. If you spot tears, holes, or loose stitching, mark them with painter’s tape for easy repair later. As Reservety wisely notes:
Small problems caught early are $10 patches; ignored problems become $500 repairs.
Don’t forget to wipe down blower housings and clean intake screens during this step. Once the debris is cleared and any damage is marked, you’re ready to move on to washing.
Wash with Soap and Water
Create a cleaning solution by mixing 3 parts water with 1 part white vinegar and adding a drop of mild dish soap. Work in small sections, about 3–4 square feet at a time. Apply the solution to one section and let it sit for 2–3 minutes to loosen dirt. Then, gently scrub using a soft-bristled brush, microfiber cloth, or non-abrasive sponge.
Be careful not to oversaturate the inflatable, especially near seams and blower motor areas, as trapped moisture can lead to mold. Vinyl and PVC inflatables can handle a bit more water and gentle pressure, but nylon materials require very light scrubbing and minimal water to avoid weakening the fibers.
Rinse Thoroughly
After scrubbing, rinse each section with a gentle garden hose until the water runs clear. Blot any pooled water from seams to prevent damage. This step is crucial since leftover soap residue can attract dirt and harm the material over time. As Reservety points out:
Soap residue left on vinyl attracts dirt, creates a sticky surface, and can degrade the material over time.
Once rinsed, keep the inflatable fully inflated for 30 to 60 minutes. This allows airflow to dry the interior surfaces and seams properly.
Apply Disinfectant
With the inflatable still slightly damp, spray a kid-safe disinfectant over all surfaces, focusing on high-touch areas. Let the disinfectant sit for the recommended dwell time specified by the manufacturer to ensure it kills 99.9% of germs, bacteria, and viruses. Afterward, either air dry the inflatable or blot away any excess moisture.
Make sure it’s completely dry before deflating to prevent mold growth. For popular inflatable water slides, consider applying a specialized slide lubricant after disinfecting and drying to maintain a slippery and functional surface.
Drying and Deflating Your Inflatable
Dry Completely Before Storage
Leaving moisture on your inflatable can lead to serious issues. Mold can start growing in as little as 24–48 hours if water is left behind, causing unpleasant odors and potential damage. After disinfecting your inflatable, keep the blower running for 30–60 minutes to push air through the interior and dry areas you can’t easily reach.
To tackle any remaining water, use absorbent towels to blot damp spots, paying extra attention to seams where moisture tends to hide and mold thrives. Run your hand along every seam – if you detect any dampness, let the blower run longer. As Reservety points out:
"Deflating a wet bounce house is the single most common cause of mold."
Taking the time to dry your inflatable thoroughly not only prevents mold but can also extend its lifespan by several years.
Once you’re sure it’s completely dry, you can move on to deflating it properly.
Deflate Without Creating Creases
After drying, deflate your inflatable with care to avoid damaging the material. Instead of folding, always roll the unit. Folding can create sharp creases, stress lines, or even leaks over time. Rolling, on the other hand, spreads the pressure evenly across the vinyl surface.
Start by laying a clean tarp on the ground to protect the inflatable from dirt and debris during deflation. For larger inflatables (over 15×15 feet), consider using a vacuum deflator attachment. This tool removes trapped air more efficiently and helps reduce the packed size.
When rolling, begin at the end farthest from the blower tubes and roll toward them, which helps push out all the air. Walk gently across the surface – without shoes – to press out any remaining air pockets and prevent condensation buildup. Midway through, check folds and creases for hidden moisture, as these areas are often overlooked when the inflatable is fully inflated.
How to Store Party Inflatables
Once your inflatables are cleaned, dried, and deflated, storing them correctly is essential to protect your investment.
Choose a Cool, Dry Storage Location
The storage environment plays a big role in maintaining inflatables. Keep the area temperature-controlled between 50–80°F (10–27°C). Cold temperatures can make vinyl brittle, while heat above 100°F can soften the material and weaken adhesive seams. To prevent mold and mildew, maintain humidity levels below 50%. As Reservety points out:
"Most inflatable damage does not happen during use. It happens during storage."
Avoid placing inflatables directly on concrete. Instead, use pallets or tarps to elevate them and prevent moisture buildup. Once the location is ready, focus on using the right storage materials.
Use Storage Bags or Containers
Opt for breathable canvas or mesh bags rather than airtight plastic, which can trap moisture and lead to mold within 24–48 hours. If you use plastic bins, drill small air holes to allow ventilation.
Add 2–4 silica gel packs to each storage bag to absorb moisture, and label the bags with details like the unit name, dimensions, and the date of the last cleaning. To deter pests, place cedar blocks or peppermint sachets in the storage area. Rodents are drawn to the warmth of packed vinyl and may chew through it, so this extra step can save you trouble. Store accessories like metal stakes, sandbags, and blowers separately in padded bins to avoid punctures or compression damage.
Regular checks are just as important as proper packing.
Inspect and Rotate Regularly
Storing inflatables isn’t a “set it and forget it” process. Inspect storage bags every 4–6 weeks during the off-season for moisture, strange odors, or pest activity. Rotate the position of stored inflatables every 2–3 months – flip or shift them to prevent flat spots or compression marks. Inflating the units every few months is also a smart move. It helps circulate air inside and lets you spot slow air leaks or pest damage early.
Matthew Lluis from Event Rental Systems sums it up perfectly:
"If your inventory goes into storage clean, dry, and organized, it will come out ready to rent."
Conclusion
Taking proper care of your inflatables is more than just good practice – it’s a smart way to protect your investment and ensure they last. With proper cleaning and storage, you can extend the lifespan of your equipment by 3–5 years, potentially saving thousands of dollars on replacements. Plus, consistent maintenance ensures your inflatables remain safe and reliable for every event.
Neglecting storage and upkeep can lead to hefty repair or replacement costs. For example, repairing mold damage can cost anywhere from $200 to $500 per unit. If a business with 20 inflatables loses just two each year due to preventable damage, the replacement costs can quickly add up. By following the right care steps, you avoid these unnecessary expenses while keeping your equipment in top condition.
Beyond the financial benefits, proper maintenance is essential for guest safety. Parents expect clean, sanitized inflatables for their kids, and you can deliver on that expectation by rolling (not folding) your units, storing them in breathable bags, and inspecting them regularly. These simple steps ensure your equipment is always ready to provide safe, fun experiences.
At Bouncy Rentals USA, we make safety and cleanliness our top priorities. Every bounce house, water slide, and obstacle course we deliver is thoroughly sanitized and inspected to meet strict safety standards. Whether it’s a birthday party, school event, or community gathering, you can trust our inflatables to arrive clean, safe, and ready to create unforgettable moments.
FAQs
How do I remove mold smells from an inflatable?
To get rid of mold smells from an inflatable, you’ll need to clean and disinfect it thoroughly. Begin by clearing away any debris and visible mold. Then, mix a mild cleaning solution – options like vinegar, dish soap, or a disinfectant work well – and use a soft brush or cloth to scrub the surface. Rinse everything off with water and allow the inflatable to dry completely in a sunny, well-ventilated spot. If the smell persists, try using white vinegar or a commercial disinfectant. Just make sure the inflatable is fully dry before you store it to prevent mold from coming back.
Can I machine-wash or power-wash an inflatable?
Machine-washing or power-washing inflatables isn’t a good idea. The intense pressure or rough handling can harm the material. Instead, stick to mild cleaning solutions like vinegar, dish soap, or disinfectants. Use soft brushes, sponges, or cloths to apply the cleaner, and rinse it off gently with a garden hose or low-pressure water. Steer clear of harsh chemicals or high-pressure tools to keep your inflatable in good condition.
What if I have to store it before it’s fully dry?
If you need to store your inflatable while it’s still damp, take precautions to limit moisture. Use towels to soak up as much water as possible, or use a leaf blower to speed up the drying process. Whenever possible, allow it to dry fully in sunlight or a well-ventilated space before putting it away for long-term storage. This helps prevent mold and mildew, which can harm the fabric.