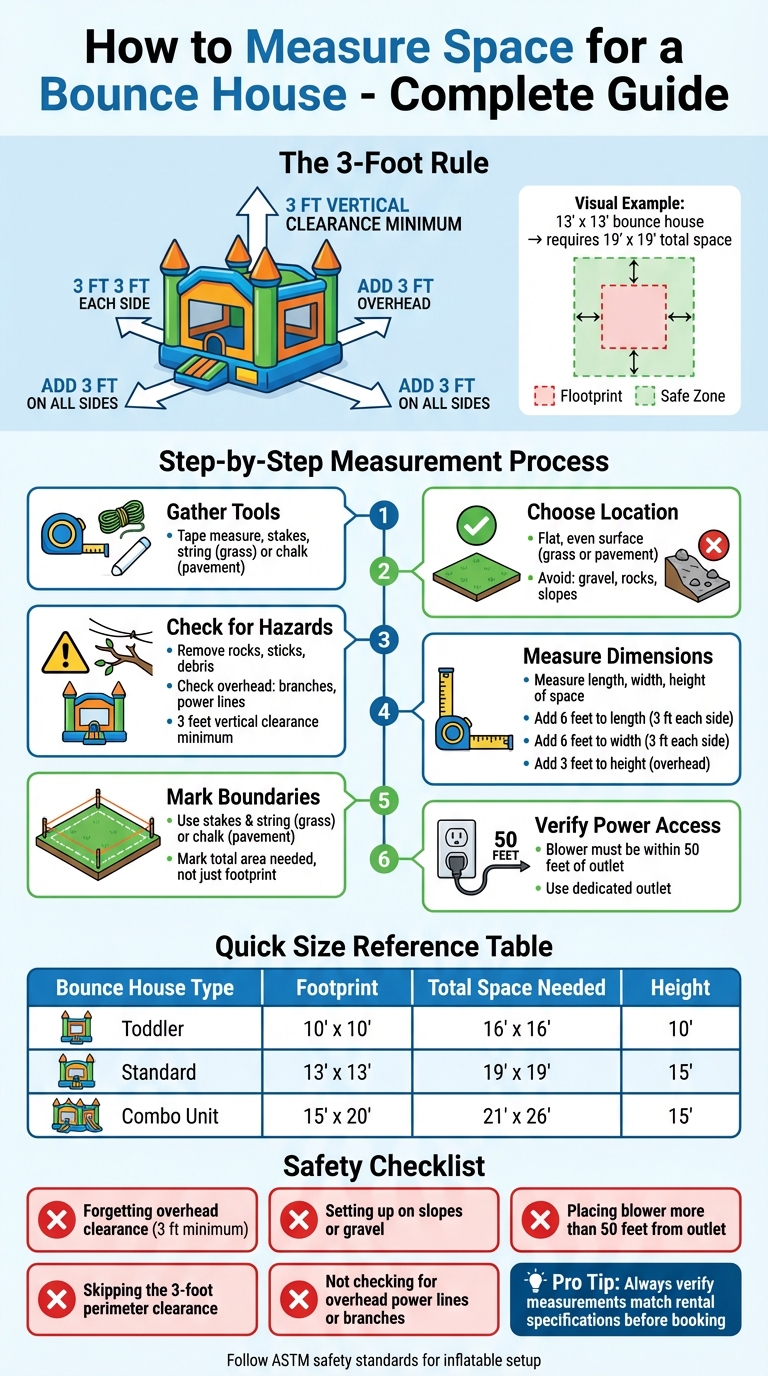
If you’re planning to rent a bounce house, measuring your space requirements for indoor and outdoor bounce houses correctly is essential to ensure it fits and is safe for use. Here’s what you need to know:
- Clearance: Add 3 feet on all sides and 3 feet overhead to the bounce house’s dimensions for safety.
- Surface: Choose a flat, even surface like grass or pavement (avoid gravel or slopes).
- Hazard Check: Remove obstacles like rocks, sticks, branches, or power lines.
- Tools Needed: Use a tape measure, stakes, string, or chalk to mark the area.
- Power Access: Ensure the blower is within 50 feet of a power outlet. Consider how much electricity a bouncy castle uses when planning your power setup.
For example, a 13′ x 13′ bounce house needs a 19′ x 19′ area. Double-check your measurements to match the rental’s requirements and avoid surprises during setup.
Proper preparation ensures a safe and fun event for everyone.
How to Measure Space for Bounce House Setup: Step-by-Step Guide
Tools and Preparation for Measuring
Gather Your Measuring Tools
Start by collecting the essentials: a long tape measure, stakes, and string if you’re working on grass, or chalk and cones for pavement. These will help you mark out the setup area accurately.
Don’t forget to factor in the air blower. Make sure there’s a 3-foot clearance around the bounce house. This space ensures safe exits and keeps the blower running smoothly without obstructions.
Once you’ve got your tools ready, double-check that the surface is suitable for a safe setup.
Select an Appropriate Surface
Pick a flat, even surface. Grass is ideal since it allows you to anchor the bounce house securely with stakes. If you’re using concrete or asphalt, opt for sandbags instead. Steer clear of gravel, rocks, or steep slopes, as they can compromise safety.
After choosing the right surface, the next step is removing potential hazards.
Inspect for Hazards and Obstacles
Look out for overhead dangers like low branches or power lines – ensure at least 3 feet of vertical clearance. On the ground, clear away rocks, sticks, and other debris. Also, make sure no fences, walls, or bushes intrude on the 3-foot perimeter around the bounce house.
Following these steps will help ensure your measurements lead to a safe and functional setup.
How to Measure Your Space: Step-by-Step
Choose Your Setup Location
Start by finding a spot that’s easy to reach, has nearby power, and is free of obstacles. Make sure there’s at least a 3-foot buffer zone around the area, keeping it clear of fences, walls, or bushes. Also, think about how kids will get in and out of the bounce house. The path should be clear and wide enough to avoid crowding or tripping hazards.
Once you’ve picked the perfect spot, it’s time to grab your tape measure and get the exact dimensions.
Measure Length, Width, and Height
Use a tape measure to note the length, width, and height of the space. For height, measure from the ground to any overhead objects like tree branches or roof edges. You’ll need at least 3 feet of clearance above the bounce house’s tallest point. Don’t forget to factor in an extra 6 feet for the length and width – this accounts for the 3-foot safety buffer on each side.
| Dimension | Inflatable Size | Required Safety Clearance | Total Space Needed |
|---|---|---|---|
| Length | Unit Length | + 6 feet (3 ft per side) | Total Length |
| Width | Unit Width | + 6 feet (3 ft per side) | Total Width |
| Height | Unit Height | + 3 feet (overhead) | Total Height Clearance |
Mark Boundaries and Add Clearance Space
Use string, stakes, or chalk to outline the total area you’ll need – not just the bounce house’s base. This visual guide ensures the inflatable will fit properly and gives you a chance to double-check for any safety issues. Walk around the marked zone to confirm there are no obstacles, like rocks or uneven ground, within the safety perimeter.
Clear and well-marked boundaries mean your setup area is ready and safe for action.
Matching Bounce House Sizes to Your Available Space
Once you’ve measured your yard, the next step is to match those dimensions to the size of the bounce house you’re considering. Don’t forget to account for safety clearances when making your calculations.
The listed dimensions of a bounce house only cover its footprint. To find the total space you’ll need, add 3 feet of clearance on all sides and overhead. For instance, a bounce house with a 13′ x 13′ footprint will actually require a setup area of at least 19′ x 19′ to ensure safe operation.
Getting the right match between your yard size and the bounce house dimensions is key to making sure everything fits properly and operates safely. With your measurements in hand, use the table below to compare bounce house vs. combo unit sizes and find the best option for your space.
Bounce House Size Reference Table
This table provides a quick comparison of common bounce house sizes, including their footprint, the recommended safety clearance, the total area required, and their typical height.
| Inflatable Type | Footprint | Recommended Side Clearance | Minimum Area Needed | Bounce House Height |
|---|---|---|---|---|
| Toddler | 10′ x 10′ | 3′ on all sides | 16′ x 16′ | 10′ |
| Standard | 13′ x 13′ | 3′ on all sides | 19′ x 19′ | 15′ |
| Combo Unit | 15′ x 20′ | 3′ on all sides | 21′ x 26′ | 15′ |
If your yard is on the smaller side, opting for a toddler or standard-sized unit might be a better fit. Always double-check the rental listing’s dimensions against your measurements to ensure you have enough room for the bounce house and its required safety clearances before making a reservation.
Common Mistakes to Avoid and Safety Tips
Even with precise planning, small oversights can lead to big problems during setup. Here’s how to avoid common issues and ensure safety.
Don’t Overlook Overhead Clearance
Always measure overhead clearance with care – leave at least 3 feet of open space above the inflatable’s highest point. Low-hanging branches can tear the vinyl and pose a risk to children, while overhead power lines are a severe safety hazard. Before finalizing your setup spot, stand directly beneath it and look up. Check for tree limbs, power lines, roof overhangs, or gutters that might interfere with the inflatable’s height. Anything in the way could lead to damage or danger.
Once overhead clearance is confirmed, turn your attention to power access and anchoring.
Ensure Proper Power and Anchoring
Position the blower within 50 feet of a dedicated power outlet. Avoid sharing this outlet with other high-powered devices, as it could cause power disruptions and deflate the inflatable. Anchoring is just as important: use heavy-duty stakes for soft surfaces like grass and commercial-grade sandbags or weighted systems for harder surfaces like concrete or asphalt. Never set up on gravel or rocky terrain – these surfaces can puncture the inflatable and make it unsteady. Even a slight ground slope of a few inches can cause the unit to shift or tip during use.
Double-check these details to ensure a safe and stable setup.
Verify Measurements Before Booking
Re-measure your setup area to confirm it matches the "Minimum Area Needed" listed in the size reference table. This includes the inflatable’s footprint plus the required 3-foot clearance on all sides. Write down your final measurements and compare them with the rental specifications. Ensuring your dimensions meet the minimum requirements will help avoid last-minute surprises.
Conclusion
Accurate measurements are the foundation of a safe and successful bounce house setup. Start by using the right tools, maintaining a 3-foot clearance on all sides and overhead, and ensuring the ground is level. These steps go beyond just making the inflatable fit – they’re about meeting ASTM safety standards and providing a secure space for kids to play without worry.
Once your setup area is ready, double-check your measurements. Compare them to the rental’s "Minimum Area Needed" to avoid any unexpected issues. Even a small slope or a low-hanging tree branch can cause problems, turning an otherwise fun event into a logistical hassle. Proper planning prevents these surprises and ensures your event goes off without a hitch.
With your measurements finalized, choosing the right inflatable becomes simple. Companies like Bouncy Rentals USA make the process even easier by providing detailed dimensions for every unit. Their team takes care of delivery, setup, and safety checks, so you can focus entirely on the celebration. Whether it’s a backyard birthday or a neighborhood block party, careful preparation ensures a smooth rental experience and a day full of fun.
So, review your notes, confirm your space requirements, and pick the bounce house that best fits your space. With the right planning, you’ll create a safe and memorable experience that keeps both kids and adults smiling.
FAQs
How do I measure overhead clearance?
To check the overhead clearance for a bounce house, make sure there’s at least 3 feet of open space above the tallest part of the inflatable. Use a tape measure to determine the distance from the ground to the lowest overhead obstacle, such as tree branches or power lines. Ensure this measurement is at least 3 feet higher than the bounce house to guarantee a safe setup.
What if my yard is slightly sloped?
If your yard has a slight slope, try to place the bounce house on the flattest spot available. Even a small incline of more than a few inches can lead to shifting or tipping, which can be dangerous. To level the surface, you can use a sturdy base like plywood or secure it with sandbags. Stay away from uneven ground, and make sure there’s at least 3 feet of overhead clearance to avoid any potential damage or safety risks.
Can I use an extension cord for the blower?
To safely use an extension cord with a blower, make sure it meets specific safety requirements. Use a 12-gauge or heavier cord, as it can handle the typical 8–15 amps that blowers draw. Keep the cord length under 25 feet to prevent voltage drops and overheating. Avoid connecting multiple cords together, as this can lead to power loss and potential safety hazards. Sticking to these precautions ensures the blower operates safely and efficiently.