When planning an event with inflatables or other party rentals, accurate space measurement is crucial. Misjudging dimensions can lead to safety risks, equipment that doesn’t fit, or a poor guest experience. Here’s a quick guide to get it right:
- Safety Clearances: Allow 3 feet on all sides and 3 feet overhead around inflatables.
- Tools You’ll Need: Use a 100-foot tape measure for length/width and a laser distance measurer for overhead obstacles.
- Ground Conditions: Ensure surfaces are flat (slopes under a few inches) and suitable for anchoring (grass is ideal; concrete/asphalt requires sandbags).
- Space for Add-Ons: Allocate extra room for items like concession stands, seating, or stages.
- Digital Help: Use apps or tools like Google Earth to map out your space.
Start by clearing the area, measure carefully, and account for all safety requirements. Proper planning ensures a safe and enjoyable event for everyone.
Tools You Need to Measure Your Space
You don’t need fancy gadgets to figure out if your space can handle inflatables and guests safely. A few straightforward tools will do the trick.
Basic Measurement Tools
A 100-foot measuring tape is your go-to for measuring length and width accurately. Shorter tapes, like the standard 25-foot ones, often fall short for larger yards. While pacing can give you a rough idea, it’s always best to double-check with a tape measure for precision.
For overhead clearance, a laser distance measurer is a handy option. It helps you quickly assess obstacles like tree branches or power lines. Pair it with a notepad to jot down measurements and a level to check for slopes – make sure any incline doesn’t exceed a few inches. If your yard has an irregular shape, sketch it out and use simple geometry to calculate the area.
Once you’ve got the basics down, digital tools can make planning even easier.
Digital Tools for Layout Planning
Google Earth is a free and easy way to get a bird’s-eye view of your property. Its 2D ruler tool lets you outline and calculate the square footage of your yard without stepping outside.
For even more precision, try smartphone apps that let you overlay measurements directly onto photos of your space. This gives you a clear visual of where inflatables, concession stands, and seating areas might fit. Some websites also offer inflatable setup space calculators. Just input the dimensions of the rental, and the calculator will factor in safety clearances for you. This takes the guesswork out of planning and ensures you’ll have enough room before booking.
Step-by-Step Guide to Measuring Your Space
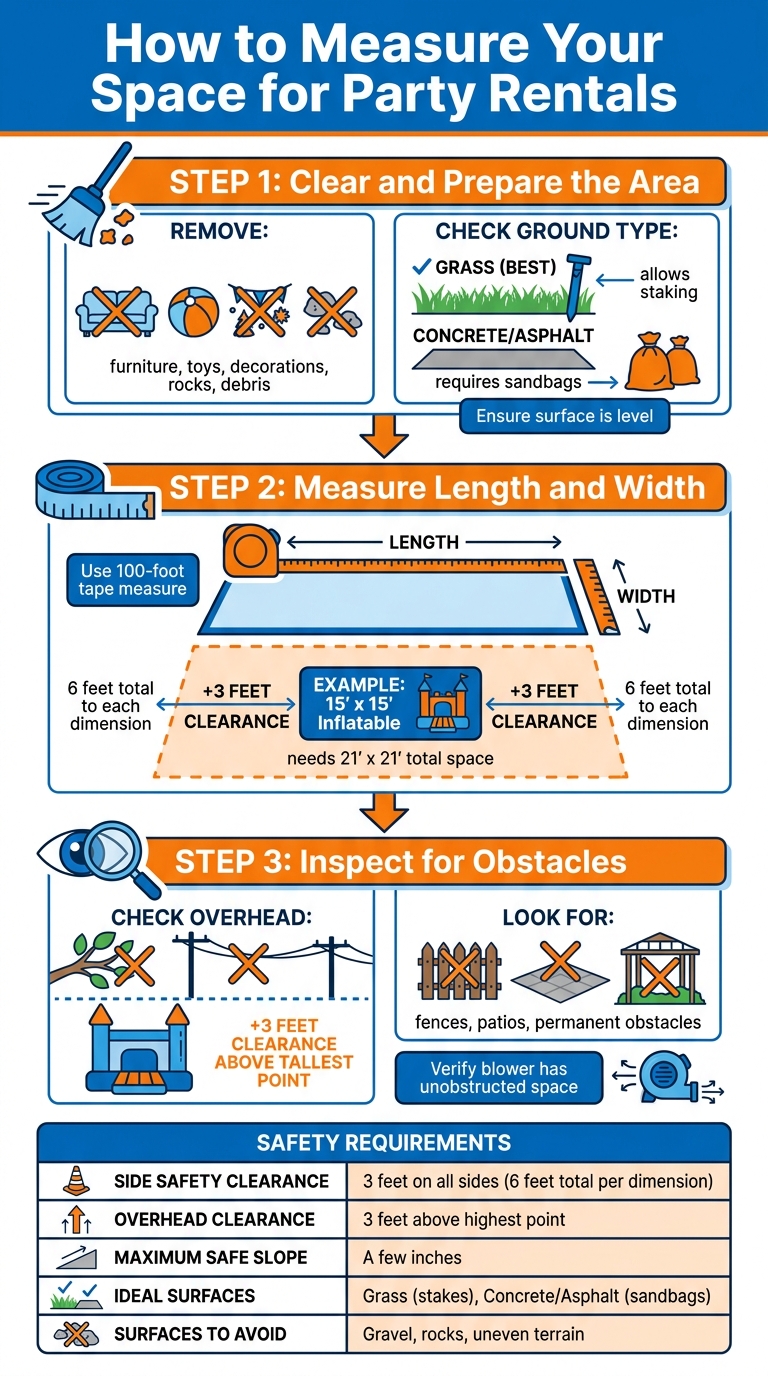
Step-by-Step Guide to Measuring Party Rental Space with Safety Clearances
Ready to measure your space? Follow these steps to ensure accurate measurements and avoid any last-minute surprises before your event.
Step 1: Clear and Prepare the Area
Start by clearing the setup area of anything that could get in the way – furniture, toys, decorations, rocks, or debris. You’ll need a flat, open space for accurate measurements and a safe setup. Check the type of ground you’re working with: grass is the best option since it allows for staking, but if you’re working on concrete or asphalt, you’ll need sandbags for anchoring. Also, make sure the surface is level.
Once the area is clear, you’re ready to measure.
Step 2: Measure Length and Width
With your measuring tape in hand, determine the dimensions of the space. Use a 100-foot tape to measure the longest side for the length, then measure the width at a right angle to that line. If the area isn’t a perfect rectangle, measure at 10-foot intervals and calculate the average width.
Don’t forget to add extra space for safety! You’ll need 3 feet of clearance on all sides, which means adding 6 feet to both the length and width. For example, if the inflatable is 15 feet by 15 feet, you’ll need a total area of 21 feet by 21 feet to meet safety standards.
Step 3: Inspect for Overhead and Ground Obstacles
Now, look up! Ensure there’s at least 3 feet of clearance above the tallest part of your inflatable. Use a laser distance measurer or a pole to check for hazards like low-hanging branches or power lines, as these can be dangerous.
Walk the setup area and note any permanent obstacles like fences or patios. Mark these on your sketch to ensure nothing interferes with the setup. Also, confirm that the blower has enough unobstructed space to operate properly within the 3-foot clearance zone.
| Measurement Factor | Requirement |
|---|---|
| Side Safety Clearance | 3 feet on all sides (6 feet total per dimension) |
| Overhead Clearance | 3 feet above the highest point |
| Maximum Safe Slope | A few inches |
| Ideal Surfaces | Grass (stakes), Concrete/Asphalt (sandbags) |
| Surfaces to Avoid | Gravel, rocks, and uneven terrain |
How to Allocate Space for Party Rentals and Guests
To make the most of your event space, it’s essential to divide it into clear zones for inflatables, guest movement, and additional amenities. Accurate measurements are your starting point, helping you determine how to arrange everything efficiently. Once you’ve assessed your area, you can allocate space for the inflatables, ensure guest comfort, and include extras like concession machines or seating.
Space Requirements for Inflatable Rentals
The size of inflatables can vary significantly, so knowing their dimensions is key. For example:
- Bounce Houses: Require a 15 ft by 15 ft area, plus a 3-ft buffer on all sides, totaling around 21 ft by 21 ft.
- Water Slides: Small slides need about 20 ft by 10 ft, medium ones around 30 ft by 12 ft, and larger models can take up 40 ft by 15 ft or more.
- Obstacle Courses: These typically range between 30–50 ft in length and 10–15 ft in width.
Water slides are especially in demand during summer events. Keep in mind that larger inflatables, like premium water slides and obstacle courses, not only take up more space but also come at a higher price – up to $10,995 compared to around $2,000 for standard units.
Guest Comfort and Flow Planning
Your guests’ experience hinges on having enough room to move freely. Here’s a general guide:
- Allow about 6 sq. ft. per standing guest.
- For seated guests, plan for 8–12 sq. ft. per person, depending on whether there’s a dance floor or other activities.
"Attendees don’t enjoy events that are overcrowded and difficult to navigate, so calculating event capacity is a critical step in planning." – Social Tables
Additionally, leave at least 4 ft of clearance at the back and sides of your space to avoid a cramped setup. Wide pathways are especially important when kids are running between attractions or when guests need easy access to seating.
Space for Concessions and Add-Ons
Extras like cotton candy machines, popcorn makers, and dunk tanks may seem small, but their combined footprint can add up. Here’s a quick breakdown:
- A DJ booth typically needs about 200 sq. ft.
- A bar setup requires around 100 sq. ft.
- A small stage (8 ft by 8 ft) is sufficient for one or two speakers, while a band or DJ may need a stage between 12 ft by 16 ft and 16 ft by 20 ft.
To maintain smooth traffic flow, place these add-ons away from inflatable exits and high-traffic areas.
| Event Setup Type | Recommended Square Feet Per Person |
|---|---|
| Standing Crowd | 6 sq. ft. |
| Theater / Auditorium Style | 6–8 sq. ft. |
| Mixed Seated & Standing | 8 sq. ft. |
| Dinner (Rectangular Tables) | 9–10 sq. ft. |
| Dinner (Round Tables) | 11–12 sq. ft. |
Source: Social Tables
Proper space planning is essential for safety and ensuring a comfortable experience for your guests. At Bouncy Rentals USA, we’re here to help you fit our inflatables and add-ons seamlessly into your venue, creating an event that’s both safe and unforgettable.
Common Mistakes to Avoid When Measuring Space
Even with the best intentions, mistakes in measuring event spaces can happen. These errors might lead to safety concerns, cramped setups, or equipment that doesn’t fit. Below are some of the most frequent pitfalls – and how to sidestep them.
Relying on Visual Estimates
Trusting your eyes instead of tools can lead to big miscalculations. For instance, visual estimates often fail to account for mandatory safety buffers. According to ASTM standards, you need at least 6 feet of total safety clearance – that’s 3 feet on each side of an inflatable. Skipping this step could mean your setup falls short of safety regulations.
Overhead clearance is another area where visual estimates fall short. Low-hanging branches or power lines might seem harmless but can damage inflatables. The rule is 3 feet of overhead clearance above the tallest point of the unit. Even ground that looks level can be deceptive; slopes greater than a few inches are unsafe because they can cause inflatables to tip or shift during use. To avoid these issues, always use a tape measure or laser distance finder for precise measurements.
Forgetting Safety Clearances
Safety buffers aren’t just guidelines – they’re essential. The 3-foot clearance on all sides ensures a safe exit zone for kids and leaves enough room for the blower to work without obstructions. Similarly, the 3-foot overhead clearance prevents accidents involving branches or power lines.
Before finalizing your setup, walk through the area. Look for obstacles like uneven ground, gravel, or rocks that could affect stability. Double-check that the space is free of hazards instead of assuming it’s ready to go.
Underestimating Add-On Space Needs
It’s easy to focus on the main attractions and forget about the extras, but that can throw off your entire layout. Concession machines, seating areas, and other add-ons also need space. Placing these items too close to inflatables can block emergency exits or interfere with blower operation.
Don’t forget that tall items like tents also require 3 feet of overhead clearance to avoid nearby trees or power lines. Additionally, food and beverage stations need to be near power sources. If they’re too far away, you could run into logistical problems. Plan ahead by measuring and marking space for every add-on before confirming your rental.
| Clearance Type | Minimum Requirement | Why It Matters |
|---|---|---|
| Side Clearance | 3 feet per side (6 feet total) | Ensures safe exits and proper blower operation |
| Overhead Clearance | 3 feet above highest point | Prevents damage and electrical hazards |
| Ground Leveling | Slope < 2–3 inches | Keeps inflatables stable and prevents shifting |
Conclusion
Getting your measurements right – from clearing your space to accounting for obstacles – is the foundation of a successful event. Skipping this step can lead to cramped layouts, safety hazards, or equipment that just doesn’t fit. With careful preparation, accurate measurements, and proper clearances, you can ensure everything runs smoothly and safely.
Outdoor spaces are rarely perfect rectangles. Break irregular areas into sections and use tools like digital measuring apps or a trusty tape measure for precision. Always measure the longest distance in your space and include a buffer to account for obstacles like fences, patios, or uneven ground. These simple steps can help you create a setup that’s both functional and inviting.
Want to make your event setup effortless? Bouncy Rentals USA has you covered. From delivery and installation to safety checks, our team ensures every inflatable, water slide, and concession machine fits perfectly into your measured space. Plus, all our equipment is thoroughly cleaned, fully insured, and ready to make your event unforgettable – no matter the size or layout of your venue.
Measure carefully, plan wisely, and let the experts handle the rest.
FAQs
How do I measure a yard that isn’t a rectangle?
To figure out the size of an irregularly shaped yard, divide it into smaller, manageable shapes like rectangles, squares, triangles, or circles. Measure each of these sections individually, calculate their areas, and then combine the results to get the total area. This approach makes measuring complex yard shapes much easier and more precise.
What should I do if my setup area is concrete or asphalt?
To set up an inflatable safely, make sure the ground is flat and level. This helps prevent shifting or tipping during use. If you’re placing it on hard surfaces like concrete or asphalt, use sandbags or weights to keep it secure. Also, check for any overhead hazards such as power lines or low-hanging branches. It’s important to have at least 3 feet of clearance above the inflatable to ensure safety.
How can I check overhead clearance for branches or power lines?
Make sure there’s at least 3 feet of open space above the highest point of the inflatable or object you’re setting up. This extra clearance reduces the risk of contact with tree branches or power lines, which can pose serious safety hazards. Before you begin, carefully inspect the area for any low-hanging branches or overhead wires to ensure everything is safe and to avoid damage or potential injuries.