A bounce house can be fun, but without proper anchoring, it can become dangerous. Whether you’re setting up on grass or concrete, securing the structure is critical to prevent tipping, sliding, or lifting. Here’s how to anchor it safely:
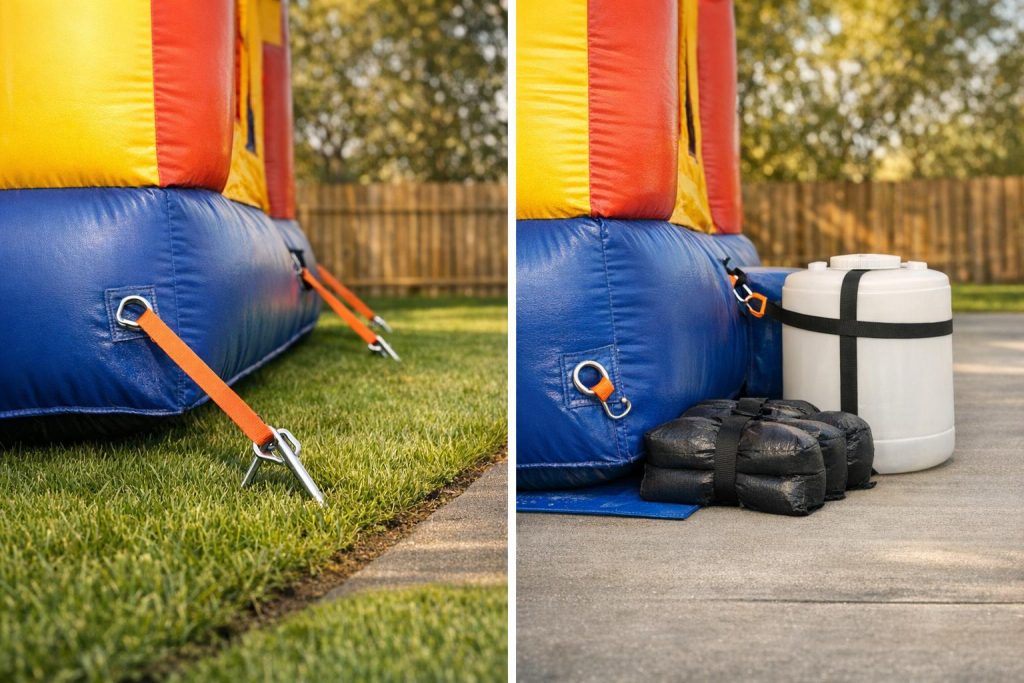
- Grass Setup: Use heavy-duty steel stakes (30–40 inches) driven at a 45° angle into the ground. Secure with durable straps or ropes, and ensure stakes are flush with the ground to avoid tripping hazards.
- Concrete Setup: Use weighted anchors like sandbags (40+ lbs each) or water barrels. Lay down a tarp to protect the bounce house and the surface. Distribute weight evenly and secure straps tightly.
Key Tips:
- Always inspect anchors before and during use.
- Avoid setting up in winds above 15 mph.
- Use safety cones to mark stakes or weights.
Proper anchoring ensures safety for everyone. Read on for detailed steps for each surface type.
How to Anchor a Bounce House on Grass
Grass is one of the easiest surfaces for securing a bounce house because you can drive stakes deep into the soil for a reliable hold. The trick lies in using the right tools and following an inflatable setup safety checklist to ensure the inflatable stays in place, even with all the bouncing and movement. Here’s what you’ll need and how to do it.
Tools You’ll Need for Grass
To anchor a bounce house securely, you’ll need heavy-duty steel stakes, such as J-hooks, straight stakes with stoppers, or twisted pins. These should be 30 to 40 inches long for maximum grip, especially if the ground is soft. A sledgehammer or heavy mallet is essential for driving the stakes into the ground, and a crowbar will come in handy for adjustments or removal.
For attaching the bounce house, use high-quality nylon ratchet straps, cam buckle straps, or 1/2-inch solid-braided polypropylene rope with at least 3,700 lbs of tensile strength. To prevent accidents, have safety cones or delineator posts ready to mark the stake locations. Before you begin, make sure to call 811 to check for underground utility lines and avoid any potential hazards.
Installation Steps for Grass Anchoring
- Position the Stakes: Place the bottom anchor stakes about 3 feet away from the bounce house’s anchor points.
- Drive the Stakes: Hammer each stake into the ground at a 45-degree angle, angled away from the bounce house. This angle helps keep the stakes secure under tension. Make sure at least 70% of each stake is buried, ideally flush with the ground, to reduce tripping hazards.
- Secure the Tethers: Wrap the webbing around the stake twice, then loop the end around the main tether three times. Tie a locking knot and tighten it toward the stake. For larger inflatables with top anchor points, position the stakes 7 to 12 feet away to maintain a 50-degree angle once the unit is inflated.
- Final Check: After inflating the bounce house, inspect all tethers to ensure they’re tight but not overly stretched. Cover each stake with a safety cone to create a visible barrier and prevent anyone from tripping.
Dealing with Uneven or Wet Grass
If you’re working on uneven or soggy ground, take extra precautions. Use a carpenter’s level to find the flattest area possible. On soft or wet grass, opt for longer stakes (up to 40 inches) to reach firmer soil. Avoid muddy spots where stakes may not hold securely. In some cases, you might need additional stakes or adjustments to stabilize the setup. Keep in mind that wind and vigorous jumping can loosen anchors, so check them periodically during use to ensure everything stays secure.
How to Anchor a Bounce House on Concrete
Securing a bounce house on concrete or asphalt requires weighted anchors to ensure stability. Unlike grass setups, where stakes can be driven into the ground, concrete anchoring depends entirely on evenly distributed weight. This makes the choice of materials and their placement especially important.
Tools and Materials for Concrete
For this setup, you’ll need heavy-duty sandbags (minimum 40 lbs each), water barrels, or water-filled anchor bags to act as weights. Residential bounce houses generally require at least 75 lbs per anchor point, while larger inflatables might call for 200–350 lbs. Always refer to your manufacturer’s manual for precise weight guidelines.
To secure the inflatable, use high-quality ratchet straps or 1/2-inch solid-braided polypropylene rope with a tensile strength of at least 3,700 lbs. Protect the bounce house from the abrasive concrete surface with a heavy-duty tarp that extends beyond the inflatable’s footprint. Additionally, place impact-absorbing mats (minimum 2 inches thick) at entry and exit points to cushion falls. A broom or leaf blower will help clear debris before setup, and a carpenter’s level can identify uneven areas that may need attention.
| Material Type | Purpose | Key Specification |
|---|---|---|
| Sandbags | Primary Anchoring | At least 40 lbs per bag; stack as needed |
| Water Barrels | Heavy-Duty Anchoring | Ideal for large inflatables; secure tightly |
| Ratchet Straps | Fastening | Adjustable tension; high-quality material |
| Polypropylene Rope | Fastening | 1/2-inch solid-braided; 3,700 lb strength |
| Protective Tarp | Surface Protection | Commercial-grade; larger than the unit |
| Impact Mats | Fall Protection | 2-inch minimum thickness; 4 feet coverage |
Installation Steps for Concrete Anchoring
Once you have the necessary materials, follow these steps to safely anchor your bounce house on concrete:
- Prepare the Surface: Clear the concrete of any debris like rocks or sharp objects that could damage the inflatable. Use a broom or leaf blower for thorough cleaning.
- Lay Down the Tarp: Spread a heavy-duty tarp that extends several feet beyond the bounce house’s footprint on all sides. This protects the vinyl material from wear caused by direct contact with concrete.
- Position and Anchor: Place the uninflated bounce house on the tarp. Attach ratchet straps or ropes to each D-ring anchor point, connecting them to the weighted anchors. Ensure the anchors are evenly distributed.
- Inflate and Secure: Inflate the bounce house and check each connection to ensure the straps are taut and the weights remain stable. Adjust as needed to eliminate slack.
- Add Safety Features: Place impact mats at entry and exit points, extending at least 4 feet out. Create a clearly marked 6-foot safety zone around the inflatable to keep participants safe.
- Monitor and Adjust: Regularly inspect all connections and weights during use. If any anchors loosen, add more weight immediately. For safety, deflate the unit if wind speeds exceed 15–20 mph on concrete surfaces, or consult our guide to weather-resistant bounce houses for more environmental safety tips.
Protecting the Concrete Surface
To avoid damaging the concrete, place mats or padding beneath the weights. Avoid rough materials like landscape rocks or unfinished concrete blocks, as they can scuff or wear down both the inflatable and the pavement.
During hot weather, concrete can absorb and retain heat, potentially causing discomfort or burns. Set up in a shaded area whenever possible, and ensure the surface is covered with mats to reduce heat exposure. After the event, inspect the concrete for any marks and check the underside of the bounce house for wear caused by friction. Addressing these issues early will help extend the life of your equipment.
Anchoring Tools Comparison
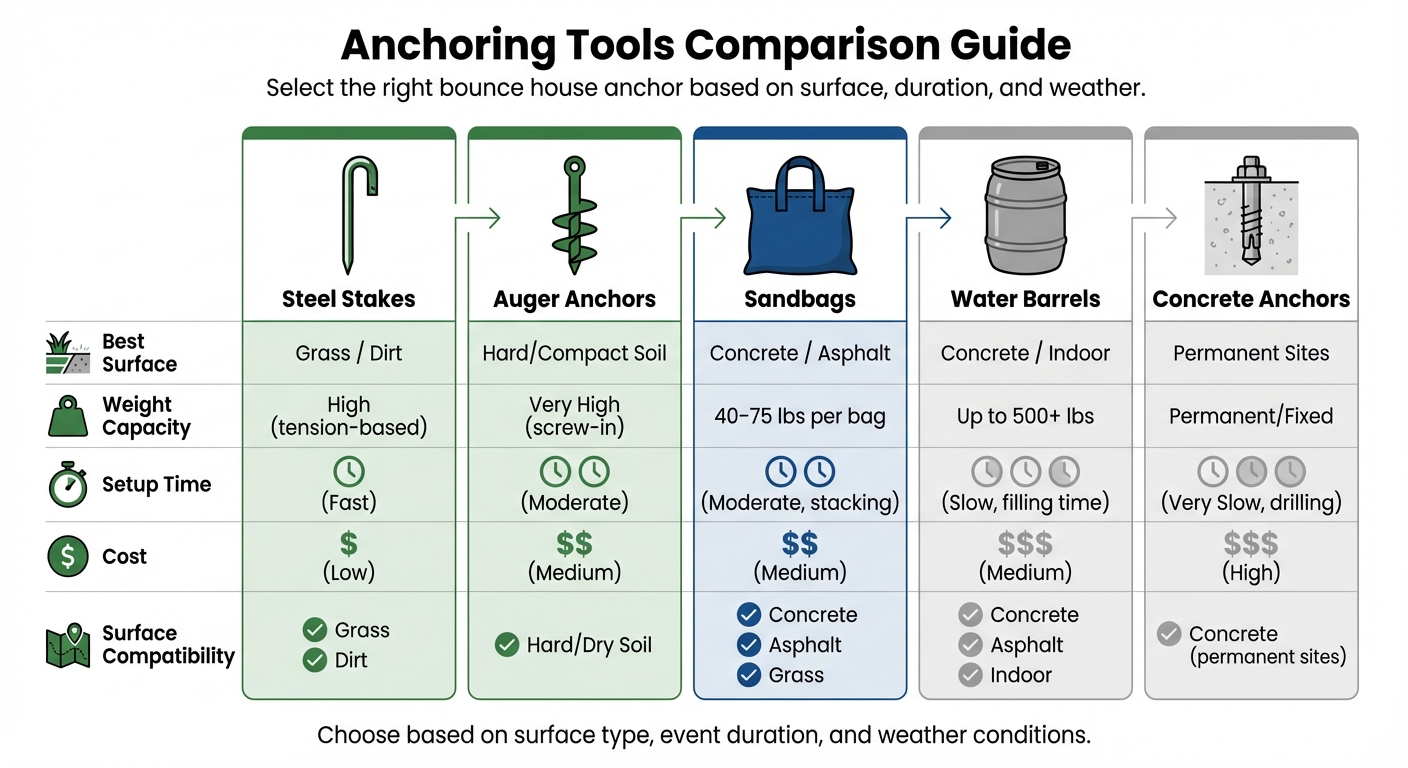
Bounce House Anchoring Tools Comparison: Surface Types, Weight Capacity, and Costs
Anchoring Tools Comparison Table
When choosing anchors, consider factors like surface type, budget, and how quickly you need to set up. For example, steel stakes are ideal for grassy areas because they can dig deep into the soil. Each method has its pros and cons, balancing cost, effort, and holding strength.
| Anchoring Tool | Best Surface | Weight Capacity | Setup Time | Cost (USD) | Surface Compatibility |
|---|---|---|---|---|---|
| Steel Stakes | Grass / Dirt | High (tension-based) | Fast | Low ($5–$15 each) | Grass, Dirt |
| Auger Anchors | Hard/Compact Soil | Very High (screw-in) | Moderate | Medium ($15–$30 each) | Hard/Dry Soil |
| Sandbags | Concrete / Asphalt | 40–75 lbs per bag | Moderate (stacking) | Medium ($20–$40 per bag) | Concrete, Asphalt, Grass |
| Water Barrels | Concrete / Indoor | Up to 500+ lbs | Slow (filling time) | Medium ($30–$60 per barrel) | Concrete, Asphalt, Indoor |
| Concrete Anchors | Permanent Sites | Permanent/Fixed | Very Slow (drilling) | High ($50+ per anchor) | Concrete (permanent sites) |
Steel stakes are a budget-friendly option and quick to install in penetrable soil. Sandbags are versatile, working on various surfaces, but require enough weight – about 75 pounds per tie-down point is a common standard. water barrels provide excellent holding power for large inflatables, but setup takes longer due to filling and transportation needs. For a permanent solution, concrete anchors offer unmatched stability but require drilling and permanently alter the surface.
This table gives a clear snapshot to help you pick the right anchoring tool for your needs.
How to Choose the Right Anchoring Method
Start by identifying the surface where you’ll set up. For grass or dirt, steel stakes are your go-to. Use stakes that are 30–40 inches long and drive them into the ground at a 45-degree angle for maximum hold. If you’re working with hard or compacted soil, auger anchors are a better choice. These screw into the ground for a stronger grip. If the soil is too dry, slightly moisten it to make installation easier.
On concrete or asphalt, weighted anchors are essential since stakes or augers won’t work. Sandbags are portable and surface-friendly but require sufficient weight – usually multiple 40-pound bags per corner for stability. For larger setups, water barrels are effective but need access to water and more time to prepare. If you’re looking for a permanent solution, drilled concrete anchors provide consistent security but will alter the surface permanently.
Think about the event’s duration and weather conditions. For short-term events in mild weather, sandbags might be enough. However, all-day setups or windy conditions may require heavier solutions. Always ensure stakes are driven at least 70% into the ground, and cover any exposed ends with sandbags or cones to prevent accidents. Choose an anchoring method that prioritizes safety and inspect all anchors before use.
Safety Checks and Common Mistakes
Pre-Event Safety Inspection
Before guests arrive, it’s crucial to perform a thorough anchor inspection. Start by confirming that each corner and tie-down station has its own dedicated anchor – this is a requirement under ASTM standards, which prohibit connecting multiple ropes to a single anchor point. This ensures that every attachment can independently support the full load.
Test each anchor point by pulling on it. If any anchor feels loose, shifts, or slips, reinforce it immediately. Make sure stakes are embedded to the required depth or that weighted anchors meet the necessary weight standards. To prevent tripping hazards, stakes should be pounded flat or covered with sandbags or safety cones. Additionally, use only approved high-strength ropes for tie-downs. Don’t forget to check the weather – wind speeds over 15 mph can create unsafe conditions, even if the bounce house is properly anchored.
Mistakes to Avoid When Anchoring
Never use a vehicle as an anchor. If the vehicle is moved accidentally, it could drag the inflatable and cause severe injuries. Similarly, stay away from using concrete blocks, bricks, or landscape rocks as weights, as they can damage the inflatable’s fabric.
Another frequent mistake is using insufficient weight on hard surfaces. Sandbags should weigh at least 40 lbs each, and you’ll likely need multiple bags per corner to secure the inflatable adequately. Even indoors, anchoring with sandbags is necessary to prevent sliding or lifting during active play. Double-check that all straps are tight and that no more than one rope is attached to each anchor point – this reduces the risk of tipping. Once everything is set up, keep an eye on the setup throughout the event.
Monitoring During the Event
After addressing common anchoring mistakes, ongoing monitoring is key. Check all anchors and straps hourly, as active play and environmental factors like wind can loosen them, particularly on hard surfaces. Look for signs such as loose straps, shifted sandbags, stakes pulling out, or the inflatable moving from its original position.
Keep an eye on the blower to ensure it remains unobstructed and powered. Inspect the vinyl regularly for any weak spots or tears. If you notice signs of increasing wind, like swaying trees or dust drifting, and wind speeds hit 15 mph or higher, it’s best to deflate the unit until conditions improve. Also, monitor participants to ensure their behavior doesn’t put undue stress on the anchors, aligning with the safety measures established from the start.
Wrapping Up
Anchoring properly and setting up a safety perimeter are key to keeping everyone safe. For grass surfaces, angle auger stakes at 45° for the best hold. On concrete, go for weight-based systems and use a tarp underneath to protect the vinyl from wear and tear.
Always test anchor points with a good tug before guests arrive, and keep an eye on them during the event. If the soil is too hard for stakes, try lightly moistening it to make the job easier.
To avoid accidents, make sure stakes are flush with the ground or cover them with sandbags or cones.
FAQs
How many anchor points does my bounce house need?
A bounce house needs several anchor points to ensure it stays secure and stable during use. At the very least, each corner must be anchored. Larger inflatables, however, often require extra anchor points along the sides or even at the top. The number of anchors needed depends on the bounce house’s size and design, but it’s crucial to secure every single anchor point. This helps minimize movement and reduces the risk of accidents.
What can I do if I can’t drive stakes into the ground?
If stakes aren’t an option, you can secure the bounce house using alternatives like sandbags, water bags, concrete blocks, or cement holders. These options are ideal for hard surfaces like concrete or asphalt. To maximize stability, consider using heavy weights or anchors specifically made for these types of surfaces to keep everything safe and secure.
How do I know if my anchors are tight enough?
To make sure your anchors are secure, drive stakes deep into the ground using a sledgehammer, ensuring they’re firmly in place. Tethers should be pulled tight, leaving no slack. If you’re using sandbags or water weights, verify they’re heavy enough and positioned securely. Always inspect anchor points both before the event begins and periodically throughout, especially if the weather shifts or the bounce house sees heavy activity.