A bounce house is only as safe as its blower. Without proper maintenance, issues like sudden deflation, electrical hazards, or overheating can arise, putting both guests and equipment at risk. Here’s what you need to know:
- Pre-Setup Checks: Inspect blower type, compatibility, housing, cords, and plugs to ensure everything is secure and damage-free.
- Electrical Safety: Use GFCI-protected outlets, heavy-duty extension cords, and dedicated circuits to avoid overloads or shocks.
- Blower Placement: Position on stable, level ground and secure connections to prevent air leaks or tipping.
- Operational Testing: Test inflation, monitor electricity usage and performance, and prepare for emergencies like power loss or bad weather.
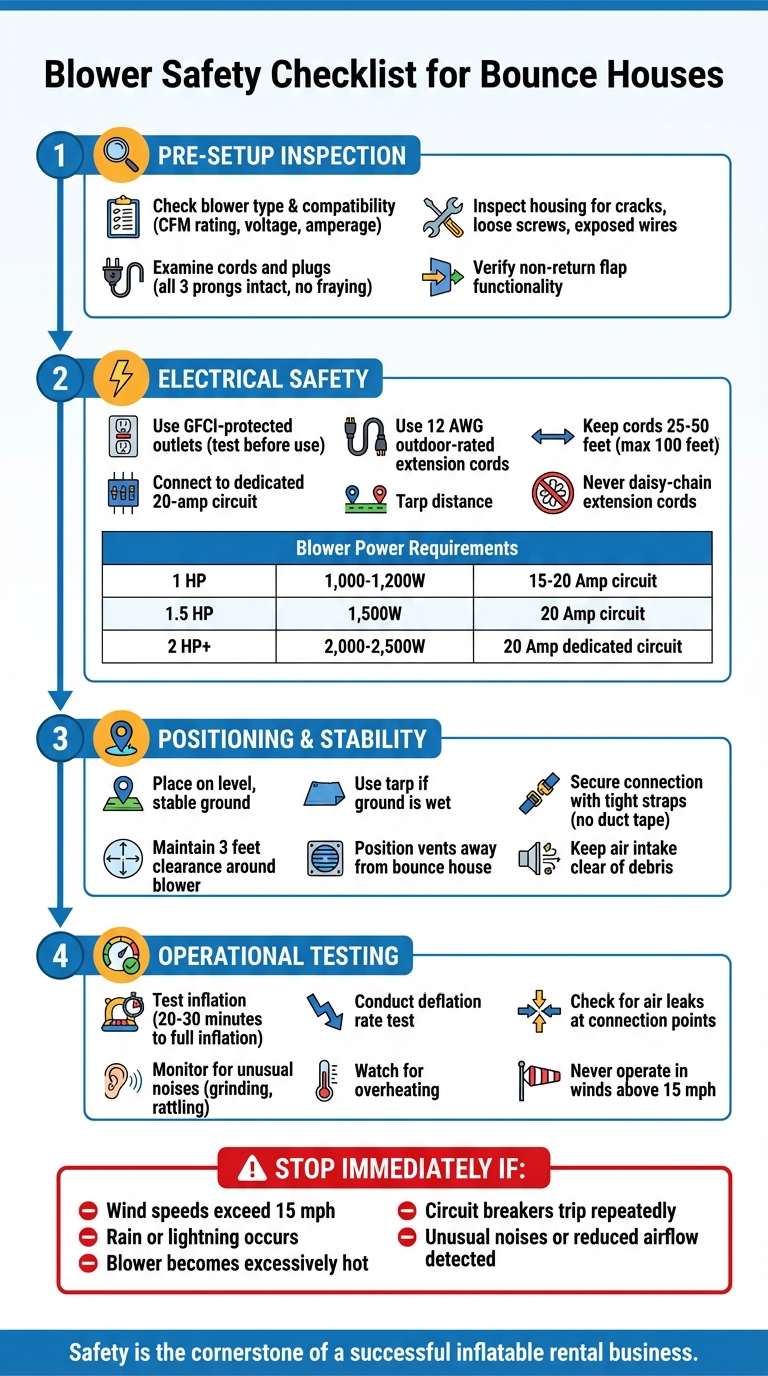
Bounce House Blower Safety Checklist: 4-Step Inspection Guide
Pre-Setup Blower Inspection
Before setting up the blower for a bounce house, take a few minutes to visually inspect it. This simple step can prevent sudden deflation, electrical hazards, or motor issues during an event. By checking the following elements, you’ll ensure everything is safe and ready to go.
Check Blower Type and Compatibility
Using the right blower is critical to avoid unnecessary strain or equipment failure. Start by verifying that the blower matches the inflatable’s specifications. The manufacturer’s manual will outline the required power output and airflow for your specific bounce house model. For bounce houses and slides, continuous airflow blowers are a must because they maintain consistent pressure as air naturally escapes through seams. On the other hand, sealed air blowers, designed for airtight structures like tents, won’t work for inflatables that need constant airflow.
Ensure the blower’s CFM (cubic feet per minute) rating aligns with the inflatable’s requirements. Larger or more complex designs demand higher CFM ratings to stay fully inflated and stable. Also, confirm that the blower’s voltage, amperage, and horsepower are compatible with your electrical setup and the bounce house needs. The blower neck should fit snugly into the inflatable’s port, with the fabric tightly pleated around the outlet to prevent air leaks.
Inspect Blower Housing and Parts
The blower’s structural integrity is essential for safe operation. Check the housing for cracks, loose screws, or exposed wires. Even minor damage can reduce air pressure and overwork the motor, which may lead to overheating. Look for damaged seals or leaks around the casing that could lower efficiency. Ensure the air intake is clear of debris, and confirm the fan blades spin freely without obstruction. The blower outlet should have a functioning non-return flap to prevent rapid deflation if the power goes out.
"Anyone touching metal parts of the unit could get a potentially lethal 230v shock." – Health and Safety Executive (HSE)
For blowers with built-in electrical sockets, inspect for visible conductors or openings where water could seep into live contacts. If the blower uses rubber boots to cover electrical terminals, make sure they are properly secured with cable glands to block moisture.
Examine Cords and Plugs
Electrical safety is non-negotiable. Inspect the entire power cord for any signs of fraying, cuts, or exposed wires. Also, check that the plug is intact and includes all three prongs – never operate a blower if the grounding pin is missing. For commercial blowers, use 14-gauge or thicker extension cords, and don’t exceed 100 feet in length.
| Extension Cord Length | Recommended Minimum Gauge | Safety Status |
|---|---|---|
| Up to 50 feet | 12 AWG | Recommended |
| Up to 100 feet | 14 AWG | Minimum Requirement |
| Any Length | 16 AWG | Insufficient / Unsafe |
Lastly, inspect the straps or ties that secure the inflation tube to the blower nozzle. These should provide a tight connection without deforming the nozzle. Avoid using duct tape to secure connections, and replace worn attachment straps annually to prevent sudden deflation.
Electrical Connection Safety
Once you’ve confirmed the blower’s mechanics, the next step is to ensure its electrical setup is safe and reliable. Blowers typically draw between 9 and 14 amps, depending on their horsepower (1 HP uses around 1,000–1,200W, while 2 HP can go up to 2,500W). Keep in mind that startup surges can draw significantly more power. Faulty electrical connections can lead to voltage drops, motor issues, or even shock hazards. Below, we cover key steps for outlet protection, cord inspection, and cable positioning to complete your safety check.
Use GFCI-Protected Outlets
Always plug bounce house blowers into GFCI-protected outlets (Ground Fault Circuit Interrupter). Before use, test the outlet’s "test" and "reset" buttons to confirm the trip mechanism is working. This simple step can prevent serious shocks if moisture contacts live electrical components.
Blowers should be connected to a dedicated 20-amp circuit. Sharing the circuit with other appliances can overload it, especially during startup when the blower may draw as much as 17 amps – more than twice its normal operating current.
| Blower Size | Typical Horsepower (HP) | Estimated Wattage | Recommended Circuit |
|---|---|---|---|
| Small | 1 HP | 1,000 – 1,200W | 15 – 20 Amp |
| Medium | 1.5 HP | 1,500W | 20 Amp |
| Large | 2 HP+ | 2,000 – 2,500W | 20 Amp (Dedicated) |
To avoid tripping breakers, never connect more than one blower to the same circuit unless you’re absolutely certain the total amperage, including startup surges, remains within the circuit’s limits.
Inspect Extension Cords
Proper extension cord selection and inspection are critical for safe operation. Always use heavy-duty, outdoor-rated extension cords with a minimum thickness of 12 AWG (American Wire Gauge). Thinner cords, like 14 or 16-gauge, can’t handle the 8 to 15 amps required by most blowers and could overheat or even catch fire.
Keep cords as short as possible – 25 to 50 feet is ideal, and never exceed 100 feet. Longer cords can cause voltage drops, making the blower work harder, which may lead to under-inflation or motor damage.
"Short and thick beats long and skinny when it comes to cord safety and performance." – Big and Bright Inflatables
Avoid connecting multiple extension cords together (daisy-chaining). Use a single continuous cord instead. Before each use, inspect cords for any damage, such as frayed insulation, exposed wires, melted plugs, or loose connections. If a cord or plug becomes excessively hot during operation, stop immediately and replace it with a thicker gauge cord.
Position Electrical Cables Safely
Proper cable placement is just as important as the cords themselves. Keep all electrical connections dry and elevated, especially when setting up near water slides or damp areas. Route cords away from walkways and high-traffic zones to prevent tripping hazards. Ensure there is at least 3 feet of clearance around the entire setup area.
To prevent accidents, cover any exposed stake heads used for anchoring the blower. If there’s a chance of rain, protect the blower and its connections with a waterproof covering or canopy. However, make sure the blower’s air intake remains unobstructed to avoid overheating.
Blower Positioning and Stability
Ensuring the blower is set up correctly is just as important as performing electrical checks. Proper placement and secure connections are key to maintaining steady airflow and reliable performance.
Place Blower on Stable Ground
Always position the blower on level ground – whether it’s grass, pavement, or gravel. If the area is wet, place a tarp underneath to protect the electrical components. This step minimizes vibration, which could otherwise cause the blower to tip over or disconnect from the inflation tube.
"Placing the blower on a rubber mat can help absorb vibration and keep it stable." – Jump N Slide Texas
Once the blower is stable, focus on securing its connection to the bounce house.
Secure Connection to Bounce House
Slide the inflation tube completely over the blower’s nozzle, smooth out any extra fabric, and fasten it tightly using the provided strap. This prevents the connection from rotating or coming loose during use.
For added security, especially at large events, try the double-strap method: first, tighten the standard strap, then use a bungee cord across the connection for extra hold. After inflating the bounce house, check for any air leaks and adjust the strap if needed.
Avoid stretching the inflation tube between the blower and the bounce house, as tension can weaken the connection. Many setups also include a secondary deflation tube – be sure to fold and secure it with its own strap to maintain proper air pressure inside the bounce house.
Once everything is connected, take steps to protect the blower from external risks.
Protect from Weather and Hazards
Never operate the blower in wind speeds above 15 mph. A handheld anemometer is the best tool for measuring wind conditions because:
"Smartphone weather applications are not a substitute for an anemometer as they do not take localised weather wind conditions into account." – Health and Safety Executive (HSE)
If rain is on the horizon, use weather-resistant bounce houses and cover the blower with a waterproof shield while ensuring the air intake remains unobstructed. Position the blower so its vents face away from the bounce house to prevent hot air from cycling back into the motor.
Keep at least 3 feet of clearance around the blower to allow proper airflow. Regularly inspect the air intake for debris like leaves, dirt, or loose fabric, as these can reduce efficiency, cause overheating, or shift the blower out of place. Additionally, keep children and spectators at least 3 feet away from the unit and its cords to avoid accidental tipping or electrical mishaps.
Operational Testing and Monitoring
Once the blower is set up, it’s time to test everything before allowing guests to use the bounce house. Start by turning on the blower – most units fully inflate within 20–30 minutes. While it’s inflating, keep an eye out for sagging fabric or any unusual noises, which could point to loose parts or damaged bearings. Once the bounce house is fully inflated, move on to testing how it deflates.
Before guests enter, conduct a deflation rate test. Turn off the blower and observe how quickly the inflatable loses air. It should hold its shape long enough for everyone to exit safely without risk of entrapment. If it deflates too quickly, check for air leaks around the connection points or inspect the non-return flap on the blower outlet to ensure it’s working properly.
Run Blower for Stability Testing
After the initial inflation, check the stability of the blower connection. Look closely at where the inflation tube connects to the blower nozzle for any gaps. If leaks are present, tighten the strap until it’s secure and can’t be rotated by hand. Next, use a manometer to confirm that the internal pressure meets the manufacturer’s specifications. This step is crucial because uneven airflow can lead to issues like users hitting the ground or walls collapsing.
Monitor Runtime Performance
During the event, keep an eye (and ear) on the blower’s performance. Listen for unusual sounds like grinding, rattling, or high-pitched whining, which could signal problems like worn motor brushes or damaged bearings. Regularly clear the air intake of debris such as leaves or dirt – clogged impeller blades can reduce air output by as much as 33%.
"If the blower becomes excessively hot to the touch, turn it off and allow it to cool down before resuming use." – East Inflatables
If the bounce house starts losing firmness during use or takes longer to recover after jumps, the blower might be struggling. This could be due to a clogged filter or restricted airflow. Additionally, if circuit breakers trip frequently, it might indicate an unstable power supply or internal blower issues.
Prepare for Emergencies
Always be ready for unexpected situations. Test your evacuation plan in case the blower stops working – riders should stop jumping immediately and exit calmly. Attendants should hold exit flaps open and guide people out to avoid panic. Use a handheld anemometer to monitor wind speeds; if winds exceed 15 mph, evacuate and deflate the unit right away. Similarly, if it starts raining or lightning strikes, clear the bounce house, turn off the blower, and cover it with a tarp.
Conclusion
Following a blower safety checklist is crucial to ensure every event runs smoothly and safely. Regular checks – like inspecting electrical connections, verifying structural stability, and testing operational performance – help prevent issues such as overheating, sudden deflation, and electrical problems. These steps not only protect guests but also help extend the life of your equipment.
"Safety is the cornerstone of a successful inflatable rental business." – Titan Inflatables
At Bouncy Rentals USA, we prioritize safety at every step. Our team takes care of professional installation, conducts detailed safety inspections, and provides fully insured equipment to guarantee a fun and stress-free experience. Whether you’re hosting a backyard birthday or a large community gathering, we’re dedicated to making your inflatable event exciting and safe.
FAQs
What size blower do I need for my inflatable?
The size of the blower you need depends on the dimensions and type of your inflatable. For smaller indoor bounce houses, typically around 9’x9’, a blower using about 5 amps should suffice. Medium-sized residential inflatables, ranging from 10’x10’ to 13’x13’, usually require a blower with 6–8 amps. Larger commercial inflatables, such as those sized 15’x15’ to 17’x17’, will need a more powerful blower, typically in the range of 12–14 amps. Always ensure the blower’s specifications align with your inflatable to guarantee safe and effective operation.
Why does my blower keep tripping the breaker?
Your blower might trip the breaker because of electrical overloads or faults. This can happen if the circuit is shared with other devices, the blower draws more power than the circuit can handle, or there are problems like faulty wiring or debris obstructing airflow. To avoid this, make sure the blower is on its own 20-amp circuit, inspect for any blockages, and double-check that all electrical connections are secure.
What should I do if the blower shuts off during use?
If the blower stops working, start by checking the electrical connections and make sure it’s plugged into a properly grounded outlet. Confirm that the breaker hasn’t tripped – blowers often require a dedicated 20-amp breaker to function correctly. If the breaker has tripped, reset it and unplug any other devices sharing the same circuit. Also, examine the blower for signs of overheating or blockages caused by debris. If none of these steps resolve the problem, reach out to the rental company or a professional for further help.