Renting inflatable sports games for your event? Here’s what you need to know to ensure a smooth and safe experience:
- Plan Ahead: Measure your space, check for level ground, and ensure clear access paths (3–6 feet wide, depending on the inflatable size).
- Power & Water: Ensure a dedicated 15-amp circuit within 100 feet and prepare a hose if renting water inflatables.
- Choose the Right Game: Match inflatables to the age and skill level of your guests (e.g., low-height games for kids, obstacle courses for teens/adults).
- Safety First: Anchor inflatables securely, enforce rules (e.g., no shoes, food, or rough play), and assign adult supervisors.
- Weather Precautions: Avoid use in winds over 15–20 mph and have a backup plan for bad weather.
- Day-of Setup: Guide delivery crews, inspect equipment for damage, and ensure proper blower operation.
Partnering with a reputable rental company simplifies the process. A detailed checklist ensures fun, safety, and a hassle-free event.
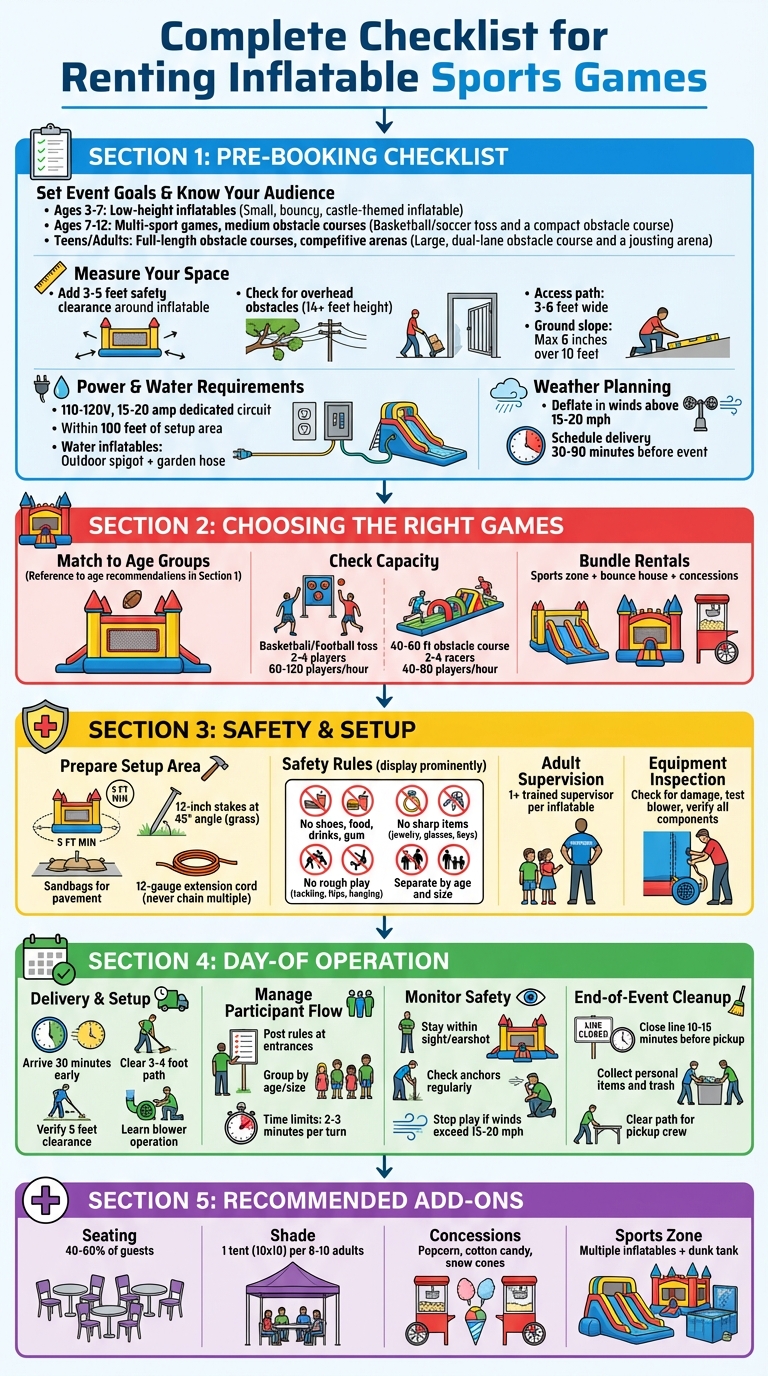
Complete Checklist for Renting Inflatable Sports Games: Planning to Cleanup
Pre-Booking Checklist: What to Plan Before You Rent
Planning ahead can save you from last-minute headaches – like discovering the inflatable won’t fit through your gate, the outlet is too far away, or the ground isn’t level enough. A bit of preparation ensures you’ll pick the right inflatable sports game and have a smooth event.
Set Your Event Goals and Know Your Audience
Start by defining the type of event you’re hosting – whether it’s a casual party, school field day, or corporate gathering. The inflatable you choose will depend on this. For laid-back fun, smaller sports-themed bounce houses or skill games are great. If you’re aiming for competition, go for timed obstacle courses or sports shootouts that allow for scoring and brackets. For team-building activities, consider larger obstacle courses or multi-lane challenges that encourage teamwork.
Next, think about your guests. What’s the age range and skill level? For younger kids (ages 3–7), look for low-height inflatables with gentle designs. Middle schoolers and teens can handle taller slides, obstacle courses, and competitive games. For adults or mixed-age groups, choose inflatables labeled for "all ages" or "children & adults." If you’re expecting a large crowd, opt for high-capacity inflatables with multiple lanes. And if there’s a big age gap between participants, renting separate inflatables or scheduling age-specific time slots can help avoid conflicts.
Once you’ve nailed down your event goals and guest needs, it’s time to evaluate your setup area.
Measure Your Space and Check the Surface
Grab a tape measure and check the length, width, and height of your setup area. Compare these dimensions to the inflatable’s listed size, and don’t forget to include 3–5 feet of safety clearance around the inflatable for stakes, blowers, and easy movement. Watch out for overhead obstacles like tree branches, power lines, or low ceilings, especially since some inflatables are over 14 feet tall.
Take a close look at the ground surface. Grass or dirt is ideal since inflatables can be anchored with 12-inch stakes, but make sure there are no underground utilities or sprinkler systems where stakes will go. For hard surfaces like concrete or asphalt, the rental company will use sandbags or other weights – just let them know the surface type in advance. Walk through the area to remove sharp objects, pet waste, or anything else that could damage the inflatable. The ground should also be mostly level, with no more than a 6-inch slope over 10 feet.
Don’t forget to measure your access path. Inflatables need to fit through gates, side yards, or tight corners. Most units require a clear path about 3 feet wide, while larger slides or obstacle courses may need 4–6 feet. If there are stairs or steep inclines, check with the rental company – these can be a dealbreaker for some setups.
Check Power and Water Access
Make sure you have a 110–120V, 15–20 amp dedicated circuit within 100 feet of the setup area. Larger inflatables or multiple units might need two or more circuits. Look for outdoor outlets with GFCI protection or indoor outlets near doors or windows. Avoid sharing these circuits with high-power devices like refrigerators or sound systems. If the outlet is farther than 75–100 feet, ask the rental company about extension cords or consider adding a generator to your order.
For water inflatables like slides or dunk tanks, confirm there’s an outdoor spigot within hose reach of the setup area. You’ll also need a standard garden hose long enough to connect to the inflatable. Plan for water runoff – grass can handle it, but driveways or patios might get slippery, and indoor or turf setups probably won’t work. If you’re hosting in a park or HOA-regulated area, check for any water-use restrictions or permits required for water inflatables.
Pick Your Date, Time, and Prepare for Weather
Choose a date and time that works for your guests – weekends or after-school hours are popular. In summer, aim for cooler parts of the day, like mornings or late afternoons, to avoid overheated vinyl surfaces. Schedule delivery and pickup times carefully, allowing 30–90 minutes before your event starts for setup, depending on the size and number of inflatables. For tightly scheduled events like school or corporate gatherings, confirm exact arrival times and provide clear access instructions.
Check the rental company’s weather policy and have a backup plan. Inflatables generally need to be deflated in winds above 15–20 mph, and most rental agreements will specify this. Consider indoor alternatives, non-inflatable activities, or rescheduling if bad weather is likely. Providing shade (like tents or canopies) and hydration stations is also a smart move for hot summer events. Many companies, such as Bouncy Rentals USA, offer flexible rescheduling options for poor weather – be sure to ask about this when booking.
How to Choose the Right Inflatable Sports Games
Once you’ve got your space, power, and event setup sorted, it’s time to focus on selecting the inflatables. The best choice will depend on your audience, the number of attendees, and the type of experience you want to create.
Match Games to Age and Skill Level
Start by aligning the inflatables to the age group and skill level of your guests. Here’s a quick breakdown:
- Ages 3–6: Opt for low-impact games like mini basketball shootouts, soft football tosses, or simple combo units. These options keep things manageable with smaller ball sizes, lower jumping heights, and straightforward rules – typically allowing one child per lane or target at a time.
- Ages 7–12: Kids in this range enjoy activities that require coordination and light competition. Consider multi-sport inflatables that combine basketball, football, and soccer challenges, or medium-sized obstacle courses and relay races. These games balance fun with easy-to-follow rules.
- Teens and Adults: For older participants, go for more challenging attractions, such as full-length obstacle courses, bungee runs, or competitive sports arenas. Many inflatables are rated for both kids and adults, but always double-check the manufacturer’s recommended age range and follow safety guidelines to ensure everyone plays safely. Avoid mixing very young kids with older players in the same unit.
Once you’ve matched the games to your audience, it’s time to assess capacity and plan your layout.
Check Game Capacity and Plan Your Layout
Every inflatable has a maximum capacity set by the manufacturer. For example:
- A basketball shootout or football toss typically accommodates 2–4 players at a time, with 1–2 minute turns, allowing 60–120 players per hour.
- A 40–60 foot obstacle course can handle 2–4 racers simultaneously, with 2–3 minute cycles, serving 40–80 players per hour.
Compare these numbers to your expected attendance. For instance, if you’re hosting a school event with 150 children over two hours, a single small game could lead to long lines. To manage crowds, consider pairing a large obstacle course with a multi-sport shootout to distribute the flow of participants. For larger events like carnivals or fundraisers, prioritize inflatables with multiple lanes, such as multi-lane slides or dual-lane obstacle courses, which can process more players and reduce wait times.
When setting up, follow the manufacturer’s clearance guidelines. Place high-energy games on flat, open areas, away from hazards like low branches, fences, or power lines. Keep inflatables separated from concession stands and seating areas to ensure clear traffic paths and prevent guests from walking through active play zones.
With space and capacity sorted, you can take your event to the next level by bundling rentals.
Bundle Rentals for a Complete Event
Create a well-rounded experience by bundling sports inflatables with other attractions. For example, you can design a "sports zone" by combining a football toss, soccer shootout, and basketball challenge with a long obstacle course. To cater to younger kids, add a standard bounce house for non-competitive fun.
Bouncy Rentals USA offers a variety of rental options to enhance your event. Their selection includes bounce houses, combo units, water slides, dunk tanks, obstacle courses, and interactive games. They also provide concessions like cotton candy machines and snow cone makers, along with essentials like tables and tents. When booking, ask about package deals – many companies offer discounts when you bundle items, such as a sports inflatable, an obstacle course or slide, and party add-ons.
Safety and Setup Checklist
When your inflatables arrive, the fun is just around the corner – but first, there’s some groundwork to cover. A proper setup and a solid safety plan are key to ensuring everyone has a great time while staying safe.
Prepare the Setup Area
Start by clearing the setup area of any debris or sharp objects that could damage the inflatable or cause accidents. Make sure there’s at least 5 feet of clearance around and above the inflatable – watch out for power lines, tree branches, or low-hanging eaves. For taller inflatables like sports games with backstops or basketball hoops, you’ll need even more vertical space.
You’ll also need access to a dedicated 110V outlet within 100 feet for each blower. Use a grounded, 12-gauge, three-wire extension cord and never connect multiple cords together. Avoid removing the grounding pin, as this can cause voltage issues and lead to blower failure.
For anchoring, use 12-inch stakes driven into the ground at a 45-degree angle for grass setups. On pavement or indoors, use sandbags or other weighted ballasts that match the unit’s size and wind resistance requirements. Lay down a ground tarp or liner under the inflatable to protect its base and reduce slipping near entry points. Before staking, double-check that there are no underground irrigation, phone, or electrical lines nearby.
Once the setup area is ready, focus on creating and enforcing safety rules.
Set and Enforce Safety Rules
Post a rules sign at each entrance and go over the guidelines with each group before they enter. The basics include: no shoes, no food or drinks, no gum, no sharp items (like keys, jewelry, or glasses), and no pets inside the inflatable. To prevent injuries, make it clear that rough play – like tackling, wrestling, flips, or hanging on nets and hoops – is not allowed.
Stick to the capacity limits listed on the inflatable’s data plate, even if lines start to form. To reduce the risk of collisions, separate participants by age and size. For example, keep small children (ages 3–5) in a different group from older kids or adults, and rotate groups in timed intervals. For competitive games like obstacle courses or basketball shootouts, group players by ability level and limit the number of participants per lane or side to what’s posted.
Mark waiting lines a few feet away from entrances and exits using cones or tape, and make sure no one is on the inflatable while it’s inflating or deflating.
Assign Adult Supervision
Every inflatable needs at least one trained adult supervisor, and larger units or games with multiple entrances might require more. Supervisors should focus solely on monitoring the inflatable. Before the event starts, walk them through the rules, show them the location of the on/off switch and power source, explain the anchoring system, and review how to handle weather changes or deflation.
Supervisors should control the flow of participants by ensuring everyone exits before letting new players in. They’ll also need to stop roughhousing or unsafe behavior immediately and watch for rule violations, like kids sneaking in food or failing to remove their shoes. If anyone seems upset or injured, they should pause play to address the situation. For larger events, it’s a good idea to appoint a lead safety contact who can check in on all inflatables, give supervisors breaks, and coordinate with the rental company if problems arise.
With supervision in place, the final step is to inspect the equipment.
Inspect Equipment When It Arrives
Once everything is set up, inspect the inflatables to ensure they’re safe and ready to use. Look for any visible damage or cleanliness issues, and make sure all components – like the blower, stakes or sandbags, tarp, extension cords, and safety instructions – are included. Test the blower and electrical connections to confirm they’re working properly.
Reputable companies, such as Bouncy Rentals USA, sanitize their inflatables between rentals, but it’s still a good idea to double-check cleanliness. Ensure the inflatable fully inflates and maintains proper air pressure without sagging. Keep cords clear of walkways to prevent tripping hazards. Set up hand sanitizer stations near shared equipment like balls or handles, and use disposable wipes or spray for periodic cleaning, especially if multiple groups will use the inflatable.
If you notice anything unsafe or missing, contact the rental company immediately to repair, replace, or remove the unit before guests arrive.
Day-of-Event Operation Checklist
With all the prep work done, here’s how to keep things running smoothly on the big day.
Guide Delivery and Setup
Plan to arrive at least 30 minutes before delivery. Meet the crew at the curb and guide them along a cleared 3-to-4-foot-wide path to the setup area. Help navigate any tricky spots, and point out the pre-measured locations for each inflatable. Make sure there’s at least 5 feet of clearance around and above each unit for proper anchoring and safety.
Double-check that power access is as planned. Stick around while the crew unrolls the inflatable, lays down a tarp, connects the blower, and secures the anchors. Stay until the unit is fully inflated and inspect it – doors, netting, slides, and seams should be straight and tight, with no sagging walls, air leaks, or rubbing against fences or trees.
Before the crew leaves, go over the operating instructions. Learn how to safely turn the blowers on and off, what to do if a breaker trips, and how to handle unexpected blower issues. Also, review weather-related shutdown procedures. Some rental companies, like Bouncy Rentals USA, even have customers sign off on a checklist covering safety measures, storm protocols, and behavior rules. This formal process ensures everyone’s on the same page.
Manage Game Rules and Participant Flow
Once everything’s set up, establish clear rules to maintain order and keep things fun. Before guests arrive, post printed rules at the entrances of each inflatable. Reinforce these rules verbally as each group enters. Group participants by age and size, keeping toddlers separate from older kids, and stick to the manufacturer’s capacity limits for each unit.
Set up clear zones for entry, exit, and waiting to avoid crowding. For inflatables with competitive games, like basketball shootouts or obstacle courses, enforce time limits per turn – such as 2–3 minutes or a set number of attempts – and use a timer or whistle to keep things moving. Explain the game format (like 1-on-1 or relay) and make sure everyone exits the inflatable after each round to prevent bottlenecks.
Monitor Safety During Play
Assign one person to supervise each inflatable at all times. This supervisor should stay within sight and earshot of the unit and never leave it unattended. Every few minutes, do a quick visual scan for rough play (like wrestling, flips, or tackling), overcrowding, or kids bouncing too closely together. Keep an eye on entrances, steps, and other potential trouble spots.
Regularly check that anchors and tie-downs are secure – stakes should stay firmly in the ground, and sandbags or weights shouldn’t shift. Listen to the blower for any changes in sound, and watch for signs like softening walls or kinked air tubes. If anything seems off, clear the inflatable immediately, fix the issue, and only restart when it’s safe. Enforce key rules like no sharp objects, jewelry, glasses, food, or gum inside to prevent injuries and damage.
Keep a close watch on the weather. If winds exceed 15–20 mph, inflatables can become unstable, even when properly anchored. Stop play immediately if you see lightning, heavy rain, or unsafe temperatures. For sports inflatables involving balls or bats, make sure bystanders stay out of impact zones – for example, no standing near a batter or under a basketball hoop when someone is shooting.
Handle End-of-Event Cleanup
When it’s time to wrap up, follow these steps to ensure a smooth cleanup. Close the line 10–15 minutes before pickup to give everyone a chance to finish their turns and clear the inflatable calmly. Walk through the unit to collect personal items, trash, or decorations like tape or string that could damage the vinyl. Note any spills so the rental company can clean and sanitize the unit, preventing damage fees.
Check whether the rental company or you are responsible for shutting down the blowers. If it’s your job, turn them off, unplug the cords, and keep them away from wet areas. Make sure no one is inside the inflatable during deflation, and keep kids at a safe distance while the unit deflates and gets rolled up. Walking or climbing on a partially deflated inflatable can damage the seams and cause accidents.
Prepare for the pickup crew by reopening gates, moving vehicles if necessary, and clearing the path of any obstacles, pets, or lingering guests. Before calling it a day, do one last walk-through of the yard or venue to ensure no rental items (like cords, stakes, or tarps) or personal belongings are left behind.
Add-Ons and Extras to Improve Your Event
Add Seating, Shade, and Concessions
Once your inflatable setup is finalized, think about adding a few simple extras to make your event more enjoyable and comfortable for everyone. Start with seating – aim to provide enough chairs for 40–60% of your guests. Parents, grandparents, and younger siblings will appreciate having a place to sit and relax. For smaller gatherings, stick to the lower end of that range, but for longer events like school carnivals or church functions, consider seating for closer to 60–70% of attendees so everyone has a chance to rest.
Shade is another must-have, especially during warmer months. A single 10×10 pop-up tent can shelter 8–10 seated adults comfortably, so for a family event with 40–50 guests, plan on setting up 3–4 canopies. Place these tents near spectator areas or concession zones, but make sure they’re outside the 5-foot safety clearance around inflatables to avoid interfering with anchoring or emergency access. Shade not only keeps guests cool but also prevents hot inflatable surfaces from causing burns.
Don’t forget a concession area! Machines like popcorn makers, cotton candy spinners, or snow cone stations are fun additions that enhance the festive vibe. Set these up on sturdy tables with access to a dedicated 15-amp circuit, and keep them away from the inflatables. Snow cones, in particular, are a hit on hot days – they help guests cool off and encourage short breaks from active play. Be sure to place a trash can and napkin station nearby, and use clear signage to remind everyone that food and drinks should stay out of the inflatables. These thoughtful extras not only improve comfort but also create a lively, fun-filled atmosphere.
Create a Sports Zone with Multiple Rentals
If you’re looking to take your event to the next level, consider setting up a dedicated sports zone. This area can feature multiple inflatables and activities designed to keep guests of all ages entertained while minimizing lines. A well-rounded sports zone might include a basketball or football toss game, a medium-sized obstacle course for timed races, and a classic bounce house for younger kids. For a standout centerpiece, add a dunk tank – it’s always a crowd-pleaser and makes for great photo opportunities.
Companies like Bouncy Rentals USA offer everything you need to build a sports zone, from inflatable obstacle courses and water slides (perfect for hot-weather events) to fun extras like popcorn machines and dunk tanks. Grouping rentals into a sports zone simplifies logistics – one provider can handle delivery, setup, and pickup for all your items. To create an efficient layout, cluster inflatables by activity level: put sports games and obstacle courses together, bounce houses in another area, and concessions near the seating. This setup keeps older and younger kids separated, ensures clear sight lines for adult supervision, and transforms your event into a mini sports festival.
Conclusion
This checklist has walked you through the essentials of planning, setting up, and ensuring safety for inflatable sports games. By taking steps like picking games suited to your crowd, preparing your space, and maintaining constant supervision, you’ll set the stage for a smooth and memorable event. Make sure to finalize your space layout, confirm power and safety requirements, and assign supervision roles. A quick review of your checklist will help ensure everything is in place.
Safety should always be your top priority. Follow all manufacturer guidelines, secure inflatables with stakes or weights, and keep an eye on the weather – pausing activities if conditions turn unsafe. When the equipment arrives, inspect it thoroughly. Look for clean surfaces, intact seams, functioning blowers, and visible safety labels to catch any potential issues before the fun begins. A proper setup not only avoids hassles but guarantees hours of carefree play – something echoed by happy customers time and again.
Partnering with a professional rental company can make the whole process easier. Bouncy Rentals USA offers a wide selection of inflatable sports games and party extras like cotton candy machines, popcorn makers, and dunk tanks. Their team handles delivery, setup, and safety instructions, leaving you free to focus on enjoying your event.
Customer Dylan Hoy shared, "The setup was quick, the castle was super clean, and the team at Bouncy Rentals USA was incredibly professional. Highly recommend them for any kids’ party in Charleston!"
Jenna Cameron added, "The bouncy castle rental from Bouncy Rentals USA was delightful, providing an incredibly lively and carefree experience for our kids. Our 7-year-olds spent hours jumping, sliding, and laughing among the inflatable rentals, making our party a wonderful and memorable celebration."
Take your event to the next level by adding features like shade tents, extra seating, and concessions to keep everyone comfortable and entertained. Pairing multiple games can also help keep lines short and energy levels high. Save or print this checklist and review it a few days before your event to make sure nothing is overlooked. With these steps and the help of Bouncy Rentals USA, you’re all set to create a safe, fun, and unforgettable experience.
FAQs
What steps should I take to ensure inflatable sports games are safe for everyone?
To ensure everyone has a safe and enjoyable time with inflatable sports games, start by carefully inspecting the equipment for any signs of wear or damage before use. Check that the inflatables are firmly anchored to the ground to prevent them from tipping or shifting during play. Always stick to the manufacturer’s guidelines regarding weight and age limits, and make sure there’s active supervision to keep an eye on participants and avoid overcrowding. Proper setup is crucial – this means placing the inflatable on level ground and ensuring there are no sharp objects nearby that could cause damage.
What should I do if the weather looks bad on the day of my event?
If the forecast predicts bad weather, your top priority should be safety and protecting the inflatable equipment. Contact Bouncy Rentals right away to explore rescheduling or setting up a rain date. Their team will walk you through the available options, helping you keep your event as smooth and worry-free as possible.
How do I handle power and water needs for inflatable rentals?
When setting up an inflatable, make sure you have a dependable power source, like a nearby outlet or a generator, that can handle the inflatable’s wattage needs. For water inflatables, attach a standard garden hose to the designated water connection point, ensuring there’s a steady water supply and that the setup area allows for proper drainage.
Always consult the inflatable’s manufacturer guidelines for detailed instructions on power and water requirements. Double-check your setup to ensure everything operates seamlessly during your event.