Inflatables are fun but can face common problems like punctures, air leaks, seam tears, blower issues, and zipper malfunctions. Here’s how to handle them:
- Surface Damage: Fix punctures or tears with vinyl patches and adhesive. Clean and prep the area, apply the patch, and let it cure for 24 hours.
- Air Leaks: Use a soapy water test to locate leaks. Temporary fixes include vinyl tape, while permanent solutions require adhesive and patches.
- Seam Tears: Reinforce with a sewing awl and apply a patch for durability.
- Blower Problems: Check for tripped outlets, blown fuses, or debris in the fan. Use proper extension cords and maintain clearance around the blower.
- Zipper Issues: Clean and lubricate zippers to prevent jams. Replace damaged parts if necessary.
Regular maintenance – like cleaning, drying, and inspecting inflatables after use – helps extend their lifespan. Keep repair kits with patches, adhesives, and tools handy to address issues quickly and avoid disruptions during events.
Seam Tears: Causes and Repairs
Seam tears happen when stitching gives way under too much stress, over-inflation, or exposure to harsh conditions. Factors like rough handling, moisture, and abrasive debris can speed up this wear and tear. For example, water left on inflatables from slides or improper storage can lead to damp seams, which not only weakens the material but also invites mold and pests. Abrasive debris and environmental hazards further contribute to seam damage. Spotting these weak areas early is key to preventing bigger issues.
How to Find Seam Tears
To locate seam tears, start by inflating the inflatable and checking for sagging or soft spots. Run your hand along the seams to feel for escaping air, or listen for a faint hissing sound when the blower is off. Another handy trick? Use a soapy water solution. Apply it to suspect areas, and watch for bubbles forming, which will pinpoint the exact location of the leak. Once you find the tear, mark it and measure its size.
How to Repair Seam Tears
Fixing seam tears involves reinforcing the stitching and applying a vinyl patch. First, use a sewing awl to strengthen the damaged seam. Next, clean the area with rubbing alcohol and lightly roughen the vinyl surface. Cut a patch with rounded edges that extends 1–2 inches beyond the tear. Apply a thin layer of industrial-strength adhesive to both the patch and the inflatable, wait 2–4 minutes for the adhesive to become tacky, and then press the patch firmly in place. Smooth it out with a seam roller and weigh it down for 24 hours to ensure a secure bond before reinflating.
For inflatables with internal access through a zipper, you can apply the patch from the inside. This method uses air pressure during inflation to press the patch against the material, creating an even tighter seal.
Air Leaks: Finding and Fixing Them
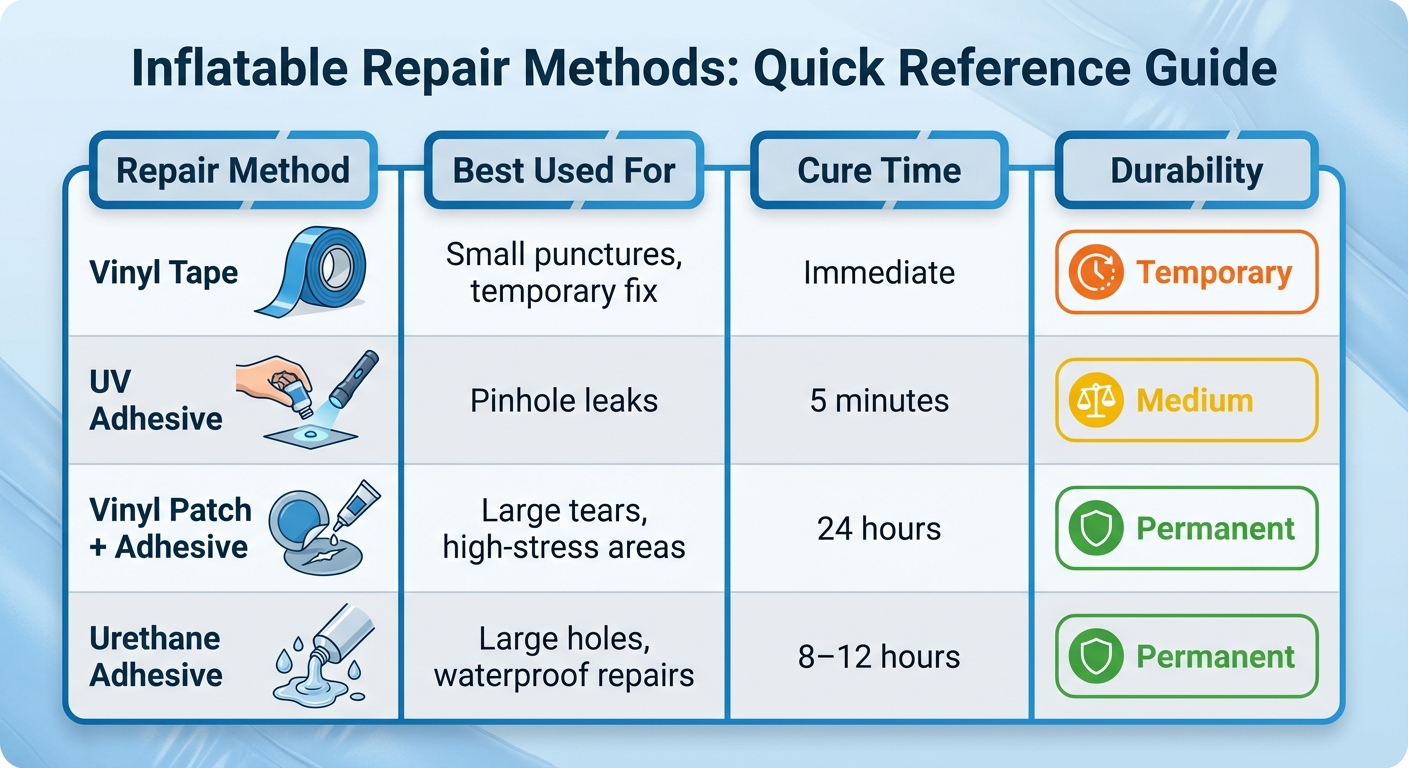
Inflatable Repair Methods Comparison Chart
Air leaks can cause gradual deflation or even a complete collapse of inflatables. The good news? With the right approach, most leaks are easy to find and fix. Look out for telltale signs like audible hissing or sections that feel soft or underinflated. Before diving into a full inspection, start with the inflation valve – clear out any debris by giving it a quick blast of air from a pump. Once that’s done, move on to pinpointing the leak using simple but effective methods.
How to Detect Air Leaks
The soapy water test is one of the easiest and most reliable ways to find a leak. Mix dish soap with water in a spray bottle and apply it to the inflated surface. If air is escaping, you’ll see bubbles forming at the leak. For even better results, add a small amount of glycerin or corn syrup to the mix to reduce surface tension. For smaller inflatables, deflating them to about 75% capacity and submerging sections in water can also reveal leaks as bubbles appear. Once you’ve found the problem spot, mark it immediately so it’s easy to locate during the repair process.
Temporary and Permanent Repair Options
Once you’ve identified the leak, fixing it quickly is key to keeping your inflatable functional and safe.
For small punctures, vinyl tape can provide a fast, temporary fix – perfect for finishing an event or activity. If you’re looking for a more long-lasting solution, a vinyl patch kit with industrial-strength adhesive is your best bet. Start by cleaning the damaged area with isopropyl alcohol and letting it dry completely. Cut a patch with rounded edges that extends 1–2 inches beyond the tear. Apply adhesive to both the patch and the surface of the inflatable, wait 2–4 minutes until the adhesive becomes tacky, and then press the patch firmly into place. To ensure a strong bond, place a heavy object over the patch and let it cure for at least 24 hours before reinflating.
For pinhole leaks, UV-cured adhesives like Aquaseal UV are a quick option, hardening in about 5 minutes when exposed to sunlight. Larger tears may require urethane adhesives, which take 8–12 hours to cure but provide a durable, waterproof seal.
| Repair Method | Best Used For | Cure Time | Durability |
|---|---|---|---|
| Vinyl Tape | Small punctures, temporary fix | Immediate | Temporary |
| UV Adhesive | Pinhole leaks | 5 minutes | Medium |
| Vinyl Patch + Adhesive | Large tears, high-stress areas | 24 hours | Permanent |
| Urethane Adhesive | Large holes, waterproof repairs | 8–12 hours | Permanent |
Zipper Problems: Troubleshooting and Repairs
Inflatable zippers often endure wear and tear from dirt, sand, sticky residues, or even spilled drinks. When a zipper jams or breaks, it can make an entryway unusable. Luckily, many zipper issues can be fixed with proper cleaning and maintenance, often avoiding the need for a full replacement. Start by cleaning and lubricating the zipper to restore its functionality.
Cleaning and Lubricating Zippers
Begin by closely inspecting the zipper. A magnifying glass can help you spot trapped fabric, sand, or lint. If fabric is caught, gently pull it backward rather than forcing the slider forward – this prevents bending the teeth or damaging the slider permanently.
To remove debris, use tweezers or a soft-bristled toothbrush. For compacted dirt or sand, compressed air works well. Clean the zipper chain and slider with a warm, soapy cotton swab, then rinse and dry them thoroughly with a lint-free cloth. Once clean, apply a light coat of lubricant like silicone spray or paraffin wax to the zipper teeth. Avoid petroleum-based products such as WD-40, as they attract dust and can damage the inflatable’s coating. Move the slider back and forth in small increments to evenly distribute the lubricant, and wipe away any excess to prevent dust buildup.
If the zipper separates behind the slider, gently tighten the metal slider using locking pliers. Squeeze the top and bottom plates together in tiny increments – 1/16 of a turn at a time – to avoid over-crimping.
"The goal is to free the jam without bending teeth or distorting the slider. When a zipper stops moving, patience and gentle technique are the most important tools." – LenZip
Replacing Broken Zipper Parts
If the zipper has missing teeth, cracked sections, or torn tape, cleaning and lubrication won’t fix the problem – it’s time to replace it. Minor repairs, like reinforcing frayed stitching or patching small tears in the fabric near the zipper, can be done using a sewing awl kit or a curved needle with strong thread. These tools are affordable, typically ranging from $10 to $30.
For more significant repairs, especially when the zipper is part of a seam or another structural component, it’s best to seek help from a professional repair service. Attempting to force a damaged zipper without the right tools can weaken the slider’s grip by as much as 30%, leading to permanent misalignment. Additionally, if any adhesive is used during repairs near the zipper, allow 12 to 24 hours for it to fully cure before reinflating the unit.
Blower and Inflation Problems: Quick Fixes
If your inflatable starts to lose firmness or the blower stops working, the problem is often either electrical or mechanical. Common issues include tripped GFCI outlets, blown fuses, or debris clogging the fan blades. Before diving into repairs, try these quick checks – they might save you both time and money. Start by inspecting the electrical connections before moving on to physical blockages.
Checking Power Sources and Connections
Begin by plugging the blower directly into a wall outlet to rule out issues with extension cords or timers. Test the outlet’s functionality, reset the GFCI if applicable, and check to ensure the breaker hasn’t tripped.
Next, take a look at the fuse on the cord plug. Many blowers include a small compartment near the plug that holds one or two fuses. If you see a blackened fuse or a broken internal wire, it’s time to replace it. For units with two fuses, one is often a spare, so swapping them might get you back up and running. Replacement fuses are inexpensive and available at most hardware stores.
If you’re using an extension cord, ensure it’s 14-gauge or thicker and no longer than 100 ft. Thinner household cords, such as 16-gauge, can’t handle the power demand and might damage the motor over time. For optimal performance, run the blower on a dedicated 20-amp circuit.
Removing Blockages and Debris
If the electrical system checks out, the next step is to look for physical blockages. Unplug the blower and inspect the air intake for any debris – things like leaves, grass, twigs, or dirt can jam the fan blades or restrict airflow, which might cause the motor to hum without producing air.
Also, examine the inflation tube that connects the blower to the inflatable. Straighten out any kinks or twists, and make sure the tube isn’t pinched. Keep a 3–5 ft clearance around the blower to prevent obstructions from nearby bushes, trees, or other inflatables. If the blower is placed on grass or carpet, use a ground cover sheet to stop debris from being sucked in. Always turn off the power before inspecting the blower.
Preventive Maintenance for Longer-Lasting Inflatables
Taking care of your inflatables isn’t just a nice-to-have – it’s a must if you want them to last. A little effort goes a long way. With consistent maintenance, your inflatables can serve you for years, but neglect might cut their lifespan short after just a few uses. The secret? Build a routine that includes quick inspections, regular cleaning, and keeping essential tools handy.
Regular Inspections and Cleaning
Make it a habit to check for issues like punctures, loose threads, sagging netting, or the telltale hiss of an air leak. Pay close attention to high-stress areas – corners, entry points, slide sections, and double-stitched seams are prime spots for wear and tear. Don’t forget to inspect anchor points, tie-downs, blower motors, and power cords, as these are just as critical to the inflatable’s performance.
"Regular inspection of your inflatable bounce houses is one of the most important things you can do to maintain them." – Beyond Tent
After every use, start by sweeping or vacuuming away debris – this prevents dirt from grinding into the vinyl when you clean it. For a deeper clean, use a mild soap or a non-corrosive cleaner like Simple Green or OdoBan, paired with a soft brush. High-touch areas, such as railings and ladders, should be disinfected with bleach-free wipes (Lysol works well). Let the disinfectant sit for the recommended time without rinsing it off. Once cleaned, ensure the inflatable is completely dry before storing it to avoid mold and mildew. For quicker drying, prop one side up with a chair or dolly to let water drain from seams and corners.
When it’s time to store your inflatable, choose a cool, dry place. Use pallets or tarps to keep it off bare concrete, which can trap moisture. For long-term storage, consider adding cedar blocks, peppermint oil, or dryer sheets to deter rodents from turning your inflatable into their new home. And don’t forget to lubricate zippers with a silicone-based product to keep them working smoothly.
Sticking to this routine not only keeps your inflatable in top shape but also minimizes the chances of needing costly repairs later. Plus, having the right tools on hand allows you to handle small issues quickly and efficiently.
Repair Tools and Supplies to Keep on Hand
A repair kit is your inflatable’s best friend. Stock it with vinyl patches (rounded edges work better – they’re less likely to peel), outdoor-grade vinyl adhesive or cement, a patching tool, seam sealer, and replacement valves. For detecting leaks, pack dish soap (Dawn or Joy works great), a small bucket, sponges, and a permanent marker. If you need to fix seams, bring along a sewing awl, heavy-duty needles, and reinforced thread.
Don’t overlook the essentials for your blower and anchoring system. Keep replacement fuses, a GFCI for electrical resets, and backup anchoring supplies like ropes, steel stakes, or sandbags. These items are affordable – usually between $10 and $30 – and can save you from unnecessary downtime.
When patching, timing is everything. Let the adhesive sit for two to four minutes until it’s tacky, then press a heavy object (like a diving weight or landscaping stone) on the patch for at least 24 hours to ensure a secure bond. A little patience here goes a long way toward a durable fix.
Conclusion
Keeping inflatables in top shape doesn’t require advanced skills – just consistent care and a few basic tools. From patching small tears to spotting air leaks with a simple soapy water test, most repairs are quick and easy when caught early. The key, though, lies in prevention: regular inspections before and after every use and folding and packing bounce houses correctly can help you avoid costly repairs or an unfortunate mid-event deflation. Staying proactive ensures everything runs smoothly and safely.
"Safety isn’t just important – it’s everything." – Hero Kiddo Inflatables
Investing in professional repair supplies, which typically cost between $10 and $30, is a small price to pay compared to the potential costs of equipment failure or liability issues. Maintenance isn’t just a good idea – it’s essential. It protects your equipment, minimizes risks, and aligns with rigorous quality standards.
At Bouncy Rentals USA, every inflatable undergoes detailed inspections, professional cleaning with vinyl-safe solutions, and thorough disinfection of high-touch areas before heading to your event. Our team checks blowers, anchors, and seams to ensure everything functions properly. We store our equipment in climate-controlled environments and use durable, professional-grade vinyl designed to handle heavy use. When you rent from us, you’re not just getting a bounce house – you’re getting peace of mind. Our equipment is fully insured, meticulously maintained, and ready to deliver fun.
Whether you’re planning a backyard birthday bash or a school carnival, well-maintained inflatables can make all the difference. With proper care and a trusted partner like Bouncy Rentals USA, you can focus on what truly matters: creating memories that last long after the party ends. Let us handle the details so your event stays fun, safe, and stress-free.
FAQs
What can I do to prevent seams from tearing in inflatables?
To keep your inflatables in good condition and prevent seam tears, avoid overinflating them. Too much air can strain the seams, making them more likely to fail. Make it a habit to inspect your inflatable regularly for any signs of wear or damage. If you spot any weak areas, address them right away – quick repairs can stop small issues from turning into major problems.
When you’re not using your inflatable, store it properly. Choose a cool, dry spot, and keep it away from sharp objects and direct sunlight, as prolonged exposure can weaken the material over time.
A little care goes a long way in extending the life of your inflatable and ensuring it’s always ready for your next event!
How can I find and fix air leaks in an inflatable?
To track down air leaks in an inflatable, begin by listening closely for the faint hiss of escaping air. If you have a hunch about where the leak might be, try applying a mixture of soapy water to that area – bubbles will form where air is escaping. Another method is to gently move your hand over the surface to feel for any air being released. After pinpointing the leak, refer to the manufacturer’s repair guidelines or use a patch kit to seal it up quickly.
How can I keep inflatable zippers in good working condition?
To keep inflatable zippers working smoothly, regular maintenance and checks are essential. After every use, take a moment to inspect the zipper for any signs of wear, damage, or debris that might interfere with its function. If you spot any damage, it’s best to replace the zipper with a sturdy, heavy-duty alternative to ensure it holds up over time.
Be gentle when using the zipper – forcing it open or closed can create unnecessary strain and lead to problems. When it comes to cleaning, stick to the manufacturer’s guidelines and carefully remove any dirt or buildup. If your inflatable doesn’t already have a deflation zipper, adding one can make deflation much easier while also reducing the load on other zippers. With these simple care steps, you can help your inflatable and its zippers last longer.