Drying an inflatable slide properly after cleaning is essential to prevent mold, bacteria, and material damage. Neglecting this step can lead to unpleasant odors, slippery surfaces, and costly repairs. Here’s how you can ensure your slide is dry, safe, and ready for storage:
- Drain and Deflate: Remove all water by draining through valves and zippers. Use a pump for any remaining water.
- Wipe Surfaces: Use towels or microfiber cloths to dry seams, crevices, and Velcro areas thoroughly.
- Airflow Tools: Partially inflate the slide and use blowers or fans to dry both surfaces and internal chambers.
- Sunlight Drying: Lay the slide in direct sunlight, rotating it every few hours for even drying.
- Inspect and Store: Check for moisture, apply talcum powder to prevent sticking, and store in a cool, dry place.
Proper drying can extend the lifespan of your inflatable by up to 40%, while skipping this process risks mold growth within 24–48 hours. Follow these steps to protect your investment and ensure safe use.
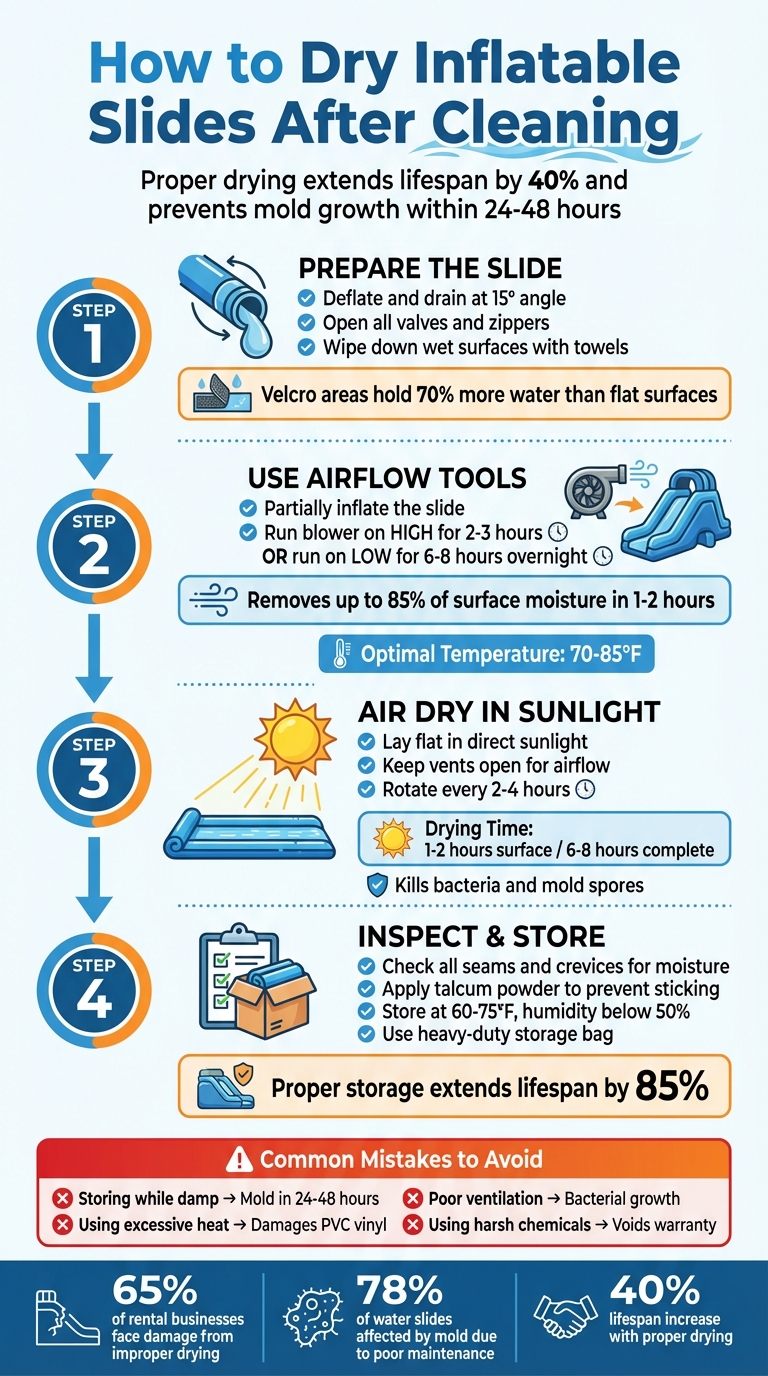
4-Step Process to Dry Inflatable Slides After Cleaning
Step 1: Prepare the Slide for Drying
Before drying your slide, it’s important to remove as much water as possible. This step ensures the drying process is quicker and more effective. Here’s how to deflate, drain, and prep the slide’s surfaces.
Deflate and Drain the Slide
Start by disconnecting all water sources and hoses. To help water flow naturally, position the slide at a 15° angle. Open all drain valves, outlet tubes, and auto-drainage zippers to release trapped water. These drainage systems are designed to remove most standing water quickly. For any remaining water, use a submersible or bilge pump to clear it out efficiently.
Tip: Keep the blower running while opening the drainage zippers. This softens the pool walls and pushes out water more effectively. Once most of the water is gone, relocate the slide to a dry area or place it on a clean tarp to avoid it sitting in leftover puddles.
Wipe Down Wet Surfaces
After draining, tackle any leftover moisture with absorbent towels or microfiber cloths. Pay close attention to vinyl surfaces, seams, Velcro areas, and crevices where water tends to collect. Velcro areas, in particular, can hold up to 70% more water than flat vinyl surfaces. Be thorough when wiping seams, folds, and contact points to ensure no moisture is left behind. If your slide has a removable pool liner, take it out and dry it separately to prevent water from being trapped underneath. This hands-on wiping process is crucial for removing the moisture that drainage alone can’t handle.
Step 2: Use Airflow Tools to Dry the Slide
After prepping the slide and removing most of the water, the next step is to tackle moisture elimination using airflow tools. Once drained and wiped down, airflow equipment becomes your go-to solution for drying. A properly used blower can remove up to 85% of surface moisture within 1 to 2 hours. This step focuses on drying both the visible surfaces and the interior chambers where water can linger.
Partially Inflate the Slide
Start by turning on your blower to partially inflate the slide. Inflate it just enough so that it’s soft and pliable, not fully rigid. This partial inflation creates airflow pathways through the chambers, seams, and joints – areas where water often hides. Keeping all zippers, outlet tubes, and air vents open during this process helps with cross-ventilation, ensuring trapped moisture is released.
Set Up Blowers and Fans
Position the primary blower at the slide’s main intake tube to push air through the entire structure. Run the blower on high for 2–3 hours immediately after draining. For overnight drying, switch to a low setting and let it run for 6–8 hours to maintain airflow and prevent mold growth.
Use secondary fans to concentrate on specific wet areas like pool liners, entryways, or exit zones. A leaf blower works well for drying seams, joints, and liners – especially triple-stitched seams and Velcro strips where water tends to collect. Rotate the slide every 2–3 hours to ensure airflow reaches all surfaces evenly.
For the best results, aim for an ambient temperature of 70–85°F during the drying process. After using the blower, make sure to wipe it dry to prevent moisture from damaging the motor.
| Drying Tool | Purpose | Recommended Duration |
|---|---|---|
| Primary Blower | Inflation and internal airflow | 2–3 hours (High) / 6–8 hours (Low) |
| Leaf Blower | Spot drying for seams and liners | As needed |
| Large Fans | External surface drying | 2–4 hours |
| Small Fans | Crevices and Velcro drying | 1–2 hours |
Once this step is complete, natural sunlight can be used to finish the drying process.
Step 3: Air Dry in Sunlight
After using airflow tools to remove most of the moisture, sunlight takes care of the final drying step. Sunlight not only evaporates any remaining water but also helps to neutralize bacteria and mold spores lingering on the surface. This step is essential because mold can start growing on damp vinyl surfaces within just 24 to 48 hours.
Position the Slide for Sun Exposure
Find a sunny, open area with good airflow, and lay the slide flat. To protect the vinyl from punctures or dirt, place a ground sheet or tarp underneath it. Keep the slide fully inflated and all vents open, allowing sunlight and air to work together for faster drying.
"Sunlight helps to dry the surface and kills bacteria and mold spores." – Happy Jump
For optimal results, choose a day with temperatures between 70°F and 85°F and low humidity. If the weather is cloudy or the humidity is high, drying will take longer, and you may need to use additional fans. Make sure the slide is on level ground or a slight slope to prevent water from pooling in any low spots.
Rotate the Slide Regularly
To ensure all areas dry evenly, rotate the slide every 2–4 hours. Pay close attention to moisture-prone spots like pool liners, triple-stitched seams, and Velcro strips. These areas can trap up to 70% more water than other parts of the slide. Use a towel to dry any spots that remain damp.
"Be sure to rotate the slide occasionally to ensure all areas receive equal exposure to the air." – Minyefun
If the slide has internal chambers, keep the blower running on a low setting while it sits in the sun. This maintains airflow inside and speeds up the drying process. While surface drying in direct sunlight usually takes 1 to 2 hours, a complete drying process may take 6 to 8 hours to ensure every part is moisture-free.
Once the slide is thoroughly dried, you can move on to inspecting and preparing it for storage.
Step 4: Final Inspection and Storage
A final moisture check before storage is crucial to avoid mold and material damage. Taking these steps can help extend your equipment’s lifespan by as much as 85%.
Check for Remaining Moisture
Focus on areas prone to moisture retention, such as pool liners, seams, and velcro. Use a dry towel to wipe down every seam, fold, and connection. Run your hand over joints and crevices to ensure they’re completely dry. If you find any damp spots, address them immediately with a towel or fan. For stubborn moisture, allow the slide to air-dry for longer. Don’t forget to dry the blower unit with a towel to prevent transferring water back to the slide during deflation.
Apply Talcum Powder
Once the slide is thoroughly dry, sprinkle talcum powder over the vinyl surface. This absorbs any leftover moisture and prevents the material from sticking together during storage.
"Lightly dusting the slide with talcum powder can help absorb any remaining moisture and prevent the material from sticking together when folded." – Happy Jump
Pay special attention to areas that will touch when folded, as this step helps protect the seams of commercial-grade PVC vinyl. After dusting, your slide is ready for storage.
Store in a Cool, Dry Location
When the slide is fully dry and treated, store it in a climate-controlled environment. Ideal conditions are a temperature range of 60°F to 75°F and humidity levels below 50%. Place the folded slide inside a heavy-duty storage bag to shield it from dust, pests, and moisture.
| Storage Factor | Recommended Specification | Purpose |
|---|---|---|
| Temperature | 60°F – 75°F | Prevents material deterioration and mold growth |
| Humidity | Below 50% | Reduces the risk of mildew on vinyl surfaces |
| Container | Heavy-duty storage bag | Protects against pests and physical damage |
| Light Exposure | Avoid direct sunlight | Prevents UV damage and material brittleness |
Select a storage spot with good ventilation and no direct sunlight, as UV rays can weaken PVC vinyl over time. Whenever possible, roll the slide instead of folding it to reduce stress on the material and avoid creating weak points. Even in storage, inspect the inflatable periodically for odors or signs of mold so you can address any problems early.
Common Drying Mistakes to Avoid
Once you’ve nailed the basics of proper drying, it’s equally important to steer clear of common missteps that can compromise your slide’s durability.
Even seasoned professionals make mistakes. One of the biggest errors? Storing the slide while it’s still damp. This can lead to mold and mildew forming in as little as 24–48 hours. Another frequent issue is overlooking seams and crevices – areas like triple-stitched seams, Velcro fastenings, and pool liners can hold up to 70% more water than flat surfaces. Additionally, using harsh chemicals can weaken stitching and welds, potentially voiding your warranty.
Poor airflow is another culprit. Drying your slide in a space with limited ventilation encourages bacteria growth. On the flip side, exposing the material to high heat – whether from industrial heaters or other sources – can cause lasting damage to PVC vinyl. Alarmingly, 65% of inflatable rental companies report material damage each year due to improper drying techniques, and mold issues affect 78% of water slides that aren’t maintained correctly.
To avoid these problems, ensure thorough airflow after cleaning to remove internal moisture. Stick to ambient temperatures (70°F–85°F) and skip the industrial heaters. Before air drying, remove any pooled water with the right pumps. Rotate the slide every 4–6 hours to allow even exposure to sunlight and air. Finally, manually check moisture-heavy areas like water cannon connections and entry/exit points with a dry towel before storing.
Mistakes, Risks, and Prevention Table
| Common Mistake | Risks & Consequences | Prevention Strategy |
|---|---|---|
| Storing while damp | Mold, mildew, foul odors, and material breakdown | Ensure extended airflow; test all seams for dryness before deflating |
| Using excessive heat | Damage to PVC vinyl and heat-welded seams | Use ambient air and fans; avoid high-heat drying methods |
| Poor ventilation | Bacterial growth and trapped humidity | Dry in open spaces or use multiple air movers for cross-ventilation |
| Leaving debris inside | Moisture trapped by dirt or grass causes rot | Rinse thoroughly and wipe down all crevices before drying |
| Using bleach/solvents | Stitch erosion and voided warranties | Opt for water or a diluted (10%) neutral, non-toxic cleaning solution |
Conclusion
Drying your inflatable water slides properly can increase their lifespan by up to 40%, while neglecting moisture control leaves 65% of rental businesses dealing with damage each year. On top of that, mold outbreaks affect 78% of improperly maintained water slides, often starting within just 24–48 hours of storing damp equipment.
To avoid these issues, follow these steps: drain, wipe, and use blowers to remove internal moisture. Place the slide in direct sunlight and rotate it regularly for even drying. Inspect seams, Velcro strips, and pool liners thoroughly before storing. Finally, apply a light dusting of talcum powder to absorb any leftover moisture and prevent the vinyl from sticking together.
"Proper drying of commercial inflatable water slides extends equipment lifespan by 40% and prevents costly material damage that affects 65% of inflatable rental businesses annually."
- Blaine Ladd, BounceWave Slide Sales
When moisture is managed effectively, proper storage preparation can extend your equipment’s lifespan by as much as 85%. Drying isn’t just about maintenance – it’s about protecting your investment, ensuring safety, and keeping your business running smoothly. Never store your inflatable slide until it’s completely dry. At Bouncy Rentals USA, we understand the importance of equipment care, so every slide is ready to deliver safe, unforgettable fun.
FAQs
What’s the best way to dry an inflatable slide after cleaning to prevent mold?
To prevent mold from forming on your inflatable slide, make sure it’s completely dry after cleaning. Pay special attention to seams, crevices, and other tricky spots where moisture can hide. Use towels or a soft cloth to thoroughly wipe down the surface. Then, leave the slide inflated in a sunny spot or a well-ventilated area to allow it to air dry fully. Never store the slide while it’s still damp, as even a little trapped moisture can cause mold issues. Once it’s dry, keep it in a clean, dry, and temperature-controlled space to maintain its condition.
What tools should I use to dry an inflatable slide properly?
To dry an inflatable slide thoroughly, you’ll need a few handy tools: a soft-bristle brush, a garden hose, a leaf blower, and an air mover or fan. These tools are essential for cleaning off dirt and debris while ensuring the slide dries completely, helping to prevent mold or other damage.
A leaf blower or air mover can make a big difference in speeding up the drying process. These tools circulate air effectively, helping to evaporate any leftover moisture. Pay extra attention to seams and crevices, as these areas often trap water.
Why should I use talcum powder after drying an inflatable slide?
Using talcum powder after drying your inflatable slide is a smart way to keep it in good shape. It absorbs any leftover moisture, helping to prevent mold and mildew from forming. Plus, by reducing friction between the slide’s surfaces, talcum powder can help protect against wear and tear. This simple trick keeps your slide clean, safe, and ready for future fun.