When transporting inflatables like bounce houses or obstacle courses, most damage happens during handling, transport, or storage – not during use. These items are expensive, costing $1,500–$10,000+, so proper care is essential to avoid costly repairs or replacements. Mold, tears, and stress lines can develop quickly if inflatables are mishandled, folded improperly, or stored while damp.
Here’s a quick summary of key steps to protect your equipment and extend its lifespan by 3–5 years:
- Inspect Before Transport: Check for tears, loose stitching, or moisture while inflated. Dry completely to prevent mold growth.
- Deflate and Fold Properly: Use a tarp, release all air, and roll (not fold) to avoid stress lines. Secure with straps or ropes.
- Prepare Your Vehicle: Clear debris, use a tarp for protection, and position inflatables carefully to prevent shifting.
- Secure the Load: Use ratchet straps with proper tension and protect against friction damage with blankets.
- Unload Safely: Use dollies to avoid dragging and inspect the ground for debris before setting up.
Follow these steps to avoid damage, save on repairs, and ensure safety during transport. Proper handling also keeps your equipment clean and ready for use at events.
Preparing Your Inflatable for Transport
Getting your inflatable ready before loading it up isn’t just a good idea – it’s essential. Skipping this step could lead to expensive repairs down the road.
Checking for Damage
Always inspect your inflatable while it’s still fully inflated. Why? Because tears, punctures, and loose stitching are much easier to spot when the structure is under air pressure. Go over the entire unit carefully, paying extra attention to seams and high-stress areas like anchor straps, D-ring attachments, and tie-down webbing. Look for any signs of fraying, stretching, or metal fatigue.
Before turning off the blower, take a moment to sweep out any debris. Small items like jewelry, sticks, rocks, pens, or even popsicle sticks can easily damage the vinyl when the inflatable is folded and rolled.
If you spot any damage, mark it with painter’s tape so you can find it again after deflation. As Reservety notes:
Small problems caught early are $10 patches; ignored problems become $500 repairs.
Don’t forget to check for moisture. After cleaning or a rainy day, run the blower for 30–60 minutes to dry out the interior and seams completely. Use the "hand test" – physically feel the seams and folds for any dampness. If anything feels wet, keep the blower running. Reservety emphasizes:
Deflating a wet bounce house is the single most common cause of mold.
Mold can start growing within 24–48 hours if the inflatable is packed up while damp. Once you’re sure it’s dry and damage-free, you can move on to deflating and folding.
Deflating and Folding
After inspecting for damage, start deflating your inflatable. Lay down a heavy-duty tarp on a clean surface to protect the vinyl from dirt and abrasions.
Fully open all deflation zippers and valves, then turn off the blower. Once most of the air is out, walk across the inflatable to push any remaining air toward the open zippers. For larger units (over 15×15 feet), using a vacuum deflator attachment can make the process quicker and more efficient.
Next, fold the inflatable using the “bed-sheet method.” Fold the two outer edges inward, walk on the unit to press out more air, and then fold the edges inward again. Make sure the bottom of the inflatable is facing outward during this process to protect the inner play surfaces.
When it’s time to roll, start from the end farthest from the deflation tubes or zippers. Rolling is better than folding because it spreads out stress across the vinyl. Repeated folding along the same lines can create creases that eventually lead to leaks. As one person rolls the inflatable forward, another should walk backward ahead of the roll to push out any leftover air.
Once rolled, secure the inflatable with straps, rope, or bungee cords to keep it compressed. Tuck in the deflation tubes to avoid snags during transport. If you’re storing it in a bag, opt for a breathable canvas or mesh option – never seal a damp inflatable in plastic.
These steps will help keep your inflatable in top condition for years to come. At Bouncy Rentals, we follow this process with every piece of equipment to ensure quality and longevity.
Loading the Inflatable
Preparing the Cargo Area
Before you start loading, make sure your truck bed or trailer is clean and ready. Sweep out any debris – things like rocks, gravel, sticks, or screws can puncture the inflatable’s vinyl. Even tiny pebbles can cause damage when the weight of the inflatable presses down on them during transport.
After clearing the area, lay down a heavy-duty tarp or protective floor covering. This adds a layer of protection between the inflatable and the vehicle’s surface, helping to prevent abrasions and keeping the equipment clean. It’s a quick step that can save you from expensive repairs later on.
Once the cargo area is prepped, you’re ready to move on to lifting and positioning the inflatable.
Lifting and Positioning
When it comes to lifting, never try to handle a large inflatable by yourself. Take stock of the weight and get help for heavier units. Lisa Friedrich, SEO Manager at uShip, offers this advice:
Squat and lift with your legs, minimizing strain on your back.
Hold the inflatable close to your body and avoid twisting your torso while carrying it.
For inflatables weighing more than 50–75 pounds, it’s best to use a dolly or hand truck secured with straps. If you’re loading into a truck bed, use sturdy objects like milk crates or blower housings as makeshift steps to give yourself extra height and leverage when pushing the unit over the tailgate. If a loading ramp is available, pull the dolly backward up the incline while a second person follows to keep the load steady.
Once the inflatable is in the truck or trailer, position it carefully. Place the heaviest items against the front wall of the truck or directly over the axles to ensure balanced weight distribution. Stand the inflatables vertically to save space and prevent them from unrolling. Use smaller accessories like blowers or sandbags to fill in gaps between larger units – this keeps everything snug and prevents shifting during transport. If you’re making multiple stops, load the equipment in reverse order so that the items for the first delivery are easily accessible at the rear.
Securing the Load
Using Ratchet Straps
Making sure your load is secure is a must to avoid damage during transit. Once your inflatables are loaded into the truck bed or trailer, secure them right away. Use at least two ratchet straps per load, applying tension in multiple directions – both forward/back and side-to-side – to ensure stability. Before you start, check the Working Load Limit (WLL) on each strap. For instance, U-Haul ratchet tie-downs typically have a WLL of 800 pounds, while sport straps with "S" hooks often max out at 500 pounds. Always rely on the WLL, not the break strength (which indicates the point of total failure).
Straps should only be attached to rated tie-down points like D-rings, stake pockets, or rub rails. Avoid weak spots like plastic or sharp metal edges, which can bend or cut the webbing. To secure the strap, fully open the ratchet, feed the strap through from the bottom (ensuring at least six inches are wound), pull it tight, and then ratchet it until snug. Don’t overdo it – tighten just enough to keep the load firm. As Tent and Table advises:
"Tie down straps can be tightened to the point they’re damaging equipment and cargo… Stop when the load is firm and doesn’t move." – Tent and Table
To prevent friction damage or strap burn, place moving blankets or furniture pads between the straps and the inflatables. Once everything is locked in place, secure any loose strap tails to avoid flapping during transit.
Weather Protection and Safe Driving
After strapping down your inflatables, take extra steps to protect them from the elements and ensure safe travel. Use a tightly secured, waterproof, mildew-resistant tarp to shield the load from rain, road grime, and wind. During the trip, stop to check your strap tension after the first 5 to 10 minutes of driving since loads often settle and loosen early on. For longer trips, re-check the straps every 50 miles or whenever you take a break.
Drive carefully – smooth and steady is key. Avoid sudden stops, sharp turns, or hard braking, as these can cause the load to shift. Unsecured loads are no small matter; they account for 81% of accidents involving road debris and injure roughly 17,000 people annually in collisions caused by objects in the road. U-Haul highlights the risks:
"Unsecured loads are now generally recognized as a danger to other drivers… Penalties vary from hefty fines to possible prison time if others are injured as a result of your unsecured load." – U-Haul
A properly secured load shouldn’t slide, tip, bounce, or shift – even when you hit bumps or brake. Take the time to double-check everything – it’s worth it.
Unloading and Inspection
Removing Straps and Unloading
When you arrive at the setup site, carefully release the ratchet straps to keep the load steady. If you secured the tie-off rope beneath the roll earlier, you’ll save yourself the hassle of lifting the entire unit just to unfasten it.
Use a dolly or hand truck to transport the inflatable from your vehicle to the setup area. Avoid dragging the vinyl across rough surfaces like pavement, gravel, or dirt, as this can cause unnecessary wear and tear. If you’re unloading from a truck bed, you can use milk crates or blowers as temporary steps to create a midpoint platform. This allows you to lower the unit onto the dolly more easily and avoids accidental drops. Before unrolling the inflatable, do a final check of the ground to remove any sharp debris that could harm the vinyl. For added protection, lay down a tarp or ground cloth to shield the material from abrasions during the setup process.
Once the inflatable is safely positioned, you can move on to a thorough inspection and setup before inflation.
Final Inspection and Setup
After unloading the inflatable with care, unroll it in the direction you intend to set it up. This minimizes the need to reposition the heavy material later. As you unfold it, check for scuffs or any tape that might indicate damage noted during previous use to determine if you should patch or replace the inflatable. Look inside seams and crevices for small objects like jewelry, pens, or rocks that could puncture the material during inflation.
Before attaching the blower, ensure all deflation zippers and Velcro compartments are securely closed. Align the blower tube so it’s perfectly straight to guarantee proper airflow. As Floatie Kings advises:
"The tube must be aligned straight, not angled at all. This is how to inflate the bounce house without having any issues." – Floatie Kings
During inflation, keep an ear out for hissing sounds that could signal air leaks, and watch for uneven inflation or sagging areas. Once the inflatable is fully inflated, walk around and inspect it thoroughly. Pay close attention to seams, stitching, and high-stress areas like slide channels and interior corners. Check D-rings, anchor straps, and webbing for fraying or signs of metal fatigue.
For anchoring on grassy surfaces, drive spiral stakes into the ground at a 45-degree angle, pointing away from the inflatable to maximize tension. On hard surfaces like pavement, use sandbags weighing at least 40 pounds. Always adhere to safety guidelines – never operate the inflatable if wind speeds exceed 20 mph, and follow the manufacturer’s setup instructions carefully.
Tools and Methods Comparison
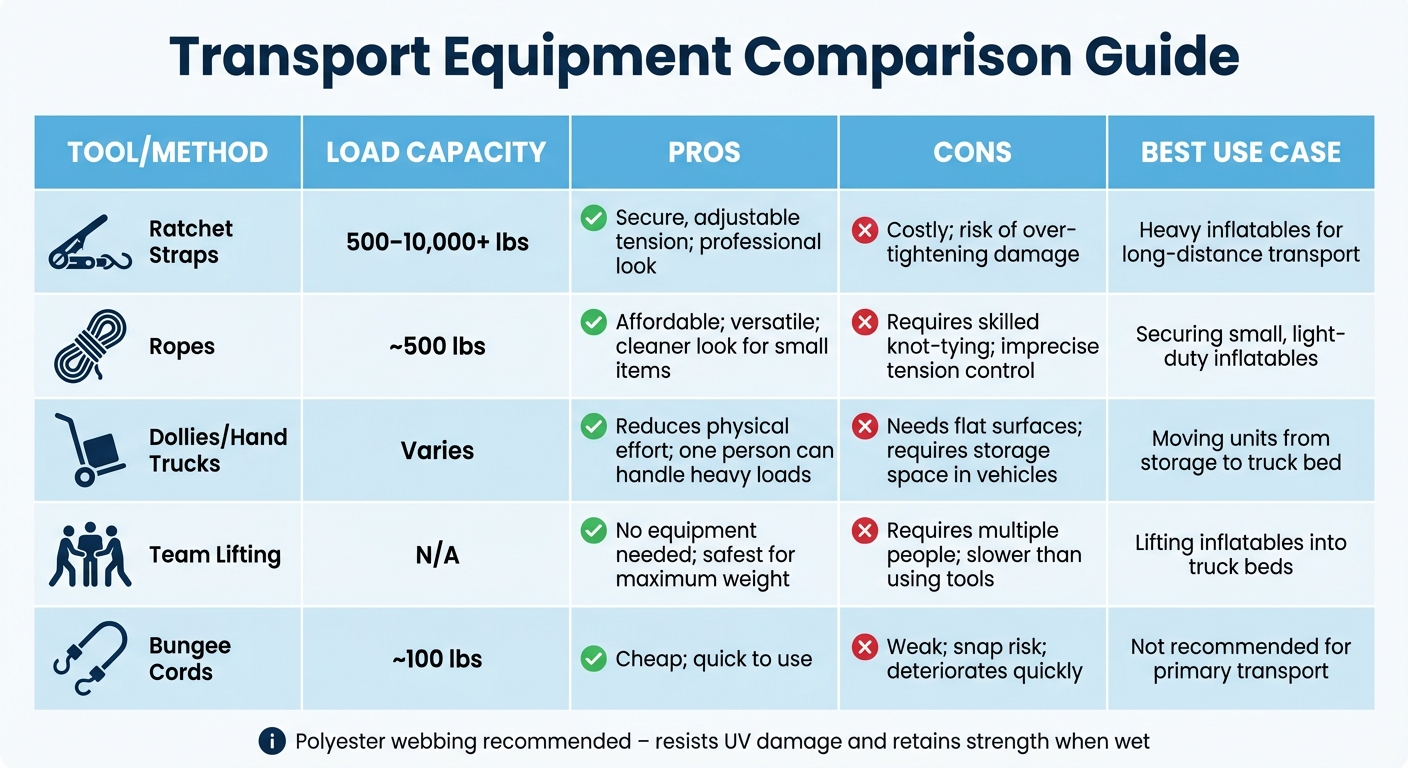
Inflatable Transport Equipment Comparison: Load Capacity, Pros, Cons and Best Uses
Comparison Table: Equipment Options
Picking the right tools is crucial for safe and efficient transport, especially when dealing with heavy or bulky items like water slides and dunk tanks. Ratchet straps are the go-to choice for securing cargo, offering load limits from 500 lbs to over 10,000 lbs. Their strength and reliability make them a staple in the transport industry, often required by law. However, they do require some know-how – threading them correctly and avoiding over-tightening are key.
For reducing physical strain, dollies and hand trucks are lifesavers. They allow one person to move heavy inflatables that would normally need a team. The downside? They work best on flat surfaces and may need extra tools to lift items into truck beds. On the other hand, ropes and bungee cords are more flexible and inexpensive, ideal for lighter items or filling gaps. But they come with limitations: ropes require skillful knot-tying, and bungee cords, with their low load capacity (around 100 lbs), are prone to stretching and wear.
Here’s a quick breakdown of the tools and their best uses:
| Tool/Method | Load Capacity | Pros | Cons | Best Use Case |
|---|---|---|---|---|
| Ratchet Straps | 500–10,000+ lbs | Secure, adjustable tension; professional look | Costly; risk of over-tightening damage | Heavy inflatables for long-distance transport |
| Ropes | ~500 lbs | Affordable; versatile; cleaner look for small items | Requires skilled knot-tying; imprecise tension control | Securing small, light-duty inflatables |
| Dollies/Hand Trucks | Varies | Reduces physical effort; one person can handle heavy loads | Needs flat surfaces; requires storage space in vehicles | Moving units from storage to truck bed |
| Team Lifting | N/A | No equipment needed; safest for maximum weight | Requires multiple people; slower than using tools | Lifting inflatables into truck beds |
| Bungee Cords | ~100 lbs | Cheap; quick to use | Weak; snap risk; deteriorates quickly | Not recommended for primary transport |
When it comes to straps, polyester webbing is the best material – it resists UV damage and retains its strength even when wet, unlike nylon, which can lose 15% to 20% of its strength in wet conditions —a critical factor when connecting water hoses to inflatable slides. Always choose straps with a working load limit at least 25% higher than the actual load, and inspect them for any damage like cuts, fraying, or bent hooks before each use.
Conclusion
Taking the right steps for loading and unloading inflatables can make a big difference in protecting your equipment over time. Simple practices like rolling inflatables instead of folding them, laying down a heavy-duty tarp for extra protection, and securing loads with durable ratchet straps can add an extra 3–5 years to your equipment’s lifespan. Considering that commercial bounce houses range from $1,500 to $5,000, and larger obstacle courses can cost over $10,000, these measures are well worth the effort. Mold, fabric tears, and poor handling can lead to expensive replacements, but following these steps helps you avoid those costs. According to Reservety, most damage happens during storage – mold can start forming in just 24–48 hours, and a small $10 patch issue can quickly turn into a $500 repair if overlooked. These precautions not only protect your equipment but also keep your business running smoothly.
Beyond preserving your gear, these practices also enhance safety. Proper deflation and secure loading reduce risks like injuries and accidents. Using dollies or hand trucks helps prevent back strain, while securing inflatables properly ensures they don’t shift during transport. Even small steps, like clearing debris before packing, can prevent punctures and other transport-related damage.
For rental business owners and event planners, following these tips is essential for saving money, improving safety, and ensuring your equipment lasts longer. At Bouncy Rentals USA, we take pride in our strict maintenance and transport protocols. Every bounce house, water slide, and obstacle course we deliver is sanitized, insured, and handled by trained professionals who understand the importance of proper care.
FAQs
How do I know my inflatable is fully dry before packing it?
Before packing up your inflatable, it’s crucial to ensure it’s completely dry. Pay close attention to seams and crevices where moisture tends to hide. Using airflow – like fans or blowers – can help speed up the drying process. Carefully inspect all surfaces for any damp areas. Properly drying your inflatable not only prevents mold and mildew but also protects it from damage, ensuring it’s safe to use and lasts longer in storage.
Should I roll or fold an inflatable for transport?
When transporting an inflatable, folding is better than rolling. Treat it like folding a large bed sheet: make sure to tuck in any colorful designs to keep them from touching the ground. Depending on the size, fold it into halves or thirds to create manageable sections. While rolling is usually reserved for storage after folding, sticking to folding during transport helps protect the inflatable from damage and makes it easier to handle.
What strap type and load rating should I use to secure inflatables?
To keep inflatables secure without causing damage, choose heavy-duty nylon straps with a load rating of at least 2,251 lbs. Look for commercial-grade straps equipped with steel D-rings or cam buckles, like Rollercam® buckles, which offer both durability and user-friendly functionality. These straps provide a dependable and secure solution for transport.