When your inflatable starts sagging, deflating unevenly, or making hissing sounds, you likely have an air leak. Small leaks are often caused by punctures, worn seams, or temperature changes. You can confirm a leak using simple methods like the soapy water test, which reveals escaping air through bubbles. Quick fixes, like vinyl patches, can handle minor damage, but you should decide whether to patch or replace based on the severity of the tear. Regular inspections, proper storage, and cleaning can prevent leaks and extend your inflatable’s lifespan. Always check for issues early to keep your inflatable safe and functional.
Common Signs of Air Leaks
Identifying an air leak early often comes down to three key indicators: how the inflatable looks, how it performs, and the sounds it makes. Each of these can provide valuable clues about where air might be escaping and how severe the issue is. Let’s break these down to help you quickly spot the source of the problem.
Sagging or Drooping Sections
One of the clearest signs of an air leak is when an inflatable starts to lose its firmness and shape. You might notice sagging walls or roofs that look wrinkled and soft – more like a deflated balloon than the tight, fully inflated structure you expect. Pay special attention to high-stress areas, like where slides attach or where bounce and slide sections connect. These spots endure frequent climbing and jumping, making them more prone to wear and tear. If just one section droops while the rest stays firm, it’s likely a localized leak. Once you spot one issue, take a closer look at nearby areas for additional leaks.
Fast or Uneven Deflation
An inflatable should stay consistently firm as long as the blower is running. If one side deflates faster than the other or the entire structure loses air quickly despite the blower being active, you could be dealing with a puncture or a problem along a seam. Uneven deflation is especially concerning in combo units where kids are playing, as it can cause the structure to lean dangerously. While cooler temperatures might make the inflatable feel softer overall, a true air leak will create isolated soft spots that won’t firm up even with constant airflow.
Hissing or Whistling Noises
Sometimes your ears can pinpoint a leak faster than your eyes. When pressurized air escapes through a puncture, tear, or seam failure, it often produces a hissing or whistling sound.
"In a quiet place, inflate the unit. Move your ear and hand close to the surface of the inflatable. You can often hear a faint hissing sound or feel the escaping air on your skin. This is great for checking seams quickly."
- Leo Li, Accounting Manager, Inflatplay
This "listen and feel" method is especially useful for detecting small leaks that aren’t immediately visible. Whistling sounds might point to issues with damaged or dirty valves in sealed inflatables, while a hissing noise usually signals a puncture caused by a sharp object. High-use areas, like slide attachments, are good places to start your inspection if you suspect a leak. Early detection can save you time and prevent further damage.
How to Confirm an Air Leak
How to Detect and Confirm Air Leaks in Inflatables: Step-by-Step Guide
If you notice signs like sagging or hissing, it’s time to confirm the presence of a leak. Here are two simple and effective ways to pinpoint the problem.
The Soapy Water Test
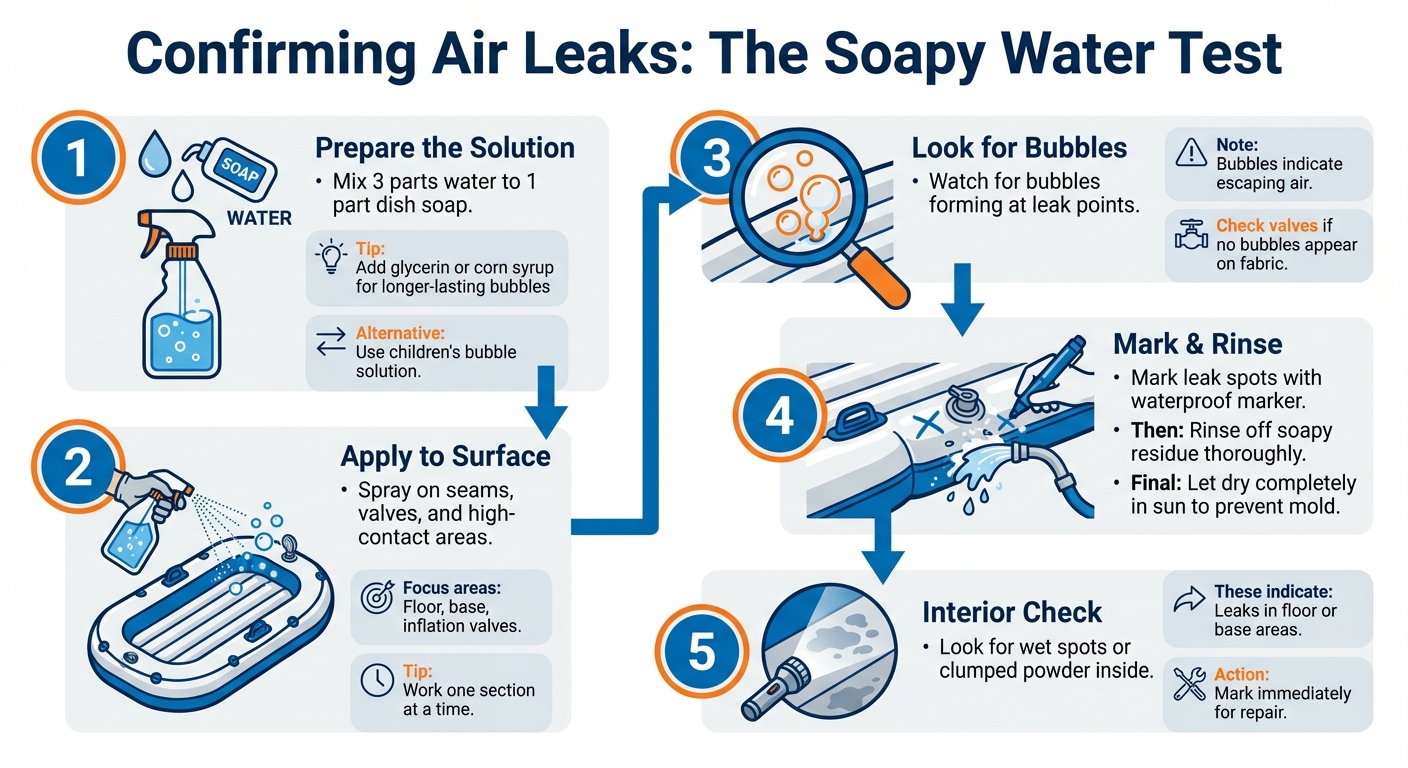
The soapy water test is a tried-and-true method for spotting leaks in inflatables. Start by mixing a solution of 3 parts water to 1 part dish soap (brands like Dawn or Joy work well) in a spray bottle. For better results, add a few drops of glycerin or a dash of corn syrup to help the bubbles last longer, making slow leaks easier to detect. If glycerin isn’t available, children’s bubble solution can be a great alternative since it already contains glycerin.
"The cheapest, effective, and most available leak detection compound is children’s bubble solution… Essentially it’s water, dish soap, and glycerin, which leads to longer-lasting and easier-to-find bubbles than dish soap alone." – Jammer, Moderator, Cruisers & Sailing Forums
Spray this solution on seams, valves, and other high-contact areas like the floor or base, working one section at a time. Look for bubbles forming at the leak point as air escapes. If no bubbles appear on the fabric, apply the solution directly to the inflation valves – loose or damaged valves are often the culprit. For larger inflatables, like bounce houses, a pressurized garden sprayer can help cover more area efficiently. Once testing is complete, rinse off the soapy residue and let the inflatable dry thoroughly in the sun to avoid mold or slippery surfaces. Afterward, check the interior for further signs of leaks.
Checking for Wet Spots or Clumped Powder
Next, inspect the interior of the inflatable for damp spots or clumped powder. These can indicate leaks in areas like the floor or base that might not be visible from the outside. If soapy water was applied to the bottom, any moisture seeping through will leave wet patches inside. Similarly, powder residue from manufacturing or storage will clump around leak points when exposed to water. Use a waterproof marker to mark these spots immediately, so they’re easy to find when it’s time for repairs.
Identifying leaks quickly is key to ensuring the safety and durability of your inflatable, making repairs much easier to handle.
Repairing Air Leaks
Once you’ve pinpointed the leak, it’s time to fix it and bring your inflatable back to working order. Small punctures and tears are usually manageable with basic tools and materials, while more severe damage may call for professional help.
Patching Small Holes and Tears
For minor damage, a DIY repair kit can be a lifesaver. Start by deflating the inflatable and laying it flat on a clean, dry surface. Use rubbing alcohol or a mild soap-and-water solution to clean the damaged area, ensuring it’s completely dry before proceeding. This step is crucial for proper adhesion.
Cut a patch from vinyl or TPU material, making sure it extends 1 to 2 inches beyond the hole on all sides. Round the edges of the patch into a circular or oval shape – sharp corners are more likely to peel away over time. Apply a thin, even layer of vinyl adhesive to both the patch and the damaged area. Allow the glue to become tacky, which usually takes 30 seconds to 2 minutes, before pressing the patch firmly onto the surface. Work from the center outward to eliminate air bubbles, then place a heavy object on the patch or use a hair dryer to set the bond.
"Always use vinyl/PVC-specific repair kits – household glue will fail." – Inflatable Island
Let the patch cure for at least 30–60 minutes before testing, though waiting 12–24 hours ensures a stronger bond. For added durability, apply the patch to the inside of the inflatable. This way, the air pressure from inflation will push the patch against the material, reinforcing the seal. Once the patch has cured, reinflate the inflatable and use the soapy water test to check for leaks around the patch edges. If the repair doesn’t hold, it may be time to explore professional options.
When to Get Professional Repairs
Some leaks are beyond the scope of DIY fixes. Tears larger than 4–6 inches, seam failures, or structural damage often require professional expertise. If you’ve tried multiple patching methods – tape, glue, or patches – and the leak persists, it’s best to consult a professional.
"For large tears (over 4–6 inches) or seam damage, professional repair is recommended." – Inflatable Island
"If you have been trying different ways to fix a hole in your bounce house and have still not had any luck, you should probably contact a professional." – Gary Simon, Jungle Jumps
For older or lower-cost inflatables, replacing the unit might be more economical than investing in extensive repairs. Whether you handle the repair yourself or seek professional help, addressing the issue promptly and preventing future air leaks is key to ensuring the safety and longevity of your inflatable.
The Importance of Regular Maintenance
Regular maintenance is essential for keeping inflatables in top condition and avoiding recurring problems like leaks. Frequent inspections can help spot small leaks before they become bigger issues. For example, checking your inflatable every 30 minutes during use can prevent minor problems from escalating and disrupting your event.
Taking care of your inflatable properly also means it will last longer. A commercial-grade PVC inflatable typically lasts 3–5 years, but with diligent maintenance, that lifespan can extend to 5–8 years. Similarly, inflatables made for home use from Oxford cloth usually last 1–3 years, but with proper care, they can last beyond three years.
"The life of your inflatable depends directly on the material quality and your maintenance habits." – Leo Li, Accounting Manager, Inflatplay
Environmental factors play a big role in preventing leaks. UV rays, for instance, can speed up fabric aging and make it more porous. To combat this, store inflatables in cool, dry, and shaded areas. Always use a tarp underneath to protect the base from sharp objects. Also, never pack an inflatable while it’s wet, as moisture can lead to mold, which weakens the fabric and seams.
Following an ultimate guide to cleaning bounce houses is equally important. Dirt and oils can interfere with the adhesion of repair patches and compromise valve integrity. Cleaning the surface ensures patches stick properly, while cleaning valves and caps before sealing helps maintain an airtight seal. Following weight and capacity limits is another critical step – overloading stresses the seams and often leads to slow leaks.
As mentioned earlier, proactive maintenance reduces downtime and enhances the performance of your inflatable. Regular upkeep not only prevents leaks but also ensures your inflatable remains safe and lasts as long as possible.
Conclusion
Spotting air leaks early is essential. Look out for signs like sagging, rapid deflation, or hissing sounds. To confirm a leak, try the soapy water test or check for damp spots. Small leaks can often be fixed with a DIY repair kit, but larger damage or seam issues might need professional help. Acting quickly helps maintain the quality and usability of your inflatable.
Routine inspections and proper storage are just as important. Always store inflatables completely dry, and use a tarp to prevent punctures. These steps help protect against mold and other damage. On average, commercial-grade PVC inflatables last 3–5 years, but with excellent care, they can last up to 5–8 years. As Leo Li from Inflatplay puts it:
"It’s a simple formula: high-quality material plus good maintenance equals a long-lasting asset".
FAQs
Is it a leak or just cold weather?
When the weather turns cold, it’s common for inflatables to appear shrunken. This happens because cooler temperatures cause the air inside to contract. It’s a natural reaction and doesn’t automatically mean there’s a leak. If the inflatable regains its shape as the temperature warms up or after you add more air, the cold is likely the culprit – not a puncture or air leak.
Where do leaks usually happen first?
Leaks often happen at tiny tears, holes, or seams in an inflatable. To find them, try listening for the sound of air escaping, feeling for airflow with your hand, or using soapy water to pinpoint the location – bubbles will form where the leak is.
How long should a patch cure before use?
Allow the patch to sit for 24 hours before using the inflatable. This waiting period gives the adhesive enough time to fully bond and form a strong seal, reducing the risk of leaks or additional damage.