Water science activities are a fun way for kids to learn about science through hands-on experiments. These activities teach concepts like buoyancy, density, and the water cycle while encouraging curiosity and problem-solving. You don’t need fancy equipment – simple household items like jars, food coloring, and dish soap work great. Safety is key, so always supervise and use non-toxic materials. Tailor experiments to the child’s age, from color mixing for younger kids to oil spill cleanups for older ones. For an extra twist, consider adding water slides or dunk tanks to combine learning with outdoor fun.
Here’s a quick overview of five easy experiments:
- Rainbow in a Jar: Learn about density by layering colorful sugar-water solutions.
- Walking Water: Watch water move through paper towels and mix colors.
- Soap-Powered Boat: See how soap breaks surface tension to propel a boat.
- Water Cycle in a Bag: Create a mini water cycle with a plastic bag and sunlight.
- Oil Spill Cleanup: Simulate cleaning up an oil spill and explore buoyancy.
With preparation and safety measures, these activities are engaging and educational.
Materials and Safety Requirements
Common Materials You’ll Need
Water science experiments often rely on items you already have at home, so there’s no need for fancy lab gear. For instance, clear glass jars and plastic cups are perfect for holding liquids and letting kids watch the action up close. A few drops of food coloring can bring your experiments to life, making it easier to observe water movement or density changes. Everyday items like vegetable oil, dish soap, salt, and sugar are excellent for demonstrating how different substances interact with water.
For chemical reaction activities, Alka-Seltzer tablets are a go-to choice. Paper towels or coffee filters are handy for showing capillary action, while pennies make a simple yet effective tool for exploring surface tension. Experiments involving biological processes can get a fun twist by using celery stalks, white flowers, or even colorful candies like Skittles or gummy bears. To keep everything organized and mess-free, trays are a great addition to your setup.
| Material Category | Common Examples | What They Demonstrate |
|---|---|---|
| Base Liquids | Water, vegetable oil | Density, buoyancy, solubility |
| Reactants | Alka-Seltzer, salt, sugar | Chemical reactions, osmosis |
| Containers | Jars, cups, plastic bottles, straws | Holding liquids, building models |
| Visual Aids | Food coloring, Skittles, flowers | Capillary action, water movement |
| Safety/Cleanup | Trays, paper towels | Organizing materials, preventing hazards |
Once you’ve gathered your materials, it’s time to focus on creating a safe and secure environment for your experiments.
Safety Rules for Water Experiments
Safety should always come first when conducting water-based activities, especially with kids. Adult supervision is crucial. As the American Red Cross emphasizes, "A child or weak swimmer can drown in the time it takes to reply to a text, check a fishing line or apply sunscreen". To ensure everyone stays safe, designate one adult as the dedicated "water watcher", whose sole responsibility is to monitor the children without distractions like phones or other tasks.
Whenever possible, set up experiments outdoors or on waterproof surfaces to make cleanup easier and protect your indoor spaces. Stick to non-toxic, food-grade materials such as food coloring, salt, and vegetable oil to minimize risks. Keep towels on hand for quick spill management, and clean any messes immediately to prevent slips or falls. Additionally, make sure supervising adults are familiar with basic first aid and CPR, just in case.
How to Plan Water Science Activities
Choosing Experiments by Age Group
The key to successful water science activities is matching them to the child’s age and learning stage. For younger kids (ages 3-6), stick to activities that are visually engaging and simple to understand. For example, color mixing experiments are perfect because they grab attention without requiring lengthy explanations. At this age, children can handle basic concepts like distinguishing between liquids and solids, but anything too abstract will go over their heads.
For older kids and pre-teens (ages 7-12), you can introduce more advanced ideas like the scientific method. They’re ready to work with controls, variables, and logical reasoning. Experiments like saltwater density tests become fascinating when they understand why objects float differently. While a 5-year-old might love watching a "rainstorm" form in a jar, a 10-year-old can explore the science behind evaporation and condensation. Start with simple demonstrations to spark curiosity, then dive into the science behind the activity.
Once you’ve chosen age-appropriate experiments, the next step is to organize your materials for a smooth and enjoyable session.
Setting Up Your Materials
Preparation is everything when it comes to keeping water science activities fun and stress-free. Set up each experiment in a separate tray or station with all materials pre-measured and ready to go. This approach avoids delays and keeps things tidy. If you’re planning multiple activities, arrange them in order of messiness – save the glitter or cornstarch experiments for last or designate a specific "messy zone" outdoors to make cleanup easier.
Label each station clearly, and if possible, provide simple visual guides or printed instructions. This setup is especially helpful for group events where kids can rotate between stations at their own pace. Once your materials are ready, you can make the session even more exciting by incorporating larger water-based attractions.
Adding Water Attractions from Bouncy Rentals
To take your water science activities up a notch, consider adding interactive water attractions from Bouncy Rentals USA. These setups not only keep kids engaged but also provide unique opportunities to explore scientific concepts. For instance, a tall inflatable water slide can serve as a fun way to demonstrate potential and kinetic energy – kids can observe how energy shifts as they slide down. The splash pool at the bottom is perfect for buoyancy experiments, like testing homemade penny boats or observing how various objects behave in water.
Dunk tanks offer a hands-on lesson in water displacement and volume, while the flow of water down slides ties in nicely with smaller experiments like water wheels or simple engineering projects. These attractions make abstract ideas tangible and memorable. Plus, they’re a fantastic way to keep everyone cool and energized during outdoor summer sessions, ensuring kids stay focused and ready to learn between experiments.
5 Water Science Experiments to Try
With your materials ready and safety measures in place, dive into these fun and educational water science experiments. Each one is designed to combine learning with hands-on discovery.
Rainbow in a Jar (Density)
This activity lets you create a vibrant, layered rainbow by using sugar-water solutions of varying densities. Start by preparing four glasses of warm water, each holding 1 cup. Mix in 8, 6, 4, and 2 tablespoons of sugar into the blue, green, yellow, and red solutions, respectively. Stir until the sugar dissolves, then add four drops of food coloring to each glass. To build the rainbow, use a pipette or baster to carefully layer the solutions in a clear jar. Begin with the densest layer (blue) at the bottom, and slowly add the others down the jar’s side to avoid mixing. If you’re working with younger kids, you might want to try just two or three colors to perfect the layering technique first.
Walking Water (Capillary Action)
This experiment shows how water can "walk" through paper towels. Arrange six clear glasses in a circle, filling every other glass three-quarters full with water. Add red, yellow, and blue food coloring to the full glasses. Next, cut paper towels into 2-inch-wide strips and fold them lengthwise. Place each strip so it bridges a full glass and an adjacent empty one. Over a few hours, the water will travel along the paper towels, mixing colors in the empty glasses to form secondary hues like orange, green, and purple. For the best results, use shorter glasses and trim the paper towels to fit.
Soap-Powered Boat (Surface Tension)
This simple experiment highlights how soap disrupts water’s surface tension. Cut a small boat shape from cardstock or foam, making sure to include a notch at the back. Fill a shallow tray with water and place the boat on the surface. Add a drop of dish soap to the notch, and watch the boat zoom forward as the soap breaks the water molecules’ cohesion. Kids can experiment with different boat shapes or see how adding multiple soap drops affects movement.
Water Cycle in a Bag (Evaporation and Condensation)
Recreate the water cycle in a clear plastic bag. Add 1/4 cup of water and a drop of blue food coloring to a sealable bag, then close it tightly. Tape the bag to a sunny window. Over the next few hours, you’ll see water droplets forming inside the bag as the water evaporates and condenses. This miniature model of the Earth’s water cycle is perfect for younger kids (grades K–4) and can spark conversations about water conservation.
Oil Spill Cleanup (Buoyancy and Pollution)
Simulate an oil spill to learn about buoyancy and pollution challenges. Fill a clear container with water and pour a thin layer of vegetable oil on top. Add small floating objects like corks or plastic toys to represent wildlife. Task kids with cleaning up the "spill" using materials such as cotton balls, spoons, dish soap, or paper towels. This hands-on activity not only teaches science but also raises awareness about the difficulties of cleaning up real oil spills and protecting ecosystems.
These experiments combine science with interactive play, making learning both fun and engaging. They also set the stage for more exciting activities to explore further in this guide.
Tips for Running Successful Activities
5 Easy Water Science Experiments for Kids by Age and Difficulty
When planning water science activities, focus on clear instructions and interactive elements. Start by encouraging kids to make predictions before each experiment. For younger children who may not yet write, ask them to draw their expectations and compare these drawings to the actual results afterward. To protect materials like instructions and posters from water damage, consider laminating them for durability.
Using a Comparison Table to Plan
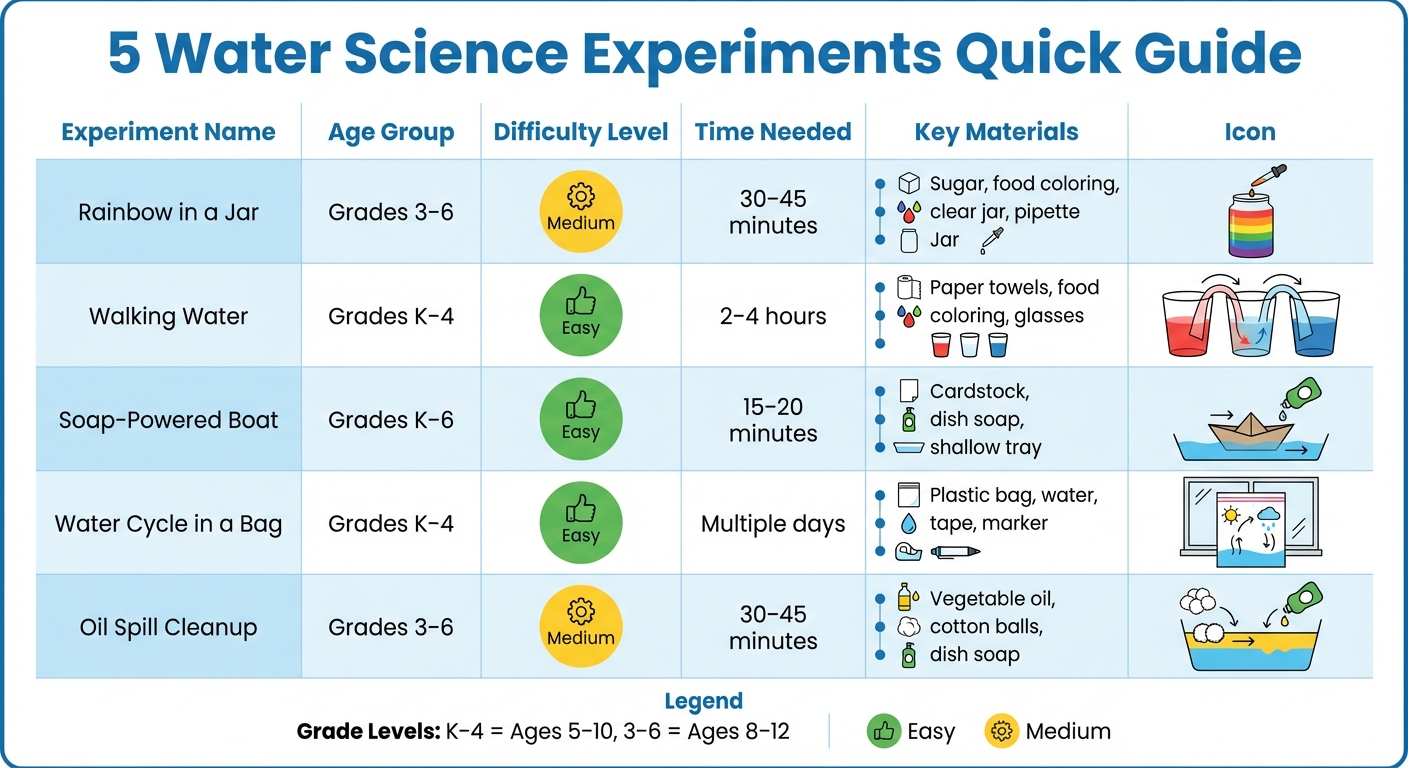
A comparison table can be a helpful way to match experiments with the age group, difficulty level, and time you have available. Below is a quick guide to some engaging water science experiments:
| Experiment | Age Group | Difficulty | Required Materials | Time Needed |
|---|---|---|---|---|
| Rainbow in a Jar | Grades 3–6 | Medium | Sugar, food coloring, clear jar, pipette | 30–45 minutes |
| Walking Water | Grades K–4 | Easy | Paper towels, food coloring, glasses | 2–4 hours (observation) |
| Soap-Powered Boat | Grades K–6 | Easy | Cardstock, dish soap, shallow tray | 15–20 minutes |
| Water Cycle in a Bag | Grades K–4 | Easy | Plastic bag, water, tape, marker | Multiple days |
| Oil Spill Cleanup | Grades 3–6 | Medium | Vegetable oil, cotton balls, dish soap | 30–45 minutes |
You can use these experiments as stand-alone activities or combine them with themed events for a more immersive learning experience.
Adding Party Themes with Bouncy Rentals
Take your water science day to the next level by incorporating outdoor attractions. Bouncy Rentals USA offers water slides and dunk tanks that tie perfectly into lessons about water pressure, gravity, and friction. These attractions make learning fun and interactive. Plus, Bouncy Rentals manages setup and takedown, typically completing installation in 30 to 60 minutes. Their equipment is sanitized and insured, but it’s a good idea to confirm their cleaning procedures to meet your standards.
Cleanup and Safety Best Practices
Maintaining a safe and clean environment is essential for successful activities. Here are some key steps to ensure everything runs smoothly:
- Always provide adult supervision, especially when children are near water or handling tools.
- Check equipment for damage or loose parts before use.
- Clean up thoroughly after each experiment, washing containers to maintain accuracy for future use.
- Repurpose the water from experiments for watering plants, as it’s not safe for drinking.
- Monitor weather conditions if your activities are outdoors. Inflatables can become unsafe in bad weather, so have a backup plan for indoor activities.
- When using rented equipment, confirm age and weight limits with the manufacturer to ensure all participants stay safe.
These practical tips will help you create an engaging and safe experience for everyone involved.
Conclusion
Water science activities offer a fun and hands-on way to teach kids about science without breaking the bank. Using simple items like food coloring, dish soap, and plastic bottles, you can explore concepts from chemistry and physics to biology and more. Adjusting experiments for different age groups ensures everyone stays engaged and learns at their level.
These activities make science come alive. Kids get to predict, observe, and analyze – just like real scientists – while discovering fascinating concepts through interactive experiments.
To take your event to the next level, consider adding inflatable water slides from Bouncy Rentals USA. These attractions showcase principles like water pressure and gravity in action, complementing the experiments perfectly. Plus, Bouncy Rentals USA handles all the setup and takedown, leaving you free to focus on creating an exciting and educational experience.
FAQs
How do I pick the right experiment for my child’s age?
When picking water science experiments for your child, it’s essential to consider their age and developmental stage. For younger children, stick to straightforward activities using everyday items – think experiments like testing which objects float or sink or observing how water can carve through sand. For older kids, you can step it up with more complex projects, such as constructing a model water strider or investigating how water flows and moves. The key is to make sure the activity is not only safe but also engaging and suited to their abilities, keeping their curiosity alive while they learn.
What safety steps matter most for water experiments at home?
When conducting water experiments at home, safety should always come first – especially when kids are involved. Start by teaching essential water skills like swimming, floating, and basic rescue techniques. These skills not only build confidence but also provide a solid foundation for safety.
Always supervise children closely. Even if they seem confident, accidents can happen in seconds. Make sure they wear properly fitted life jackets, especially if the activity involves deeper water. It’s also crucial to teach them to avoid risky behaviors, like swimming alone or jumping into water without checking for depth or obstacles.
If a child falls into the water, encourage them to stay with a float or any object that can help them stay buoyant until help arrives. By staying alert and maintaining constant supervision, you can create a safe environment for everyone involved.
How can I turn these into a backyard water science day with Bouncy Rentals?
Creating a backyard water science day with Bouncy Rentals is a fantastic way to mix learning with fun. Start by selecting water-based experiments that are easy and engaging for kids. Think about activities like making simple water rockets, testing objects to see if they float or sink, or even creating mini whirlpools in bottles. These hands-on experiments can spark curiosity while being enjoyable.
Next, set up activity stations to keep everything organized. Dedicate spaces for each experiment and ensure there’s plenty of room for kids to explore safely. To take the fun up a notch, rent inflatables like water slides or bounce houses. These can serve as a perfect way for kids to burn off energy between learning activities.
Make sure safety is a top priority. Always have adults supervising both the experiments and the inflatables. This ensures everyone has fun while staying safe. Finally, wrap up the day with some water-themed snacks or games. Think blue Jello cups, watermelon slices, or a quick water balloon toss. It’s a great way to end a day filled with exploration, laughter, and splashes!