Testing bounce house air pressure is crucial for safety, performance, and durability. Proper inflation minimizes risks like tipping or damage and ensures a fun experience. Here’s a quick guide:
- Why it matters: Underinflation causes instability; overinflation strains seams and risks tears.
- Tools needed: Pressure gauge, soapy water for leaks, a functional air blower, and a repair kit.
- Steps:
- Inflate fully on flat ground.
- Use a pressure gauge (target: 0.5–1.5 PSI for most models).
- Check firmness by hand – walls should feel firm but slightly compressible.
- Test for leaks with soapy water; fix any punctures.
- Adjust for temperature changes (air expands in heat, contracts in cold).
Proper care extends a bounce house’s lifespan from 3–5 years to 8+ years. Always follow manufacturer guidelines, inspect regularly, and maintain detailed records to ensure safety and longevity.
Tools and Equipment Needed
Before testing air pressure, make sure you have the right tools ready. The most crucial item is a pressure gauge or manometer, which provides an accurate reading of the bounce house’s internal air pressure. Both digital and analog models work well, so choose based on your preference.
"Invest in a pressure gauge to monitor the air pressure inside the bounce house accurately." – Hero Kiddo Inflatables
You’ll also need a soapy water solution to check for leaks. Ensure your air blower is in good working condition and securely attached to the inflation tube, as it supplies the continuous airflow needed for testing. To power the blower, use a 14-gauge or heavier extension cord to avoid overheating and ensure full performance. Keep the bounce house within 50 feet of the power source; longer cords can reduce airflow and potentially damage the blower. Lastly, review the tools and manufacturer recommendations specific to your bounce house model.
Required Tools
Here’s what you’ll need:
- A pressure gauge (digital or analog manometer)
- A spray bottle with a soapy water solution
- A functional air blower with a heavy-duty extension cord
- A repair kit for fixing any leaks found during testing
Attach the pressure gauge to the inflation inlet valve for a continuous pressure reading.
Manufacturer’s Guidelines
Once you’ve gathered your tools, consult the owner’s manual. It outlines the ideal pressure range for your bounce house model. The manual also specifies the blower’s required voltage and wattage – using the wrong power source can prevent the unit from reaching proper inflation levels. A properly inflated bounce house should feel firm and sturdy, with no sagging, wrinkles, or drooping in the walls or corners.
How to Test Air Pressure: Step-by-Step
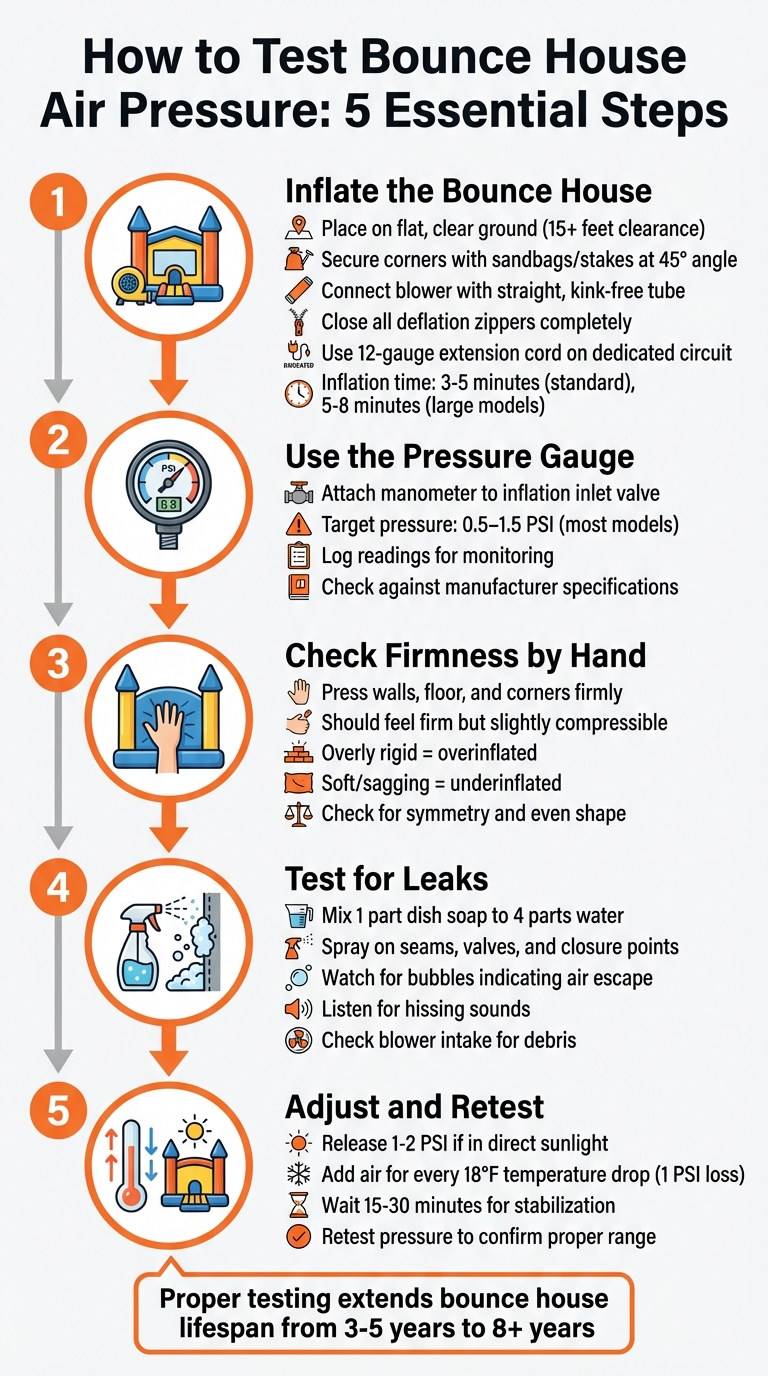
5-Step Bounce House Air Pressure Testing Process
Step 1: Inflate the Bounce House
Start by placing the bounce house on flat, clear ground with at least 15 feet of space from trees, overhead wires, or other obstacles. Unfold it completely and secure the corners using sandbags or ground stakes at a 45° angle. Connect the blower to the inflation tube, making sure the tube is straight and free from kinks. Use the provided straps or clips to secure it tightly. Double-check that all deflation zippers are fully closed, and press down the velcro flaps to avoid air leaks. Plug the blower into a dedicated circuit using a heavy-duty 12-gauge extension cord for optimal power. Once you turn on the blower, listen for steady airflow; most bounce houses fully inflate within 3 to 5 minutes, while larger models might take 5 to 8 minutes.
"A properly inflated bounce house will have firm walls that still offer a slight give when gently pressed." – Jump N Slide Texas
Step 2: Use the Pressure Gauge
Attach a manometer or pressure gauge to the tap-in point at the inflation inlet valve or blower tube. The reading should align with the manufacturer’s recommended range, typically 0.5 to 1.5 PSI for most bounce houses. For sealed inflatables, check the maximum inflation pressure noted near the inflation point. Keep a log of these readings to monitor safe operating levels. If the pressure drops below the recommended range, inspect for leaks or issues with the blower.
"Regular measurements of the internal pressure of the inflatable should be taken using a suitable pressure measuring device, such as a manometer. If one of these is not available, the inflatable should not be operated." – Health and Safety Executive (HSE)
Step 3: Check Firmness by Hand
Press firmly on various parts of the bounce house, including the walls, floor, and corners. The material should feel firm but still compress slightly under pressure. If walls feel overly rigid, the structure might be overinflated, while soft or sagging areas suggest underinflation. Also, check for symmetry – any misshapen or uneven sections could point to internal issues or airflow problems.
"The ideal bounce is somewhere in between [stiff and soft], providing fun while absorbing impact safely." – East Inflatables
Step 4: Test for Leaks
Mix a solution of 1 part dish soap to 4 parts water in a spray bottle. Spray this along all seams, valves, and closure points, watching for bubbles that form where air escapes. For larger leaks, you can listen for hissing sounds or feel for escaping air by running your hand close to the surface. Check the blower intake as well to ensure it’s free of debris like leaves, grass, or plastic bags that might block airflow.
"The soapy water method is the most reliable trick. Even the tiniest pinhole leak will create a stream of small bubbles, showing you exactly where the problem is." – Leo Li, Production Manager, Inflatplay
Once you’ve identified and fixed any leaks, you can move on to adjusting the inflation as needed.
Step 5: Adjust and Retest
After addressing any issues, restore proper inflation by tweaking the blower output. If the bounce house will be in direct sunlight, release 1 to 2 PSI to account for air expansion due to heat. Similarly, for every 18°F temperature drop, expect a 1 PSI loss and adjust accordingly. Allow 15 to 30 minutes for the adjustments to stabilize, then retest the pressure to ensure it stays within the recommended range. Keeping the pressure stable not only ensures a better experience but also helps prolong the life of the bounce house.
Common Air Pressure Problems and Solutions
After testing your bounce house, you might encounter some air pressure issues that can impact its performance and safety. Knowing how to identify and resolve these problems ensures everything runs smoothly during your event.
Low Air Pressure
If the bounce house feels too soft or the walls begin to sag, the usual culprits are blower problems, leaks, or setup mistakes. Start by securing all closures, checking the blower intake for debris, and using a short, heavy-duty 12-gauge extension cord to ensure the blower gets adequate power.
A weak power supply can also cause low air pressure. If the blower sounds like it’s struggling, this might indicate insufficient power.
For leaks, try the soapy water test to spot small punctures. Use a vinyl repair kit for minor holes, while larger tears (over 2 inches) may require stitching and a PVC patch. Keep in mind, constant-air bounce houses are designed to release some air through the seams for pressure regulation, so a bit of air escape is completely normal.
"Yes, all inflatables lose air over time. Constant air bounce houses are designed to leak from the seams and will deflate when the blower is off." – Leo Li, Accounting Manager, Inflatplay
Cold weather can also mimic the effects of a leak. A drop of 18°F reduces pressure by about 1 PSI as the air contracts. If your bounce house seems soft on a chilly morning but you can’t find any leaks, simply add more air rather than jumping to mechanical troubleshooting.
Once you’ve resolved low-pressure issues, be cautious not to overinflate.
Overinflation Risks
Too much air pressure can strain the seams and shorten the bounce house’s lifespan. An overinflated unit will feel overly firm, with little to no give when pressed, and the bounce experience may become uncomfortably stiff. Check the seams – if they appear stretched or the stitching looks tight, it’s a sign of overinflation.
Temperature is a major factor in overinflation. As the day heats up, air inside the bounce house expands, increasing internal pressure. Dark-colored inflatables are especially prone to this due to heat absorption. To prevent damage, release 1–2 PSI of air if the bounce house will be exposed to direct sunlight for extended periods.
"If it’s going to be in the sun for a long time, it’s a good practice to let out 1-2 PSI of air. In the evening, when it cools down, the pressure will drop naturally." – Leo Li, Accounting Manager, Inflatplay
For sealed inflatables, always disconnect the blower or compressor once the target pressure is reached to avoid overfilling. Never try to seal the seams of a constant-air bounce house – those small leaks are necessary safety features that help prevent bursting. Use a manometer to monitor pressure and keep it within the manufacturer’s recommended range.
Pressure Fluctuations
Shifts in temperature and environmental conditions can cause pressure to vary throughout the day. For example, bounce houses often feel softer in the morning because cooler temperatures cause air to contract. By afternoon, the same unit may feel overly firm as the air expands with rising temperatures. In sealed units, expect about a 1 PSI change for every 18°F temperature swing.
Before assuming there’s a leak, check for simpler issues: Is the blower intake blocked? Is the inflation tube kinked? Are all zippers fully closed? Is the blower getting full power through a proper extension cord? These minor problems are often the cause of pressure fluctuations and can be fixed quickly.
| Problem | Likely Cause | Immediate Solution |
|---|---|---|
| Sudden softness | Blocked blower intake or loose air tube | Clear the intake; re-secure the tube |
| Softness in morning | Temperature drop (air contraction) | Top up with air; recheck as it warms |
| Firmness in afternoon sun | Solar heat (air expansion) | Release 1–2 PSI to protect seams |
| Slow pressure loss | Dirty valve or pinhole leak | Clean the valve; use the soapy water test |
For constant-air bounce houses, remember that some air loss through seams is normal. These units rely on the blower running continuously to maintain pressure and will naturally deflate when the blower is turned off. Keep an eye on pressure throughout the event using a gauge, and make small adjustments as needed to ensure safe and consistent performance.
Maintaining Proper Air Pressure
Keeping a close eye on air pressure is essential for extending the life of your bounce house and avoiding accidents. Regular monitoring and maintenance can help prevent up to 90% of inflatable-related issues and increase the lifespan of your unit from the usual 5–7 years to 8 years or more with excellent care.
Testing Schedule
- Before use: Perform a thorough inspection and test the unit manually.
- During use: Check firmness every few hours, especially during temperature swings or heavy activity.
- After use: Inspect again to identify any potential damage.
Temperature changes can impact air pressure since warm air expands and cold air contracts. For example, a drop of 18°F can significantly affect firmness. It’s also a good idea to conduct unscheduled checks after extreme weather or if the bounce house has been overloaded. These quick inspections can help you catch small issues before they become major problems.
Once your checks are complete, proper storage is the next step in preserving your bounce house’s condition.
Storage Best Practices
How you store your bounce house can make a big difference in maintaining its air pressure and overall condition. Always let the unit air dry completely before deflating it – trapped moisture can lead to mold, mildew, and weaken the vinyl material. Clear away any debris like sticks, rocks, or jewelry before folding. Use an accordion-style fold along the length of the bounce house, keeping the bottom side outward to protect the jumping surface. Roll it toward the deflation tubes to push out any remaining air.
Store the unit in a cool, dry, and climate-controlled area, away from direct sunlight and sharp objects. Place it on a pallet to avoid moisture damage and pests, and don’t stack heavy items on top, as this can compress the material and weaken the seams. Even during off-season storage, unroll the bounce house periodically to check for wear or damage.
In addition to regular checks and proper storage, keeping detailed maintenance records can help you spot patterns and address issues early.
Maintenance Records
Maintenance logs go beyond basic inspections – they help track performance over time. Record details like pressure readings, blower performance, repairs, and environmental conditions during each use. For example, you might notice a blower motor losing power gradually or recurring seam issues in specific areas.
| Maintenance Task | Frequency | Priority Level |
|---|---|---|
| Visual & Pressure Inspection | Before & After Each Use | Critical |
| Firmness Check | Every Few Hours During Use | High |
| Deep Cleaning & Sanitization | Weekly or After 3–4 Uses | High |
| Professional Inspection | Monthly (for heavy rental use) | Medium |
| Certification Renewal | Annually | High |
Detailed records also ensure compliance with safety standards and help maximize the lifespan of your equipment. With top-tier care, commercial-grade PVC inflatables can last 5–8 years, compared to just 3–5 years with minimal upkeep. Make sure to log when you replace components like safety labels, netting, or patches to maintain compliance with ASTM safety standards.
"Regular maintenance isn’t just about keeping your bounce house clean – it’s about ensuring the safety of children and protecting your investment."
- Safety in Inflatable Amusement Alliance
Conclusion
Keeping an eye on bounce house air pressure is about more than just ensuring fun – it’s about safety and protecting your investment. Proper inflation helps prevent accidents caused by underinflation or overinflation, avoids damage to seams, and ensures a consistent bouncing experience. Regular pressure checks are a simple yet effective way to reduce inflatable-related risks and extend the life of your equipment.
Key Takeaways
Here’s a quick recap of how to keep your bounce house safe and performing at its best:
- Start with a manometer for precise pressure readings. Follow a thorough process: fully inflate, measure pressure with your gauge, check firmness by hand across multiple areas, test for leaks using soapy water, and adjust as needed.
- Pay attention to your blower. If it sounds strained, it could indicate a blockage or leak that’s impacting pressure. Also, check that seams remain secure and intact.
- Address any issues immediately. If pressure drops during use, inspect for leaks or blower problems. If seams appear overly stretched, release some air to avoid long-term damage. Be mindful of temperature changes, as they can affect firmness and may require adjustments.
- Keep detailed records of inspections, pressure readings, and repairs. This helps you identify patterns early and ensures compliance with ASTM safety standards.
Bouncy Rentals USA: Your Trusted Party Partner
By following these guidelines, you’ll create a safe and enjoyable environment – something Bouncy Rentals USA is proud to deliver.
When you rent from Bouncy Rentals USA, you’re choosing equipment that’s thoroughly inspected, professionally maintained, and fully insured. Our team handles setup and takedown, conducts safety checks before every event, and ensures each bounce house is inflated to the correct pressure. Whether it’s a birthday party, school event, or neighborhood celebration, we provide sanitized equipment on time and with the expertise to keep your guests safe. Explore our selection of bounce houses, water slides, obstacle courses, and more at bouncyrentalsusa.com/ to create unforgettable memories at your next event.
FAQs
What PSI should my bounce house be at?
The ideal PSI for a bounce house depends on the specific model, as there isn’t a one-size-fits-all standard. Inflate it until it’s firm enough to hold its shape but not so tight that it feels rigid. To be precise, use a pressure gauge or manometer to monitor the pressure. Always stick to the manufacturer’s recommendations and conduct regular inspections to ensure both safety and optimal performance.
How can I tell if low pressure is a leak or cold weather?
Low pressure in a bounce house often makes it feel soft, saggy, or uneven. This is usually due to a leak, so inspect the structure carefully for tears, holes, or air escaping from seams or valves. Another factor to consider is cold weather – when temperatures drop, the air inside contracts, which can reduce pressure. However, this typically doesn’t alter the bounce house’s overall shape. If the softness occurs only in colder conditions and no damage is found, the temperature change is likely to blame.
When should I recheck air pressure during an event?
You should check the air pressure of the bounce house regularly during the event, especially after it’s been in use for several hours. Keeping an eye on the inflation level ensures the bounce house stays properly inflated, which is key for both safety and performance. This way, you can quickly spot if it needs more air to avoid any problems while it’s in use.